DataMapper Flat-to-Structured and Structured-to-Flat Mapping (Deprecated - DataMapper)
|
DataMapper will continue to be fully supported in all current and future versions of Mule 3.x, however it will be removed in Mule 4.0 in favor of the Transform Message component (based on DataWeave code). We recommend that if you wish to take advantage of the new capabilities of DataWeave or if you start new projects, upgrade now. A migration tool is now included in Studio, which assists in converting a DataMapper map to DataWeave. Right click on a DataMapper, select Migrate to DataWeave, and follow the instructions. 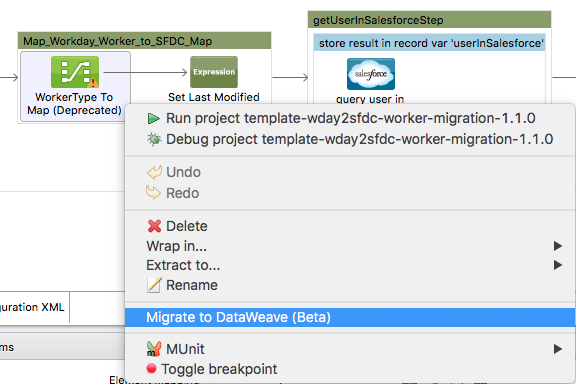
If you don’t see DataMapper on your palette, you can enable it by going to Preferences > Anypoint Studio > Palette Profiles and ticking the checkbox Show deprecated Mule Components and Attributes. |
This document describes how to use Anypoint DataMapper to map data between a flat format and a structured format. Here you find two working examples: Mapping from CSV to XML and from XML to CSV.
In the first example, the CSV file contains repetitive numbered fields (address 1 and address 2) which we must map to nested structures in the XML file. Likewise, the XML file contains nested structures which we must map to numbered fields in the CSV output file.
To map numbered CSV fields to XML, we work with mapping levels. To map from XML to numbered CSV fields, we work with XPath![]() rules.
rules.
CSV to XML
Files Used For This Example
Name,Last Name,Street 1,ZipCode 1,Street 2,ZipCode 2 John,Doe,123 Main Street,111,987 Cypress Avenue,222 Jane,Doe,345 Main Street,111,654 Sunset Boulevard,333text
<users>
<user>
<name></name>
<lastName></lastName>
<addresses>
<address>
<street></street>
<zipCode></zipCode>
</address>
<address>
<street></street>
<zipCode></zipCode>
</address>
</addresses>
</user>
<user>
<name></name>
<lastName></lastName>
<addresses>
<address>
<street></street>
<zipCode></zipCode>
</address>
</addresses>
</user>
</users>xmlThis example shows how to map the numbered fields in the CSV file shown above to the XML file shown below it.
Map the numbered fields Street 1 and Street 2, and ZipCode 1 and ZipCode 2, to the elements <street> and <zipCode> in the XML <address> element. To do this, use mapping levels as shown in the image below.
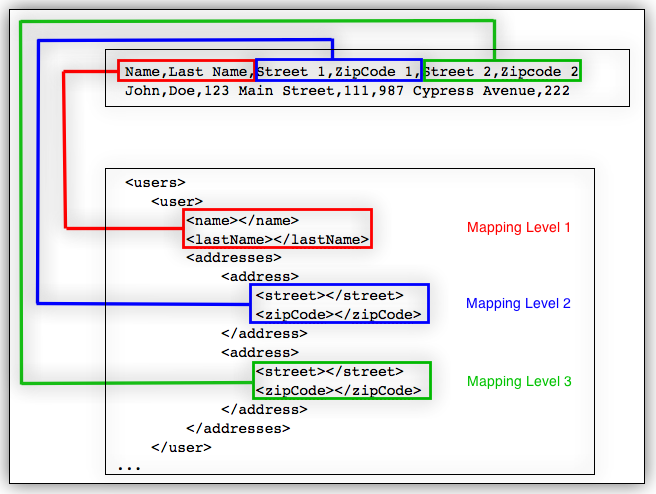
The image above shows the three mapping levels, visible when you click Element Mapping.
Creating the Example
-
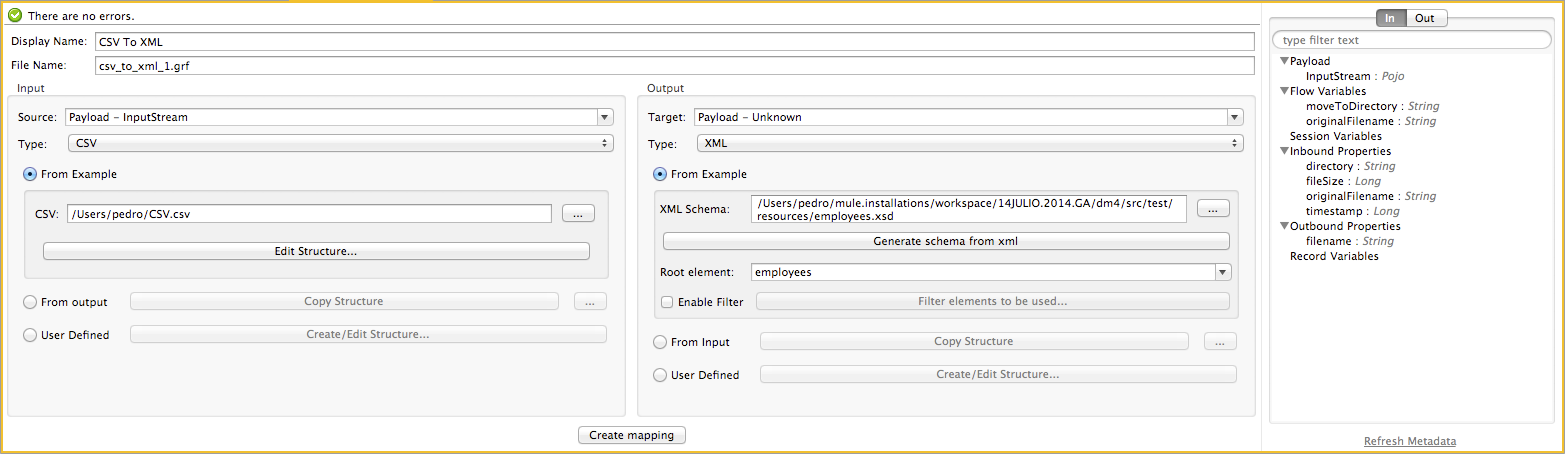
First, create a new DataMapper transformer of Input Type CSV and Output Type XML, using the files provided Files Used For This Example.
-
In the Input pane, select Type
CSV, and provide the sample CSV file. -
In the Output pane, select Type
XML, and provide the sample XML file. -
After assigning the input and output files, click Create mapping. The Data Mapping View should look like the image below.

As you can see, Anypoint DataMapper has automatically created a top-level mapping called
Foreach 'CSV' → 'employees', and mapped the fieldNamesince it is identical in the input and output panes. You can now map additional elements, such asStreet 1tostreetandZipcode 1tozipCode.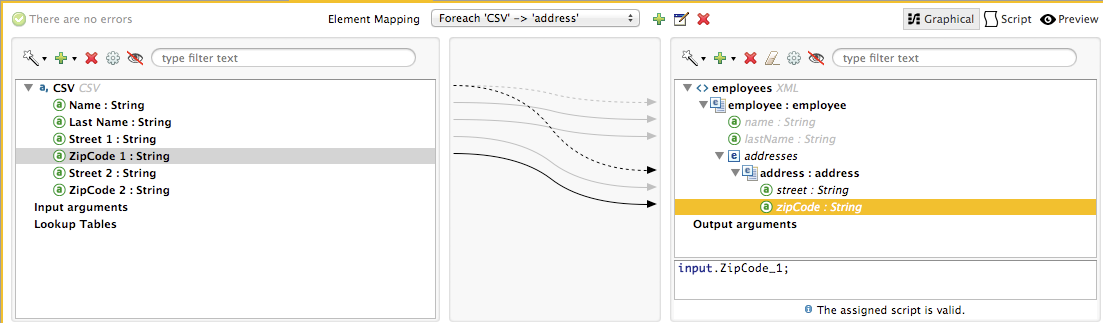
-
Now, map the input fields
Street 2tostreet, andZipCode 2tozipCode. The final mapping should look like the image below.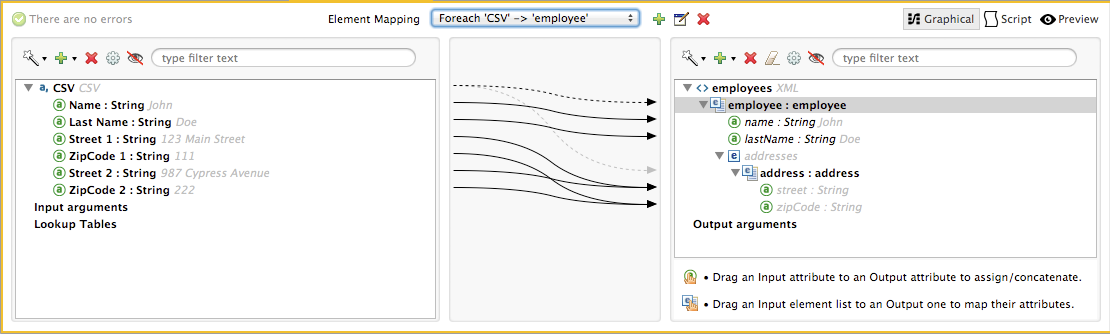
To test your mapping, use the Preview feature by completing the following steps:
-
Click Preview to access the Preview pane.
-
Click Run.
The resulting output XML is listed below.
<?xml version="1.0" encoding="UTF-8"?>
<employees>
<employee>
<name>John</name>
<lastName>Doe</lastName>
<addresses>
<address>
<street>123 Main Street</street>
<zipCode>111</zipCode>
</address>
<address>
<street>987 Cypress Avenue</street>
<zipCode>222</zipCode>
</address>
</addresses>
</employee>
<employee>
<name>Jane</name>
<lastName>Doe</lastName>
<addresses>
<address>
<street>345 Main Street</street>
<zipCode>111</zipCode>
</address>
<address>
<street>654 Sunset Boulevard</street>
<zipCode>333</zipCode>
</address>
</addresses>
</employee>
</employees>xmlXML to CSV
Files Used For This Example
<employees>
<employee>
<name>John</name>
<lastName>Doe</lastName>
<addresses>
<address>
<street>123 Main Street</street>
<zipCode>111</zipCode>
</address>
<address>
<street>987 Cypress Avenue</street>
<zipCode>222</zipCode>
</address>
</addresses>
</employee>
<employee>
<name>Jane</name>
<lastName>Doe</lastName>
<addresses>
<address>
<street>345 Main Street</street>
<zipCode>111</zipCode>
</address>
<address>
<street>654 Sunset Boulevard</street>
<zipCode>333</zipCode>
</address>
</addresses>
</employee>
</employees>xmlName,Last Name,Street 1,ZipCode 1, Street 2, ZipCode 2text
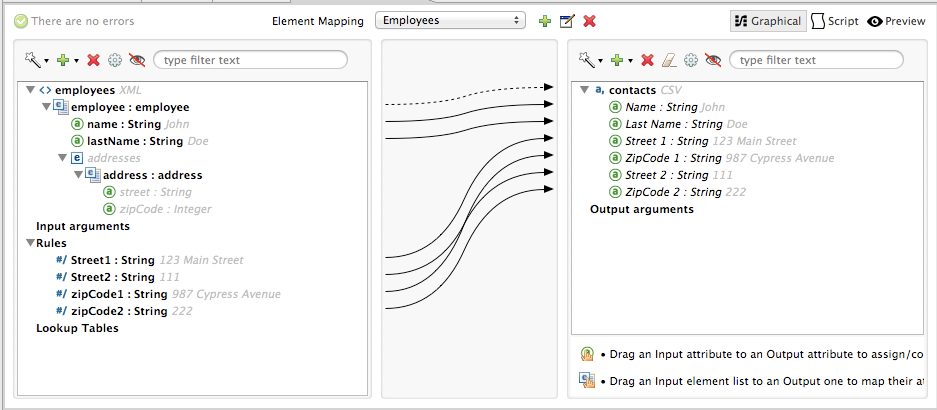
In order to map from XML to CSV we will use rules, which we define in DataMapper. These rules use the XPath![]() query language for obtaining nodes in an XML document.
query language for obtaining nodes in an XML document.
Using XPath, the rules fetch the values of the XML elements that you want, and feed them to DataMapper. DataMapper maps the values to whatever output fields you define in the CSV output file.
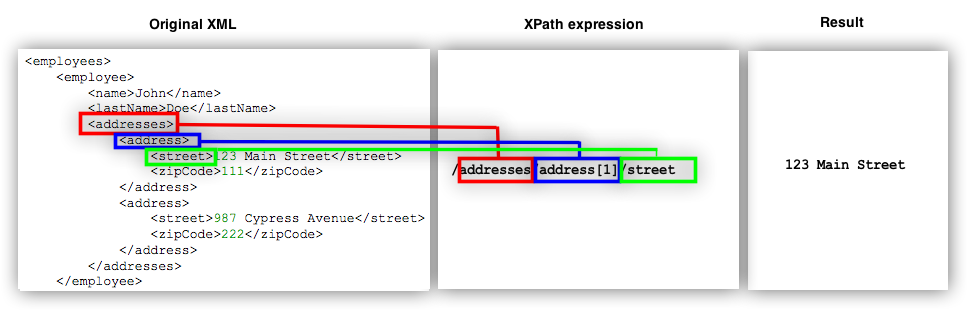
The image above shows how XPath retrieves values stored in XML structures. The XPath expression /addresses/address[1]/street retrieves the contents of the street element in the first address element of addresses.
Creating the Example
-
First, create a new DataMapper transformer of Input Type XML and Output Type CSV, using the files provided Files Used For This Example.
-
In the Input pane, select Type
XML. Click Generate schema from xml, and provide the sample XML file. -
In the Output pane, select Type
CSV, and provide the sample CSV file. -
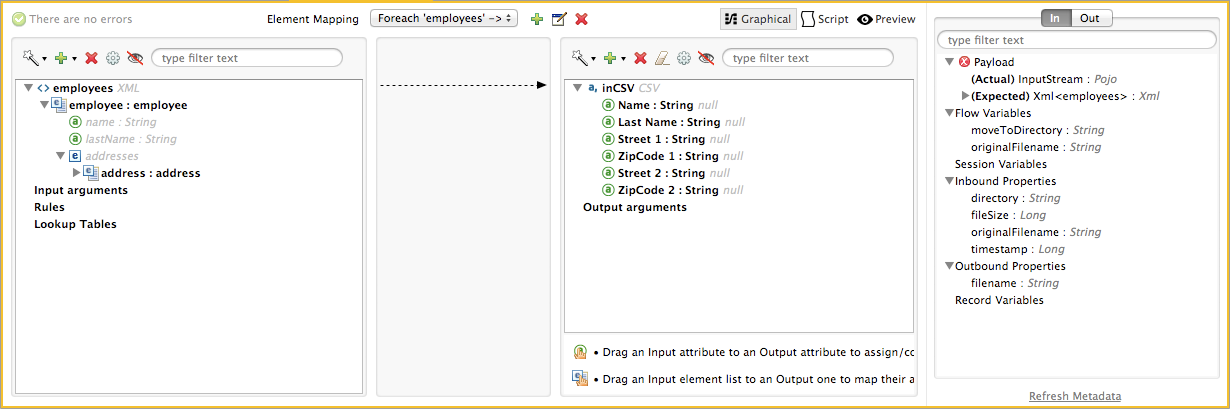
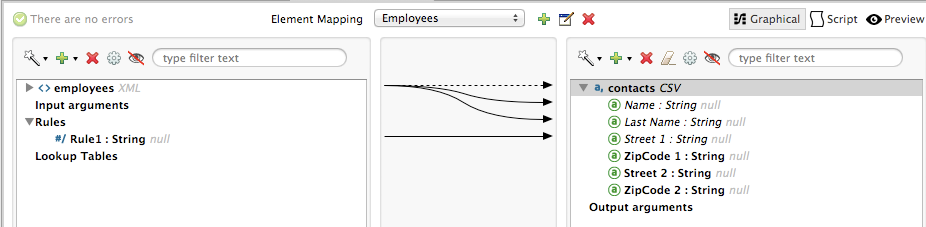
After assigning the input and output files, click Create mapping. The Data Mapping View should look like the image below.
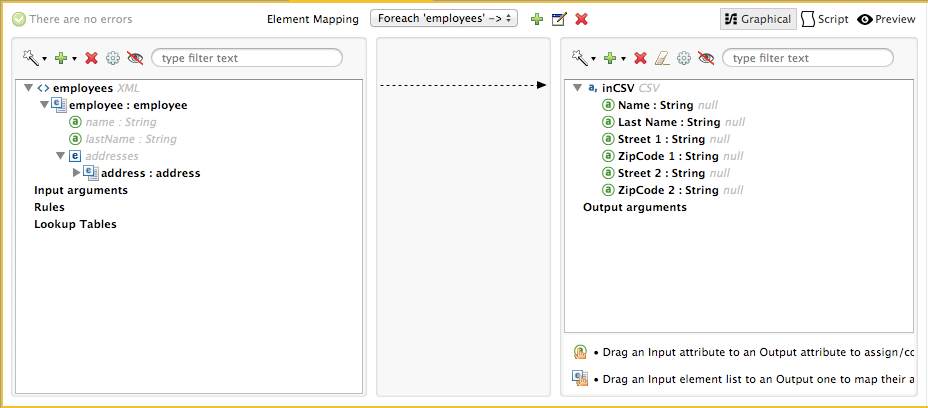
As you can see, DataMapper has automatically created a top-level mapping called
Foreach 'employees' > 'contacts'. Because there are no top-level elements in the source XML document that populate rows in the output CSV document, this mapping is not needed, and in fact it will generate an extra row of output in the CSV if left in place. -
Delete this top-level mapping by clicking the
 icon. Then, create a new mapping by clicking the Add Map icon.
 -
Studio displays the Add Mapping window. Configure the window as outlined in the table below.
-
Window: Add Mapping
Parameter Value Remarks Configuration window image Name
EmployeesSuggested value
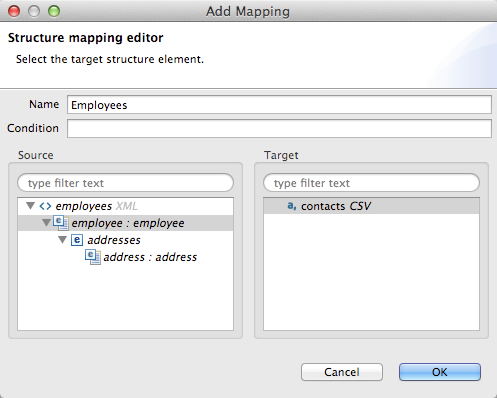
Source
employee : employeeClick
employee : employeein the Source pane to selectTarget
contactsClick
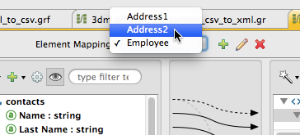
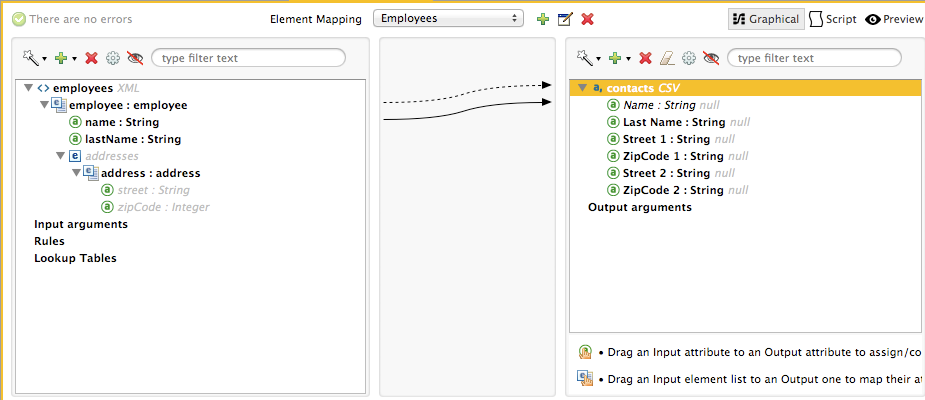
contactsin the Target pane to selectAfter creating the new mapping, the DataMapper view should look like the image below.
-
As you can see, DataMapper mapped the top-level input element employee : employee to contacts, enabling you to map child elements between the two. DataMapper also mapped the field Name, because the name of this field is exactly the same in the input and output.
You now have to manually map the input field lastName to the output field Last Name. Click the input field, drag it to the output field, and release.

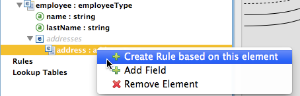
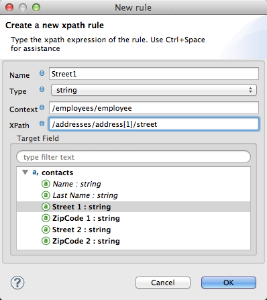
To map the addresses in the input XML file to the output CSV fields Street 1, Street 2, etc., you need to create a rule for the input element address : address. To create the rule, right-click address : address in the Input pane, then select Create Rule based on this element.
DataMapper displays the Create a new xpath rule window. Configure the window as outlined in the table below.
Window: Create xpath rule
| Parameter | Value | Remarks | Configuration window image |
|---|---|---|---|
Name |
|
Suggested value |
|
Type |
|
||
Context |
|
||
XPath |
|
||
Target Field |
|
After creating the rule, the DataMapper view should look like the image below.
As you can see, DataMapper indicates that the rule Street1 is in effect for mapping to the output field Street 1.
At this point, the output CSV file would be the following:
"John","Doe","123 Main Street","","","" "Jane","Doe","345 Main Street","","",""text
We have mapped the street of the first address of the first employee in the input XML file. We now have to create additional rules to map the remaining addresses and their child elements.
Following the procedure outlined above to create XPath rules, create additional rules for the address : address input element, using the values provided in the table below.
| Name (suggested) | Type | Context | XPath | Target field |
|---|---|---|---|---|
|
|
|
|
ZipCode 1 |
|
|
|
|
Street 2 |
|
|
|
|
ZipCode 2 |
Once you have created the rules, you have mapped all of the input elements to their corresponding output elements. The DataMapper view should look like the image below.
To test your mapping, use the Preview feature by completing the following steps:
-
Click Preview to go to the Preview pane.
-
In the Input data field, type the path of the input XML file you prepared for this example, or use the ellipsis (…) button to select the file.
-
Click Run.
The resulting output CSV file should be the following:
"Name","Last Name","Street 1","ZipCode 1","Street 2","ZipCode 2" "John","Doe","123 Main Street","111","987 Cypress Avenue","222" "Jane","Doe","345 Main Street","111","654 Sunset Boulevard","333"text
See Also
-
Read about using in-memory databases for flat-file integration in our MuleSoft Blog
 .
.