To Generate a Mule Flow from an API Specification
In Anypoint Studio 6.x you can use APIkit to generate a flow based on an API specification written in RAML or WSDL.
In this procedure, you use a RAML specification and add a new service to the interface. You call the API to access services. The interface connects to a free online REST service, JSONPlaceholder.
Resources are:
-
All user information.
-
Information about user having ID = n.
The JSONPlaceholder service provides all the JSON user information.
-
Click here to download the RAML for this procedure.
-
Unzip the downloaded archive.
-
In Studio, create a new Mule project: File > New > Mule Project.
The New Mule Project dialog appears.
-
In Project Settings, set the following options:
-
Project Name:
myproject. -
Runtime: Select or accept the default
Mule Server 3.9.0 EEor later. -
Add APIkit components: Check Add APIkit components.
-
API Definition: Browse to and select the
api.ramlfile you downloaded.When you click Finish, both files you downloaded appear in
src/main/api. On the canvas, the flow scaffolded by APIkit appears:
-
-
Right-click the API name
api.xmland select Run As > Mule Application.
On the Console tab, messages indicate that the project is deployed, and the API Console appears in the API Console tab.
Simulate API Calls Using APIkit Console
-
In APIkit Console, on the /users resource GET tab, click Try It.
-
Click GET to retrieve the RAML example in the
user-example.jsonfile.Status 200 and the user 1 example appears:
[ { "id": 1, "name": "Leanne Graham", "username": "Bret", "email": "Sincere@april.biz", "address": { "street": "Kulas Light", "suite": "Apt. 556", "city": "Gwenborough", "zipcode": "92998-3874", "geo": { "lat": "-37.3159", "lng": "81.1496" } }, "phone": "1-770-736-8031 x56442", "website": "hildegard.org", "company": { "name": "Romaguera-Crona", "catchPhrase": "Multi-layered client-server neural-net", "bs": "harness real-time e-markets" } } ] -
Click Try It on the GET tab of the
/usersbyidresource.
The response is:
 [{
 "id": 3,
 "name": "Clementine Bauch",
 "username": "Samantha",
 "email": "Nathan@yesenia.net",
 "address": {
   "street": "Douglas Extension",
   "suite": "Suite 847",
   "city": "McKenziehaven",
   "zipcode": "59590-4157",
   "geo": {
     "lat": "-68.6102",
     "lng": "-47.0653"
   }
 },
 "phone": "1-463-123-4447",
 "website": "ramiro.info",
 "company": {
   "name": "Romaguera-Jacobson",
   "catchPhrase": "Face to face bifurcated interface",
   "bs": "e-enable strategic applications"
 } }]
To Implement an API from the APIkit Project
After simulating calls to the API, prepare the API for release. Modify and add flows that return actual data from the JSON Placeholder site instead of the data from RAML examples. Modify the users flow to get actual data from the Json Placeholder site:
-
Drag an HTTP component to the Source section of the get:/users:api-config flow.
-
In the properties editor of the HTTP Listener, change the Path from
/to /placeholder. -
In Connector Configuration of the HTTP Listener, click
 and click OK to accept the default host 0.0.0.0 and port 8081.
 -
Delete the Set Payload component from the Process area of the get:/users:api-config flow.
-
Drag an HTTP connector to the Process area of the flow.
-
In the properties editor of the HTTP Requester, set the following options:
-
Path:
/users -
Method: Select GET from the drop-down.
-
-
In Connector Configuration of the HTTP Requester, click
 .
.The HTTP Request Configuration dialog appears.
-
Set the following HTTP Request Configuration options:
-
Accept the default Name, HTTP_Request_Configuration.
-
Accept the default HTTP protocol.
-
Set Host to jsonplaceholder.typicode.com.
-
Set Port to 80.
-
-
Save changes.
To Filter Users By ID Using a Parameter
Revise the flow to filter users by ID:
-
Drag an HTTP component to the Source section of the get:/users/userbyid:api-config flow.
-
In the properties editor, set Path to /placeholder/byid.
-
In Connector Configuration of the HTTP Listener, click
and click OK to accept the default host 0.0.0.0 and port 8081. -
Delete Set Payload from the flow, and in its place, drag an HTTP component to the Process area.
-
In the properties editor, set the following HTTP Requester options:
-
Path: Set to /users.
-
Method: Select GET from the drop-down.
-
Click Add Parameter and set the following options:
-
Name: id
-
Value to #[message.inboundProperties.'http.query.params'.id]
-
-
-
Save.
To Add a Service to Get Names Only
In this procedure, you add a flow to filter users to get a list of user names. You set up the Transform Message input and output metadata to generate DataWeave code and return results you want.
-
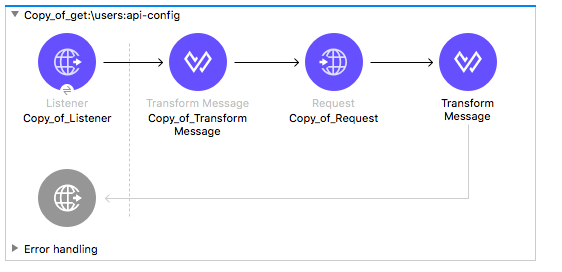
Copy and paste the get:/users:api-config flow to create another flow: Select the flow, and then Edit > Copy. Click a blank area of the canvas, and select Edit > Paste.
A copy of the flow appears at the bottom of the canvas.
-
In the copy of the flow, select the HTTP listener component, and in the properties editor, change the Path from /placeholder to /placeholder/names.
-
Drag a Transform Message component from the Mule Palette to the right of the HTTP requester.
-
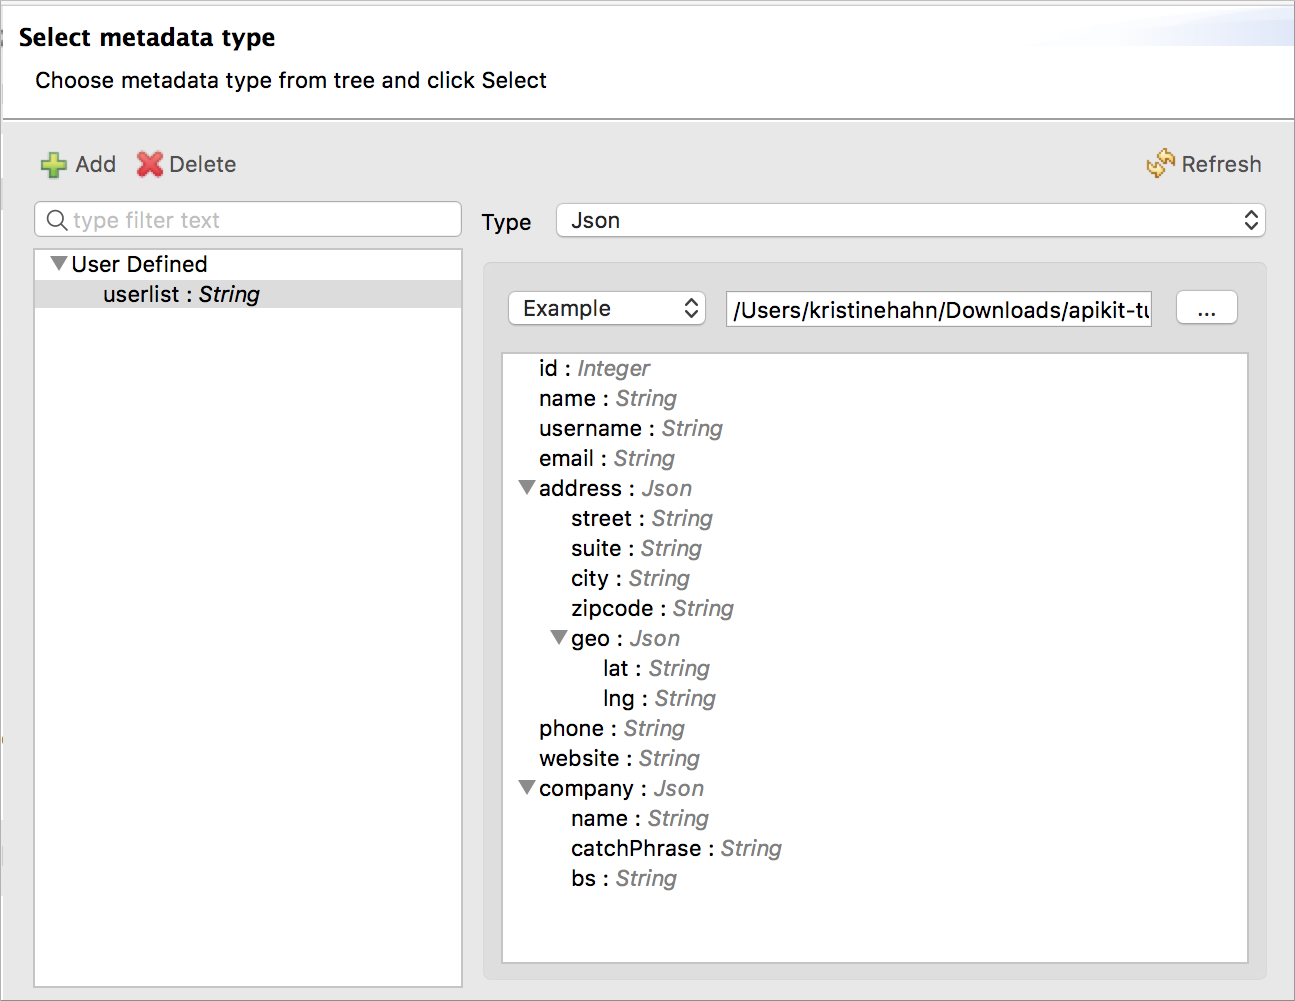
In Transform Message, in Input, click Define Metadata, and set the metadata:
-
Click
to create a new type, and give the type an arbitrary name, userlist, for example. -
In Type, select JSON, and then select Example. Browse to the same user-example.json that you downloaded and referenced in the RAML.
-
Click Select.
-
-
Create a file having a JSON array, which represents the list of names you want in the output:
["Jane Doe", "John Smith"]Give the file an arbitrary name, for example, names.json.
-
In Transform Message, in Output, click Define Metadata, and set the metadata:
-
Click
to create a new type, and give the type an arbitrary name, namelist, for example. -
In Type, select JSON, and then select Example. Browse to names.json.
-
Click Select.
-
-
In Transform Message, in Input, drag Name:String to
List<String>in Output.DataWeave code is generated.
-
In the properties editor, change the output code to specify the application/json mime type instead of application/java:
%dw 1.0
%output application/json
---
payload.name
To Test the API
-
In Package Explorer, right-click the project name, and choose Run As > Mule Application.
-
Open a browser, and go to
http://localhost:8081/placeholder.All user information from the JSONPlaceholder service appears:
[ { "id": 1, "name": "Leanne Graham", "username": "Bret", "email": "Sincere@april.biz", "address": { "street": "Kulas Light", "suite": "Apt. 556", "city": "Gwenborough", "zipcode": "92998-3874", "geo": { "lat": "-37.3159", "lng": "81.1496" ... { "id": 10, "name": "Clementina DuBuque", "username": "Moriah.Stanton", "email": "Rey.Padberg@karina.biz", "address": { "street": "Kattie Turnpike", "suite": "Suite 198", "city": "Lebsackbury", "zipcode": "31428-2261", "geo": { "lat": "-38.2386", "lng": "57.2232" } ... ] -
Get user information about only the user having ID = 4. Go to
http://localhost:8081/placeholder/byid?id=4.[ { "id": 4, "name": "Patricia Lebsack", "username": "Karianne", "email": "Julianne.OConner@kory.org", "address": { "street": "Hoeger Mall", "suite": "Apt. 692", "city": "South Elvis", "zipcode": "53919-4257", "geo": { "lat": "29.4572", "lng": "-164.2990" } }, "phone": "493-170-9623 x156", "website": "kale.biz", "company": { "name": "Robel-Corkery", "catchPhrase": "Multi-tiered zero tolerance productivity", "bs": "transition cutting-edge web services" } } ] -
Get only the names of users. Go to
http://localhost:8081/placeholder/names.[ "Leanne Graham", "Ervin Howell", "Clementine Bauch", "Patricia Lebsack", "Chelsey Dietrich", "Mrs. Dennis Schulist", "Kurtis Weissnat", "Nicholas Runolfsdottir V", "Glenna Reichert", "Clementina DuBuque" ]