Salesforce Commerce Cloud B2C Data Connector の例
次の例は、割り当ての検索を実行して検索結果を取得する方法を示しています。
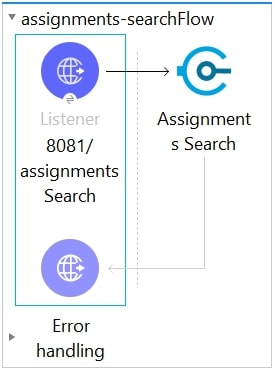
次の画像は、割り当て検索の例のフローを示しています。
HTTP Listener ソースの設定
Studio で、コネクタのソースを追加および設定する新しい Mule プロジェクトを作成します。
-
Studio で、[File (ファイル)] > [New (新規)] > [Mule Project (Mule プロジェクト)] を選択します。
-
Mule プロジェクトの名前を入力して、[Finish (完了)] をクリックします。
-
[Mule Palette (Mule パレット)] ビューで、[HTTP] > [Listener] を選択します。
-
[Listener] を Studio キャンバスにドラッグします。
-
[Listener (リスナー)] 設定画面で、必要に応じて [Display Name (表示名)] 項目の値を変更します。
-
[Path (パス)] 項目に「
/assignmentsSearch」を指定します。![HTTP Listener の [General (一般)] 設定サンプル値](_images/data-connector-http-listener-config.jpg)
-
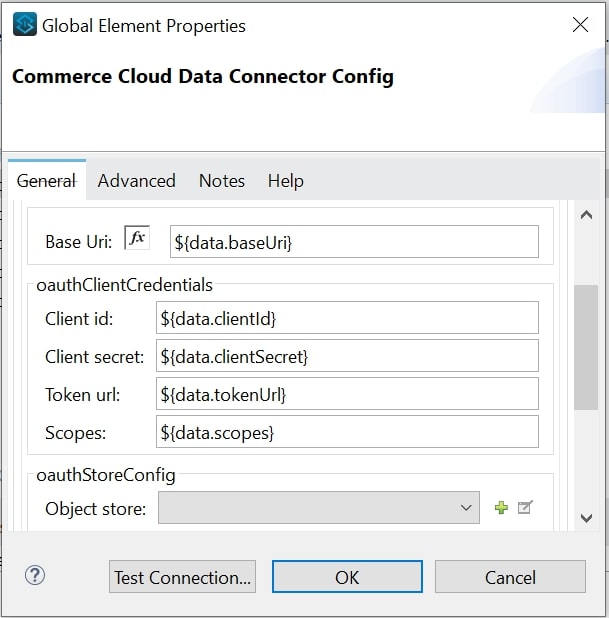
[Connector configuration (コネクタ設定)] 項目の横にあるプラス記号 (+) をクリックして、アプリケーション内の HTTP リスナーのすべてのインスタンスで使用できるグローバル要素を設定します。
-
[General (一般)] タブで、[Port (ポート)] に「
8081」と入力します。 -
[Test Connection (接続をテスト)] をクリックします。
-
[OK] をクリックします。
-
-
Mule プロジェクトを保存します。 .
Assignments Search 操作の設定
-
[Mule Palette (Mule パレット)] ビューのパレットから [Assignment Search] 操作を選択して、フローにドラッグします。
-
http://localhost:8081/assignmentsSearch に移動して Postman を開き、Assignments Search 操作に必要な本文をコピーします。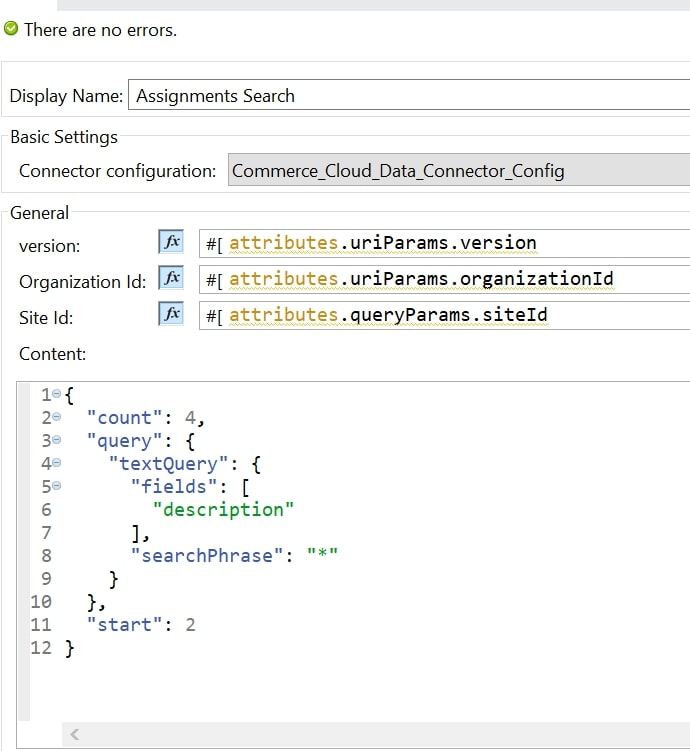
サンプル Assignments Search 操作ペイロードは次のとおりです。
{
  "count": 4,
  "query": {
    "textQuery": {
      "fields": [
        "description"
      ],
      "searchPhrase": "*"
    }
  },
  "start": 2
}-
前のステップで取得した本文を [Content (コンテンツ)] パラメーターに追加します。
-
[Connector Configuration (コネクタ設定)] 項目の横にあるプラス記号 (+) をクリックし、必要な値を使用して B2C データコネクタを設定します。
-
[Test Connection (接続をテスト)] をクリックします。
-
Mule プロジェクトを保存します。
Mule アプリケーションの実行
プロジェクトを Mule アプリケーションとして実行します。
-
Package Explorer で、プロジェクト名を右クリックし、[Run As (別のユーザーとして実行)] > [Mule Application (Mule アプリケーション)] を選択します。
-
http://localhost:8081/assignmentsSearch に移動して Postman を開き、応答を確認します。
出力に検索データの結果が表示されます。
XML の例
この例のフローをすばやく Mule アプリケーションに読み込むには、Studio で次のコードを [Configuration XML (設定 XML)] タブに貼り付けます。
<?xml version="1.0" encoding="UTF-8"?>

<mule xmlns:commerce-cloud-dataapi="http://www.mulesoft.org/schema/mule/commerce-cloud-dataapi" xmlns:http="http://www.mulesoft.org/schema/mule/http"
	xmlns="http://www.mulesoft.org/schema/mule/core"
	xmlns:doc="http://www.mulesoft.org/schema/mule/documentation" xmlns:xsi="http://www.w3.org/2001/XMLSchema-instance" xsi:schemaLocation="http://www.mulesoft.org/schema/mule/core http://www.mulesoft.org/schema/mule/core/current/mule.xsd
http://www.mulesoft.org/schema/mule/http http://www.mulesoft.org/schema/mule/http/current/mule-http.xsd
http://www.mulesoft.org/schema/mule/commerce-cloud-dataapi http://www.mulesoft.org/schema/mule/commerce-cloud-dataapi/current/mule-commerce-cloud-dataapi.xsd">
	<flow name="assignments-searchFlow" >
		<http:listener doc:name="8081/pricing/assignments/{version}/organizations/{organizationId}/assignments"  config-ref="HTTP_Listener_config" path="/pricing/assignments/{version}/organizations/{organizationId}/assignments"/>
		<commerce-cloud-dataapi:create-pricing-assignments-organizations-assignments-by-version-organization-id doc:name="Assignments Search"
    config-ref="Commerce_Cloud_Data_Connector_Config" version="#[attributes.uriParams.version]" organizationId="#[attributes.uriParams.organizationId]" siteId="#[attributes.queryParams.siteId]">
			<commerce-cloud-dataapi:content ><![CDATA[#[{
  "count": 4,
  "query": {
    "textQuery": {
      "fields": [
        "description"
      ],
      "searchPhrase": "*"
    }
  },
  "start": 2
}]]]></commerce-cloud-dataapi:content>
		</commerce-cloud-dataapi:create-pricing-assignments-organizations-assignments-by-version-organization-id>
	</flow>
</mule>*[Configuration XML (設定 XML)]* タブにコードを追加すると、キャンバスの *[Message Flow (メッセージフロー)]* タブにフローが表示されます。