IBM CTG Connector 2.3 の例
IBM CTG Connector の Mule フローの例を示します。
始める前に
-
Java 8 または 11
-
Anypoint Studio 7.x
-
Mule Runtime Engine (Mule) 4.x
-
DataWeave
-
IBM CTG システム 9.1 または 9.2 へのアクセス権
-
IBM SDK 9.1 または 9.2
接続の設定
接続を保護するには、接続項目の値を指定する必要があります。次の手順を実行します。
接続の設定ファイルを作成する
接続のプロパティが含まれる設定ファイルを作成します。
-
/src/main/resources/ フォルダー内に mule-app.properties という名前のファイルを作成します。 -
mule-app.properties ファイルに、次のような接続の一連のプロパティを作成します。括弧で囲まれたテキスト (括弧を含む) を各自の設定の適切な値に置き換えます。ibm.host=<hostname> ibm.port=<port number> ibm.serverName=<server name> ibm.username=<username> (optional) ibm.password=<password> (optional) ibm.keystoreLocation=<location of the keystore containing the certificates required for an SSL connection> (optional) ibm.keystorePassword=<password required to access the keystore for an SSL connection> (optional)
これは、選択した接続設定によって異なる場合があります。
プロパティファイルの作成についての詳細は、「プロパティプレースホルダーの設定」を参照してください。
接続のグローバル要素を設定する
接続のグローバル要素を設定します。
-
新しい Mule プロジェクトを作成します。
-
[Mule Palette (Mule パレット)] ビューで、[Search in Exchange (Exchange 内を検索)] をクリックして「
ibm ctg」と入力します。 -
[Selected modules (選択したモジュール)] セクションに [IBM CICS Transaction Gateway Connector] を追加し、[Finish (完了)] をクリックします。
-
[Global Elements (グローバル要素)] タブをクリックし、[Create (作成)] をクリックします。
-
[Connector Configuration (コネクタ設定)] > [IBM CTG Config (IBM CTG 設定)] を選択し、[OK] をクリックします。
-
[Connection (接続)] を設定するための値を入力します。
-
[Test Connection (接続をテスト)] ボタンをクリックして、IBM CTG API と接続されていることを確認します。ポップアップに成功メッセージが表示されます。
-
[OK] をクリックします。
プロパティファイルのグローバル要素を設定する
mule-app.properties ファイルのグローバル要素を設定して、Mule がその場所を認識できるようにします。
-
[Global Elements (グローバル要素)] タブをクリックし、[Create (作成)] をクリックします。
-
[Choose Global Type (グローバル種別の選択)] ダイアログで、[Configuration properties (設定プロパティ)] を選択し、[OK] をクリックします。
-
[File (ファイル)] 項目に「
mule.app.properties」と入力します。 -
[OK] をクリックします。
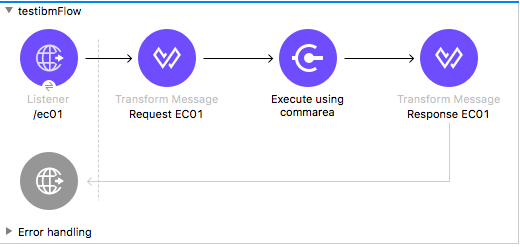
COMMAREA プログラムを呼び出す
このアプリケーションは、EC01 という COMMAREA ベースのプログラムを呼び出します。EC01 は、現在の日付と時刻を、書式設定された EBCDIC 文字列として出力します。
-
Anypoint Studio で新しい Mule プロジェクトを作成し、IBM CTG のログイン情報を
src/main/resources/mule-app.properties に入力します。ctg.host=<HOST> ctg.port=<PORT> ctg.serverName=<SERVER_NAME> ctg.username=<USERNAME> ctg.password=<PASSWORD> -
HTTP Listener 操作をキャンバスにドラッグし、[Host (ホスト)] と [Port (ポート)] はデフォルト値のままにして、[Path (パス)] を
/test/ec01 に設定します。 -
IBM CTG 操作をキャンバスにドラッグして、標準 (非 SSL) クライアントを設定するための新しいグローバル要素を追加します。
パラメーター 値 Host (ホスト)
${ctg.host}Port (ポート)
${ctg.port}Server Name (サーバー名)
${ctg.serverName}Username (ユーザー名)
${ctg.username}Password (パスワード)
${ctg.password}[Test Connection (接続をテスト)] をクリックして、Mule が IBM CTG インスタンスに接続できることを確認してください。接続に成功した場合は、[OK] をクリックして設定を保存します。失敗した場合は、パラメーターを確認して修正し、もう一度テストを実行してください。 -
IBM CTG コンポーネントをダブルクリックし、[Execute] 操作を選択して、次のパラメーターを設定します。
パラメーター 値 Content Reference (コンテンツリファレンス)
#[payload]Request Reference (要求リファレンス)
#[flowVars.commareaRequest] -
HTTP と IBM CTG 操作の間に Transform Message を追加します。
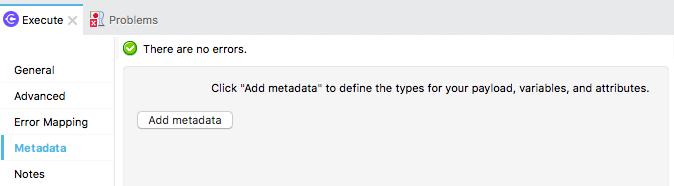
コネクタは動的または静的メタデータを提供していませんが、Metadata Type (メタデータ型) ツールを使用して、カスタム型を定義することができます。
-
スキーマファイルの ec01-type.ffd を使用して、「カスタムメタデータの追加」の入力メタデータを定義します。
form: COPYBOOK id: 'DFHCOMMAREA' values: - { name: 'LK-DATE-OUT', type: String, length: 8 } - { name: 'LK-SPACE-OUT', type: String, length: 1 } - { name: 'LK-TIME-OUT', type: String, length: 8 } - { name: 'LK-LOWVAL-OUT', type: String, length: 1 } -
DataWeave トランスフォーマーの項目をマップします。
%dw 2.0 output text/plain schemaPath = "ec01-type.ffd", segmentIdent = "DFHCOMMAREA" --- [{ LK-DATE-OUT: "", LK-SPACE-OUT: "", LK-TIME-OUT: "", LK-LOWVAL-OUT: "" }] -
flow 変数を
commareaRequest という名前で作成し、「Java メタデータを読み込む」の説明に従って次の項目を設定します。%dw 2.0 output application/java --- { channel: "EC03", encoding: "US-ASCII", errorContainer: "OUTPUTMESSAGE", programName: "EC03", requestContainer: "INPUTDATA", responseContainer: "CICSDATETIME", tpnName: "CSMI" } as Object { class : "org.mule.modules.ibmctg.internal.model.ChannelRequest" }CommareaRequest のメタデータを取得する方法については、「Java メタデータを読み込む」を参照してください。
-
-
IBM CTG の後に変換メッセージを追加して、結果を JSON 形式で抽出します。
%dw 2.0 output application/json --- { date: payload } -
フローの最後にロガーを追加します。
-
変更内容を保存して、Mule アプリケーションをデプロイします。ブラウザーを開いて、
http://localhost:8081/ec01 に要求を送信します。次のような結果が返されます。{ date: "08/01/2019 13:41:17" }
この例の XML
この例のフローをすばやく Mule アプリケーションに読み込むには、次のコードを Studio XML エディターに貼り付けます。
<?xml version="1.0" encoding="UTF-8"?>

<mule xmlns:bti="http://www.mulesoft.org/schema/mule/ee/bti"
	xmlns:ibmctg="http://www.mulesoft.org/schema/mule/ibmctg"
	xmlns:ee="http://www.mulesoft.org/schema/mule/ee/core"
	xmlns:http="http://www.mulesoft.org/schema/mule/http"
	xmlns="http://www.mulesoft.org/schema/mule/core"
	xmlns:doc="http://www.mulesoft.org/schema/mule/documentation"
	xmlns:xsi="http://www.w3.org/2001/XMLSchema-instance"
	xsi:schemaLocation="
http://www.mulesoft.org/schema/mule/ee/bti
http://www.mulesoft.org/schema/mule/ee/bti/current/mule-bti-ee.xsd
http://www.mulesoft.org/schema/mule/core
http://www.mulesoft.org/schema/mule/core/current/mule.xsd
http://www.mulesoft.org/schema/mule/http
http://www.mulesoft.org/schema/mule/http/current/mule-http.xsd
http://www.mulesoft.org/schema/mule/ee/core
http://www.mulesoft.org/schema/mule/ee/core/current/mule-ee.xsd
http://www.mulesoft.org/schema/mule/ibmctg
http://www.mulesoft.org/schema/mule/ibmctg/current/mule-ibmctg.xsd">
	<configuration-properties file="automation-credentials.properties"/>
	<http:listener-config
		name="HTTP_Listener_config"
		doc:name="HTTP Listener config"
		basePath="/" >
		<http:listener-connection host="0.0.0.0" port="8081" />
	</http:listener-config>
	<bti:transaction-manager />
	<ibmctg:config name="IBMCTG_Config" doc:name="IBMCTG Config">
		<ibmctg:connection host="${config.host}"
		port="${config.port}"
		serverName="${config.serverName}"
		username="${config.username}"
		password="${config.password}" />
	</ibmctg:config>
	<flow name="ibmdemoFlow">
		<http:listener doc:name="/ec01"
			config-ref="HTTP_Listener_config"
			path="/ec01"/>
		<ee:transform doc:name="Transform Message">
			<ee:message >
				<ee:set-payload ><![CDATA[%dw 2.0
output application/flatfile schemaPath = "ec01-type.ffd", segmentIdent = "DFHCOMMAREA"
---
[{
	"LK-DATE-OUT": "",
	"LK-SPACE-OUT": "",
	"LK-TIME-OUT": "",
	"LK-LOWVAL-OUT": ""
}]]]></ee:set-payload>
			</ee:message>
			<ee:variables >
				<ee:set-variable variableName="request" ><![CDATA[%dw 2.0

output application/java
---
{
	commareaLength: 18,
	encoding: "IBM037",
	programName: "EC01",
	replyLength: 18,
	tpnName: "CSMI"
} as Object {
	class : "org.mule.modules.ibmctg.internal.model.CommareaRequest"
}]]></ee:set-variable>
			</ee:variables>
		</ee:transform>
		<ibmctg:execute-using-commarea doc:name="Execute using commarea"
		commareaRequestType="#[vars.request]" config-ref="IBMCTG_Config"/>
		<ee:transform doc:name="Transform Message">
			<ee:message >
				<ee:set-payload ><![CDATA[%dw 2.0
output application/json
---
{
	date:payload
}]]></ee:set-payload>
			</ee:message>
		</ee:transform>
	</flow>
</mule>
チャネルプログラムを呼び出す
このアプリケーションは、EC03 というチャネルベースのプログラムを呼び出します。EC03 は、入力データコンテナを取って 3 つのコンテナを返します。
-
日付および時刻コンテナ。
-
入力データの長さ。CICS プログラムのチャネルとコンテナを使用します。
-
入力コンテナのコピーまたはエラーメッセージが格納された出力コンテナ。
-
上の例のステップ 1 ~ 3 を実行して、HTTP パスを
/ec03 に設定します。 -
IBM CTG 操作をダブルクリックし、Execute 操作を選択して、次のパラメーターを設定します。
パラメーター 値 Content Reference (コンテンツリファレンス)
#[payload]Request Reference (要求リファレンス)
#[flowVars.request] -
HTTP と IBM CTG 操作の間に Transform Message を追加します。
-
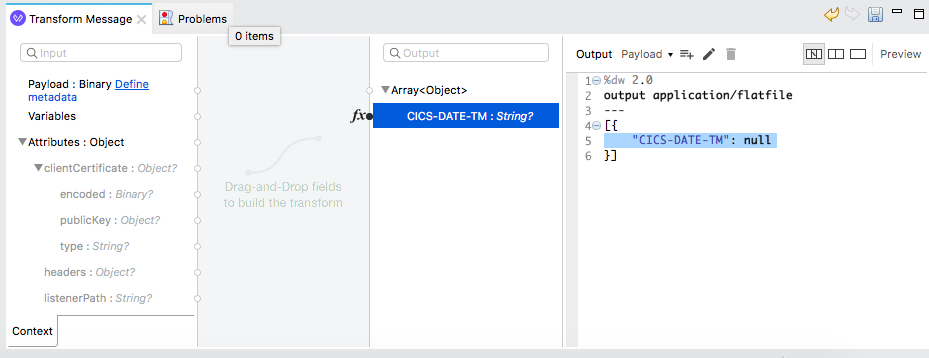
「カスタムメタデータを追加する」に従い、スキーマファイルの ec03-type.ffd を使用して入力メタデータを定義します。
form: COPYBOOK id: 'DFHCOMMAREA' values: - { name: 'CICS-DATE-TM', type: String, length: 8 } -
DataWeave トランスフォーマーの項目をマップします。
%dw 2.0 output text/plain schemaPath = "ec03-type.ffd", segmentIdent = "DFHCOMMAREA" --- [{ CICS-DATE-TM: "" }] -
flowVar 変数を
request という名前で作成し、「Java メタデータを読み込む」の説明に従って次の項目を設定します。%dw 2.0 output application/java --- { channel: "EC03", encoding: "US-ASCII", errorContainer: "OUTPUTMESSAGE", programName: "EC03", requestContainer: "INPUTDATA", responseContainer: "CICSDATETIME", tpnName: "CSMI" } as Object { class : "org.mule.modules.ibmctg.internal.model.ChannelRequest" } -
IBM CTG 操作の後に変換メッセージを追加して、結果を読みやすい形式に変換します。
-
フローの最後にロガーを追加します。
-
変更内容を保存して、Mule アプリケーションをデプロイします。
-
ブラウザーを開いて、
http://localhost:8081/ec03 に要求を送信します。次のような結果が返されます。
{
   cics-date-time: "08/01/2019 13:57:25"
}
カスタムメタデータを追加する
IBM CTG Connector は設定済みの動的/静的メタデータを提供していませんが、Metadata Type (メタデータ型) ツールを使用して、カスタム型を定義することができます。入力および出力メタデータを次のように定義します。
-
スキーマファイルは、通常は
.ffd 形式で src/main/resources ディレクトリに格納します。注意: これらのスキーマファイルはユーザーが用意する必要があります。CICS のインストールパッケージに含まれている COBOL コピーブックからも入手できます。
-
コネクタ操作の [Metadata (メタデータ)] タブに移動して、[Add metadata (メタデータを追加)] をクリックします。
-
[Input:Payload (入力:ペイロード)] を選択し、[Edit (編集)] をクリックしてメタデータエディターを開きます。
-
-
[Add (追加)] をクリックして新しい型を作成し、ID を入力します (例: EC03 プログラムの入力データであれば ec03-in-type)。
-
[Copybook] 型を選択して [Schema (スキーマ)] を選択し、スキーマファイルの場所を指定します。
-
表示される使用可能なデータセグメントのリストのドロップダウンメニューから、必要なセグメントを選択し、[Select (選択)] をクリックして設定を保存します。
-
DataWeave トランスフォーマーをフロー内の IBM CTG コンポーネントの前にドラッグします。
マッピングを定義するためのメタデータ項目が利用可能になります。
メタデータの定義は IBM CTG Connector の使用には必要ありませんが、コネクタを使いやすくするためには必要です。「メタデータの作成」を参照してください。
Java メタデータを読み込む
DataWeave で、[Define Metadata (メタデータを定義)] をクリックして [Metadata (メタデータ)] ウィンドウを開きます。
-
[Add (追加)] をクリックして、ID (例:
CommareaRequest) を入力します。 -
[Java] 型を選択し、[Data Structure (データ構造)] テーブルで Java オブジェクトを選択します。
-
クラス名の CommareaRequest または完全修飾名の
org.mule.modules.ibmctg.internal.model.CommareaRequest を検索して [OK] をクリックします。 -
[Select (選択)] をクリックして、設定を保存します。
-
同じステップを繰り返して、ChannelRequest 型のメタデータを読み込みます。
この例の XML
この例のフローをすばやく Mule アプリケーションに読み込むには、次のコードを Studio XML エディターに貼り付けます。
<?xml version="1.0" encoding="UTF-8"?>
<mule xmlns:bti="http://www.mulesoft.org/schema/mule/ee/bti"
xmlns:ibmctg="http://www.mulesoft.org/schema/mule/ibmctg"
xmlns:ee="http://www.mulesoft.org/schema/mule/ee/core"
xmlns:http="http://www.mulesoft.org/schema/mule/http"
xmlns="http://www.mulesoft.org/schema/mule/core"
xmlns:doc="http://www.mulesoft.org/schema/mule/documentation"
xmlns:xsi="http://www.w3.org/2001/XMLSchema-instance"
xsi:schemaLocation="
http://www.mulesoft.org/schema/mule/ee/bti
http://www.mulesoft.org/schema/mule/ee/bti/current/mule-bti-ee.xsd
http://www.mulesoft.org/schema/mule/core
http://www.mulesoft.org/schema/mule/core/current/mule.xsd
http://www.mulesoft.org/schema/mule/http
http://www.mulesoft.org/schema/mule/http/current/mule-http.xsd
http://www.mulesoft.org/schema/mule/ee/core
http://www.mulesoft.org/schema/mule/ee/core/current/mule-ee.xsd
http://www.mulesoft.org/schema/mule/ibmctg
http://www.mulesoft.org/schema/mule/ibmctg/current/mule-ibmctg.xsd">
<configuration-properties file="automation-credentials.properties"/>
<http:listener-config
name="HTTP_Listener_config"
doc:name="HTTP Listener config"
basePath="/" >
<http:listener-connection host="0.0.0.0" port="8081" />
</http:listener-config>
<bti:transaction-manager />
<ibmctg:config name="IBMCTG_Config" doc:name="IBMCTG Config">
<ibmctg:connection host="${config.host}"
port="${config.port}"
serverName="${config.serverName}"
username="${config.username}"
password="${config.password}" />
</ibmctg:config>
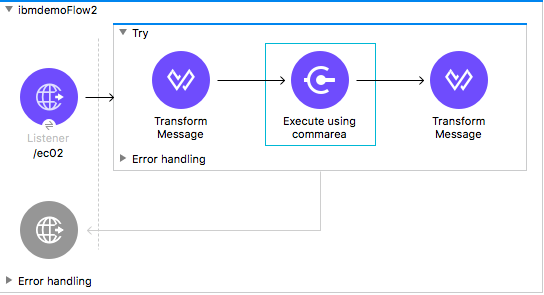
<flow name="ibmdemoFlow2">
<http:listener doc:name="/ec02" config-ref="HTTP_Listener_config" path="/ec02"/>
<try doc:name="Try" transactionalAction="ALWAYS_BEGIN" transactionType="XA">
<ee:transform doc:name="Transform Message">
<ee:message>
<ee:set-payload ><![CDATA[%dw 2.0
output application/flatfile schemaPath = "ec02-type.ffd" , segmentIdent = "DFHCOMMAREA"
---
[{
"LK-COUNT": "000001234TH RUN OF EC02"
}]]]></ee:set-payload>
</ee:message>
<ee:variables >
<ee:set-variable variableName="request" ><![CDATA[%dw 2.0
output application/java
---
{
commareaLength: 40,
encoding: "IBM037",
programName: "EC02",
replyLength: 40,
tpnName: "CSMI"
} as Object {
class : "org.mule.modules.ibmctg.internal.model.CommareaRequest"
}]]></ee:set-variable>
</ee:variables>
</ee:transform>
<ibmctg:execute-using-commarea doc:name="Execute using commarea"
config-ref="IBMCTG_Config" commareaRequestType="#[vars.request]"/>
<ee:transform doc:name="Transform Message">
<ee:message >
<ee:set-payload ><![CDATA[%dw 2.0
output application/json
---
{
count:payload
}]]></ee:set-payload>
</ee:message>
</ee:transform>
</try>
</flow>
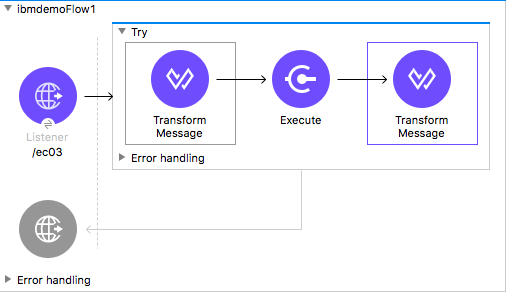
</mule>トランザクションスコープ内で COMMAREA またはチャネルプログラムを呼び出す
このアプリケーションは、EC02 という COMMAREA ベースのプログラムを呼び出します。EC02 は、シンプルな実行カウンターを返します。
-
上の例のステップ 1 ~ 3 を実行して、HTTP パスを
/test/ec02 に設定します。 -
[Global Elements (グローバル要素)] タブで新しい Bitronix トランザクションマネージャーを追加し、設定はそのままにします。
-
トランザクション要素を HTTP の隣にドラッグし、次の表に従って設定します。
パラメーター 値 型
XA Transactionアクション
BEGIN_OR_JOIN -
IBM CTG コンポーネントをダブルクリックし、Execute using COMMAREA 操作を選択して、次のパラメーターを設定します。
パラメーター 値 Content Reference (コンテンツリファレンス)
#[payload]Request Reference (要求リファレンス)
#[flowVars.request] -
HTTP と IBM CTG コンポーネントの間に Transform Message を追加します。コネクタは動的/静的メタデータを提供していませんが、Metadata Type (メタデータ型) ツールを使用して、カスタム型を定義することができます。
-
「カスタムメタデータを追加する」に従い、スキーマファイルの ec02-type.ffd を使用して入力メタデータを定義します。
form: COPYBOOK id: 'DFHCOMMAREA' values: - { name: 'LK-COUNT', type: String, length: 40 } -
DataWeave トランスフォーマーの項目をマップします。
%dw 2.0 %output text/plain schemaPath = "ec02-type.ffd" , segmentIdent = "DFHCOMMAREA" --- [{ LK-COUNT: "000001234TH RUN OF EC02" }] -
flowVar を
request という名前で作成し、「Java メタデータを読み込む」の説明に従って次の項目を設定します。%dw 2.0 output application/java --- { commareaLength: 40, encoding: "IBM037", programName: "EC02", replyLength: 40, tpnName: "CSMI" } as Object { class : "org.mule.modules.ibmctg.internal.model.CommareaRequest" } -
IBM CTG の後に変換メッセージを追加して、結果を JSON 形式で抽出します。
%dw 2.0 output application/json --- { count: payload } -
フローの最後にロガーを追加します。
-
変更内容を保存して、Mule アプリケーションをデプロイします。
-
ブラウザーを開いて、
http://localhost:8081/ec02 に要求を送信します。次のような結果が返されます。{ count: "1st RUN OF EC02" }
この例の XML
この例のフローをすばやく Mule アプリケーションに読み込むには、次のコードを Studio XML エディターに貼り付けます。
<?xml version="1.0" encoding="UTF-8"?>
<mule xmlns:bti="http://www.mulesoft.org/schema/mule/ee/bti"
xmlns:ibmctg="http://www.mulesoft.org/schema/mule/ibmctg"
xmlns:ee="http://www.mulesoft.org/schema/mule/ee/core"
xmlns:http="http://www.mulesoft.org/schema/mule/http"
xmlns="http://www.mulesoft.org/schema/mule/core"
xmlns:doc="http://www.mulesoft.org/schema/mule/documentation"
xmlns:xsi="http://www.w3.org/2001/XMLSchema-instance"
xsi:schemaLocation="
http://www.mulesoft.org/schema/mule/ee/bti
http://www.mulesoft.org/schema/mule/ee/bti/current/mule-bti-ee.xsd
http://www.mulesoft.org/schema/mule/core
http://www.mulesoft.org/schema/mule/core/current/mule.xsd
http://www.mulesoft.org/schema/mule/http
http://www.mulesoft.org/schema/mule/http/current/mule-http.xsd
http://www.mulesoft.org/schema/mule/ee/core
http://www.mulesoft.org/schema/mule/ee/core/current/mule-ee.xsd
http://www.mulesoft.org/schema/mule/ibmctg
http://www.mulesoft.org/schema/mule/ibmctg/current/mule-ibmctg.xsd">
<configuration-properties file="automation-credentials.properties"/>
<http:listener-config
name="HTTP_Listener_config"
doc:name="HTTP Listener config"
basePath="/" >
<http:listener-connection host="0.0.0.0" port="8081" />
</http:listener-config>
<bti:transaction-manager />
<ibmctg:config name="IBMCTG_Config" doc:name="IBMCTG Config">
<ibmctg:connection host="${config.host}"
port="${config.port}"
serverName="${config.serverName}"
username="${config.username}"
password="${config.password}" />
</ibmctg:config>
<flow name="ibmdemoFlow1">
<http:listener doc:name="/ec03" config-ref="HTTP_Listener_config" path="/ec03"/>
<try doc:name="Try" transactionalAction="ALWAYS_BEGIN" transactionType="XA">
<ee:transform doc:name="Transform Message">
<ee:message >
<ee:set-payload ><![CDATA[%dw 2.0
output application/flatfile
schemaPath = "ec03-type.ffd" , segmentIdent = "DFHCOMMAREA"
---
[{
"CICS-DATE-TM": null
}]]]></ee:set-payload>
</ee:message>
<ee:variables >
<ee:set-variable variableName="request" ><![CDATA[%dw 2.0
output application/java
---
{
channel: "EC03",
encoding: "US-ASCII",
errorContainer: "OUTPUTMESSAGE",
programName: "EC03",
requestContainer: "INPUTDATA",
responseContainer: "CICSDATETIME",
tpnName: "CSMI"
} as Object {
class : "org.mule.modules.ibmctg.internal.model.ChannelRequest"
}]]></ee:set-variable>
</ee:variables>
</ee:transform>
<ibmctg:execute doc:name="Execute" channelRequest="#[vars.request]"
config-ref="IBMCTG_Config"/>
<ee:transform doc:name="Transform Message">
<ee:message >
<ee:set-payload ><![CDATA[%dw 2.0
output application/json
---
{
"cics-date-time":payload
}
]]></ee:set-payload>
</ee:message>
</ee:transform>
</try>
</flow>
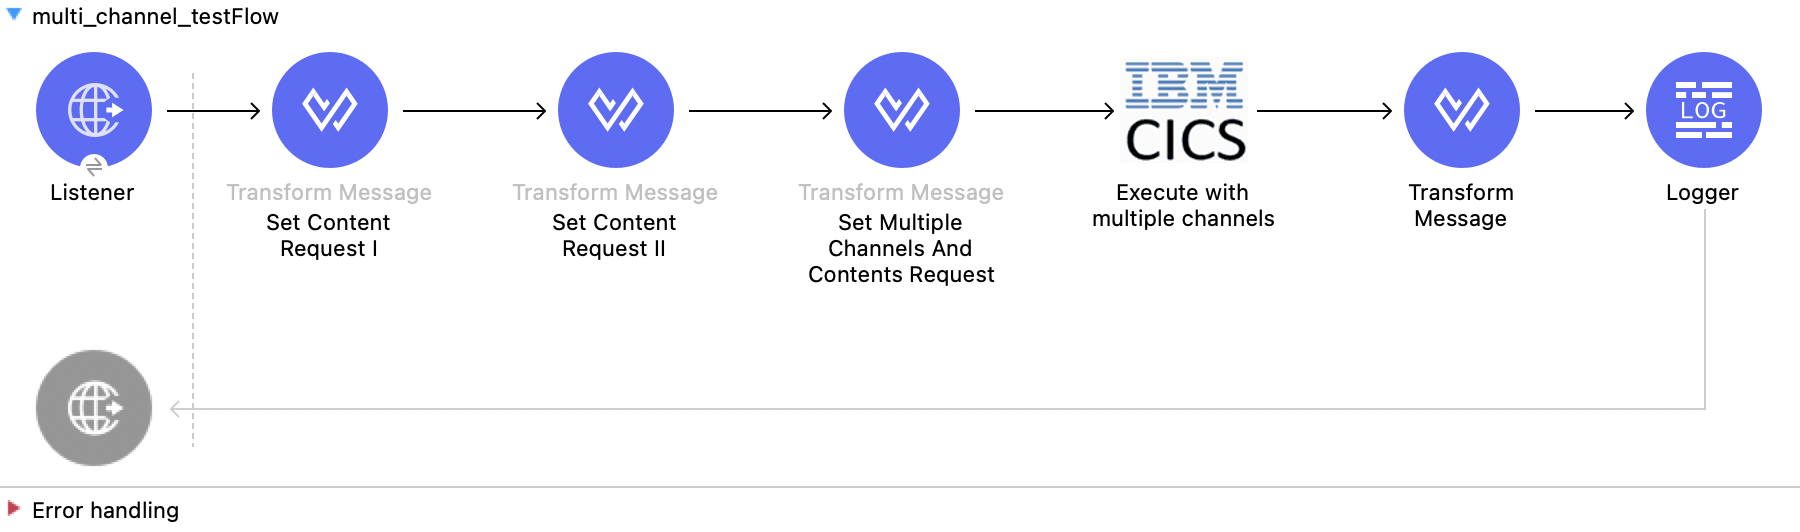
</mule>複数のコンテナを使用する
この Mule フローでは、複数のコンテナを使用する方法を示します。この例では、次の操作を使用します。
-
HTTP Listener
HTTP 要求からデータを受け取ります。 -
Transform Message
最初のコンテンツ要求を設定し、データをフラットファイルとして出力します。%dw 2.0 output application/flatfile schemaPath = "ec03-type.ffd", segmentIdent = "DFHCOMMAREA", encoding="cp037" --- [{ "CICS-DATE-TM": "" }] -
Transform Message
2 番目のコンテンツ要求を設定し、データをフラットファイルとして出力します。%dw 2.0 output application/flatfile schemaPath = "ec03-type.ffd", segmentIdent = "DFHCOMMAREA", encoding="cp037" --- [{ "CICS-DATE-TM": "" }] -
Transform Message
複数のチャネルおよびコンテンツ要求を設定し、データを JSON で出力します。%dw 2.0 output application/json --- [ { channelRequest : { channel: "EC03", encoding: "US-ASCII", errorContainer: "OUTPUTMESSAGE", programName: "EC03", requestContainer: "INPUTDATA", responseContainer: "CICSDATETIME", tpnName: "CSMI" }, content : vars.request1.^raw }, { channelRequest : { channel: "EC03", encoding: "US-ASCII", errorContainer: "OUTPUTMESSAGE", programName: "EC03", requestContainer: "INPUTDATA", responseContainer: "CICSDATETIME", tpnName: "CSMI" }, content : vars.request2.^raw } ] -
Execute with multiple channels
チャネルとコンテナ内にカプセル化されたデータを送信するリモート CICS プログラムをコールし、ユーザーが 1 回の要求で 32 KB を超えるデータを転送できるようにします。次の値を入力します。
項目 値 Object type (オブジェクト種別)
ListConnector Configuration (コネクタ設定)
IBMCTG_ConfigChannel and contents (チャネルおよびコンテンツ)
payload -
Transform Message
データを JSON で出力します。%dw 2.0 output application/json --- { "cics-date-time":payload } -
Logger
ロギングを実行します。
この例の XML
この例のフローをすばやく Mule アプリケーションに読み込むには、次のコードを Studio XML エディターに貼り付けます。
<?xml version="1.0" encoding="UTF-8"?>

<mule xmlns:bti="http://www.mulesoft.org/schema/mule/ee/bti"
	xmlns:ibmctg="http://www.mulesoft.org/schema/mule/ibmctg" xmlns:ee="http://www.mulesoft.org/schema/mule/ee/core"
	xmlns:http="http://www.mulesoft.org/schema/mule/http"
	xmlns="http://www.mulesoft.org/schema/mule/core" xmlns:doc="http://www.mulesoft.org/schema/mule/documentation" xmlns:xsi="http://www.w3.org/2001/XMLSchema-instance" xsi:schemaLocation="
http://www.mulesoft.org/schema/mule/ee/bti http://www.mulesoft.org/schema/mule/ee/bti/current/mule-bti-ee.xsd http://www.mulesoft.org/schema/mule/core http://www.mulesoft.org/schema/mule/core/current/mule.xsd
http://www.mulesoft.org/schema/mule/http http://www.mulesoft.org/schema/mule/http/current/mule-http.xsd
http://www.mulesoft.org/schema/mule/ee/core http://www.mulesoft.org/schema/mule/ee/core/current/mule-ee.xsd
http://www.mulesoft.org/schema/mule/ibmctg http://www.mulesoft.org/schema/mule/ibmctg/current/mule-ibmctg.xsd">
	<configuration-properties file="mule-app.properties"/>
	<http:listener-config name="HTTP_Listener_config" doc:name="HTTP Listener config" doc:id="de838cd2-71c3-41b3-9fbd-be6f671921dc" basePath="/" >
		<http:listener-connection host="0.0.0.0" port="8081" />
	</http:listener-config>
	<bti:transaction-manager />
	<ibmctg:config name="IBMCTG_Config" doc:name="IBMCTG Config" doc:id="1435fcc3-4b97-496e-8552-58a339dce96f" >
		<ibmctg:connection host="${config.host}" port="${config.port}" serverName="${config.serverName}" username="${config.username}" password="${config.password}" />
	</ibmctg:config>
	<flow name="multi_channel_testFlow" doc:id="a79bd0f2-e659-4778-96b1-fdcbf86166eb" >
		<http:listener doc:name="Listener" doc:id="594a7d30-b82f-4899-a212-0fc8897b414a" config-ref="HTTP_Listener_config" path="/multi"/>
		<ee:transform doc:name="Set Content Request I" doc:id="f3ebec71-8cb5-41f0-a993-bd68a963ac63" >
			<ee:variables >
				<ee:set-variable variableName="request1" ><![CDATA[%dw 2.0
output application/flatfile schemaPath = "ec03-type.ffd", segmentIdent = "DFHCOMMAREA", encoding="cp037"
---
[{
	"CICS-DATE-TM": ""
}]]]></ee:set-variable>
			</ee:variables>

		</ee:transform>
		<ee:transform doc:name="Set Content Request II" doc:id="1362b85a-a36c-4fa1-bc28-96266bc416c5">
			<ee:variables>
				<ee:set-variable variableName="request2" ><![CDATA[%dw 2.0
output application/flatfile schemaPath = "ec03-type.ffd", segmentIdent = "DFHCOMMAREA", encoding="cp037"
---
[{
	"CICS-DATE-TM": ""
}]]]></ee:set-variable>
			</ee:variables>
		</ee:transform>
		<ee:transform doc:name="Set Multiple Channels And Contents Request" doc:id="4157b44c-ac57-40a6-8ced-c5e165a1035c" >
			<ee:message >
				<ee:set-payload ><![CDATA[%dw 2.0
output application/json
---
[
	{
		channelRequest : 	{
			channel: "EC03",
			encoding: "US-ASCII",
			errorContainer: "OUTPUTMESSAGE",
			programName: "EC03",
			requestContainer: "INPUTDATA",
			responseContainer: "CICSDATETIME",
			tpnName: "CSMI"
		},
		content : vars.request1.^raw
	},
	{
		channelRequest : 	{
			channel: "EC03",
			encoding: "US-ASCII",
			errorContainer: "OUTPUTMESSAGE",
			programName: "EC03",
			requestContainer: "INPUTDATA",
			responseContainer: "CICSDATETIME",
			tpnName: "CSMI"
		},
		content : vars.request2.^raw
	}
]]]></ee:set-payload>
			</ee:message>
		</ee:transform>
		<ibmctg:execute-with-multiple-channels doc:name="Execute with multiple channels" doc:id="1913f9b3-95b2-4e83-8028-ea934d1a59ae" config-ref="IBMCTG_Config" />
		<ee:transform doc:name="Transform Message" doc:id="31f774bb-a848-42c6-a1ea-efb44612ca03" >
			<ee:message >
				<ee:set-payload ><![CDATA[%dw 2.0
output application/json
---
{
	"cics-date-time":payload
}]]></ee:set-payload>
			</ee:message>
		</ee:transform>
		<logger level="INFO" doc:name="Logger" doc:id="dff20a20-43a0-401f-8c20-7d480062fe64" message="#[payload]"/>
	</flow>
</mule>