Google Pub/Sub Connector 1.0 の例
これらの例では、Google Pub/Sub Connector を使用して次のアクションを実行する方法を示しています。
PubSub 接続の設定
このコネクタでは、PubSub を使用して接続を保護するため、[PubSub Connection (PubSub 接続)] 項目値を指定する必要があります。次の手順を実行します。
PubSub 接続の設定ファイルを作成する
PubSub 接続のプロパティが含まれる設定ファイルを作成します。
-
/src/main/resources/ フォルダー内に mule-app.properties という名前のファイルを作成します。 -
mule-app.properties ファイルに、次のような PubSub Connection の一連のプロパティを作成します。括弧で囲まれたテキスト (括弧を含む) を各自の設定の適切な値に置き換えます。config.private_key_id=<privatekeyid> config.private_key=<privatekey> config.client_id=<clientid> config.client_email=<clientemail> config.default_project_id=<defaultprojectid>
プロパティファイルの作成についての詳細は、「プロパティプレースホルダーの設定」を参照してください。
PubSub 接続のグローバル要素を設定する
PubSub Connection ファイルのグローバル要素を設定します。
-
新しい Mule プロジェクトを作成します。
-
[Mule Palette (Mule パレット)] ビューで、[Search in Exchange (Exchange 内を検索)] をクリックして「
google pubsub」と入力します。 -
[Google Pub/Sub Connector] を [Selected modules (選択済みモジュール)] セクションに追加し、[Finish (完了)] をクリックします。
-
[Global Elements (グローバル要素)] タブをクリックし、[Create (作成)] をクリックします。
-
[Connector Configuration (コネクタ設定)] > [Google PubSub Configuration (Google PubSub 設定)] を選択し、[OK] をクリックします。
-
次の値を入力します。
項目 値 名前
Google_Pub_Sub_ConfigurationPrivate key id (非公開キー ID)
${config.private_key_id}Private key (非公開キー)
${config.private_key}Client id (クライアント ID)
${config.client_id}Client email (クライアントメール)
${config.client_email}Default Project Id (デフォルトのプロジェクト ID)
${config.default_project_id}Default Subscription Name (デフォルトのサブスクリプション名)
orders-subscriptionDefault Topic Name (デフォルトのトピック名)
orders-topic -
[OK] をクリックします。
プロパティファイルのグローバル要素を設定する
mule-app.properties ファイルのグローバル要素を設定して、Mule がその場所を認識できるようにします。
-
[Global Elements (グローバル要素)] タブをクリックし、[Create (作成)] をクリックします。
-
[Choose Global Type (グローバル種別の選択)] ダイアログで、[Configuration properties (設定プロパティ)] を選択し、[OK] をクリックします。
-
[File (ファイル)] 項目に「
mule.app.properties」と入力します。 -
[OK] をクリックします。
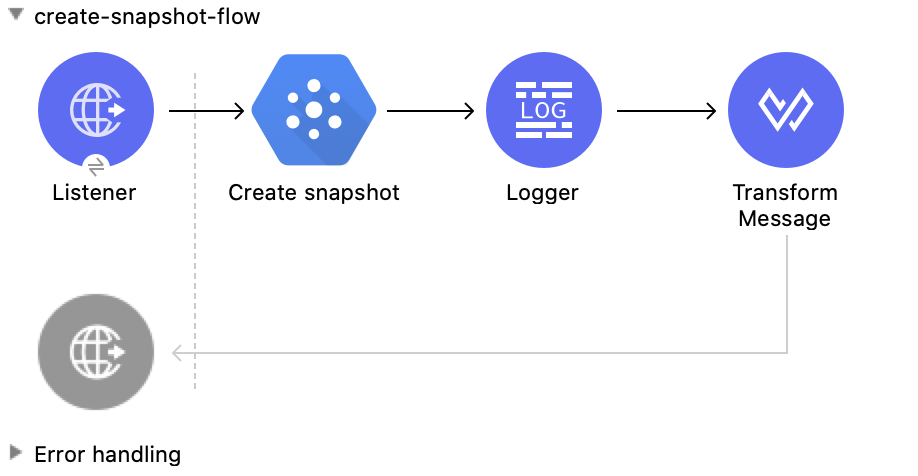
スナップショットの作成
この Mule フローでは要求されたサブスクリプションからスナップショットを作成します。
この例では、次の操作を使用します。
-
HTTP Listener
HTTP 要求からデータを受け入れる -
Create snapshot
スナップショットの作成 -
Logger
Create snapshot 操作からの HTTP 応答を表示する -
Transform Message
Create snapshot 操作の結果を JSON 形式で出力する
この例の XML
この例のフローをすばやく Mule アプリケーションに読み込むには、次のコードを Studio XML エディターに貼り付けます。
<?xml version="1.0" encoding="UTF-8"?>

<mule xmlns:ee="http://www.mulesoft.org/schema/mule/ee/core"
      xmlns:pubsub="http://www.mulesoft.org/schema/mule/pubsub"
      xmlns:http="http://www.mulesoft.org/schema/mule/http"
      xmlns="http://www.mulesoft.org/schema/mule/core"
      xmlns:doc="http://www.mulesoft.org/schema/mule/documentation"
      xmlns:xsi="http://www.w3.org/2001/XMLSchema-instance"
      xsi:schemaLocation="http://www.mulesoft.org/schema/mule/core http://www.mulesoft.org/schema/mule/core/current/mule.xsd
                          http://www.mulesoft.org/schema/mule/http http://www.mulesoft.org/schema/mule/http/current/mule-http.xsd
                          http://www.mulesoft.org/schema/mule/pubsub http://www.mulesoft.org/schema/mule/pubsub/current/mule-pubsub.xsd
                          http://www.mulesoft.org/schema/mule/ee/core http://www.mulesoft.org/schema/mule/ee/core/current/mule-ee.xsd">

    <http:listener-config name="HTTP_Listener_config" doc:name="HTTP Listener config">
        <http:listener-connection host="0.0.0.0" port="8081" />
    </http:listener-config>

    <pubsub:config name="Google_Pub_Sub_Configuration" doc:name="Google Pub Sub Configuration" projectId="${config.default_project_id}">
        <pubsub:connection privateKeyId="${config.private_key_id}" privateKey="${config.private_key}" clientId="${config.client_id}" clientEmail="${config.client_email}" />
    </pubsub:config>

    <configuration-properties doc:name="Configuration properties" file="mule-app.properties" />

    <flow name="create-snapshot-flow">
        <http:listener doc:name="Listener" config-ref="HTTP_Listener_config" path="/createSnapshot"/>
        <pubsub:create-snapshot
                doc:name="Create snapshot"
                config-ref="Google_Pub_Sub_Configuration"
                snapshotName="#[attributes.queryParams.snapshot]"
                subscriptionName="#[attributes.queryParams.sub]">
            <pubsub:labels ><![CDATA[#[output application/java
---
{
	"label1" : "test-snapshot-demo"
}]]]></pubsub:labels>
        </pubsub:create-snapshot>
        <logger level="INFO" doc:name="Logger" message="Created Snapshot with name: #[payload.name]"/>
        <ee:transform doc:name="Transform Message">
            <ee:message >
                <ee:set-payload ><![CDATA[%dw 2.0
output application/json
---
payload]]></ee:set-payload>
            </ee:message>
        </ee:transform>
    </flow>
</mule>
この例の実行手順
-
コネクタが設定されていることを確認します。
-
プロジェクトを保存します。
-
Web ブラウザーから「
http://localhost:8081/」と入力してアプリケーションをテストします。 [Create Snapshot (スナップショットを作成)] フォームが表示されます。 [Snapshot Name (スナップショット名)] 項目と [Subscription Name (サブスクリプション名)] 項目は事前入力されています。![[Create Snapshot (スナップショットを作成)] フォーム](_images/create-snapshot.png)
-
[Create Snapshot (スナップショットを作成)] をクリックします。スナップショットが正常に作成されたというアラートが表示されます。
スナップショットへのパッチ適用
この Mule フローでは、既存のスナップショットを更新します。
この例では、次の操作を使用します。
-
HTTP Listener
HTTP 要求からデータを受け取ります。 -
Patch snapshot
スナップショットを更新する -
Transform Message
Patch snapshot 操作の結果を JSON 形式で出力する -
Logger
PATCH snapshot 操作からの HTTP 応答を表示する

この例の XML
この例のフローをすばやく Mule アプリケーションに読み込むには、次のコードを Studio XML エディターに貼り付けます。
<?xml version="1.0" encoding="UTF-8"?>
<mule xmlns:ee="http://www.mulesoft.org/schema/mule/ee/core"
xmlns:pubsub="http://www.mulesoft.org/schema/mule/pubsub"
xmlns:http="http://www.mulesoft.org/schema/mule/http"
xmlns="http://www.mulesoft.org/schema/mule/core"
xmlns:doc="http://www.mulesoft.org/schema/mule/documentation"
xmlns:xsi="http://www.w3.org/2001/XMLSchema-instance"
xsi:schemaLocation="http://www.mulesoft.org/schema/mule/core http://www.mulesoft.org/schema/mule/core/current/mule.xsd
http://www.mulesoft.org/schema/mule/http http://www.mulesoft.org/schema/mule/http/current/mule-http.xsd
http://www.mulesoft.org/schema/mule/pubsub http://www.mulesoft.org/schema/mule/pubsub/current/mule-pubsub.xsd
http://www.mulesoft.org/schema/mule/ee/core http://www.mulesoft.org/schema/mule/ee/core/current/mule-ee.xsd">
<http:listener-config name="HTTP_Listener_config" doc:name="HTTP Listener config">
<http:listener-connection host="0.0.0.0" port="8081" />
</http:listener-config>
<pubsub:config name="Google_Pub_Sub_Configuration" doc:name="Google Pub Sub Configuration" projectId="${config.default_project_id}">
<pubsub:connection privateKeyId="${config.private_key_id}" privateKey="${config.private_key}" clientId="${config.client_id}" clientEmail="${config.client_email}" />
</pubsub:config>
<configuration-properties doc:name="Configuration properties" file="mule-app.properties" />
<flow name="patch-snapshot-flow">
<http:listener doc:name="Listener" config-ref="HTTP_Listener_config" path="/patch-snapshot"/>
<pubsub:patch-snapshot doc:name="Patch snapshot" config-ref="Google_Pub_Sub_Configuration" updateMask="labels">
<pubsub:snapshot><![CDATA[#[%dw 2.0
output application/json
---
{
"name": "projects/<<project-name>>/snapshots/<<snapshot-name>>",
"topic": "projects/<<project-name>>/topic/<<topic-name>>"
"expireTime": "2099-01-01T00:00:00Z",
"labels": {
"label1": "test-patch-snapshot"
}
}]]]></pubsub:snapshot>
</pubsub:patch-snapshot>
<ee:transform doc:name="Transform Message">
<ee:message>
<ee:set-payload><![CDATA[%dw 2.0
output application/json
---
payload]]></ee:set-payload>
</ee:message>
</ee:transform>
<logger level="INFO" doc:name="Logger" message="Updated Snapshot: #[payload]"/>
</flow>
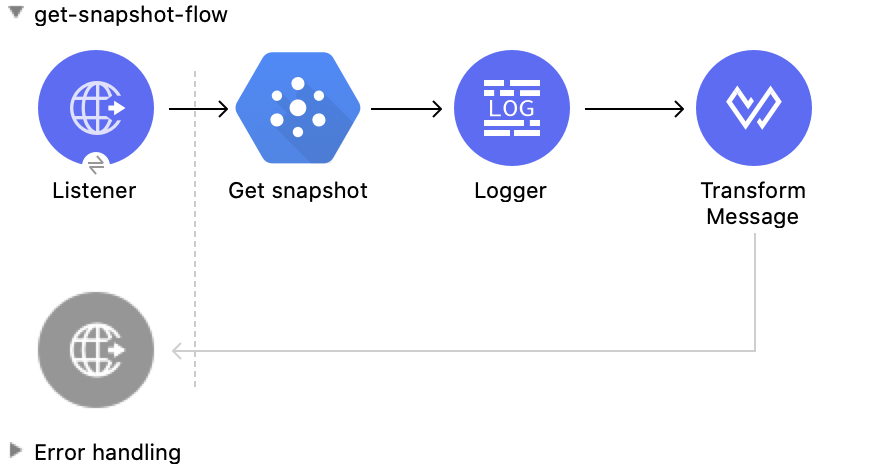
</mule>スナップショットの取得
この Mule フローでは、既存のスナップショットを取得します。
この例では、次の操作を使用します。
-
HTTP Listener
HTTP 要求からデータを受け取ります。 -
Get snapshot
スナップショットを取得する -
Logger
Get snapshot 操作からの HTTP 応答を表示する -
Transform Message
Get snapshot 操作の結果を JSON 形式で出力する
この例の XML
この例のフローをすばやく Mule アプリケーションに読み込むには、次のコードを Studio XML エディターに貼り付けます。
<?xml version="1.0" encoding="UTF-8"?>

<mule xmlns:ee="http://www.mulesoft.org/schema/mule/ee/core"
      xmlns:pubsub="http://www.mulesoft.org/schema/mule/pubsub"
      xmlns:http="http://www.mulesoft.org/schema/mule/http"
      xmlns="http://www.mulesoft.org/schema/mule/core"
      xmlns:doc="http://www.mulesoft.org/schema/mule/documentation"
      xmlns:xsi="http://www.w3.org/2001/XMLSchema-instance"
      xsi:schemaLocation="http://www.mulesoft.org/schema/mule/core http://www.mulesoft.org/schema/mule/core/current/mule.xsd
                          http://www.mulesoft.org/schema/mule/http http://www.mulesoft.org/schema/mule/http/current/mule-http.xsd
                          http://www.mulesoft.org/schema/mule/pubsub http://www.mulesoft.org/schema/mule/pubsub/current/mule-pubsub.xsd
                          http://www.mulesoft.org/schema/mule/ee/core http://www.mulesoft.org/schema/mule/ee/core/current/mule-ee.xsd">

    <http:listener-config name="HTTP_Listener_config" doc:name="HTTP Listener config">
        <http:listener-connection host="0.0.0.0" port="8081" />
    </http:listener-config>

    <pubsub:config name="Google_Pub_Sub_Configuration" doc:name="Google Pub Sub Configuration" projectId="${config.default_project_id}">
        <pubsub:connection privateKeyId="${config.private_key_id}" privateKey="${config.private_key}" clientId="${config.client_id}" clientEmail="${config.client_email}" />
    </pubsub:config>

    <configuration-properties doc:name="Configuration properties" file="mule-app.properties" />

    <flow name="get-snapshot-flow">
        <http:listener doc:name="Listener" config-ref="HTTP_Listener_config" path="/getSnapshot"/>
        <pubsub:get-snapshot doc:name="Get snapshot" config-ref="Google_Pub_Sub_Configuration" snapshotName="#[attributes.queryParams.getsnapshot]"/>
        <logger level="INFO" doc:name="Logger" message="Received Snapshot Topic: #[payload.topic]"/>
        <ee:transform doc:name="Transform Message">
            <ee:message >
                <ee:set-payload ><![CDATA[%dw 2.0
output application/json
---
payload]]></ee:set-payload>
            </ee:message>
        </ee:transform>
    </flow>
</mule>
この例の実行手順
-
コネクタが設定されていることを確認します。
-
プロジェクトを保存します。
-
Web ブラウザーから「
http://localhost:8081/ 」と入力してアプリケーションをテストします。 [GET Snapshot (スナップショットを取得)] フォームが表示されます。 [Snapshot Name (スナップショット名)] 項目は事前入力されています。![[GET Snapshot (スナップショットを取得)] フォーム](_images/get-snapshot.png)
-
[GET Snapshot (スナップショットを取得)] をクリックします。スナップショットが正常に取得されたというアラートが表示されます。
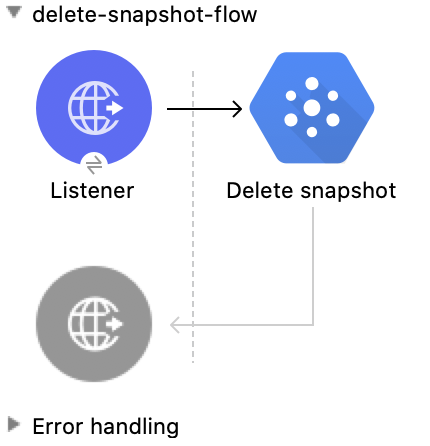
スナップショットの削除
この Mule フローでは、既存のスナップショットを削除します。
この例では、次の操作を使用します。
-
HTTP Listener
HTTP 要求からデータを受け取ります。 -
Delete snapshot
スナップショットを削除する
この例の XML
この例のフローをすばやく Mule アプリケーションに読み込むには、次のコードを Studio XML エディターに貼り付けます。
<?xml version="1.0" encoding="UTF-8"?>

<mule xmlns:ee="http://www.mulesoft.org/schema/mule/ee/core"
      xmlns:pubsub="http://www.mulesoft.org/schema/mule/pubsub"
      xmlns:http="http://www.mulesoft.org/schema/mule/http"
      xmlns="http://www.mulesoft.org/schema/mule/core"
      xmlns:doc="http://www.mulesoft.org/schema/mule/documentation"
      xmlns:xsi="http://www.w3.org/2001/XMLSchema-instance"
      xsi:schemaLocation="http://www.mulesoft.org/schema/mule/core http://www.mulesoft.org/schema/mule/core/current/mule.xsd
                          http://www.mulesoft.org/schema/mule/http http://www.mulesoft.org/schema/mule/http/current/mule-http.xsd
                          http://www.mulesoft.org/schema/mule/pubsub http://www.mulesoft.org/schema/mule/pubsub/current/mule-pubsub.xsd
                          http://www.mulesoft.org/schema/mule/ee/core http://www.mulesoft.org/schema/mule/ee/core/current/mule-ee.xsd">

    <http:listener-config name="HTTP_Listener_config" doc:name="HTTP Listener config">
        <http:listener-connection host="0.0.0.0" port="8081" />
    </http:listener-config>

    <pubsub:config name="Google_Pub_Sub_Configuration" doc:name="Google Pub Sub Configuration" projectId="${config.default_project_id}">
        <pubsub:connection privateKeyId="${config.private_key_id}" privateKey="${config.private_key}" clientId="${config.client_id}" clientEmail="${config.client_email}" />
    </pubsub:config>

    <configuration-properties doc:name="Configuration properties" file="mule-app.properties" />

    <flow name="delete-snapshot-flow">
        <http:listener doc:name="Listener" config-ref="HTTP_Listener_config" path="/deleteSnapshot"/>
        <pubsub:delete-snapshot doc:name="Delete snapshot" config-ref="Google_Pub_Sub_Configuration" snapshotName="#[attributes.queryParams.deletesnapshot]"/>
    </flow>
</mule>
この例の実行手順
-
コネクタが設定されていることを確認します。
-
プロジェクトを保存します。
-
Web ブラウザーから「
http://localhost:8081/ 」と入力してアプリケーションをテストします。 [Delete Snapshot (スナップショットを削除)] フォームが表示されます。 [Snapshot Name (スナップショット名)] 項目は事前入力されています。![[Delete Snapshot (スナップショットを削除)] フォーム](_images/delete-snapshot.png)
-
[Delete Snapshot (スナップショットを削除)] をクリックします。スナップショットが正常に削除されたというアラートが表示されます。
メッセージのパブリッシュ
この Mule フローでは、1 つのメッセージを選択されたトピックにパブリッシュします。
この例では、次の操作を使用します。
-
HTTP Listener
HTTP 要求からデータを受け取ります。 -
Publish Message
メッセージをパブリッシュする

この例の XML
この例のフローをすばやく Mule アプリケーションに読み込むには、次のコードを Studio XML エディターに貼り付けます。
<?xml version="1.0" encoding="UTF-8"?>

<mule xmlns:ee="http://www.mulesoft.org/schema/mule/ee/core"
      xmlns:pubsub="http://www.mulesoft.org/schema/mule/pubsub"
      xmlns:http="http://www.mulesoft.org/schema/mule/http"
      xmlns="http://www.mulesoft.org/schema/mule/core"
      xmlns:doc="http://www.mulesoft.org/schema/mule/documentation"
      xmlns:xsi="http://www.w3.org/2001/XMLSchema-instance"
      xsi:schemaLocation="http://www.mulesoft.org/schema/mule/core http://www.mulesoft.org/schema/mule/core/current/mule.xsd
                          http://www.mulesoft.org/schema/mule/http http://www.mulesoft.org/schema/mule/http/current/mule-http.xsd
                          http://www.mulesoft.org/schema/mule/pubsub http://www.mulesoft.org/schema/mule/pubsub/current/mule-pubsub.xsd
                          http://www.mulesoft.org/schema/mule/ee/core http://www.mulesoft.org/schema/mule/ee/core/current/mule-ee.xsd">

    <http:listener-config name="HTTP_Listener_config" doc:name="HTTP Listener config">
        <http:listener-connection host="0.0.0.0" port="8081" />
    </http:listener-config>

    <pubsub:config name="Google_Pub_Sub_Configuration" doc:name="Google Pub Sub Configuration" projectId="${config.default_project_id}">
        <pubsub:connection privateKeyId="${config.private_key_id}" privateKey="${config.private_key}" clientId="${config.client_id}" clientEmail="${config.client_email}" />
    </pubsub:config>

    <configuration-properties doc:name="Configuration properties" file="mule-app.properties" />

    <flow name="publish-message-flow">
        <http:listener doc:name="Listener" config-ref="HTTP_Listener_config" path="/message"/>
        <pubsub:publish-message
                doc:name="Publish Message"
                config-ref="Google_Pub_Sub_Configuration"
                topicName="#[attributes.queryParams.topicname]"
                orderingKey="#[attributes.queryParams.orderkey]">
            <pubsub:message ><![CDATA[#[attributes.queryParams.message]]]></pubsub:message>
        </pubsub:publish-message>
    </flow>
</mule>
この例の実行手順
-
コネクタが設定されていることを確認します。
-
プロジェクトを保存します。
-
Web ブラウザーから「
http://localhost:8081/ 」と入力してアプリケーションをテストします。[Publish Message (メッセージをパブリッシュ)] フォームが表示されます。[Topic Name (トピック名)]、[Ordering Key (順序キー)]、および [Message (メッセージ)] 項目は事前入力されています。![[Publish Message (メッセージをパブリッシュ)] フォーム](_images/publish-message.png)
-
[Publish Message (メッセージをパブリッシュ)] をクリックします。スナップショットが正常にパブリッシュされたというアラートが表示されます。