Amazon DynamoDB の例
次に、Amazon DynamoDB Connector の一般的なユースケースを示します。
-
Amazon DynamoDB テーブルの作成
-
Amazon DynamoDB テーブルの削除
-
Amazon DynamoDB テーブルスキャンの実行
Amazon DynamoDB テーブルの作成
次の例は、Amazon DynamoDB Connector を使用して Amazon DynamoDB テーブルを作成する方法を示しています。
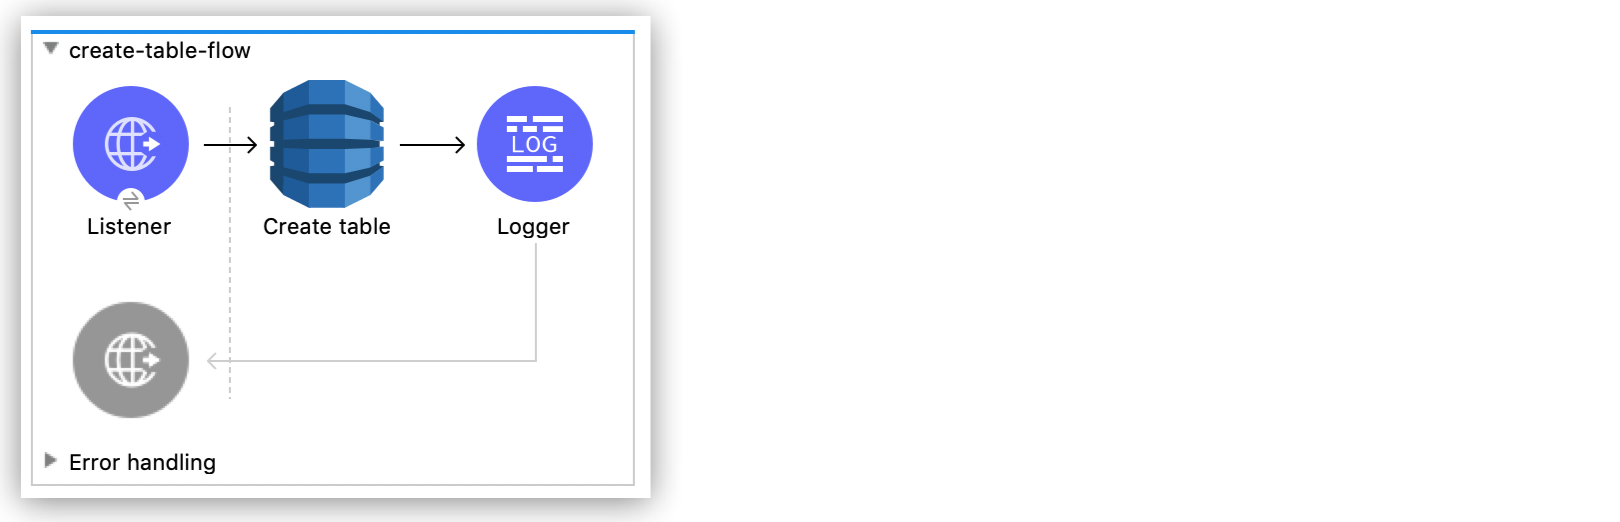
Amazon DynamoDB テーブルの作成フロー
次のスクリーンショットは、Amazon DynamoDB テーブルを作成するための Anypoint Studio フローを示しています。
事前手順
次の手順に従って、Amazon DynamoDB テーブルの作成を開始します。
-
Studio で新しい Mule プロジェクトを作成します。
-
次のプロパティを
mule-artifact.properties ファイルに追加して、Amazon DynamoDB ログイン情報を保存します。config.accesskey=<Access Key> config.secretkey=<Secret Key> -
プロジェクトの
src/main/resources ディレクトリに mule-artifact.properties ファイルを置きます。
HTTP リスナーを設定する
/createtable パスで HTTP 要求をリスンするように HTTP Listener を設定します。
-
[Mule Palette (Mule パレット)] ビューで「
http」を検索し、[Listener] 操作を選択します。 -
[Listener] 操作を Studio キャンバスにドラッグします。
-
[Listener] タブで、[Connector configuration (コネクタ設定)] 項目の横にあるプラス記号 (+) をクリックして、
HTTP Listener のグローバル要素設定項目にアクセスします。 -
[Host (ホスト)] 項目で
localhost を選択します。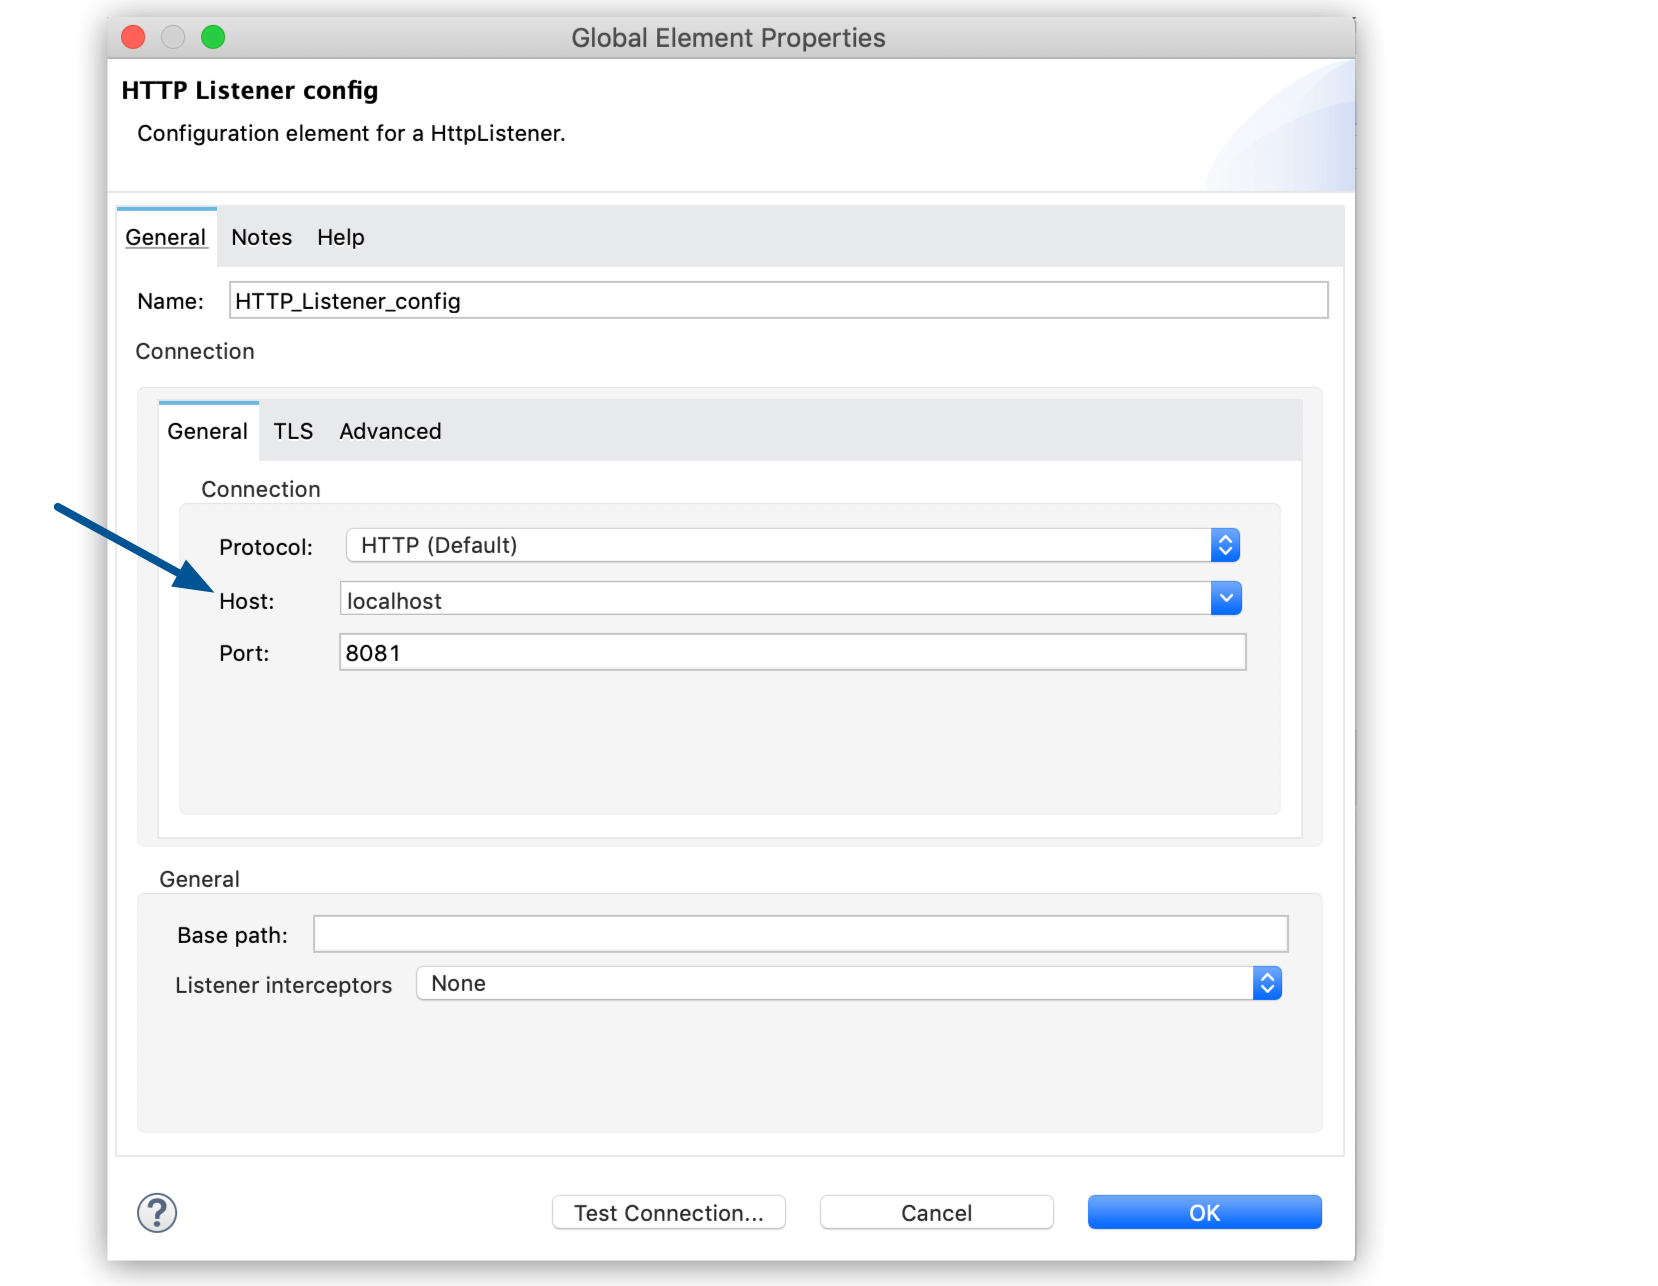 Figure 2. [Host (ホスト)] 項目で
 localhost を選択して、ローカルコンピューターで HTTP 要求をリスンします。 -
[OK] をクリックします。
-
[Listener] タブの [Path (パス)] 項目で、「
/createtable」と入力します。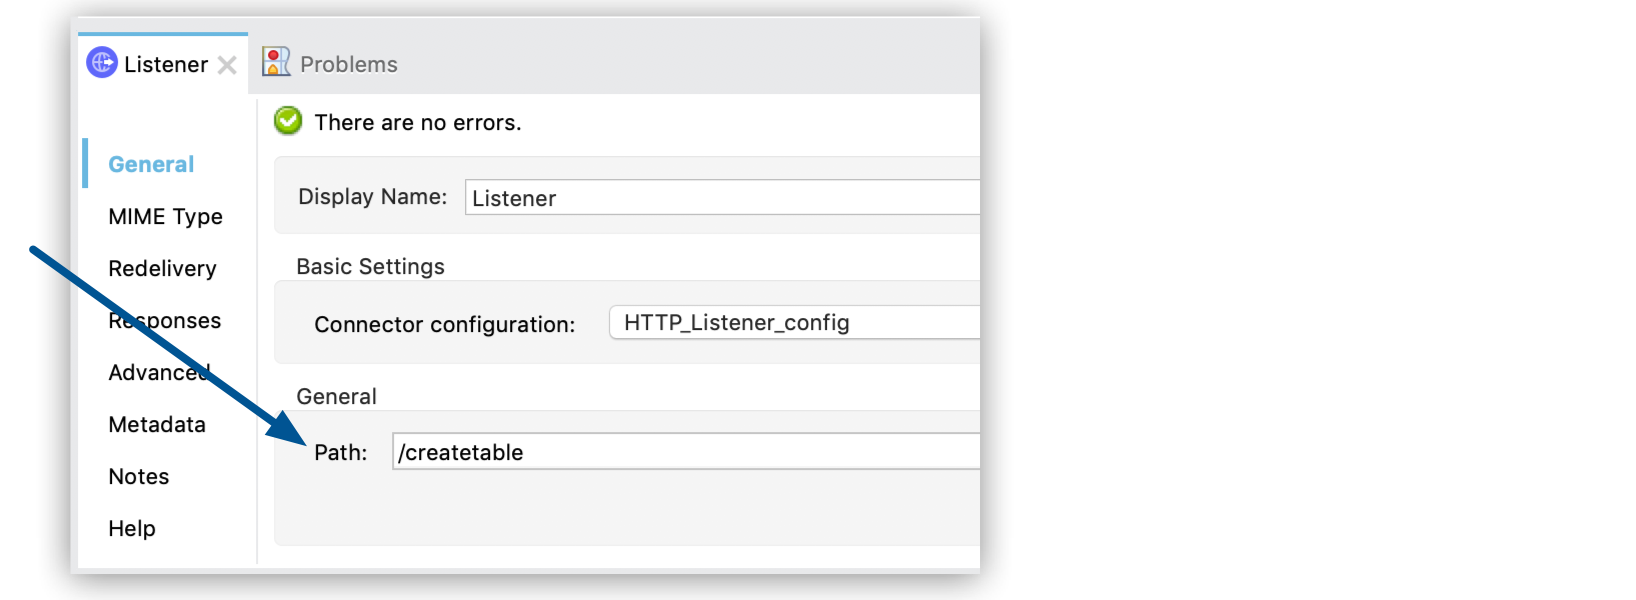 Figure 3. [Path (パス)] 項目に「
/createtable」と入力して、/createtable パスで HTTP 要求をリスンします。
Create Table 操作を設定する
Issues というテーブルを作成する Create Table 操作を設定します。
-
[Mule Palette (Mule パレット)] ビューで、[Search in Exchange (Exchange 内を検索)] をクリックして「
amazon dynamodb」を検索します。 -
[Amazon DynamoDB Connector] を選択して [Add> (追加>)] をクリックし、[Finish (完了)] をクリックします。
-
[Create Table] 操作を Studio キャンバスの [Listener] の右にドラッグします。
-
フローの下の [Global Elements (グローバル要素)] リンクをクリックします。
-
「プロパティ値のプロパティプレースホルダーの使用」の説明に従って、以前に作成したプロパティファイルを [Configuration properties (設定プロパティ)] 項目に追加します。
-
[Create (作成)] をクリックします。
-
[Connector Configuration (コネクタ設定)] を展開します。
-
[Amazon DynamoDB Configuration (Amazon DynamoDB 設定)] を選択し、[OK] をクリックします。
-
次の項目に入力します。
パラメーター 説明 Value (値) Name (名前)
設定名
create-table-flowAccess Key (アクセスキー)
アカウントを所有するユーザーを一意に識別する英数字のテキスト文字列
${config.accesskey}Secret Key (シークレットキー)
パスワードの役割を果たすキー
${config.secretkey}Region Endpoint (リージョンエンドポイント)
Amazon DynamoDB クライアントに設定するリージョン
us-east-1次のスクリーンショットは、Amazon DynamoDB Connector のグローバル要素を設定する例を示しています。
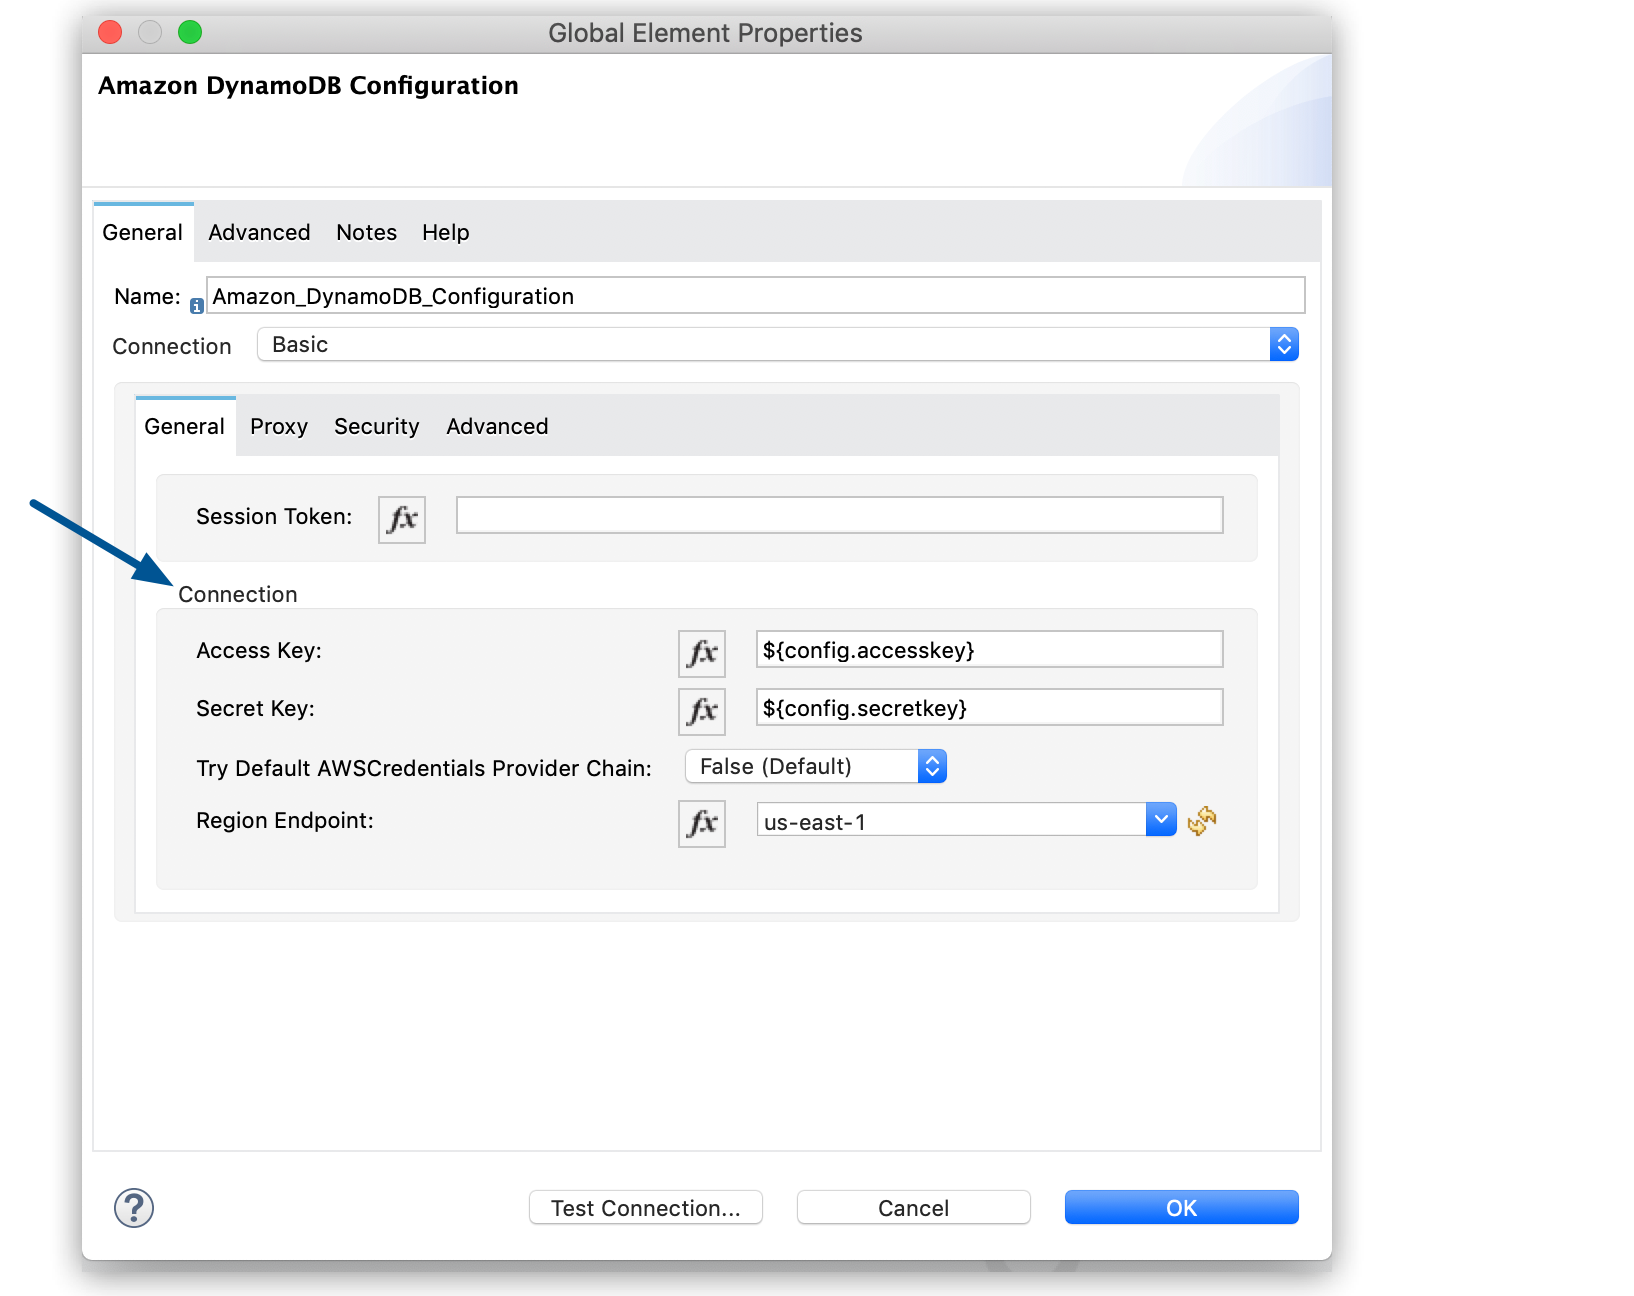 Figure 4. グローバル要素の [Connection (接続)] セクションで、Amazon DynamoDB にアクセスするために必要なログイン情報を設定します。
 -
[Test Connection (接続をテスト)] をクリックして、Mule が Amazon DynamoDB インスタンスに接続できることを確認します。
-
正常に接続できた場合は、[OK] をクリックして設定を保存します。
-
接続に失敗した場合は、誤ったパラメーターを確認して修正し、もう一度テストを実行してください。
-
-
[OK] をクリックします。
-
[Create Table] タブで、次の項目を設定します。
項目 説明 ユーザーアクション Table name (テーブル名)
テーブルの名前
「
Issues」と入力します。Attribute definitions (属性定義)
テーブルとそのインデックスのキースキーマを記述する属性の配列
Edit inline を選択して緑のプラス記号 (+) をクリックし、次の属性を追加します。-
IssueId (STRING 型) -
Title (STRING 型) -
CreateDate (STRING 型) -
DueDate (STRING 型)
Key schemas (キースキーマ)
テーブルまたはそのインデックスのいずれかの主キーを構成する属性
Edit inline を選択して緑のプラス記号 (+) をクリックし、次の属性を追加します。-
IssueId (HASH キー種別) -
Title (RANGE キー種別)
Read capacity units (読み取り容量単位)
Amazon DynamoDB が調整例外を返す前にコンシュームされる 1 秒あたりの厳密な一貫性読み取りの最大数
「
5」と入力します。Write capacity units (書き込み容量単位)
Amazon DynamoDB が調整例外を返す前にコンシュームされる 1 秒あたりの書き込みの最大数。
「
5」と入力します。Global secondary indexes (グローバルセカンダリインデックス)
テーブルの省略可能な追加キー構造
「Issues テーブルへのセカンダリインデックスの追加」の説明に従って、「
#[vars.secondary]」と入力してセカンダリインデックスの変数を作成し、XML コードにセカンダリインデックスを追加します。次のスクリーンショットは、
Create table 操作の設定例を示しています。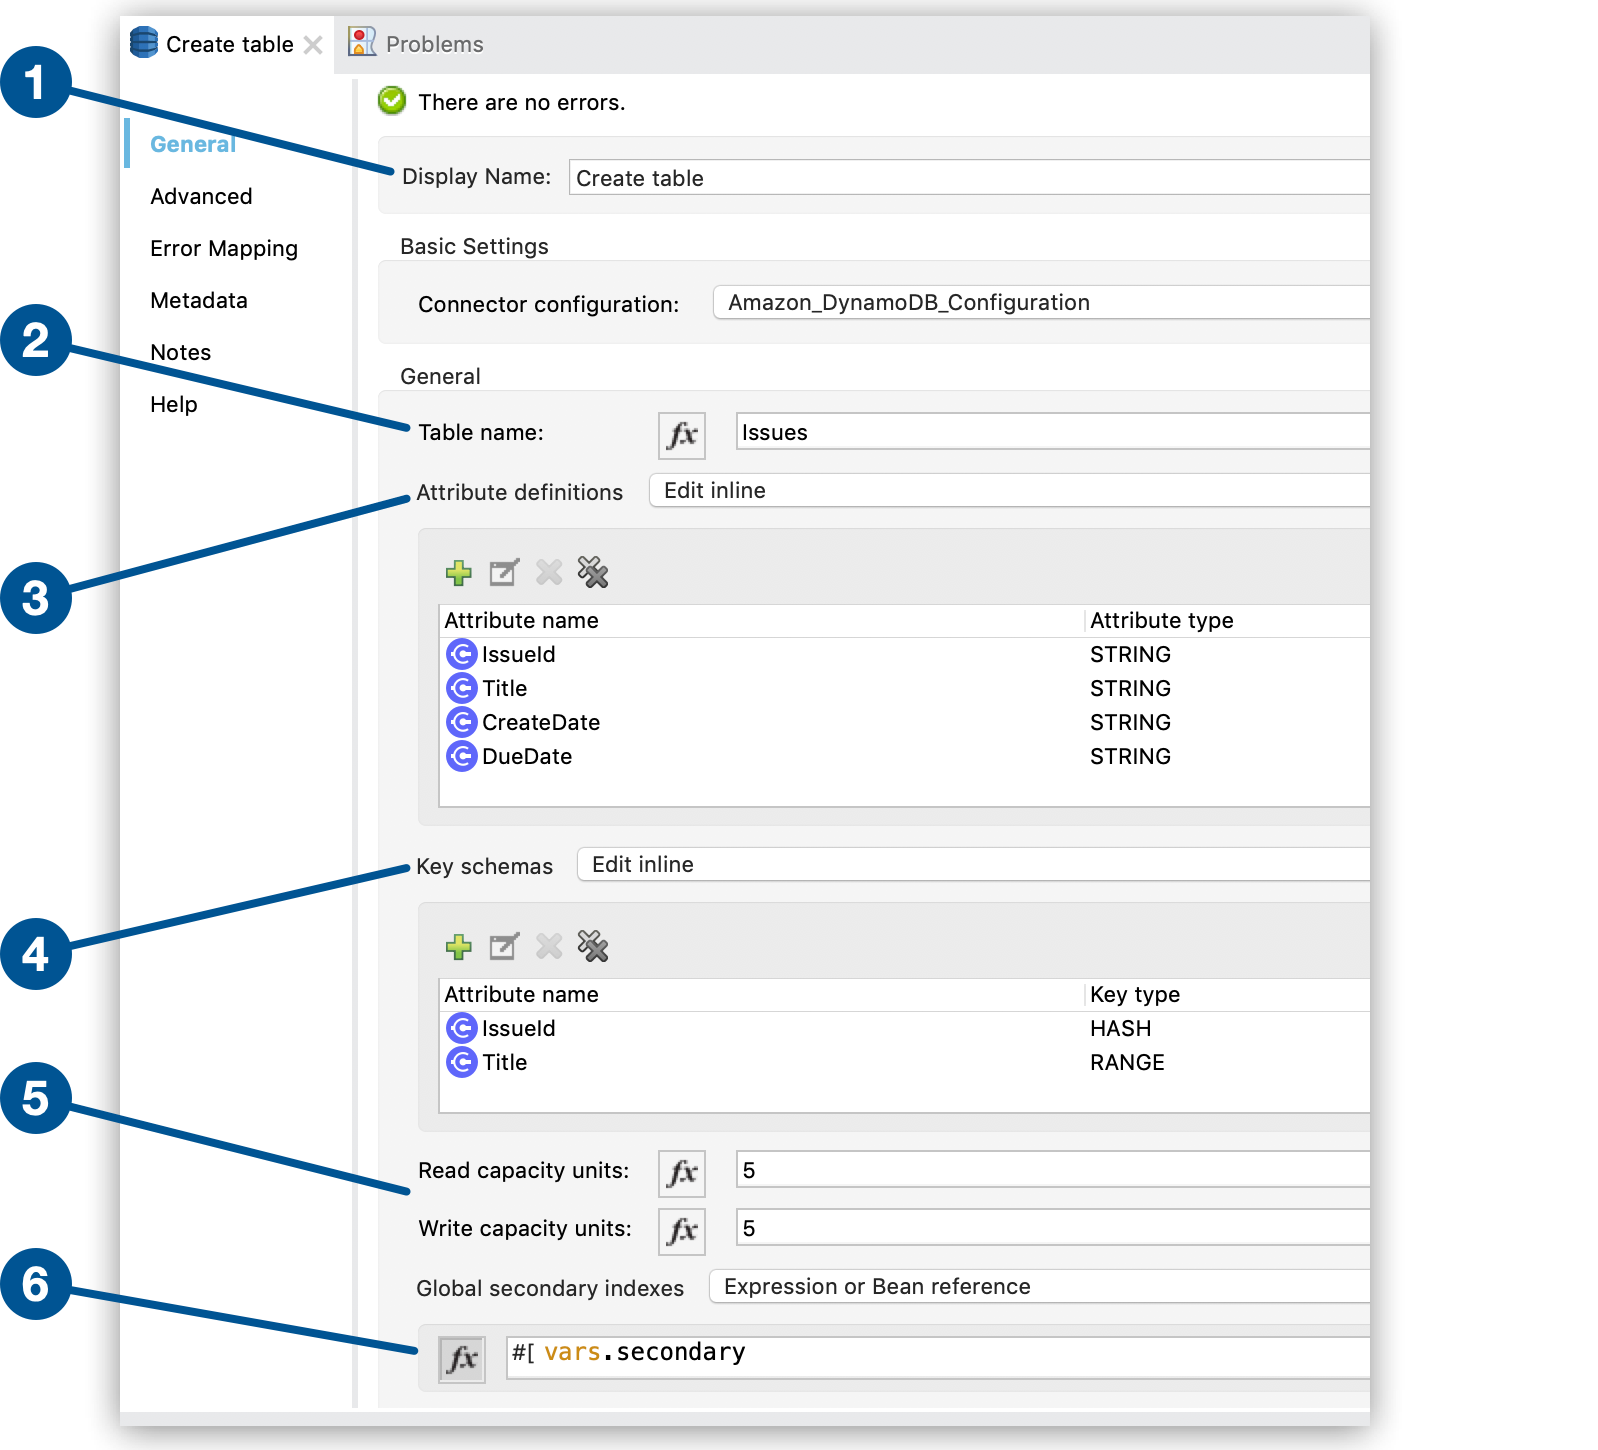 Figure 5.
Create table 操作の項目値を入力します。このスクリーンショットについて説明します。
-
最初の項目では、フロー内の
Create table 操作を表すコンポーネントの名前を指定します。 -
2 番目の項目では、作成するテーブルの名前を指定します。
-
3 番目の項目では、新しいテーブルの属性を定義します。
-
4 番目の項目では、新しいテーブルのキースキーマを定義します。
-
5 番目の項目では、Amazon DynamoDB が調整例外を返す前にコンシュームされる 1 秒あたりの厳密な一貫性読み取りと 1 秒あたりの厳密な一貫性書き込みの最大数を指定します。
-
6 番目の項目では、セカンダリインデックスの変数を指定します。
-
HTTP Listener および Create table 操作を設定したら、Create Table の例の XML フローは次のようになります。
<?xml version="1.0" encoding="UTF-8"?>

<mule xmlns:http="http://www.mulesoft.org/schema/mule/http"
xmlns:dynamodb="http://www.mulesoft.org/schema/mule/dynamodb"
xmlns="http://www.mulesoft.org/schema/mule/core"
xmlns:doc="http://www.mulesoft.org/schema/mule/documentation"
xmlns:xsi="http://www.w3.org/2001/XMLSchema-instance"
xsi:schemaLocation="
http://www.mulesoft.org/schema/mule/http http://www.mulesoft.org/schema/mule/http/current/mule-http.xsd
http://www.mulesoft.org/schema/mule/core
http://www.mulesoft.org/schema/mule/core/current/mule.xsd
http://www.mulesoft.org/schema/mule/dynamodb
http://www.mulesoft.org/schema/mule/dynamodb/current/mule-dynamodb.xsd
http://www.mulesoft.org/schema/mule/http
http://www.mulesoft.org/schema/mule/http/current/mule-http.xsd">
	<dynamodb:config
		name="Amazon_DynamoDB_Configuration"
		doc:name="Amazon DynamoDB Configuration">
		<dynamodb:basic-connection
			accessKey="${config.accesskey}"
			secretKey="${config.secretkey}" />
	</dynamodb:config>
	<http:listener-config
		name="HTTP_Listener_config"
		doc:name="HTTP Listener config">
		<http:listener-connection host="localhost"
		port="8081" />
	</http:listener-config>
	<flow name="create-table-flow" >
	<http:listener doc:name="Listener" config-ref="HTTP_Listener_config" path="/createtable"/>
		<dynamodb:create-table doc:name="Create table" config-ref="Amazon_DynamoDB_Configuration" tableName="Issues" readCapacityUnits="5" writeCapacityUnits="5" globalSecondaryIndexes="#[vars.secondary]">
		<dynamodb:attribute-definitions>
			<dynamodb:attribute-definition attributeName="IssueId" attributeType="STRING" />
			<dynamodb:attribute-definition attributeName="Title" attributeType="STRING" />
			<dynamodb:attribute-definition attributeName="CreateDate" attributeType="STRING" />
			<dynamodb:attribute-definition attributeName="DueDate" attributeType="STRING" />
		</dynamodb:attribute-definitions>
		<dynamodb:key-schemas>
			<dynamodb:key-schema-element attributeName="IssueId" keyType="HASH" />
			<dynamodb:key-schema-element attributeName="Title" keyType="RANGE" />
		</dynamodb:key-schemas>
	</dynamodb:create-table>
</flow>
</mule>
Issues テーブルへのセカンダリインデックスの追加
グローバルセカンダリインデックスを Issues テーブルに追加するには、XML の <dynamodb:create-table> 要素の前に変数を追加します。
次の例では、3 つのセカンダリインデックスを Issues テーブルに追加します。
-
CreateDateIndex (CreateDate パーティションキーと IssueId 並び替えキーを使用) -
TitleIndex (Title パーティションキーと IssueId 並び替えキーを使用) -
DueDateIndex (DueDate パーティションキーを使用)
XML に次の要素を含める必要があります。
-
<Projection>: テーブルからインデックスにコピーする属性を指定します。この例では、値
ALL はすべての属性がコピーされることを意味します。<Projection> 要素に設定した値に関係なく、主キー属性とインデックスキー属性は自動的にコピーされます。 -
ProvisionedThroughput: 読み取りおよび書き込みアクティビティのスループットをプロビジョニングします。 -
KeySchema: インデックスのキースキーマを指定します。
<set-variable value='#[[
            {
                "IndexName": "CreateDateIndex",
                "Projection": {
                    "ProjectionType": "ALL"
                },
                "ProvisionedThroughput": {
                    "WriteCapacityUnits": 5,
                    "ReadCapacityUnits": 5
                },
                "KeySchema": [
                    {
                        "KeyType": "HASH",
                        "AttributeName": "CreateDate"
                    },
                    {
                    	"KeyType": "RANGE",
                    	"AttributeName": "IssueId"
                    }
                ]
            } as Object {
            	class: "org.mule.extension.dynamodb.api.model.GlobalSecondaryIndex"
            },
            {
                "IndexName": "TitleIndex",
                "Projection": {
                    "ProjectionType": "ALL"
                },
                "ProvisionedThroughput": {
                    "WriteCapacityUnits": 5,
                    "ReadCapacityUnits": 5
                },
                "KeySchema": [
                    {
                        "KeyType": "HASH",
                        "AttributeName": "Title"
                    },
                    {
                    	"KeyType": "RANGE",
                    	"AttributeName": "IssueId"
                    }
                ]
            } as Object {
            	class: "org.mule.extension.dynamodb.api.model.GlobalSecondaryIndex"
            },
            {
                "IndexName": "DueDateIndex",
                "Projection": {
                    "ProjectionType": "ALL"
                },
                "ProvisionedThroughput": {
                    "WriteCapacityUnits": 5,
                    "ReadCapacityUnits": 5
                },
                "KeySchema": [
                    {
                        "KeyType": "HASH",
                        "AttributeName": "DueDate"
                    }
                ]
            } as Object {
            	class: "org.mule.extension.dynamodb.api.model.GlobalSecondaryIndex"
            }
        ]]' doc:name="Secondary" variableName="secondary"/>
Logger コンポーネントを設定する
Create Table 操作によって生成された応答を Mule コンソールに出力するように、Logger コンポーネントを設定します。
-
[Mule Palette (Mule パレット)] ビューで、「
logger」を検索します。 -
[Logger] コンポーネントを Studio キャンバスの [Create Table] の右にドラッグします。
-
[Logger] タブの [Message (メッセージ)] 項目に「
#[payload]」と入力します。![[Logger] タブ](_images/amazon-dynamodb-logger-props.png) Figure 6. [Message (メッセージ)] 項目に「
Figure 6. [Message (メッセージ)] 項目に「#[payload]」と入力し、Mule コンソールに操作の応答を出力します。
完全な Create Table の例の XML
完全な Create Table の例の XML は次のようになります。
<?xml version="1.0" encoding="UTF-8"?>

<mule xmlns:http="http://www.mulesoft.org/schema/mule/http"
xmlns:dynamodb="http://www.mulesoft.org/schema/mule/dynamodb"
xmlns="http://www.mulesoft.org/schema/mule/core"
xmlns:doc="http://www.mulesoft.org/schema/mule/documentation"
xmlns:xsi="http://www.w3.org/2001/XMLSchema-instance"
xsi:schemaLocation="
http://www.mulesoft.org/schema/mule/http http://www.mulesoft.org/schema/mule/http/current/mule-http.xsd
http://www.mulesoft.org/schema/mule/core
http://www.mulesoft.org/schema/mule/core/current/mule.xsd
http://www.mulesoft.org/schema/mule/dynamodb
http://www.mulesoft.org/schema/mule/dynamodb/current/mule-dynamodb.xsd
http://www.mulesoft.org/schema/mule/http
http://www.mulesoft.org/schema/mule/http/current/mule-http.xsd">
	<dynamodb:config
		name="Amazon_DynamoDB_Configuration"
		doc:name="Amazon DynamoDB Configuration">
		<dynamodb:basic-connection
			accessKey="${config.accesskey}"
			secretKey="${config.secretkey}" />
	</dynamodb:config>
	<http:listener-config
		name="HTTP_Listener_config"
		doc:name="HTTP Listener config">
		<http:listener-connection host="localhost"
		port="8081" />
	</http:listener-config>
	<flow name="create-table-flow" >
	<http:listener doc:name="Listener" config-ref="HTTP_Listener_config" path="/createtable"/>

		<set-variable value='#[[
            {
                "IndexName": "CreateDateIndex",
                "Projection": {
                    "ProjectionType": "ALL"
                },
                "ProvisionedThroughput": {
                    "WriteCapacityUnits": 5,
                    "ReadCapacityUnits": 5
                },
                "KeySchema": [
                    {
                        "KeyType": "HASH",
                        "AttributeName": "CreateDate"
                    },
                    {
                    	"KeyType": "RANGE",
                    	"AttributeName": "IssueId"
                    }
                ]
            } as Object {
            	class: "org.mule.extension.dynamodb.api.model.GlobalSecondaryIndex"
            },
            {
                "IndexName": "TitleIndex",
                "Projection": {
                    "ProjectionType": "ALL"
                },
                "ProvisionedThroughput": {
                    "WriteCapacityUnits": 5,
                    "ReadCapacityUnits": 5
                },
                "KeySchema": [
                    {
                        "KeyType": "HASH",
                        "AttributeName": "Title"
                    },
                    {
                    	"KeyType": "RANGE",
                    	"AttributeName": "IssueId"
                    }
                ]
            } as Object {
            	class: "org.mule.extension.dynamodb.api.model.GlobalSecondaryIndex"
            },
            {
                "IndexName": "DueDateIndex",
                "Projection": {
                    "ProjectionType": "ALL"
                },
                "ProvisionedThroughput": {
                    "WriteCapacityUnits": 5,
                    "ReadCapacityUnits": 5
                },
                "KeySchema": [
                    {
                        "KeyType": "HASH",
                        "AttributeName": "DueDate"
                    }
                ]
            } as Object {
            	class: "org.mule.extension.dynamodb.api.model.GlobalSecondaryIndex"
            }
        ]]' doc:name="Secondary" variableName="secondary"/>

		<dynamodb:create-table doc:name="Create table" config-ref="Amazon_DynamoDB_Configuration" tableName="Issues" readCapacityUnits="5" writeCapacityUnits="5" globalSecondaryIndexes="#[vars.secondary]">
		<dynamodb:attribute-definitions>
			<dynamodb:attribute-definition attributeName="IssueId" attributeType="STRING" />
			<dynamodb:attribute-definition attributeName="Title" attributeType="STRING" />
			<dynamodb:attribute-definition attributeName="CreateDate" attributeType="STRING" />
			<dynamodb:attribute-definition attributeName="DueDate" attributeType="STRING" />
		</dynamodb:attribute-definitions>
		<dynamodb:key-schemas>
			<dynamodb:key-schema-element attributeName="IssueId" keyType="HASH" />
			<dynamodb:key-schema-element attributeName="Title" keyType="RANGE" />
		</dynamodb:key-schemas>
	</dynamodb:create-table>
		<logger level="INFO" doc:name="Logger"
    message="#[payload]"/>
</flow>
</mule>Amazon DynamoDB テーブルの削除
次の例は、Amazon DynamoDB Connector を使用して Amazon DynamoDB テーブルを削除する方法を示しています。
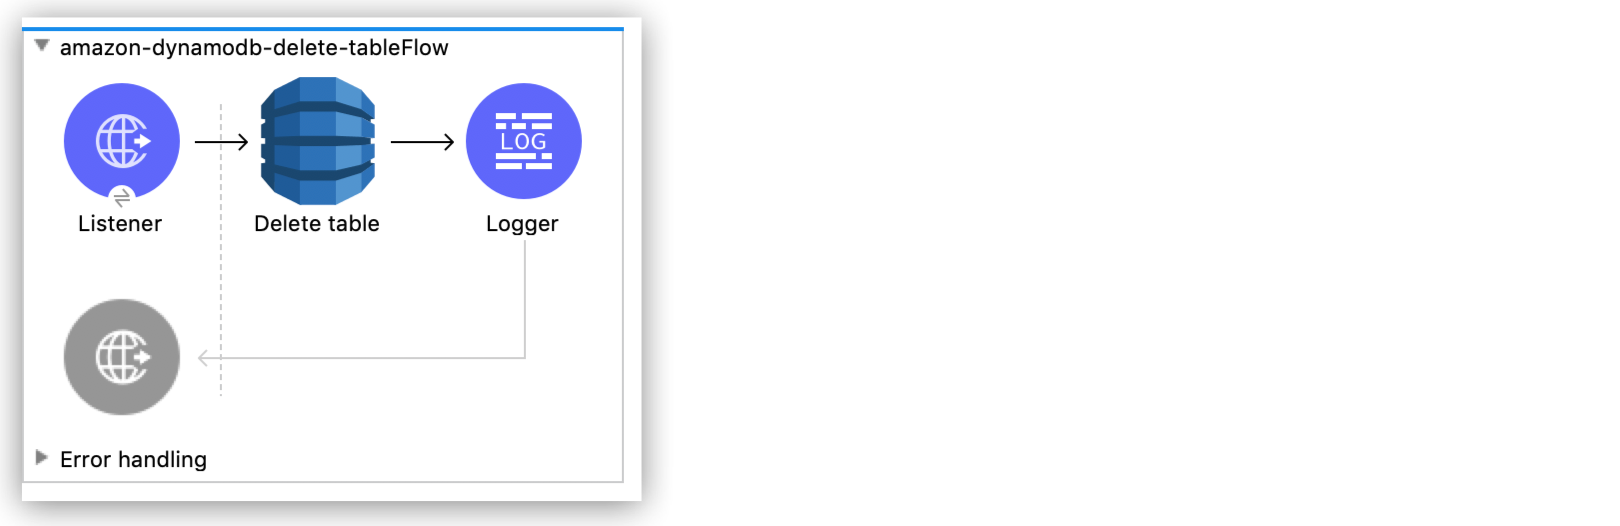
DynamoDB テーブルの削除フロー
次のスクリーンショットは、Amazon DynamoDB テーブルを削除するための Anypoint Studio フローを示しています。
事前手順
次の手順に従って、Amazon DynamoDB テーブルの削除を開始します。
-
Studio で新しい Mule プロジェクトを作成します。
-
次のプロパティを
mule-artifact.properties ファイルに追加して、Amazon DynamoDB ログイン情報を保持します。config.accesskey=<Access Key> config.secretkey=<Secret Key> -
プロジェクトの
src/main/resources ディレクトリに mule-artifact.properties ファイルを置きます。
HTTP リスナーを設定する
/deletetable パスで HTTP 要求をリスンするように HTTP Listener を設定します。
-
[Mule Palette (Mule パレット)] ビューで「
http」を検索し、[Listener] 操作を選択します。 -
[Listener] 操作を Studio キャンバスにドラッグします。
-
[Listener] タブで、[Connector configuration (コネクタ設定)] 項目の横にあるプラス記号 (+) をクリックして、
HTTP Listener のグローバル要素設定項目にアクセスします。 -
[Host (ホスト)] 項目で
localhost を選択し、[OK] をクリックします。 -
[Listener] タブの [Path (パス)] 項目で、「
/deletetable」と入力します。
Delete Table 操作を設定する
Issues テーブルを削除する Delete table 操作を設定します。
-
[Mule Palette (Mule パレット)] ビューで、[Search in Exchange (Exchange 内を検索)] をクリックして「
amazon dynamodb」を検索します。 -
[Amazon DynamoDB Connector] を選択して [Add> (追加>)] をクリックし、[Finish (完了)] をクリックします。
-
[Delete Table] 操作を Studio キャンバスの [Listener] の右にドラッグします。
-
フローの下の [Global Elements (グローバル要素)] リンクをクリックします。
-
「プロパティ値のプロパティプレースホルダーの使用」の説明に従って、以前に作成したプロパティファイルを [Configuration properties (設定プロパティ)] 項目に追加します。
-
[Create (作成)] をクリックします。
-
[Connector Configuration (コネクタ設定)] を展開します。
-
[Amazon DynamoDB Configuration (Amazon DynamoDB 設定)] を選択し、[OK] をクリックします。
-
次の項目に入力します。
パラメーター 説明 Value (値) Name (名前)
設定名
delete-table-flowAccess Key (アクセスキー)
アカウントを所有するユーザーを一意に識別する英数字のテキスト文字列
${config.accesskey}Secret Key (シークレットキー)
パスワードの役割を果たすキー
${config.secretkey}Region Endpoint (リージョンエンドポイント)
Amazon DynamoDB クライアントに設定するリージョン
us-east-1対応する XML の設定は次のようになります。
<dynamodb:config name="Amazon_DynamoDB_Configuration1" doc:name="Amazon DynamoDB Configuration" > <dynamodb:basic-connection accessKey="${config.accesskey}" secretKey="${config.secretkey}" /> </dynamodb:config> -
[Test Connection (接続をテスト)] をクリックして、Mule が Amazon DynamoDB インスタンスに接続できることを確認します。
-
正常に接続できた場合は、[OK] をクリックして設定を保存します。
-
接続に失敗した場合は、誤ったパラメーターを確認して修正し、もう一度テストを実行してください。
-
-
[OK] をクリックします。
-
[Delete table] タブで、
Table name の値を Issues に設定します。
Logger コンポーネントを設定する
Delete table 操作によって生成された応答を Mule コンソールに出力するように、Logger コンポーネントを設定します。
-
[Mule Palette (Mule パレット)] ビューで、「
logger」を検索します。 -
[Logger] コンポーネントを Studio キャンバスの [Delete Table] の右にドラッグします。
-
[Logger] タブで、[Message (メッセージ)] 項目に「
#[payload]」と入力します。
Delete Table の例の XML
Delete Table の例の XML は次のようになります。
<?xml version="1.0" encoding="UTF-8"?>

<mule xmlns:dynamodb="http://www.mulesoft.org/schema/mule/dynamodb" xmlns:http="http://www.mulesoft.org/schema/mule/http"
	xmlns="http://www.mulesoft.org/schema/mule/core"
	xmlns:doc="http://www.mulesoft.org/schema/mule/documentation" xmlns:xsi="http://www.w3.org/2001/XMLSchema-instance" xsi:schemaLocation="http://www.mulesoft.org/schema/mule/core http://www.mulesoft.org/schema/mule/core/current/mule.xsd
http://www.mulesoft.org/schema/mule/http http://www.mulesoft.org/schema/mule/http/current/mule-http.xsd
http://www.mulesoft.org/schema/mule/dynamodb http://www.mulesoft.org/schema/mule/dynamodb/current/mule-dynamodb.xsd">
	<http:listener-config name="HTTP_Listener_config" doc:name="HTTP Listener config" >
		<http:listener-connection host="localhost" port="8081" />
	</http:listener-config>
	<dynamodb:config name="Amazon_DynamoDB_Configuration" doc:name="Amazon DynamoDB Configuration" >
		<dynamodb:basic-connection accessKey="${config.accesskey}" secretKey="${config.secretkey}" />
	</dynamodb:config>
	<flow name="delete-table-flow" >
		<http:listener doc:name="Listener" config-ref="HTTP_Listener_config" path="/deletetable"/>
		<dynamodb:delete-table doc:name="Delete table" config-ref="Amazon_DynamoDB_Configuration" tableName="Issues"/>
		<logger level="INFO" doc:name="Logger" message="#[payload]"/>
	</flow>
</mule>Amazon DynamoDB テーブルのスキャン
次の例は、Amazon DynamoDB Connector を使用して Amazon DynamoDB テーブルをスキャンする方法を示しています。
Amazon DynamoDB Connector を使用してスキャンを実行する場合、次の考慮事項が適用されます。
-
DynamoDB AWS SDK は、結果を特定のページに分割します。
返される結果には 1 MB の制限が適用されます。この制限を超えた場合、残りのデータを受信するには、別のスキャンを実行する必要があります。
-
後続のスキャンを実行するには、JSON 応答の
LastEvaluatedKey 項目の値を Scan 操作の Studio 設定内の Exclusive start keys 項目に適用します。操作でデータのすべてのページが返された場合、JSON 応答の
LastEvaluatedKey 値は null です。
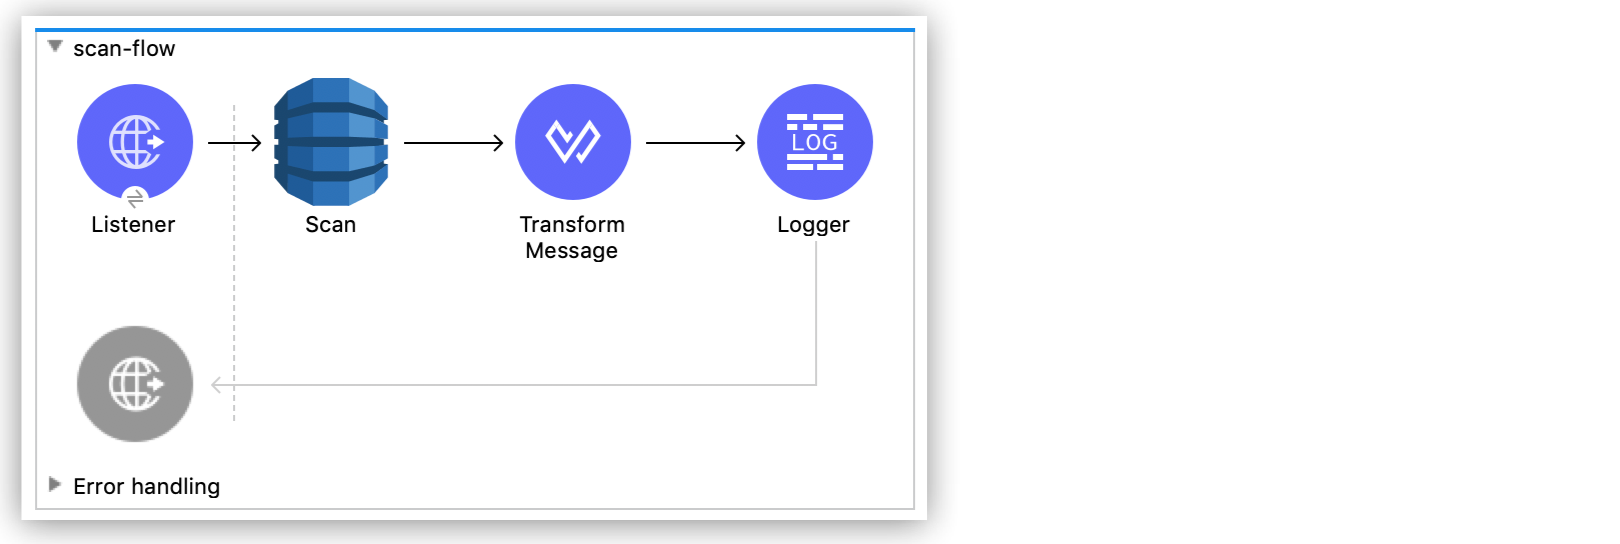
テーブルのスキャンフロー
次のスクリーンショットは、Amazon DynamoDB テーブルをスキャンするための Anypoint Studio フローを示しています。
事前手順
次の手順に従って、Amazon DynamoDB テーブルのスキャンを開始します。
-
Studio で新しい Mule プロジェクトを作成します。
-
次のプロパティを
mule-artifact.properties ファイルに追加して、Amazon DynamoDB ログイン情報を保持します。config.accesskey=<Access Key> config.secretkey=<Secret Key> -
プロジェクトの
src/main/resources ディレクトリに mule-artifact.properties ファイルを置きます。
HTTP リスナーを設定する
/scantable パスで HTTP 要求をリスンするように HTTP Listener を設定します。
-
[Mule Palette (Mule パレット)] ビューで「
http」を検索し、[Listener] 操作を選択します。 -
[Listener] 操作を Studio キャンバスにドラッグします。
-
[Listener] タブで、[Connector configuration (コネクタ設定)] 項目の横にあるプラス記号 (+) をクリックして、
HTTP Listener のグローバル要素設定項目にアクセスします。 -
[Host (ホスト)] 項目で
localhost を選択し、[OK] をクリックします。 -
[Listener] タブの [Path (パス)] 項目で、「
/scantable」と入力します。
Scan 操作を設定する
-
[Mule Palette (Mule パレット)] ビューで、[Search in Exchange (Exchange 内を検索)] をクリックして「
amazon dynamodb」を検索します。 -
[Amazon DynamoDB Connector] を選択して [Add> (追加>)] をクリックし、[Finish (完了)] をクリックします。
-
[Scan] 操作を Studio キャンバスの [Listener] の右にドラッグします。
-
フローの下の [Global Elements (グローバル要素)] リンクをクリックします。
-
「プロパティ値のプロパティプレースホルダーの使用」の説明に従って、以前に作成したプロパティファイルを [Configuration properties (設定プロパティ)] 項目に追加します。
-
[Create (作成)] をクリックします。
-
[Connector Configuration (コネクタ設定)] を展開します。
-
[Amazon DynamoDB Configuration (Amazon DynamoDB 設定)] を選択し、[OK] をクリックします。
-
次の項目に入力します。
パラメーター 説明 Value (値) Name (名前)
設定名
scan-table-flowAccess Key (アクセスキー)
アカウントを所有するユーザーを一意に識別する英数字のテキスト文字列
${config.accesskey}Secret Key (シークレットキー)
パスワードの役割を果たすキー
${config.secretkey}Region Endpoint (リージョンエンドポイント)
Amazon DynamoDB クライアントに設定するリージョン
us-east-1 -
[Test Connection (接続をテスト)] をクリックして、Mule が Amazon DynamoDB インスタンスに接続できることを確認します。
-
正常に接続できた場合は、[OK] をクリックして設定を保存します。
-
接続に失敗した場合は、誤ったパラメーターを確認して修正し、もう一度テストを実行してください。
-
-
[OK] をクリックします。
-
[Scan] タブで、
Table name の値を Issues に設定します。
Transform Message コンポーネントを設定する
Scan 操作の出力を Java から JSON に変更する Transform Message コンポーネントを設定します。
-
[Mule Palette (Mule パレット)] ビューで、「
transform」を検索します。 -
[Transform Message] コンポーネントを Studio キャンバスの [Scan] の右にドラッグします。
-
[Scan] 操作の [Output (出力)] セクションで、
output/application/java を output/application/json に変更します。
Logger コンポーネントを設定する
Scan 操作によって生成された応答を Mule コンソールに出力するように、Logger コンポーネントを設定します。
-
[Mule Palette (Mule パレット)] ビューで、「
Logger」を検索します。 -
[Logger] コンポーネントを Studio キャンバスの [Transform] の右にドラッグします。
-
[Logger] タブの [Message (メッセージ)] 項目に「
#[payload]」と入力します。
Scan Table の例の XML
Scan Table の例の XML は次のようになります。
<?xml version="1.0" encoding="UTF-8"?>

<mule xmlns:ee="http://www.mulesoft.org/schema/mule/ee/core" xmlns:dynamodb="http://www.mulesoft.org/schema/mule/dynamodb"
	xmlns:http="http://www.mulesoft.org/schema/mule/http"
	xmlns="http://www.mulesoft.org/schema/mule/core" xmlns:doc="http://www.mulesoft.org/schema/mule/documentation" xmlns:xsi="http://www.w3.org/2001/XMLSchema-instance" xsi:schemaLocation="http://www.mulesoft.org/schema/mule/core http://www.mulesoft.org/schema/mule/core/current/mule.xsd
http://www.mulesoft.org/schema/mule/http http://www.mulesoft.org/schema/mule/http/current/mule-http.xsd
http://www.mulesoft.org/schema/mule/dynamodb http://www.mulesoft.org/schema/mule/dynamodb/current/mule-dynamodb.xsd
http://www.mulesoft.org/schema/mule/ee/core http://www.mulesoft.org/schema/mule/ee/core/current/mule-ee.xsd">
	<http:listener-config name="HTTP_Listener_config" doc:name="HTTP Listener config" >
		<http:listener-connection host="localhost" port="8081" />
	</http:listener-config>
	<dynamodb:config name="Amazon_DynamoDB_Configuration" doc:name="Amazon DynamoDB Configuration" >
		<dynamodb:basic-connection accessKey="${config.accesskey}" secretKey="${config.secretkey}" />
	</dynamodb:config>
	<dynamodb:config name="Amazon_DynamoDB_Configuration1" doc:name="Amazon DynamoDB Configuration" >
		<dynamodb:basic-connection accessKey="${config.accesskey}" secretKey="${config.secretkey}" />
	</dynamodb:config>
	<flow name="delete-table-flow" >
		<http:listener doc:name="Listener" path="/scantable" config-ref="HTTP_Listener_config"/>
		<dynamodb:scan doc:name="Scan" config-ref="Amazon_DynamoDB_Configuration1" tableName="Issues"/>
		<ee:transform doc:name="Transform Message" >
			<ee:message >
				<ee:set-payload ><![CDATA[%dw 2.0
output application/json
---
{
}]]></ee:set-payload>
			</ee:message>
		</ee:transform>
		<logger level="INFO" doc:name="Logger" message="#[payload]"/>
	</flow>
</mule>
Scan Table の例への応答
Scan 操作への応答は、次のようになる可能性があります (簡潔にするため、応答の他のセクションは省略されています)。
{
  "scannedCount": 2,
  "lastEvaluatedKey": null,
  "count": 2,
  "consumedCapacity": null,
  "items": [
    {
      "studentID": {
        "ss": null,
        "nullvalue": null,
        "b": null,
        "bool": null,
        "ns": null,
        "l": null,
        "m": null,
        "n": null,
        "bs": null,
        "s": "102"
      },
      ...
  ]
}