Amazon Redshift Connector 1.1 の例
次の例は、Amazon Redshift 用 Anypoint Connector (Amazon Redshift Connector) を使用して、Amazon S3 のデータを Amazon Redshift に読み込む方法を示しています。
始める前に
-
Java 8、11、または 17
-
Anypoint Studio 7.5 以降
-
Mule Runtime Engine (Mule) 4.3.0 以降
-
DataWeave
-
Amazon S3 および Amazon Redshift へのアクセス
-
Amazon S3 および Amazon Redshift のログイン情報
Mule プロジェクトの作成
-
Studio で、[File (ファイル)] > [New (新規)] > [Mule Project (Mule プロジェクト)] を選択します。
-
Mule プロジェクトの名前として「
redshift-demo」と入力し、[Finish (完了)] をクリックします。 -
src/main/mule フォルダー内の redshift-demo.xml ファイルを開きます。 -
[Mule Palette (Mule パレット)] ビューで、[(X) Search in Exchange ((X) Exchange 内を検索)] をクリックします。
-
[Add Modules to Project (モジュールをプロジェクトに追加)] で、検索項目に「
redshift」と入力します。 -
[Available modules (使用可能なモジュール)] で [Amazon Redshift Connector] をクリックします。
-
[Add (追加)] をクリックします。
-
[Finish (完了)] をクリックします。
-
前の手順を繰り返して、Amazon S3 Connector (
amazon s3 を検索) と File Connector (file を検索) も Mule プロジェクトに追加します。
この例の XML コード
redshift-demo.xml ファイルのコンテンツを次の XML スニペットで上書きします。
<?xml version="1.0" encoding="UTF-8"?>

<mule xmlns:ee="http://www.mulesoft.org/schema/mule/ee/core"
	  xmlns:file="http://www.mulesoft.org/schema/mule/file"
	  xmlns:s3="http://www.mulesoft.org/schema/mule/s3"
	  xmlns:redshift="http://www.mulesoft.org/schema/mule/redshift"
	  xmlns:http="http://www.mulesoft.org/schema/mule/http"
	  xmlns="http://www.mulesoft.org/schema/mule/core"
	  xmlns:doc="http://www.mulesoft.org/schema/mule/documentation"
	  xmlns:xsi="http://www.w3.org/2001/XMLSchema-instance"
	  xsi:schemaLocation="http://www.mulesoft.org/schema/mule/core http://www.mulesoft.org/schema/mule/core/current/mule.xsd
http://www.mulesoft.org/schema/mule/http http://www.mulesoft.org/schema/mule/http/current/mule-http.xsd
http://www.mulesoft.org/schema/mule/redshift http://www.mulesoft.org/schema/mule/redshift/current/mule-redshift.xsd
http://www.mulesoft.org/schema/mule/s3 http://www.mulesoft.org/schema/mule/s3/current/mule-s3.xsd
http://www.mulesoft.org/schema/mule/file http://www.mulesoft.org/schema/mule/file/current/mule-file.xsd
http://www.mulesoft.org/schema/mule/ee/core http://www.mulesoft.org/schema/mule/ee/core/current/mule-ee.xsd">

	<http:listener-config name="HTTP_Listener_config" doc:name="HTTP Listener config" basePath="/">
		<http:listener-connection host="0.0.0.0" port="8081" />
	</http:listener-config>

	<redshift:config name="Amazon_Redshift_Connector_Config" doc:name="Amazon Redshift Connector Config">
		<redshift:basic-connection
				clusterId="${redshift.cluster_id}"
				database="${redshift.database}"
				user="${redshift.user}"
				password="${redshift.password}"
				region="${redshift.region}"
				port="${redshift.port}"
		/>
	</redshift:config>

     <redshift:config name="Amazon_Redshift_Connector_Config_Fips" doc:name="Amazon Redshift Connector Config Fips">
		<redshift:iam-connection
                clusterId="${redshift.cluster_id}"
                database="${redshift.database}"
                user="${redshift.user}"
                accessKey="${redshift.password}"
                secretKey="${redshift.secret_key}" customStsEndpoint="${redshift.fips.sts}">
            <redshift:role arn="${redshift.role_arn}" />
		</redshift:iam-connection>
	</redshift:config>

	<s3:config name="Amazon_S3_Configuration" doc:name="Amazon S3 Configuration">
		<s3:basic-connection accessKey="${s3.access_key}" secretKey="${s3.secret_key}" region="${s3.region}"/>
	</s3:config>

	<file:config name="File_Config" doc:name="File Config">
		<file:connection workingDir="${mule.home}/apps/${app.name}/" />
	</file:config>

	<configuration-properties doc:name="Configuration properties" file="mule-artifact.properties" />

	<flow name="Create-Redshift-Table-S3-Bucket-S3-Object-Flow">
		<http:listener doc:name="Listener" config-ref="HTTP_Listener_config" path="/init"/>
		<set-variable value="username-bucket" doc:name="Bucket Name" variableName="bucket" />
		<redshift:execute-ddl doc:name="Execute DDL" config-ref="Amazon_Redshift_Connector_Config">
			<redshift:sql ><![CDATA[CREATE TABLE username (Username VARCHAR(50), Identifier INTEGER, First_Name VARCHAR(50), Last_Name VARCHAR(50));]]></redshift:sql>
		</redshift:execute-ddl>
		<s3:create-bucket doc:name="Create bucket" config-ref="Amazon_S3_Configuration" bucketName="#[vars.bucket]"/>
		<file:read doc:name="Read" config-ref="File_Config" path="username.csv"/>
		<s3:create-object doc:name="Create object" config-ref="Amazon_S3_Configuration" bucketName="#[vars.bucket]" key="username.csv" contentType="text/csv"/>
		<ee:transform doc:name="Transform Message">
			<ee:message >
				<ee:set-payload ><![CDATA[%dw 2.0
output application/json
---
{
	success: true,
	redshiftTable: "username",
	s3bucket: vars.bucket,
	s3object: "username.csv"
}]]></ee:set-payload>
			</ee:message>
		</ee:transform>
	</flow>

	<flow name="Execute-Copy-Command-Flow">
		<http:listener doc:name="Listener" config-ref="HTTP_Listener_config" path="/execute"/>
		<set-variable value="#['s3://username-bucket/username.csv']" doc:name="Bucket Name" variableName="bucketNameEndpoint"/>
		<set-variable value="${copy.access_key}" doc:name="Access Key" variableName="access_key"/>
		<set-variable value="${copy.secret_key}" doc:name="Secret Key" variableName="secret_key"/>
		<redshift:execute-script doc:name="Execute script" config-ref="Amazon_Redshift_Connector_Config">
			<redshift:sql ><![CDATA[#["copy username from " ++ "'" ++ vars.bucketNameEndpoint ++ "'" ++ " access_key_id " ++ "'" ++ vars.access_key ++ "'" ++ " secret_access_key " ++ "'" ++ vars.secret_key ++ "'" ++ " delimiter ';' IGNOREHEADER 1 IGNOREBLANKLINES"]]]></redshift:sql>
		</redshift:execute-script>
		<ee:transform doc:name="Transform Message">
			<ee:message >
				<ee:set-payload ><![CDATA[%dw 2.0
output application/json
---
{
	"success": true
}
]]></ee:set-payload>
			</ee:message>
		</ee:transform>
	</flow>

	<flow name="Delete-Redshift-Table-S3-Bucket-Flow">
		<http:listener doc:name="Listener" config-ref="HTTP_Listener_config" path="/deleteAll"/>
		<set-variable value="username-bucket" doc:name="Set Variable" variableName="bucketDelete"/>
		<redshift:execute-ddl doc:name="Execute DDL" config-ref="Amazon_Redshift_Connector_Config">
			<redshift:sql ><![CDATA[DROP TABLE username;]]></redshift:sql>
		</redshift:execute-ddl>
		<s3:delete-bucket doc:name="Delete bucket" config-ref="Amazon_S3_Configuration" force="true" bucketName='#[vars.bucketDelete]'/>
		<ee:transform doc:name="Transform Message">
			<ee:message >
				<ee:set-payload ><![CDATA[%dw 2.0
output application/json
---
{
	"success": true
}]]></ee:set-payload>
			</ee:message>
		</ee:transform>
	</flow>

    <flow name="redshiftFipsDemoFlow">
		<http:listener doc:name="Listener" config-ref="HTTP_Listener_config" path="/redshift"/>
		<redshift:select doc:name="Select" config-ref="Amazon_Redshift_Connector_Config_Fips">
			<redshift:sql ><![CDATA[select * from <your-tableName>]]></redshift:sql>
		</redshift:select>
		<ee:transform doc:name="Transform Message">
			<ee:message >
				<ee:set-payload ><![CDATA[%dw 2.0
output application/json
---
payload]]></ee:set-payload>
			</ee:message>
		</ee:transform>
		<logger level="INFO" doc:name="Logger"  message="#[payload]"/>
	</flow>
</mule>
グローバル要素の設定
-
src/main/resources/ フォルダー内に mule-artifact.properties という名前のファイルを作成します。 -
次のプロパティを
mule-artifact.properties ファイルに追加し、適切な値を割り当てます。s3.access_key= s3.secret_key= s3.region= redshift.cluster_id= redshift.region= redshift.port= redshift.database= redshift.user= redshift.password= copy.access_key= copy.secret_key=
-
バケットの作成と削除、およびオブジェクトの作成には Amazon S3 ログイン情報が必要です。
-
データベースへの接続を確立するには、Amazon Redshift ログイン情報が必要です。
-
この例では、
COPY コマンドを使用して Amazon S3 のデータファイルからテーブルを並列で読み込んでいます。COPY コマンドを使用するには、適切なポリシーがアタッチされた IAM ユーザーログイン情報を使用して認証する必要があります。したがって、copy.access_key および copy.secret_key プロパティには Amazon S3 の参照のみポリシーを使用することをお勧めします。 -
または、アクセスキーとシークレットキーのペアの代わりに IAM ロールを使用することもできます。
これを行うには、ロールに正しいポリシーがアタッチされていることを確認する必要があります。この目的では、Amazon S3 の参照のみポリシーを使用することをお勧めします。
-
自分の代わりに Redshift クラスターが Amazon S3 サービスと通信できるようにする IAM ロールを作成するには、この Amazon Redshift チュートリアルの手順に従います。
-
-
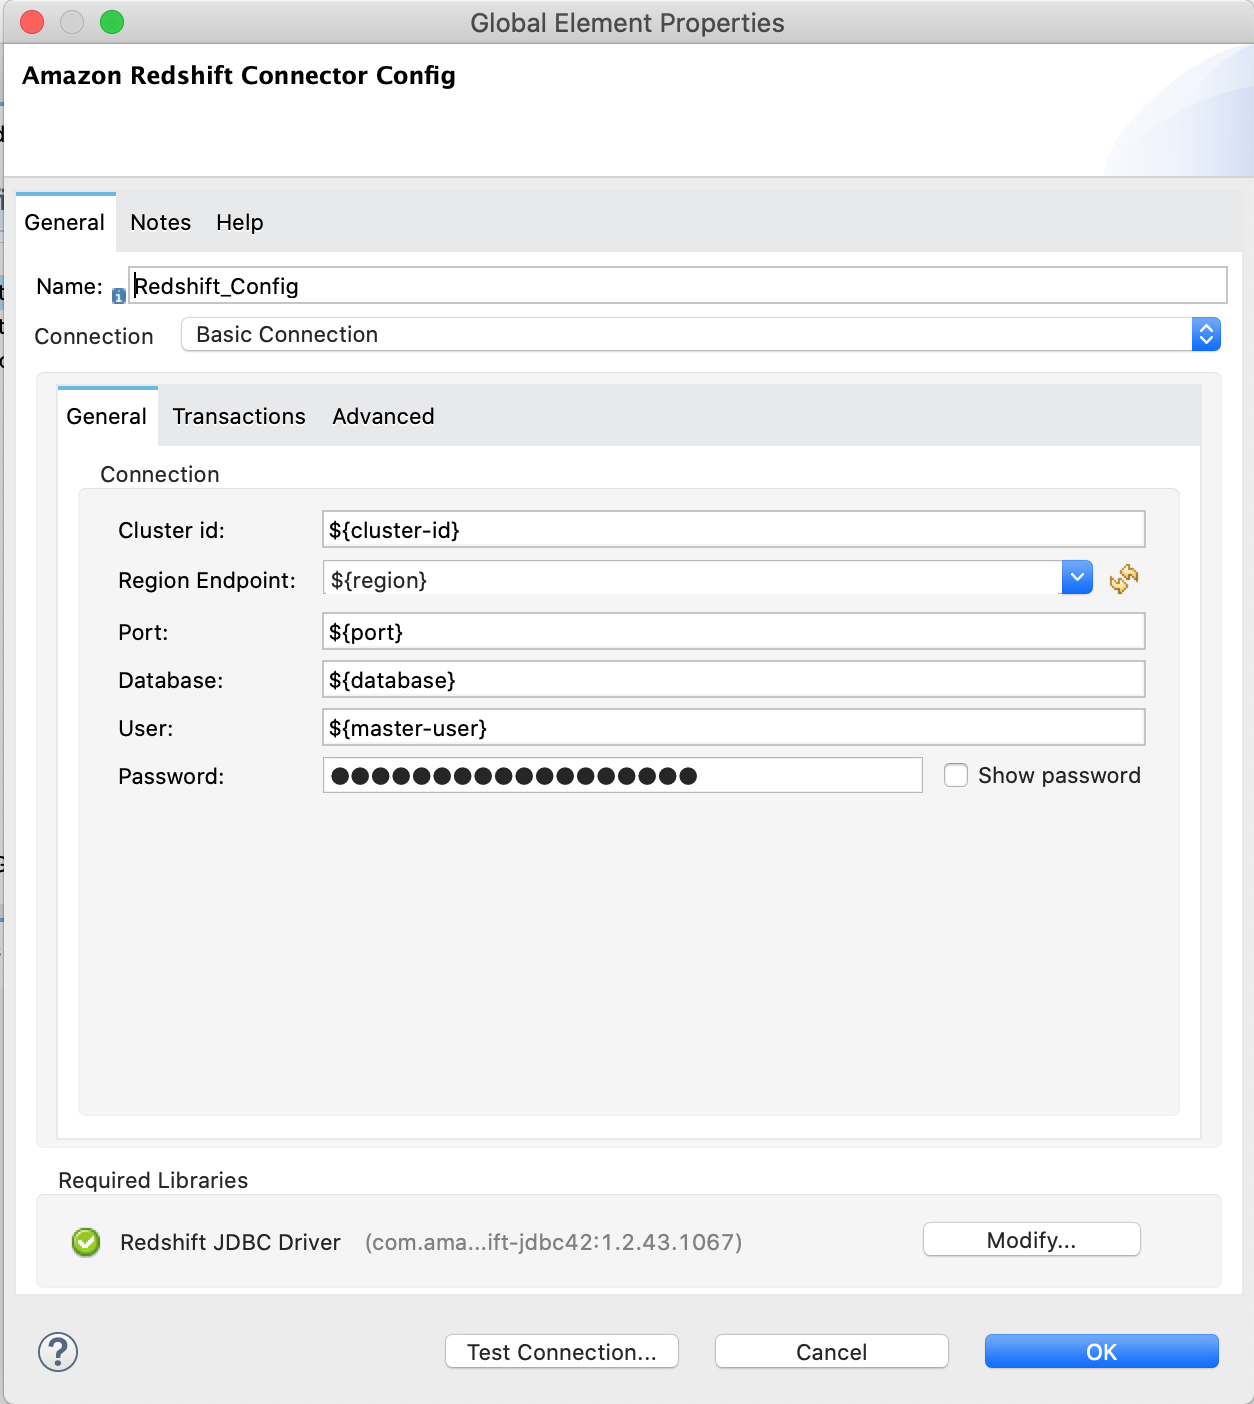
Amazon Redshift 設定を開き、下にスクロールして [Required libraries (必須のライブラリ)] セクションで JDBC ドライバーを設定します。この例では、[Add recommended library (推奨されるライブラリを追加)] オプションを選択します。 これが機能しない場合は、Amazon Maven リポジトリを
pom.xml ファイルに追加して、もう一度お試しください。<repositories> ... <repository> <id>redshift</id> <url>https://s3.amazonaws.com/redshift-maven-repository/release</url> </repository> </repositories>
次の画像は、Amazon S3 と Amazon Redshift の設定を示しています。
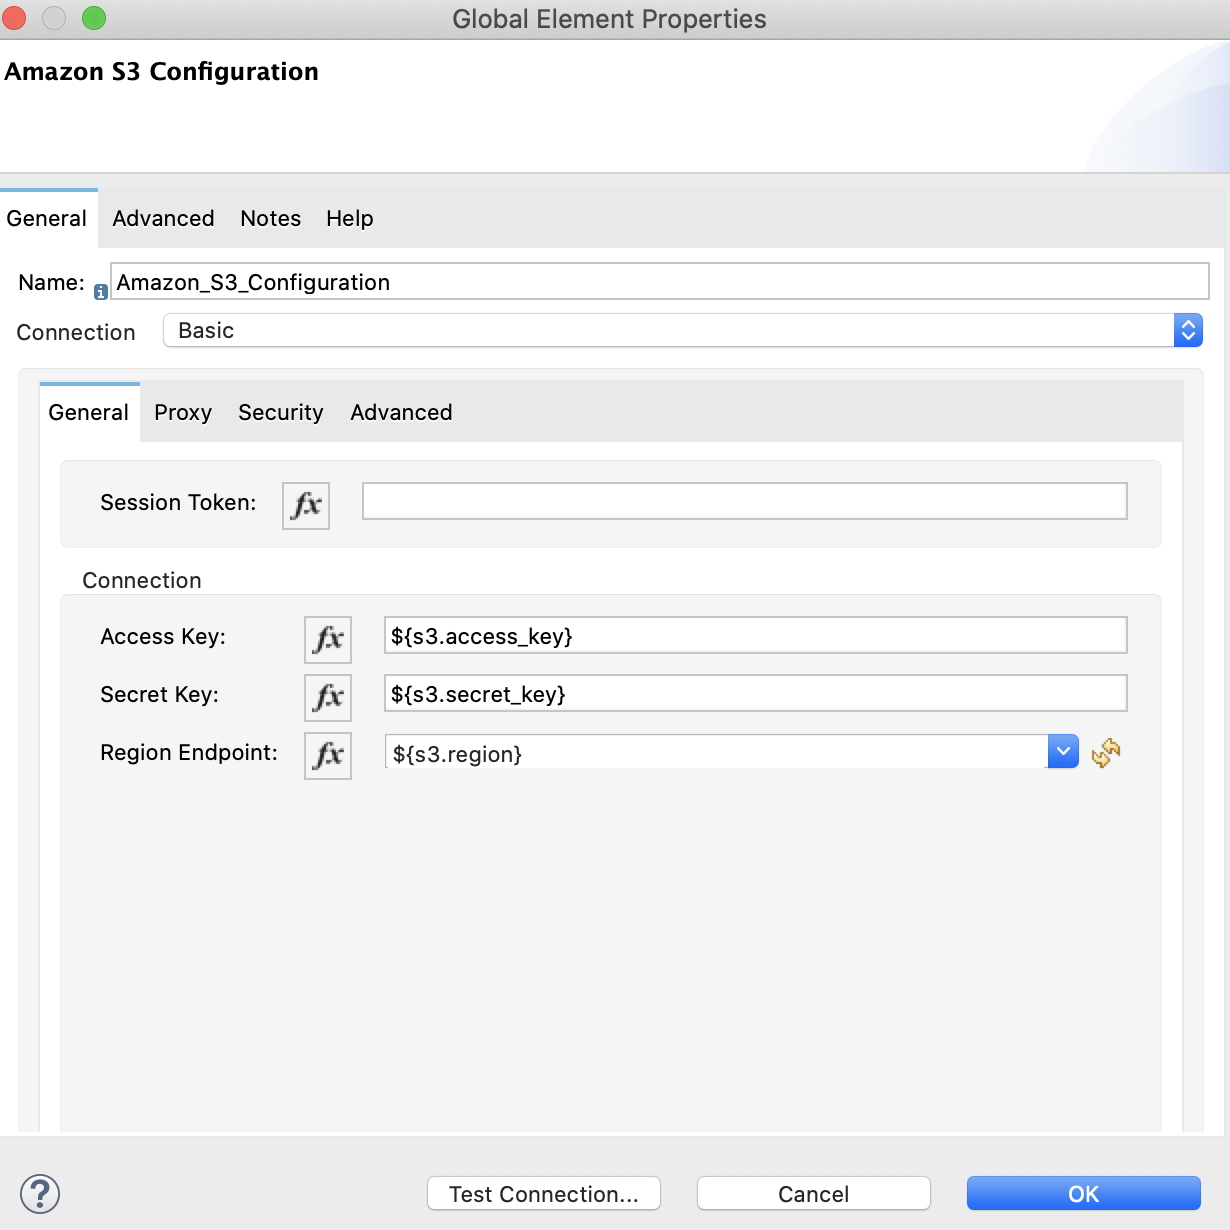

![Amazon Redshift IAM 設定の [Advanced (詳細)] タブ](_images/redshift-advanced-configuration.png)
データファイルの準備
Amazon S3 にアップロードするデータファイルを準備します。このデータファイルは、Amazon Redshift テーブルの COPY コマンドでデータセットとして使用されます。
-
Mule プロジェクトの
src/main/resources/ フォルダー内に username.csv という名前のファイルを作成します。 -
username.csv ファイルに次のサンプルデータを入力します。
Username; Identifier;First name;Last name
booker12;9012;Rachel;Booker
grey07;2070;Laura;Grey
johnson81;4081;Craig;Johnson
jenkins46;9346;Mary;Jenkins
smith79;5079;Jamie;Smith
この例のフロー
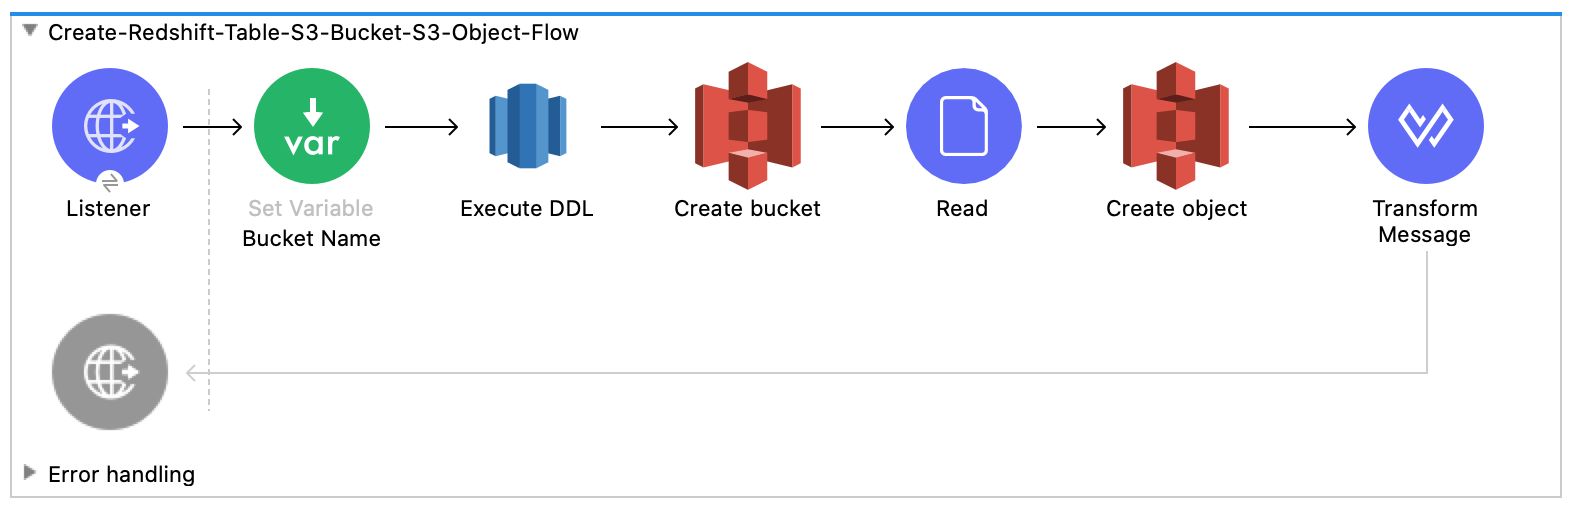
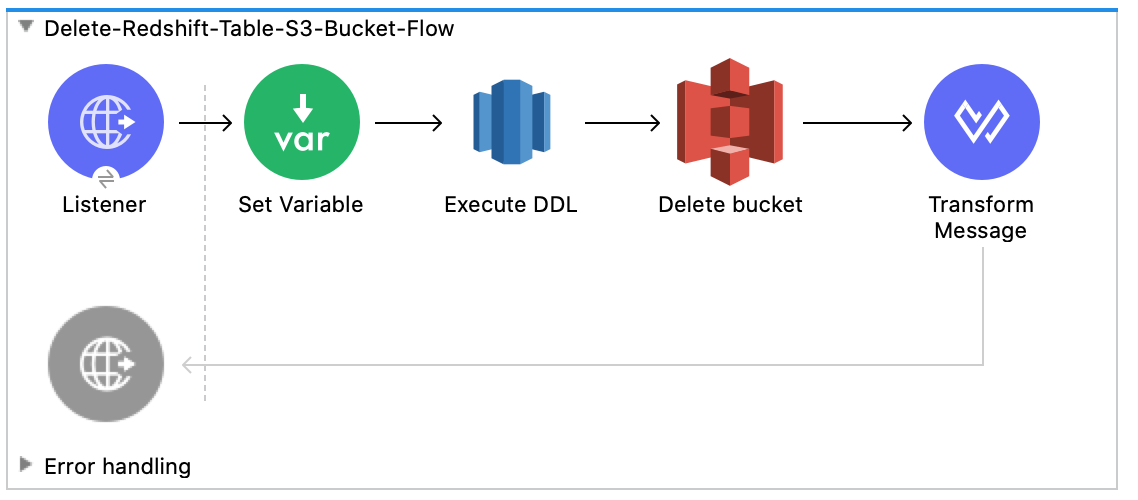
次のスクリーンショットは、この例の Anypoint Studio アプリケーションフローを示しています。
-
このフローは、Amazon Redshift テーブル、Amazon S3 バケット、およびオブジェクトを作成します。
-
このフローは、Amazon Redshift 超並列処理 (MPP) アーキテクチャを利用する
COPY コマンドを実行して、Amazon S3 バケット内のファイルからデータを並列で読み込みます。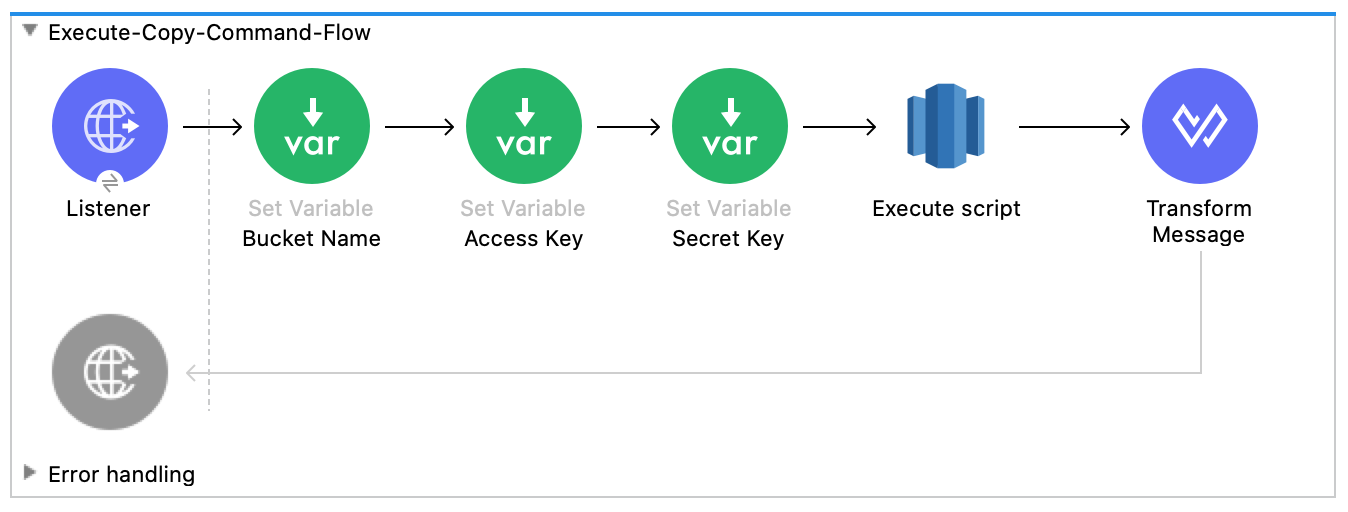
-
このフローは、Amazon Redshift テーブルと Amazon S3 バケットを削除します。
例の実行
-
プロジェクトのキャンバス内を右クリックして、[Run project redshift-demo (プロジェクト redshift-demo を実行)] を選択します。
-
Web ブラウザーで
localhost:8081/init を開き、作成されたテーブル、バケット、およびオブジェクトと共に success:true を含む応答が返されるまで待ちます。 -
新しい Amazon S3 バケット
username-bucket が Amazon S3 インスタンスで作成されたことを確認します。 -
新しい Redshift テーブル
username が Amazon Redshift インスタンスで作成されたことを確認します。 -
Web ブラウザーで
localhost:8081/execute を開き、success:true を含む応答が返されるまで待ちます。 -
「データファイルの準備」で Mule プロジェクトに追加した
username.csv ファイルのデータが username テーブルに含まれていることを確認します。 -
Web ブラウザーで
localhost:8081/delete を開き、success:true を含む応答が返されるまで待ちます。 -
username Amazon Redshift テーブルと username-bucket Amazon S3 バケットの両方が削除されたことを確認します。