Commerce Cloud B2C Shop Connector 2.1 の例
Commerce Cloud B2C Shop コネクタは、操作ベースのコネクタです。つまり、コネクタをフローに追加するときに、コネクタで実行する特定の操作を設定する必要があります。 Commerce Cloud B2C Shop コネクタでは、2 種類の設定がサポートされています。 この例では、顧客認証接続プロバイダー設定を使用します。 Get Customer 操作が正常に実行されると、顧客の結果を取得できます。
アクセストークンを取得するには、Authenticate Customer と Get Access Token (B2C Shop Connector 2.1 以降を使用している場合) を使用するか、Authorize Customer を使用できます。
Authenticate Customer と Get Access Token
-
Anypoint Studio (Studio) で新しい Mule アプリケーションを作成し、ポート 8081 を HTTP リスナーとして、パスを「
/login」などとして設定します。 -
Authenticate Customer を使用する前に、買い物客の USID と認証コードを含む SLAS からのリダイレクトを処理するリダイレクト URI を準備する必要があります。リダイレクト URI は一般公開されている必要があるため、webhook.site や ngrok などのツールを使用して、localhost エンドポイントを外部に公開する必要があります。
-
[Authenticate Customer] 操作を Mule パレットからフローにドラッグします。
-
登録ユーザーの場合、Authenticate Customer コールバック応答のコードを使用してトークンを登録する必要があります。ポート 8081 にパス
/register を使用して新しい HTTP リスナーを作成します。 -
[Get Access Token] 操作を Mule パレットからパス
/register のフローにドラッグします。 -
Postman から Authenticate Customer および Get Access Token 操作の必須パラメーターを取得します。
-
両方の操作で、[B2C Shop Connector] から [Commerce Cloud B2C Shop Connector Shopper Token Config (Commerce Cloud B2C Shop Connector の Shopper トークン設定)] を選択し、必要な値を設定するか、緑のプラス記号 (+) をクリックして新しい設定を追加します。
-
すべての必須パラメーターを入力したら、Mule プロジェクトを保存します。
-
Package Explorer でプロジェクト名を右クリックし、[Run As (別のユーザーとして実行)] > [Mule Application (Mule アプリケーション)] をクリックして、プロジェクトを Mule アプリケーションとして実行します。
-
http://localhost:8081/auth に移動して Postman を開き、応答を確認します。Postman に状況 200 で空の本文が表示されます。これは、コールバック要求がリダイレクト URI に送信されたことを意味します。 -
コールバック要求からコードクエリパラメーターを取得します。このステップは、OAuth2 コールバックの処理方法によって異なります。
-
2 番目の要求のコードを使用して、Get Access Token への新しい要求を作成します。
-
http://localhost:8081/register に移動して Postman を開き、応答を確認します。コールが成功したら、他の SCAPI コールで使用するアクセストークンと更新トークンを取得します。 操作を実行するための認証ヘッダーパラメーターとして Postman からこの JWT トークンを提供します。
Authorize Customer
-
Authorize Customer 操作を実行して、Shopper JWT トークンを取得します。
-
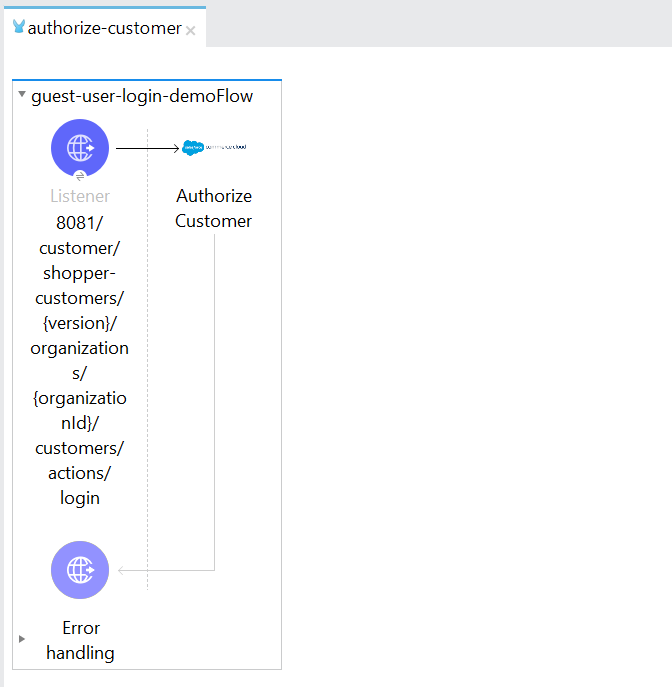
Anypoint Studio (Studio) で新しい Mule アプリケーションを作成し、ポート 8081 を HTTP リスナーとして、パスを「/customer/shopper-customers/{version}/organizations/{organizationId}/customers/actions/login」として設定します。
![[General (一般)] タブの Authorize Customer 操作設定](_images/shop-connector-authorize-customer-http-listener-config.jpg)
-
パレットからフローに操作「Authorize Customer」を追加します。
-
postman から Authorize Customer 操作の必須パラメーターを取得します。

-
[Commerce Cloud B2C Shop Connector (Commerce Cloud B2C Shop コネクタ)] から [Commerce Cloud B2C Shop Connector Shopper Token Config (Commerce Cloud B2C Shop コネクタの Shopper トークン設定)] を選択し、必要な値で設定するか、緑のプラス記号 (+) をクリックして新しい設定を追加します。
![トークンのグローバル設定ウィンドウの [General (一般)] タブ](_images/shop-connector-shopper-token-config.jpg)
-
すべての必須パラメーターを入力したら、Mule プロジェクトを保存します。
-
Package Explorer でプロジェクト名を右クリックし、[Run As (別のユーザーとして実行)] > [Mule Application (Mule アプリケーション)] を選択して、プロジェクトを Mule アプリケーションとして実行します。
-
http://localhost:8081/customer/shopper-customers/{version}/organizations/{organizationId}/customers/actions/login に移動して Postman を開き、応答を確認します。 -
レスポンスヘッダーに JWT トークンが表示されます。 この JWT トークンを Postman から認証ヘッダーパラメーターとして指定して、操作を実行できます。
Get Customer
-
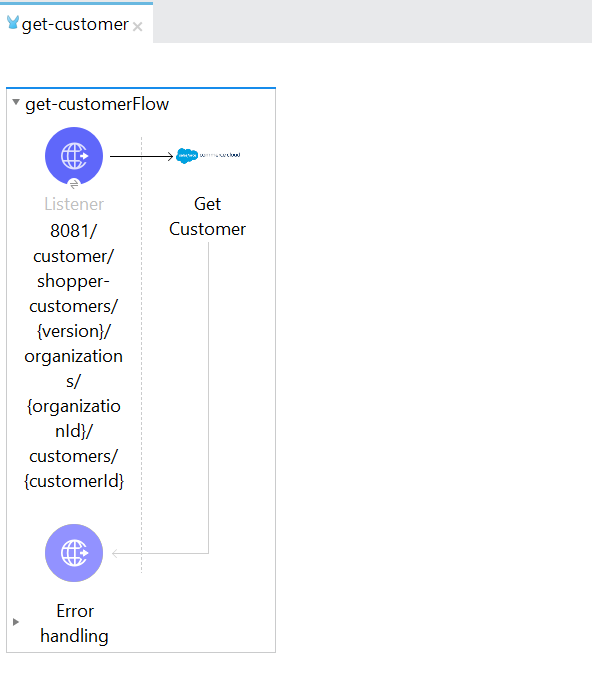
Anypoint Studio (Studio) で新しい Mule アプリケーションを作成し、ポート 8081 を HTTP リスナーとして、パスを「/customer/shopper-customers/{version}/organizations/{organizationId}/customers/{customerId}」として設定します。
![[General (一般)] タブの HTTP リスナー設定](_images/shop-connector-http-listener-config.jpg)
-
パレットからフローに操作「Get Customer」を追加します。
-
postman から Get Customer 操作の必須パラメーターを取得します。
-
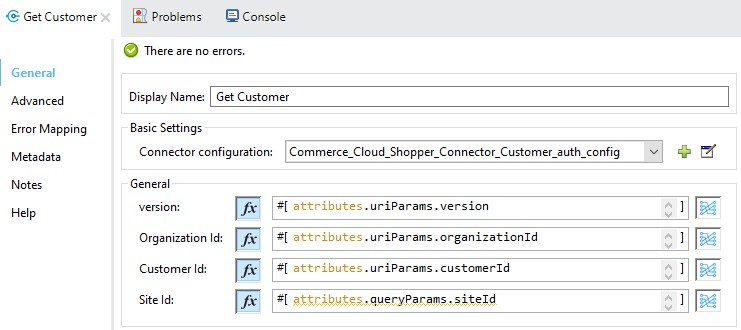
[Commerce Cloud B2C Shop Connector (Commerce Cloud B2C Shop コネクタ)] から [Commerce Cloud B2C Shop Connector Config (Commerce Cloud B2C Shop コネクタ設定)] を選択し、必要な値で設定するか、緑のプラス記号 (+) をクリックして新しい設定を追加します。
![認証設定のグローバル設定ウィンドウの [General (一般)] タブ](_images/shop-connector-customer-auth-config.jpg)
-
上記の画像では、Authorize Customer の認証トークンが認証パラメーター値として使用されています。
-
すべての必須パラメーターを入力したら、Mule プロジェクトを保存します。
-
Package Explorer でプロジェクト名を右クリックし、[Run As (別のユーザーとして実行)] > [Mule Application (Mule アプリケーション)] を選択して、プロジェクトを Mule アプリケーションとして実行します。
-
http://localhost:8081/customer/shopper-customers/{version}/organizations/{organizationId}/customers/{customerId} に移動して Postman を開き、ヘッダーの Shopper JWT トークンを渡して、応答を確認します。 -
出力に顧客の詳細が表示されます。
Authenticate Customer と Get Access Token の XML
この例のフローをすばやく Mule アプリケーションに読み込むには、次のコードを Studio XML エディターに貼り付けます。
# guest_flow.xml

<?xml version="1.0" encoding="UTF-8"?>

<mule xmlns:commerce-cloud-shopper-api="http://www.mulesoft.org/schema/mule/commerce-cloud-shopper-api" xmlns:http="http://www.mulesoft.org/schema/mule/http"
	xmlns="http://www.mulesoft.org/schema/mule/core"
	xmlns:doc="http://www.mulesoft.org/schema/mule/documentation" xmlns:xsi="http://www.w3.org/2001/XMLSchema-instance" xsi:schemaLocation="http://www.mulesoft.org/schema/mule/core http://www.mulesoft.org/schema/mule/core/current/mule.xsd
http://www.mulesoft.org/schema/mule/http http://www.mulesoft.org/schema/mule/http/current/mule-http.xsd
http://www.mulesoft.org/schema/mule/commerce-cloud-shopper-api http://www.mulesoft.org/schema/mule/commerce-cloud-shopper-api/current/mule-commerce-cloud-shopper-api.xsd">
	<flow name="get-guest-access-tokenFlow" doc:id="708f66c3-d761-4151-8ba1-ae5c67d34fab" >
		<http:listener doc:name="Listener" doc:id="701eda50-679c-4e9e-91bb-3f576b8f878b" config-ref="HTTP_Listener_config" path="/login" />
		<commerce-cloud-shopper-api:create-shopper-auth-organizations-oauth2-token-by-version-organization-id doc:name="Get Access Token" doc:id="9e26b4e3-57d9-4428-bbb6-f8c66855ea1c" config-ref="Commerce_Cloud_B2C_Shop_Connector_Shopper_token_config" version="${shopper.version}" organizationId="${shopper.orgId}" authorization="${shopper.clientAuthHeader}" >
			<commerce-cloud-shopper-api:custom-query-params ><![CDATA[#[output application/java
---
{
	"grant_type" : "client_credentials",
	"channel_id" : "${shopper.siteId}"
}]]]></commerce-cloud-shopper-api:custom-query-params>
			<commerce-cloud-shopper-api:custom-headers ><![CDATA[#[output application/java
---
{
	"Content-Type" : "application/x-www-form-urlencoded"
}]]]></commerce-cloud-shopper-api:custom-headers>
		</commerce-cloud-shopper-api:create-shopper-auth-organizations-oauth2-token-by-version-organization-id>
	</flow>
</mule>
# registered_flow.xml
<?xml version="1.0" encoding="UTF-8"?>
<mule xmlns:commerce-cloud-shopper-api="http://www.mulesoft.org/schema/mule/commerce-cloud-shopper-api" xmlns:http="http://www.mulesoft.org/schema/mule/http"
xmlns="http://www.mulesoft.org/schema/mule/core"
xmlns:doc="http://www.mulesoft.org/schema/mule/documentation" xmlns:xsi="http://www.w3.org/2001/XMLSchema-instance" xsi:schemaLocation="http://www.mulesoft.org/schema/mule/core http://www.mulesoft.org/schema/mule/core/current/mule.xsd
http://www.mulesoft.org/schema/mule/http http://www.mulesoft.org/schema/mule/http/current/mule-http.xsd
http://www.mulesoft.org/schema/mule/commerce-cloud-shopper-api http://www.mulesoft.org/schema/mule/commerce-cloud-shopper-api/current/mule-commerce-cloud-shopper-api.xsd">
<flow name="login" doc:id="f7f75d0e-fb56-4d42-b329-8e04b9cff3fa" >
<http:listener doc:name="Listener" doc:id="5ecd86a9-800e-4773-966d-55333d7ae026" config-ref="HTTP_Listener_config" path="/login" responseStreamingMode="ALWAYS" />
<commerce-cloud-shopper-api:create-shopper-auth-organizations-oauth2-login-by-version-organization-id doc:name="Authenticate Customer" doc:id="cf3ff6ff-b2ae-48e7-b5f6-e6b8de6476df" config-ref="Commerce_Cloud_B2C_Shop_Connector_Shopper_token_config" version="${shopper.version}" organizationId="${shopper.orgId}" authorization="#[attributes.headers.Authorization]" streamingType="ALWAYS" />
</flow>
<flow name="register-user-access-token-flow" doc:id="021f4f75-3916-4399-a346-b7a1a6da0881" >
<http:listener doc:name="Listener" doc:id="642be5c6-bbed-4ab8-8deb-2f0c96ce8784" config-ref="HTTP_Listener_config" path="/register" />
<commerce-cloud-shopper-api:create-shopper-auth-organizations-oauth2-token-by-version-organization-id doc:name="Get Access Token" doc:id="36aaa585-793e-4437-9653-ddf84f3c558d" config-ref="Commerce_Cloud_B2C_Shop_Connector_Shopper_token_config" version="${shopper.version}" organizationId="${shopper.orgId}" >
<commerce-cloud-shopper-api:custom-headers ><![CDATA[#[output application/java
---
{
"Content-Type" : "application/x-www-form-urlencoded"
}]]]></commerce-cloud-shopper-api:custom-headers>
</commerce-cloud-shopper-api:create-shopper-auth-organizations-oauth2-token-by-version-organization-id>
</flow>
</mule>Authenticate Customer と Get Access Token の手順
-
新しい Mule アプリケーションを作成します。
-
キャンバスの下部にある [Configuration XML (設定 XML)] タブをクリックします。
-
上記のコードをコピーして貼り付けます。
-
プロジェクトを保存します。
-
Package Explorer でプロジェクト名を右クリックし、[Run As (別のユーザーとして実行)] > [Mule Application (Mule アプリケーション)] を選択して、プロジェクトを Mule アプリケーションとして実行します。
-
ゲストフローの場合は
http://localhost:8081/login、登録ユーザーフローの場合は http://localhost:8081/register に移動し、Postman を開いて応答を確認します。 -
レスポンスヘッダーに JWT トークンが表示されます。操作を実行するための認証ヘッダーパラメーターとして Postman からこの JWT トークンを提供します。
Authorize Customer の XML
この例のフローをすばやく Mule アプリケーションに読み込むには、次のコードを Studio XML エディターに貼り付けます。
<?xml version="1.0" encoding="UTF-8"?>

<mule xmlns:commerce-cloud-shopper-api="http://www.mulesoft.org/schema/mule/commerce-cloud-shopper-api"
	xmlns:http="http://www.mulesoft.org/schema/mule/http"
	xmlns:commerce-cloud-shopperapi="http://www.mulesoft.org/schema/mule/commerce-cloud-shopperapi"
	xmlns="http://www.mulesoft.org/schema/mule/core" xmlns:doc="http://www.mulesoft.org/schema/mule/documentation"
	xmlns:xsi="http://www.w3.org/2001/XMLSchema-instance"
	xsi:schemaLocation="
http://www.mulesoft.org/schema/mule/http http://www.mulesoft.org/schema/mule/http/current/mule-http.xsd http://www.mulesoft.org/schema/mule/core http://www.mulesoft.org/schema/mule/core/current/mule.xsd
http://www.mulesoft.org/schema/mule/commerce-cloud-shopperapi http://www.mulesoft.org/schema/mule/commerce-cloud-shopperapi/current/mule-commerce-cloud-shopperapi.xsd
http://www.mulesoft.org/schema/mule/commerce-cloud-shopper-api http://www.mulesoft.org/schema/mule/commerce-cloud-shopper-api/current/mule-commerce-cloud-shopper-api.xsd">
	<flow name="guest-user-login-demoFlow">
		<http:listener
			doc:name="8081/customer/shopper-customers/{version}/organizations/{organizationId}/customers/actions/login"
			config-ref="HTTP_Listener_config"
			path="/customer/shopper-customers/{version}/organizations/{organizationId}/customers/actions/login"
			allowedMethods="POST">
			<http:response>
				<http:headers><![CDATA[#[output application/java
---
{
"Authorization" : message.attributes.headers.Authorization }]]]></http:headers>

			</http:response>
			<http:error-response statusCode="#[error.errorMessage.attributes.statusCode]">
				<http:body><![CDATA[#[output text/json --- error.errorMessage.payload]]]></http:body>

			</http:error-response>
		</http:listener>
		<commerce-cloud-shopper-api:create-customer-shopper-customers-organizations-customers-actions-login-by-version-organization-id
			doc:name="Authorize Customer"
			version="#[attributes.uriParams.version]"
			organizationId="#[attributes.uriParams.organizationId]" clientId="#[attributes.queryParams.clientId]"
			siteId="#[attributes.queryParams.siteId]" authorization="#[attributes.headers.Authorization]" config-ref="Commerce_Cloud_B2C_Shop_Connector_Shopper_token"/>

	</flow>
</mule>
Authorize Customer のステップ
-
新しい Mule アプリケーションを作成します。
-
キャンバスの下部にある [Configuration XML (設定 XML)] タブをクリックします。
-
上記のコードをコピーして貼り付けます。
-
プロジェクトを保存します。
-
Package Explorer でプロジェクト名を右クリックし、[Run As (別のユーザーとして実行)] > [Mule Application (Mule アプリケーション)] を選択して、プロジェクトを Mule アプリケーションとして実行します。
-
http://localhost:8081/customer/shopper-customers/{version}/organizations/{organizationId}/customers/actions/login に移動して Postman を開き、応答を確認します。 -
レスポンスヘッダーに JWT トークンが表示されます。この JWT トークンを Postman から認証ヘッダーパラメーターとして指定して、操作を実行できます。
Get Customer の XML
この例のフローをすばやく Mule アプリケーションに読み込むには、次のコードを Studio XML エディターに貼り付けます。
xml <?xml version="1.0" encoding="UTF-8"?>

<mule xmlns:commerce-cloud-shopper-api="http://www.mulesoft.org/schema/mule/commerce-cloud-shopper-api"
xmlns:http="http://www.mulesoft.org/schema/mule/http" xmlns="http://www.mulesoft.org/schema/mule/core"
xmlns:doc="http://www.mulesoft.org/schema/mule/documentation"
xmlns:xsi="http://www.w3.org/2001/XMLSchema-instance"
xsi:schemaLocation="http://www.mulesoft.org/schema/mule/core http://www.mulesoft.org/schema/mule/core/current/mule.xsd
http://www.mulesoft.org/schema/mule/http http://www.mulesoft.org/schema/mule/http/current/mule-http.xsd
http://www.mulesoft.org/schema/mule/commerce-cloud-shopper-api http://www.mulesoft.org/schema/mule/commerce-cloud-shopper-api/current/mule-commerce-cloud-shopper-api.xsd">
<flow name="get-customerFlow"> <http:listener doc:name="8081/customer/shopper-customers/{version}/organizations/{organizationId}/customers/{customerId}" config-ref="HTTP_Listener_config" path="/customer/shopper-customers/{version}/organizations/{organizationId}/customers/{customerId}" allowedMethods="GET"> <http:error-response statusCode="#[error.errorMessage.attributes.statusCode]"> <http:body><![CDATA[#[output text/json --- error.errorMessage.payload]]]></http:body>

			</http:error-response>
		</http:listener>
		<commerce-cloud-shopper-api:get-customer-shopper-customers-organizations-customers-by-version-organization-id-customer-id
			doc:name="Get Customer"
			config-ref="Commerce_Cloud_Shopper_Connector_Customer_auth_config"
			version="#[attributes.uriParams.version]" organizationId="#[attributes.uriParams.organizationId]"
			customerId="#[attributes.uriParams.customerId]" siteId="#[attributes.queryParams.siteId]" />
	</flow>
</mule>
Get Customer のステップ
-
新しい Mule アプリケーションを作成します。
-
キャンバスの下部にある [Configuration XML (設定 XML)] タブをクリックします。
-
上記のコードをコピーして貼り付けます。
-
プロジェクトを保存します。
-
Package Explorer でプロジェクト名を右クリックし、[Run As (別のユーザーとして実行)] > [Mule Application (Mule アプリケーション)] を選択して、プロジェクトを Mule アプリケーションとして実行します。
-
http://localhost:8081/customer/shopper-customers/{version}/organizations/{organizationId}/customers/{customerId} に移動して Postman を開き、ヘッダーの Shopper JWT トークンを渡して、応答を確認します。 -
出力に顧客の詳細が表示されます。