Google BigQuery Connector 1.1 の例
Google BigQuery Connector の Mule フローの例を次にいくつか示します。
始める前に
-
Java 8 または 11
-
Anypoint Studio 7.5 以降
-
Mule Runtime Engine (Mule) 4.3.0 以降
-
DataWeave
-
Google API の OAuth ログイン情報
接続の設定
接続を保護するには、OAuth 接続項目の値を指定する必要があります。次の手順を実行します。
接続の設定ファイルを作成する
接続のプロパティが含まれる設定ファイルを作成します。
-
/src/main/resources/ フォルダー内に mule-app.properties という名前のファイルを作成します。 -
mule-app.properties ファイルに、次のような接続の一連のプロパティを作成します。括弧で囲まれたテキスト (括弧を含む) を各自の設定の適切な値に置き換えます。config.consumerKey=<consumerkey> config.consumerSecret=<consumersecret>
これは、選択した接続設定によって異なる場合があります。
プロパティファイルの作成についての詳細は、「プロパティプレースホルダーの設定」を参照してください。
接続のグローバル要素を設定する
接続のグローバル要素を設定します。
-
新しい Mule プロジェクトを作成します。
-
[Mule Palette (Mule パレット)] ビューで、[Search in Exchange (Exchange 内を検索)] をクリックして「
google bigquery」と入力します。 -
[Google BigQuery Connector] を [Selected modules (選択済みモジュール)] セクションに追加し、[Finish (完了)] をクリックします。
-
[Global Elements (グローバル要素)] タブをクリックし、[Create (作成)] をクリックします。
-
[Connector Configuration (コネクタ設定)] > [Google BigQuery Config (Google BigQuery 設定)] を選択し、[OK] をクリックします。
-
JWT または OAuth2 を設定するための値を入力します。コネクタ設定の項目に入力する値についての詳細は、「コネクタのグローバル要素を設定する」を参照してください。
-
[Test Connection (接続をテスト)] ボタンをクリックして、Google API と接続されていることを確認します。ポップアップに成功メッセージが表示されます。
-
[OK] をクリックします。
-
[Global Element Configuration (グローバル要素設定)] で HTTPS リスナー設定を開きます。
-
[TLS] タブをクリックし、[TLS Configuration (TLS 設定)] > [Edit inline (インライン編集)] を選択します。
-
生成されたキーストアの詳細を使用して [Key Store Configuration (キーストア設定)] を指定し、この設定で HTTPS を有効にします。
-
[OK] をクリックします。
プロパティファイルのグローバル要素を設定する
mule-app.properties ファイルのグローバル要素を設定して、Mule がその場所を認識できるようにします。
-
[Global Elements (グローバル要素)] タブをクリックし、[Create (作成)] をクリックします。
-
[Choose Global Type (グローバル種別の選択)] ダイアログで、[Configuration properties (設定プロパティ)] を選択し、[OK] をクリックします。
-
[File (ファイル)] 項目に「
mule.app.properties」と入力します。 -
[OK] をクリックします。
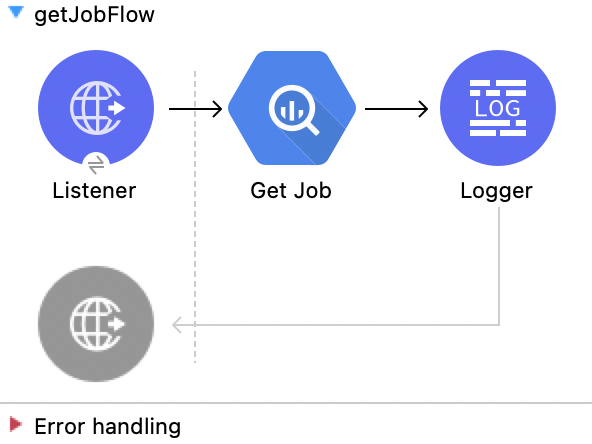
ジョブの取得
この Mule フローでは、指定されたジョブ ID からジョブを取得します。
この例では、次の操作を使用します。
-
HTTP Listener
HTTP 要求からデータを受け取ります。 -
Get Job
ジョブを取得します。次の値を入力します。
項目 値 Job id (ジョブ ID)
attributes.queryParams.jobId -
Logger
Get Job 操作からの HTTP 応答を表示します。
この例の XML
この例のフローをすばやく Mule アプリケーションに読み込むには、次のコードを Studio XML エディターに貼り付けます。
<?xml version="1.0" encoding="UTF-8"?>

<mule xmlns:ee="http://www.mulesoft.org/schema/mule/ee/core"
	  xmlns:os="http://www.mulesoft.org/schema/mule/os"
	  xmlns:http="http://www.mulesoft.org/schema/mule/http"
	  xmlns:bigquery="http://www.mulesoft.org/schema/mule/bigquery"
	  xmlns="http://www.mulesoft.org/schema/mule/core"
	  xmlns:doc="http://www.mulesoft.org/schema/mule/documentation"
	  xmlns:xsi="http://www.w3.org/2001/XMLSchema-instance"
	  xmlns:secure-properties="http://www.mulesoft.org/schema/mule/secure-properties"
	  xsi:schemaLocation="
http://www.mulesoft.org/schema/mule/ee/core http://www.mulesoft.org/schema/mule/ee/core/current/mule-ee.xsd http://www.mulesoft.org/schema/mule/core http://www.mulesoft.org/schema/mule/core/current/mule.xsd
http://www.mulesoft.org/schema/mule/bigquery http://www.mulesoft.org/schema/mule/bigquery/current/mule-bigquery.xsd
http://www.mulesoft.org/schema/mule/http http://www.mulesoft.org/schema/mule/http/current/mule-http.xsd
http://www.mulesoft.org/schema/mule/os http://www.mulesoft.org/schema/mule/os/current/mule-os.xsd
		http://www.mulesoft.org/schema/mule/secure-properties http://www.mulesoft.org/schema/mule/secure-properties/current/mule-secure-properties.xsd">
	<secure-properties:config name="Secure_Properties_Config_demo" doc:name="Secure Properties Config"  file="mule-artifact.properties" key="mulesoft" >
		<secure-properties:encrypt algorithm="Blowfish" />
	</secure-properties:config>

	<configuration-properties
			file="mule-artifact.properties" />
	<http:request-config
			name="HTTP_Request_configuration"
			doc:name="HTTP Request configuration"
			>
		<http:request-connection host="127.0.0.1"
								 port="8087"/>
	</http:request-config>
	<http:listener-config name="HTTP_Listener_config"
						  doc:name="HTTP Listener config"
						  >
		<http:listener-connection host="0.0.0.0"
								  port="8082" />
	</http:listener-config>
	<http:listener-config
			name="HTTP_Listener_config1_Test" doc:name="HTTP Listener config">
		<http:listener-connection host="127.0.0.1"
								  port="8087" usePersistentConnections="false"
								  connectionIdleTimeout="4000" />
	</http:listener-config>
	<bigquery:config name="BigQuery__Configuration"
					 doc:name="BigQuery  Configuration"
					 >
		<bigquery:oauth2-connection projectId="${config.projectId}">
			<bigquery:oauth-authorization-code
					consumerKey="${secure::config.consumerKey}"
					consumerSecret="${secure::config.consumerSecret}"
					resourceOwnerId="demo" />
			<bigquery:oauth-callback-config
					listenerConfig="HTTP_Listener_config1_Test" callbackPath="/callback"
					authorizePath="/authorize" />
		</bigquery:oauth2-connection>
	</bigquery:config>
	<flow name="getQueryFlow"
		  >
		<http:listener doc:name="Listener"

					   config-ref="HTTP_Listener_config" path="/get" />
		<bigquery:get-job doc:name="Get Job"

						  jobId="#[attributes.queryParams.jobId]"
						  config-ref="BigQuery__Configuration" />
		<logger level="INFO" doc:name="Logger"
				 />
	</flow>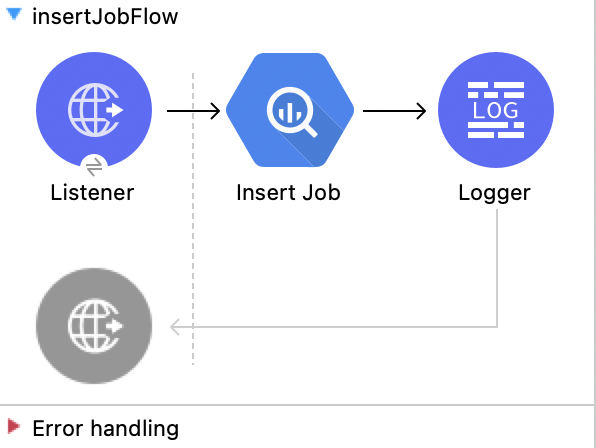
</mule>ジョブの挿入
この Mule フローでは、入力設定を使用してジョブを挿入します。
この例では、次の操作を使用します。
-
HTTP Listener
HTTP 要求からデータを受け取ります。 -
Insert Job
ジョブを挿入します。次の値を入力します。
項目 値 Job values content (ジョブ値のコンテンツ)
payload -
Logger
Insert Job 操作からの HTTP 応答を表示します。
この例の XML
この例のフローをすばやく Mule アプリケーションに読み込むには、次のコードを Studio XML エディターに貼り付けます。
<?xml version="1.0" encoding="UTF-8"?>

<mule xmlns:ee="http://www.mulesoft.org/schema/mule/ee/core"
	  xmlns:os="http://www.mulesoft.org/schema/mule/os"
	  xmlns:http="http://www.mulesoft.org/schema/mule/http"
	  xmlns:bigquery="http://www.mulesoft.org/schema/mule/bigquery"
	  xmlns="http://www.mulesoft.org/schema/mule/core"
	  xmlns:doc="http://www.mulesoft.org/schema/mule/documentation"
	  xmlns:xsi="http://www.w3.org/2001/XMLSchema-instance"
	  xmlns:secure-properties="http://www.mulesoft.org/schema/mule/secure-properties"
	  xsi:schemaLocation="
http://www.mulesoft.org/schema/mule/ee/core http://www.mulesoft.org/schema/mule/ee/core/current/mule-ee.xsd http://www.mulesoft.org/schema/mule/core http://www.mulesoft.org/schema/mule/core/current/mule.xsd
http://www.mulesoft.org/schema/mule/bigquery http://www.mulesoft.org/schema/mule/bigquery/current/mule-bigquery.xsd
http://www.mulesoft.org/schema/mule/http http://www.mulesoft.org/schema/mule/http/current/mule-http.xsd
http://www.mulesoft.org/schema/mule/os http://www.mulesoft.org/schema/mule/os/current/mule-os.xsd
		http://www.mulesoft.org/schema/mule/secure-properties http://www.mulesoft.org/schema/mule/secure-properties/current/mule-secure-properties.xsd">
	<secure-properties:config name="Secure_Properties_Config_demo" doc:name="Secure Properties Config"  file="mule-artifact.properties" key="mulesoft" >
		<secure-properties:encrypt algorithm="Blowfish" />
	</secure-properties:config>

	<configuration-properties
			file="mule-artifact.properties" />
	<http:request-config
			name="HTTP_Request_configuration"
			doc:name="HTTP Request configuration"
			>
		<http:request-connection host="127.0.0.1"
								 port="8087"/>
	</http:request-config>
	<http:listener-config name="HTTP_Listener_config"
						  doc:name="HTTP Listener config"
						  >
		<http:listener-connection host="0.0.0.0"
								  port="8082" />
	</http:listener-config>
	<http:listener-config
			name="HTTP_Listener_config1_Test" doc:name="HTTP Listener config">
		<http:listener-connection host="127.0.0.1"
								  port="8087" usePersistentConnections="false"
								  connectionIdleTimeout="4000" />
	</http:listener-config>
	<bigquery:config name="BigQuery__Configuration"
					 doc:name="BigQuery  Configuration"
					 >
		<bigquery:oauth2-connection projectId="${config.projectId}">
			<bigquery:oauth-authorization-code
					consumerKey="${secure::config.consumerKey}"
					consumerSecret="${secure::config.consumerSecret}"
					resourceOwnerId="demo" />
			<bigquery:oauth-callback-config
					listenerConfig="HTTP_Listener_config1_Test" callbackPath="/callback"
					authorizePath="/authorize" />
		</bigquery:oauth2-connection>
	</bigquery:config>
	<flow name="insertJobFlow"
		  >
		<http:listener doc:name="Listener"

					   config-ref="HTTP_Listener_config" path="/insert" />
		<bigquery:insert-job doc:name="Insert Job"

							 config-ref="BigQuery__Configuration">
			<bigquery:job-values-content><![CDATA[#[payload]]]></bigquery:job-values-content>
		</bigquery:insert-job>
		<logger level="INFO" doc:name="Logger"
				 />
	</flow>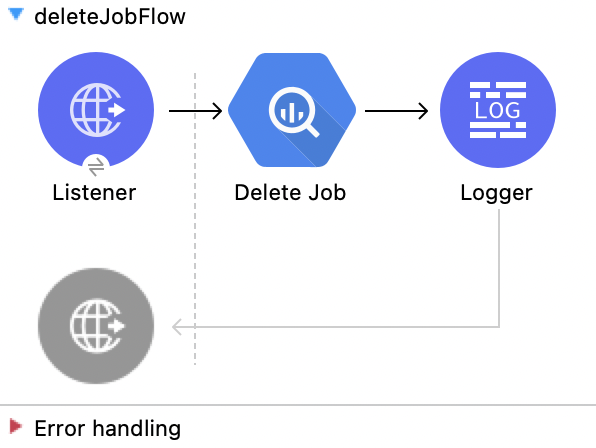
</mule>ジョブの削除
この Mule フローでは、指定されたジョブ ID からジョブを削除します。
この例では、次の操作を使用します。
-
HTTP Listener
HTTP 要求からデータを受け取ります。 -
Delete Job
ジョブを削除します。次の値を入力します。
項目 値 Job id (ジョブ ID)
attributes.queryParams.jobId -
Logger
Delete Job 操作からの HTTP 応答を表示します。
この例の XML
この例のフローをすばやく Mule アプリケーションに読み込むには、次のコードを Studio XML エディターに貼り付けます。
<?xml version="1.0" encoding="UTF-8"?>

<mule xmlns:ee="http://www.mulesoft.org/schema/mule/ee/core"
	  xmlns:os="http://www.mulesoft.org/schema/mule/os"
	  xmlns:http="http://www.mulesoft.org/schema/mule/http"
	  xmlns:bigquery="http://www.mulesoft.org/schema/mule/bigquery"
	  xmlns="http://www.mulesoft.org/schema/mule/core"
	  xmlns:doc="http://www.mulesoft.org/schema/mule/documentation"
	  xmlns:xsi="http://www.w3.org/2001/XMLSchema-instance"
	  xmlns:secure-properties="http://www.mulesoft.org/schema/mule/secure-properties"
	  xsi:schemaLocation="
http://www.mulesoft.org/schema/mule/ee/core http://www.mulesoft.org/schema/mule/ee/core/current/mule-ee.xsd http://www.mulesoft.org/schema/mule/core http://www.mulesoft.org/schema/mule/core/current/mule.xsd
http://www.mulesoft.org/schema/mule/bigquery http://www.mulesoft.org/schema/mule/bigquery/current/mule-bigquery.xsd
http://www.mulesoft.org/schema/mule/http http://www.mulesoft.org/schema/mule/http/current/mule-http.xsd
http://www.mulesoft.org/schema/mule/os http://www.mulesoft.org/schema/mule/os/current/mule-os.xsd
		http://www.mulesoft.org/schema/mule/secure-properties http://www.mulesoft.org/schema/mule/secure-properties/current/mule-secure-properties.xsd">
	<secure-properties:config name="Secure_Properties_Config_demo" doc:name="Secure Properties Config"  file="mule-artifact.properties" key="mulesoft" >
		<secure-properties:encrypt algorithm="Blowfish" />
	</secure-properties:config>

	<configuration-properties
			file="mule-artifact.properties" />
	<http:request-config
			name="HTTP_Request_configuration"
			doc:name="HTTP Request configuration"
			>
		<http:request-connection host="127.0.0.1"
								 port="8087"/>
	</http:request-config>
	<http:listener-config name="HTTP_Listener_config"
						  doc:name="HTTP Listener config"
						  >
		<http:listener-connection host="0.0.0.0"
								  port="8082" />
	</http:listener-config>
	<http:listener-config
			name="HTTP_Listener_config1_Test" doc:name="HTTP Listener config">
		<http:listener-connection host="127.0.0.1"
								  port="8087" usePersistentConnections="false"
								  connectionIdleTimeout="4000" />
	</http:listener-config>
	<bigquery:config name="BigQuery__Configuration"
					 doc:name="BigQuery  Configuration"
					 >
		<bigquery:oauth2-connection projectId="${config.projectId}">
			<bigquery:oauth-authorization-code
					consumerKey="${secure::config.consumerKey}"
					consumerSecret="${secure::config.consumerSecret}"
					resourceOwnerId="demo" />
			<bigquery:oauth-callback-config
					listenerConfig="HTTP_Listener_config1_Test" callbackPath="/callback"
					authorizePath="/authorize" />
		</bigquery:oauth2-connection>
	</bigquery:config>
	<flow name="deleteJobFlow">
		<http:listener doc:name="Listener"
					   config-ref="HTTP_Listener_config" path="/delete" />
		<bigquery:delete-job doc:name="Delete Job"
							 config-ref="BigQuery__Configuration"
							 jobId="#[attributes.queryParams.jobId]" />
		<logger level="INFO" doc:name="Logger" />
	</flow>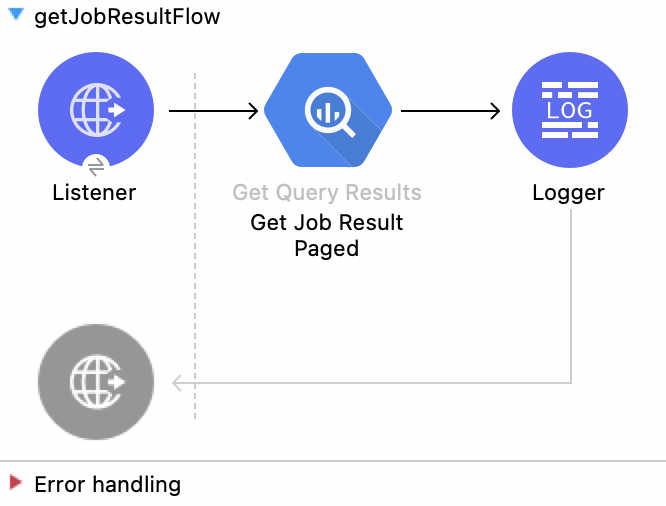
</mule>クエリ結果の取得
この Mule フローでは、クエリの結果を取得します。
この例では、次の操作を使用します。
-
HTTP Listener
HTTP 要求からデータを受け取ります。 -
Get Query Results
クエリの結果を取得します。次の値を入力します。
項目 値 Job id (ジョブ ID)
attributes.queryParams.jobIdStart Index (開始インデックス)
0Max Results (最大結果数)
25 -
Logger
Get Query Result 操作からの HTTP 応答を表示します。
この例の XML
この例のフローをすばやく Mule アプリケーションに読み込むには、次のコードを Studio XML エディターに貼り付けます。
<?xml version="1.0" encoding="UTF-8"?>

<mule xmlns:ee="http://www.mulesoft.org/schema/mule/ee/core"
	  xmlns:os="http://www.mulesoft.org/schema/mule/os"
	  xmlns:http="http://www.mulesoft.org/schema/mule/http"
	  xmlns:bigquery="http://www.mulesoft.org/schema/mule/bigquery"
	  xmlns="http://www.mulesoft.org/schema/mule/core"
	  xmlns:doc="http://www.mulesoft.org/schema/mule/documentation"
	  xmlns:xsi="http://www.w3.org/2001/XMLSchema-instance"
	  xmlns:secure-properties="http://www.mulesoft.org/schema/mule/secure-properties"
	  xsi:schemaLocation="
http://www.mulesoft.org/schema/mule/ee/core http://www.mulesoft.org/schema/mule/ee/core/current/mule-ee.xsd http://www.mulesoft.org/schema/mule/core http://www.mulesoft.org/schema/mule/core/current/mule.xsd
http://www.mulesoft.org/schema/mule/bigquery http://www.mulesoft.org/schema/mule/bigquery/current/mule-bigquery.xsd
http://www.mulesoft.org/schema/mule/http http://www.mulesoft.org/schema/mule/http/current/mule-http.xsd
http://www.mulesoft.org/schema/mule/os http://www.mulesoft.org/schema/mule/os/current/mule-os.xsd
		http://www.mulesoft.org/schema/mule/secure-properties http://www.mulesoft.org/schema/mule/secure-properties/current/mule-secure-properties.xsd">
	<secure-properties:config name="Secure_Properties_Config_demo" doc:name="Secure Properties Config"  file="mule-artifact.properties" key="mulesoft" >
		<secure-properties:encrypt algorithm="Blowfish" />
	</secure-properties:config>

	<configuration-properties
			file="mule-artifact.properties" />
	<http:request-config
			name="HTTP_Request_configuration"
			doc:name="HTTP Request configuration"
			>
		<http:request-connection host="127.0.0.1"
								 port="8087"/>
	</http:request-config>
	<http:listener-config name="HTTP_Listener_config"
						  doc:name="HTTP Listener config"
						  >
		<http:listener-connection host="0.0.0.0"
								  port="8082" />
	</http:listener-config>
	<http:listener-config
			name="HTTP_Listener_config1_Test" doc:name="HTTP Listener config">
		<http:listener-connection host="127.0.0.1"
								  port="8087" usePersistentConnections="false"
								  connectionIdleTimeout="4000" />
	</http:listener-config>
	<bigquery:config name="BigQuery__Configuration"
					 doc:name="BigQuery  Configuration"
					 >
		<bigquery:oauth2-connection projectId="${config.projectId}">
			<bigquery:oauth-authorization-code
					consumerKey="${secure::config.consumerKey}"
					consumerSecret="${secure::config.consumerSecret}"
					resourceOwnerId="demo" />
			<bigquery:oauth-callback-config
					listenerConfig="HTTP_Listener_config1_Test" callbackPath="/callback"
					authorizePath="/authorize" />
		</bigquery:oauth2-connection>
	</bigquery:config>
	<flow name="getQueryResultFlow">
		<http:listener doc:name="Listener"
					   config-ref="HTTP_Listener_config" path="/get/results" />
		<bigquery:get-query-results doc:name="Get Query Result Paged" config-ref="BigQuery__Configuration" maxResults="25" jobId="#[attributes.queryParams.jobId]">
			<ee:repeatable-file-store-iterable inMemoryObjects="1000" />
		</bigquery:get-query-results>
		<logger level="INFO" doc:name="Logger"
			 message="#[payload]" />
	</flow>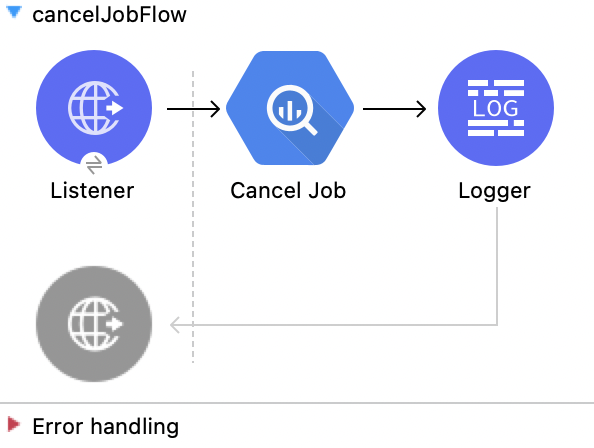
</mule>ジョブのキャンセル
この Mule フローでは、指定されたジョブ ID からジョブをキャンセルします。
この例では、次の操作を使用します。
-
HTTP Listener
HTTP 要求からデータを受け取ります。 -
Cancel Job
ジョブをキャンセルします。次の値を入力します。
項目 値 Job id (ジョブ ID)
attributes.queryParams.jobIdContent-Type (コンテンツタイプ)
application/json -
Logger
Cancel Job 操作からの HTTP 応答を表示します。
この例の XML
この例のフローをすばやく Mule アプリケーションに読み込むには、次のコードを Studio XML エディターに貼り付けます。
<?xml version="1.0" encoding="UTF-8"?>

<mule xmlns:ee="http://www.mulesoft.org/schema/mule/ee/core"
	  xmlns:os="http://www.mulesoft.org/schema/mule/os"
	  xmlns:http="http://www.mulesoft.org/schema/mule/http"
	  xmlns:bigquery="http://www.mulesoft.org/schema/mule/bigquery"
	  xmlns="http://www.mulesoft.org/schema/mule/core"
	  xmlns:doc="http://www.mulesoft.org/schema/mule/documentation"
	  xmlns:xsi="http://www.w3.org/2001/XMLSchema-instance"
	  xmlns:secure-properties="http://www.mulesoft.org/schema/mule/secure-properties"
	  xsi:schemaLocation="
http://www.mulesoft.org/schema/mule/ee/core http://www.mulesoft.org/schema/mule/ee/core/current/mule-ee.xsd http://www.mulesoft.org/schema/mule/core http://www.mulesoft.org/schema/mule/core/current/mule.xsd
http://www.mulesoft.org/schema/mule/bigquery http://www.mulesoft.org/schema/mule/bigquery/current/mule-bigquery.xsd
http://www.mulesoft.org/schema/mule/http http://www.mulesoft.org/schema/mule/http/current/mule-http.xsd
http://www.mulesoft.org/schema/mule/os http://www.mulesoft.org/schema/mule/os/current/mule-os.xsd
		http://www.mulesoft.org/schema/mule/secure-properties http://www.mulesoft.org/schema/mule/secure-properties/current/mule-secure-properties.xsd">
	<secure-properties:config name="Secure_Properties_Config_demo" doc:name="Secure Properties Config"  file="mule-artifact.properties" key="mulesoft" >
		<secure-properties:encrypt algorithm="Blowfish" />
	</secure-properties:config>

	<configuration-properties
			file="mule-artifact.properties" />
	<http:request-config
			name="HTTP_Request_configuration"
			doc:name="HTTP Request configuration"
			>
		<http:request-connection host="127.0.0.1"
								 port="8087"/>
	</http:request-config>
	<http:listener-config name="HTTP_Listener_config"
						  doc:name="HTTP Listener config"
						  >
		<http:listener-connection host="0.0.0.0"
								  port="8082" />
	</http:listener-config>
	<http:listener-config
			name="HTTP_Listener_config1_Test" doc:name="HTTP Listener config">
		<http:listener-connection host="127.0.0.1"
								  port="8087" usePersistentConnections="false"
								  connectionIdleTimeout="4000" />
	</http:listener-config>
	<bigquery:config name="BigQuery__Configuration"
					 doc:name="BigQuery  Configuration"
					 >
		<bigquery:oauth2-connection projectId="${config.projectId}">
			<bigquery:oauth-authorization-code
					consumerKey="${secure::config.consumerKey}"
					consumerSecret="${secure::config.consumerSecret}"
					resourceOwnerId="demo" />
			<bigquery:oauth-callback-config
					listenerConfig="HTTP_Listener_config1_Test" callbackPath="/callback"
					authorizePath="/authorize" />
		</bigquery:oauth2-connection>
	</bigquery:config>
	<flow name="cancelJobFlow">
		<http:listener doc:name="Listener"
					   config-ref="HTTP_Listener_config" path="/cancel" />
		<bigquery:cancel-job doc:name="Cancel Job"
							 config-ref="BigQuery__Configuration"
							 jobId="#[attributes.queryParams.jobId]" />
		<logger level="INFO" doc:name="Logger" />
	</flow>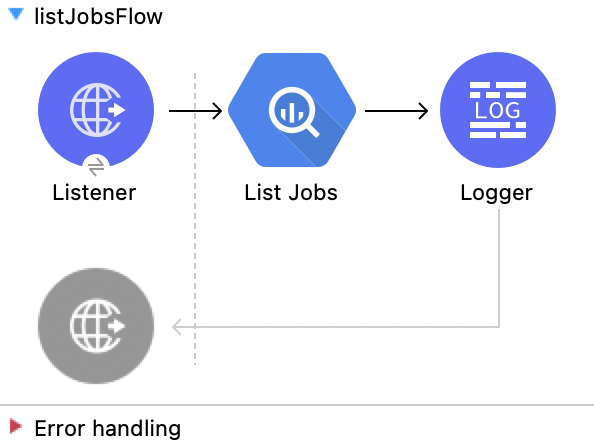
</mule>ジョブのリスト
この Mule フローでは、プロジェクトからジョブを取得します。
この例では、次の操作を使用します。
-
HTTP Listener
HTTP 要求からデータを受け取ります。 -
List Jobs
ジョブをリストします。次の値を入力します。
項目 値 Content-Type (コンテンツタイプ)
application/jsonMax Results (最大結果数)
30Pretty Print (プリティプリント)
False (デフォルト) -
Logger
List Jobs 操作からの HTTP 応答を表示します。
この例の XML
この例のフローをすばやく Mule アプリケーションに読み込むには、次のコードを Studio XML エディターに貼り付けます。
<?xml version="1.0" encoding="UTF-8"?>

<mule xmlns:ee="http://www.mulesoft.org/schema/mule/ee/core"
	  xmlns:os="http://www.mulesoft.org/schema/mule/os"
	  xmlns:http="http://www.mulesoft.org/schema/mule/http"
	  xmlns:bigquery="http://www.mulesoft.org/schema/mule/bigquery"
	  xmlns="http://www.mulesoft.org/schema/mule/core"
	  xmlns:doc="http://www.mulesoft.org/schema/mule/documentation"
	  xmlns:xsi="http://www.w3.org/2001/XMLSchema-instance"
	  xmlns:secure-properties="http://www.mulesoft.org/schema/mule/secure-properties"
	  xsi:schemaLocation="
http://www.mulesoft.org/schema/mule/ee/core http://www.mulesoft.org/schema/mule/ee/core/current/mule-ee.xsd http://www.mulesoft.org/schema/mule/core http://www.mulesoft.org/schema/mule/core/current/mule.xsd
http://www.mulesoft.org/schema/mule/bigquery http://www.mulesoft.org/schema/mule/bigquery/current/mule-bigquery.xsd
http://www.mulesoft.org/schema/mule/http http://www.mulesoft.org/schema/mule/http/current/mule-http.xsd
http://www.mulesoft.org/schema/mule/os http://www.mulesoft.org/schema/mule/os/current/mule-os.xsd
		http://www.mulesoft.org/schema/mule/secure-properties http://www.mulesoft.org/schema/mule/secure-properties/current/mule-secure-properties.xsd">
	<secure-properties:config name="Secure_Properties_Config_demo" doc:name="Secure Properties Config"  file="mule-artifact.properties" key="mulesoft" >
		<secure-properties:encrypt algorithm="Blowfish" />
	</secure-properties:config>

	<configuration-properties
			file="mule-artifact.properties" />
	<http:request-config
			name="HTTP_Request_configuration"
			doc:name="HTTP Request configuration"
			>
		<http:request-connection host="127.0.0.1"
								 port="8087"/>
	</http:request-config>
	<http:listener-config name="HTTP_Listener_config"
						  doc:name="HTTP Listener config"
						  >
		<http:listener-connection host="0.0.0.0"
								  port="8082" />
	</http:listener-config>
	<http:listener-config
			name="HTTP_Listener_config1_Test" doc:name="HTTP Listener config">
		<http:listener-connection host="127.0.0.1"
								  port="8087" usePersistentConnections="false"
								  connectionIdleTimeout="4000" />
	</http:listener-config>
	<bigquery:config name="BigQuery__Configuration"
					 doc:name="BigQuery  Configuration"
					 >
		<bigquery:oauth2-connection projectId="${config.projectId}">
			<bigquery:oauth-authorization-code
					consumerKey="${secure::config.consumerKey}"
					consumerSecret="${secure::config.consumerSecret}"
					resourceOwnerId="demo" />
			<bigquery:oauth-callback-config
					listenerConfig="HTTP_Listener_config1_Test" callbackPath="/callback"
					authorizePath="/authorize" />
		</bigquery:oauth2-connection>
	</bigquery:config>
	<flow name="listJobsFlow">
		<http:listener doc:name="Listener"
					   config-ref="HTTP_Listener_config" path="/list" />
		<bigquery:list-jobs doc:name="List Jobs"
							config-ref="BigQuery__Configuration" />
		<logger level="INFO" doc:name="Logger" />
	</flow>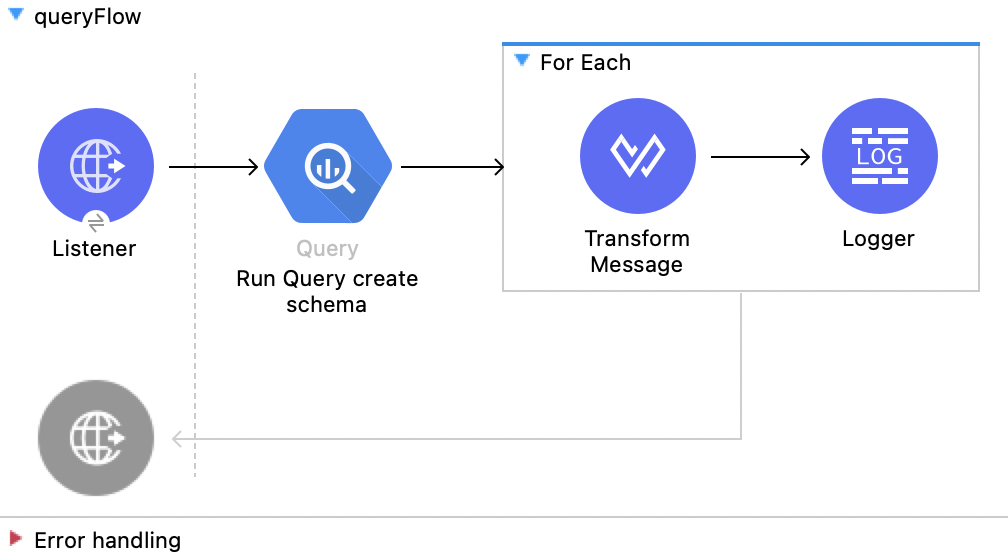
</mule>クエリ
この Mule フローでは、クエリジョブ値で指定されたクエリを実行します。
この例では、次の操作を使用します。
-
HTTP Listener
HTTP 要求からデータを受け取ります。 -
Query
クエリを実行します。次の値を入力します。
項目 値 Query values content (クエリ値のコンテンツ)
%dw 2.0 output application/json --- payload -
For Each
複数のコンポーネントを反復処理します。次の値を入力します。
項目 値 Counter Variable Name (カウンター変数名)
counterBatch Size (バッチサイズ)
1Root Message Variable Name (ルートメッセージ変数名)
rootMessage-
Transform Message
Query 操作の結果を JSON 形式で出力します。%dw 2.0 output application/json var resultt = read(payload."output","application/json") --- ((resultt.f) map ((item, index) -> {(payload.attributes.tableSchema.fields[index].name as String) : item.v} )) reduce ((item, accumulator) -> accumulator ++ item) -
Logger
Query 操作からの HTTP 応答を表示します。
-
この例の XML
この例のフローをすばやく Mule アプリケーションに読み込むには、次のコードを Studio XML エディターに貼り付けます。
<?xml version="1.0" encoding="UTF-8"?>
<mule xmlns:google-drive="http://www.mulesoft.org/schema/mule/google-drive"
	  xmlns:ee="http://www.mulesoft.org/schema/mule/ee/core"
	  xmlns:os="http://www.mulesoft.org/schema/mule/os"
	  xmlns:http="http://www.mulesoft.org/schema/mule/http"
	  xmlns:bigquery="http://www.mulesoft.org/schema/mule/bigquery"
	  xmlns="http://www.mulesoft.org/schema/mule/core"
	  xmlns:doc="http://www.mulesoft.org/schema/mule/documentation"
	  xmlns:xsi="http://www.w3.org/2001/XMLSchema-instance"
	  xmlns:secure-properties="http://www.mulesoft.org/schema/mule/secure-properties" xsi:schemaLocation="
http://www.mulesoft.org/schema/mule/ee/core http://www.mulesoft.org/schema/mule/ee/core/current/mule-ee.xsd http://www.mulesoft.org/schema/mule/core http://www.mulesoft.org/schema/mule/core/current/mule.xsd
http://www.mulesoft.org/schema/mule/bigquery http://www.mulesoft.org/schema/mule/bigquery/current/mule-bigquery.xsd
http://www.mulesoft.org/schema/mule/http http://www.mulesoft.org/schema/mule/http/current/mule-http.xsd
http://www.mulesoft.org/schema/mule/os http://www.mulesoft.org/schema/mule/os/current/mule-os.xsd
		http://www.mulesoft.org/schema/mule/secure-properties http://www.mulesoft.org/schema/mule/secure-properties/current/mule-secure-properties.xsd
http://www.mulesoft.org/schema/mule/google-drive http://www.mulesoft.org/schema/mule/google-drive/current/mule-google-drive.xsd">
	<secure-properties:config name="Secure_Properties_Config_demo" doc:name="Secure Properties Config"  file="mule-artifact.properties" key="mulesoft" >
		<secure-properties:encrypt algorithm="Blowfish" />
	</secure-properties:config>
	<configuration-properties
			file="mule-artifact.properties" />
	<http:request-config
			name="HTTP_Request_configuration"
			doc:name="HTTP Request configuration"
			>
		<http:request-connection host="127.0.0.1"
								 port="8087"/>
	</http:request-config>
	<http:listener-config name="HTTP_Listener_config"
						  doc:name="HTTP Listener config"
						  >
		<http:listener-connection host="0.0.0.0"
								  port="8082" />
	</http:listener-config>
	<http:listener-config
			name="HTTP_Listener_config1_Test" doc:name="HTTP Listener config">
		<http:listener-connection host="127.0.0.1"
								  port="8087" usePersistentConnections="false"
								  connectionIdleTimeout="4000" />
	</http:listener-config>
	<bigquery:config name="BigQuery__Configuration"
					 doc:name="BigQuery  Configuration"
					 >
		<bigquery:oauth2-connection projectId="${config.projectId}">
			<bigquery:oauth-authorization-code
					consumerKey="${secure::config.consumerKey}"
					consumerSecret="${secure::config.consumerSecret}"
					resourceOwnerId="demo" />
			<bigquery:oauth-callback-config
					listenerConfig="HTTP_Listener_config1_Test" callbackPath="/callback"
					authorizePath="/authorize" />
		</bigquery:oauth2-connection>
	</bigquery:config>
	<flow name="queryFlow">
		<http:listener doc:name="Listener"
					   config-ref="HTTP_Listener_config" path="/query" />
		<bigquery:query doc:name="Run Query create schema" config-ref="BigQuery__Configuration" responseTimeout="300" responseTimeoutUnit="SECONDS" >
			<bigquery:query-values-content ><![CDATA[#[%dw 2.0
output application/json
---
payload]]]></bigquery:query-values-content>
		</bigquery:query>
		<foreach doc:name="For Each" >
			<ee:transform doc:name="Transform Message">
				<ee:message>
					<ee:set-payload><![CDATA[%dw 2.0
output application/json
var resultt = read(payload."output","application/json")
---
((resultt.f) map ((item, index) ->
        {(payload.attributes.tableSchema.fields[index].name as String) : item.v}
    ))
    reduce ((item, accumulator) -> accumulator ++ item)
]]></ee:set-payload>
				</ee:message>
			</ee:transform>
			<logger level="INFO" doc:name="Logger" message="#[payload]"/>
		</foreach>
	</flow>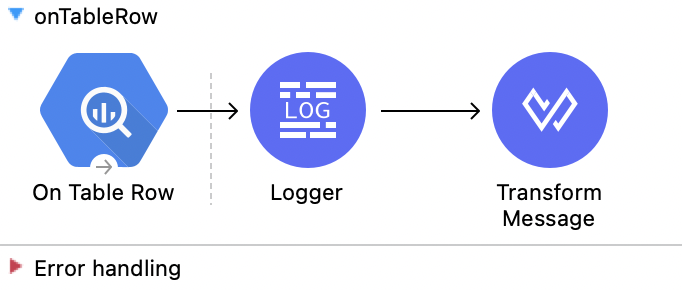
</mule>On Table Row の使用
この Mule フローでは、On Table Row ソースを使用します。
この例では、次の操作を使用します。
-
On Table Row
ウォーターマークに基づいてテーブルのすべての行を返します。次の値を入力します。
項目 値 Scheduling Strategy (スケジュール戦略)
Fixed FrequencyFrequency (頻度)
1000Start delay (開始遅延)
0Time unit (時間単位)
MILLISECONDS (Default)Dataset name (データセット名)
test124Table name (テーブル名)
table_dataWatermark column (ウォーターマーク列)
idSince (以降)
1Column id (列 ID)
id -
Logger
On Table Row ソースからの HTTP 応答を表示します。 -
Transform Message
On Table Row 操作の結果を JSON 形式で出力します。%dw 2.0 output application/json --- payload
この例の XML
この例のフローをすばやく Mule アプリケーションに読み込むには、次のコードを Studio XML エディターに貼り付けます。
<?xml version="1.0" encoding="UTF-8"?>

<mule xmlns:ee="http://www.mulesoft.org/schema/mule/ee/core"
	  xmlns:os="http://www.mulesoft.org/schema/mule/os"
	  xmlns:http="http://www.mulesoft.org/schema/mule/http"
	  xmlns:bigquery="http://www.mulesoft.org/schema/mule/bigquery"
	  xmlns="http://www.mulesoft.org/schema/mule/core"
	  xmlns:doc="http://www.mulesoft.org/schema/mule/documentation"
	  xmlns:xsi="http://www.w3.org/2001/XMLSchema-instance"
	  xmlns:secure-properties="http://www.mulesoft.org/schema/mule/secure-properties"
	  xsi:schemaLocation="
http://www.mulesoft.org/schema/mule/ee/core http://www.mulesoft.org/schema/mule/ee/core/current/mule-ee.xsd http://www.mulesoft.org/schema/mule/core http://www.mulesoft.org/schema/mule/core/current/mule.xsd
http://www.mulesoft.org/schema/mule/bigquery http://www.mulesoft.org/schema/mule/bigquery/current/mule-bigquery.xsd
http://www.mulesoft.org/schema/mule/http http://www.mulesoft.org/schema/mule/http/current/mule-http.xsd
http://www.mulesoft.org/schema/mule/os http://www.mulesoft.org/schema/mule/os/current/mule-os.xsd
		http://www.mulesoft.org/schema/mule/secure-properties http://www.mulesoft.org/schema/mule/secure-properties/current/mule-secure-properties.xsd">
	<secure-properties:config name="Secure_Properties_Config_demo" doc:name="Secure Properties Config"  file="mule-artifact.properties" key="mulesoft" >
		<secure-properties:encrypt algorithm="Blowfish" />
	</secure-properties:config>

	<configuration-properties
			file="mule-artifact.properties" />
	<http:request-config
			name="HTTP_Request_configuration"
			doc:name="HTTP Request configuration"
			>
		<http:request-connection host="127.0.0.1"
								 port="8087"/>
	</http:request-config>
	<http:listener-config name="HTTP_Listener_config"
						  doc:name="HTTP Listener config"
						  >
		<http:listener-connection host="0.0.0.0"
								  port="8082" />
	</http:listener-config>
	<http:listener-config
			name="HTTP_Listener_config1_Test" doc:name="HTTP Listener config">
		<http:listener-connection host="127.0.0.1"
								  port="8087" usePersistentConnections="false"
								  connectionIdleTimeout="4000" />
	</http:listener-config>
	<bigquery:config name="BigQuery__Configuration"
					 doc:name="BigQuery  Configuration"
					 >
		<bigquery:oauth2-connection projectId="${config.projectId}">
			<bigquery:oauth-authorization-code
					consumerKey="${secure::config.consumerKey}"
					consumerSecret="${secure::config.consumerSecret}"
					resourceOwnerId="demo" />
			<bigquery:oauth-callback-config
					listenerConfig="HTTP_Listener_config1_Test" callbackPath="/callback"
					authorizePath="/authorize" />
		</bigquery:oauth2-connection>
	</bigquery:config>
	<flow name="onTableRow">
		<bigquery:on-table-row doc:name="On Table Row"
							   config-ref="BigQuery__Configuration" datasetName="test124"
							   tableName="table_data" watermarkColumn="id" since="'1'"
							   columnId="id">
			<scheduling-strategy>
				<fixed-frequency />
			</scheduling-strategy>
		</bigquery:on-table-row>
		<logger level="INFO" doc:name="Logger" />
		<ee:transform doc:name="Transform Message">
			<ee:message>
				<ee:set-payload><![CDATA[%dw 2.0
output application/json
---
payload]]></ee:set-payload>
			</ee:message>
		</ee:transform>
	</flow>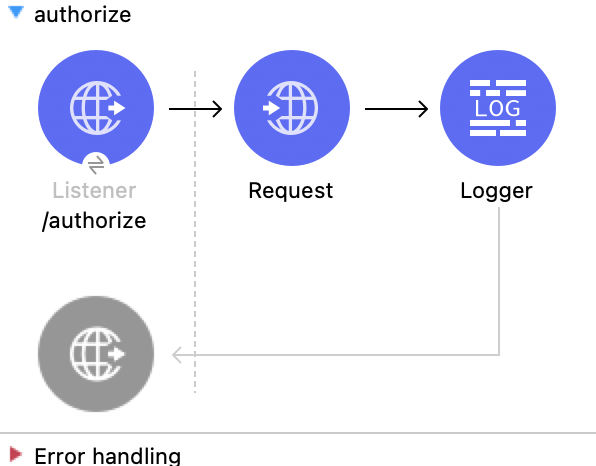
</mule>認証
この Mule フローでは、接続を認証します。
この例では、次の操作を使用します。
-
HTTP Listener
HTTP 要求からデータを受け取ります。 -
Request
HTTP サービスをコンシュームします。次の値を入力します。
項目 値 Method (メソッド)
GET (Default)Path (パス)
/authorize?resourceOwnerId=demoBody (本文)
payload -
Logger
Request 操作からの HTTP 応答を表示します。
この例の XML
この例のフローをすばやく Mule アプリケーションに読み込むには、次のコードを Studio XML エディターに貼り付けます。
<?xml version="1.0" encoding="UTF-8"?>

<mule xmlns:ee="http://www.mulesoft.org/schema/mule/ee/core"
	  xmlns:os="http://www.mulesoft.org/schema/mule/os"
	  xmlns:http="http://www.mulesoft.org/schema/mule/http"
	  xmlns:bigquery="http://www.mulesoft.org/schema/mule/bigquery"
	  xmlns="http://www.mulesoft.org/schema/mule/core"
	  xmlns:doc="http://www.mulesoft.org/schema/mule/documentation"
	  xmlns:xsi="http://www.w3.org/2001/XMLSchema-instance"
	  xmlns:secure-properties="http://www.mulesoft.org/schema/mule/secure-properties"
	  xsi:schemaLocation="
http://www.mulesoft.org/schema/mule/ee/core http://www.mulesoft.org/schema/mule/ee/core/current/mule-ee.xsd http://www.mulesoft.org/schema/mule/core http://www.mulesoft.org/schema/mule/core/current/mule.xsd
http://www.mulesoft.org/schema/mule/bigquery http://www.mulesoft.org/schema/mule/bigquery/current/mule-bigquery.xsd
http://www.mulesoft.org/schema/mule/http http://www.mulesoft.org/schema/mule/http/current/mule-http.xsd
http://www.mulesoft.org/schema/mule/os http://www.mulesoft.org/schema/mule/os/current/mule-os.xsd
		http://www.mulesoft.org/schema/mule/secure-properties http://www.mulesoft.org/schema/mule/secure-properties/current/mule-secure-properties.xsd">
	<secure-properties:config name="Secure_Properties_Config_demo" doc:name="Secure Properties Config"  file="mule-artifact.properties" key="mulesoft" >
		<secure-properties:encrypt algorithm="Blowfish" />
	</secure-properties:config>

	<configuration-properties
			file="mule-artifact.properties" />
	<http:request-config
			name="HTTP_Request_configuration"
			doc:name="HTTP Request configuration"
			>
		<http:request-connection host="127.0.0.1"
								 port="8087"/>
	</http:request-config>
	<http:listener-config name="HTTP_Listener_config"
						  doc:name="HTTP Listener config"
						  >
		<http:listener-connection host="0.0.0.0"
								  port="8082" />
	</http:listener-config>
	<http:listener-config
			name="HTTP_Listener_config1_Test" doc:name="HTTP Listener config">
		<http:listener-connection host="127.0.0.1"
								  port="8087" usePersistentConnections="false"
								  connectionIdleTimeout="4000" />
	</http:listener-config>
	<bigquery:config name="BigQuery__Configuration"
					 doc:name="BigQuery  Configuration"
					 >
		<bigquery:oauth2-connection projectId="${config.projectId}">
			<bigquery:oauth-authorization-code
					consumerKey="${secure::config.consumerKey}"
					consumerSecret="${secure::config.consumerSecret}"
					resourceOwnerId="demo" />
			<bigquery:oauth-callback-config
					listenerConfig="HTTP_Listener_config1_Test" callbackPath="/callback"
					authorizePath="/authorize" />
		</bigquery:oauth2-connection>
	</bigquery:config>
	<flow name="authorize">
		<http:listener doc:name="/authorize"
					   config-ref="HTTP_Listener_config" path="/authorize">
			<http:response>
				<http:headers><![CDATA[#[{'content-type' : 'text/html'}]]]></http:headers>
			</http:response>
		</http:listener>
		<http:request method="GET" doc:name="Request"
					  config-ref="HTTP_Request_configuration"
					  path="/authorize?resourceOwnerId=demo">
		</http:request>
		<logger level="INFO" doc:name="Logger"
			 message="#[payload]" />
	</flow>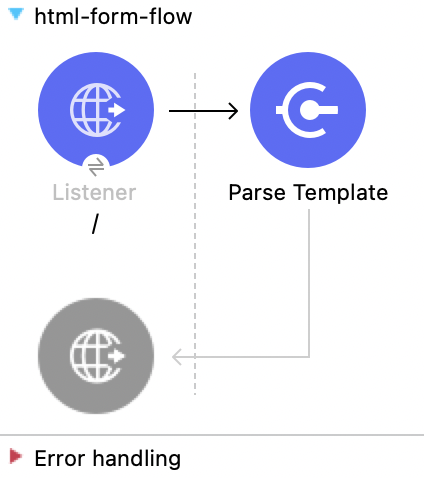
</mule>HTML フォームの表示
この Mule フローでは、HTML フォームを表示します。
この例では、次の操作を使用します。
-
HTTP Listener
HTTP 要求からデータを受け取ります。 -
Parse Template
テンプレートを処理します。次の値を入力します。
項目 値 Location (場所)
index.html
この例の XML
この例のフローをすばやく Mule アプリケーションに読み込むには、次のコードを Studio XML エディターに貼り付けます。
<?xml version="1.0" encoding="UTF-8"?>

<mule xmlns:ee="http://www.mulesoft.org/schema/mule/ee/core"
	  xmlns:os="http://www.mulesoft.org/schema/mule/os"
	  xmlns:http="http://www.mulesoft.org/schema/mule/http"
	  xmlns:bigquery="http://www.mulesoft.org/schema/mule/bigquery"
	  xmlns="http://www.mulesoft.org/schema/mule/core"
	  xmlns:doc="http://www.mulesoft.org/schema/mule/documentation"
	  xmlns:xsi="http://www.w3.org/2001/XMLSchema-instance"
	  xmlns:secure-properties="http://www.mulesoft.org/schema/mule/secure-properties"
	  xsi:schemaLocation="
http://www.mulesoft.org/schema/mule/ee/core http://www.mulesoft.org/schema/mule/ee/core/current/mule-ee.xsd http://www.mulesoft.org/schema/mule/core http://www.mulesoft.org/schema/mule/core/current/mule.xsd
http://www.mulesoft.org/schema/mule/bigquery http://www.mulesoft.org/schema/mule/bigquery/current/mule-bigquery.xsd
http://www.mulesoft.org/schema/mule/http http://www.mulesoft.org/schema/mule/http/current/mule-http.xsd
http://www.mulesoft.org/schema/mule/os http://www.mulesoft.org/schema/mule/os/current/mule-os.xsd
		http://www.mulesoft.org/schema/mule/secure-properties http://www.mulesoft.org/schema/mule/secure-properties/current/mule-secure-properties.xsd">
	<secure-properties:config name="Secure_Properties_Config_demo" doc:name="Secure Properties Config"  file="mule-artifact.properties" key="mulesoft" >
		<secure-properties:encrypt algorithm="Blowfish" />
	</secure-properties:config>

	<configuration-properties
			file="mule-artifact.properties" />
	<http:request-config
			name="HTTP_Request_configuration"
			doc:name="HTTP Request configuration"
			>
		<http:request-connection host="127.0.0.1"
								 port="8087"/>
	</http:request-config>
	<http:listener-config name="HTTP_Listener_config"
						  doc:name="HTTP Listener config"
						  >
		<http:listener-connection host="0.0.0.0"
								  port="8082" />
	</http:listener-config>
	<http:listener-config
			name="HTTP_Listener_config1_Test" doc:name="HTTP Listener config">
		<http:listener-connection host="127.0.0.1"
								  port="8087" usePersistentConnections="false"
								  connectionIdleTimeout="4000" />
	</http:listener-config>
	<bigquery:config name="BigQuery__Configuration"
					 doc:name="BigQuery  Configuration"
					 >
		<bigquery:oauth2-connection projectId="${config.projectId}">
			<bigquery:oauth-authorization-code
					consumerKey="${secure::config.consumerKey}"
					consumerSecret="${secure::config.consumerSecret}"
					resourceOwnerId="demo" />
			<bigquery:oauth-callback-config
					listenerConfig="HTTP_Listener_config1_Test" callbackPath="/callback"
					authorizePath="/authorize" />
		</bigquery:oauth2-connection>
	</bigquery:config>
	<flow name="html-form-flow">
		<http:listener doc:name="/"
					   config-ref="HTTP_Listener_config" path="/">
			<http:response>
				<http:headers><![CDATA[#[{'content-type' : 'text/html'}]]]></http:headers>
			</http:response>
		</http:listener>
		<parse-template doc:name="Parse Template"
						location="index.html" />
	</flow>
</mule>