Microsoft Dynamics 365 Business Central Connector 1.0 の例
始める前に
-
Java 8、11、または 17
-
Anypoint Studio 7.x
-
Mule Runtime Engine (Mule) 4.3.0 以降
-
Business Central インスタンスのログイン情報
-
Azure Active Directory アプリケーションレジストリ内の登録済みの OAuth で保護されたアプリケーション
Business Central 接続の設定
Business Central 接続の項目値を指定して、接続を保護します。次の手順を実行します。
Business Central 接続の設定ファイルを作成する
Business Central 接続のプロパティが含まれる設定ファイルを作成します。
-
/src/main/resources/ フォルダー内に mule-app.properties という名前のファイルを作成します。 -
mule-app.properties ファイルで、次のように Basic Auth または OAuth2 の一連のプロパティを作成します。括弧で囲まれたテキスト (括弧を含む) は、各自の設定の適切な値に置き換えます。# Config config.tenantId= config.environment=Production # OAuth2 Configuration oauth.client.id= oauth.client.secret= oauth.callbackPath=callback # Api api.companyId= # Static Configuration config.baseUri=https://api.businesscentral.dynamics.com/v2.0/${config.tenantId}/${config.environment}/api/v2.0/ oauth.authUrl=https://login.microsoftonline.com/${config.tenantId}/oauth2/v2.0/authorize oauth.tokenUrl=https://login.microsoftonline.com/${config.tenantId}/oauth2/v2.0/token oauth.externalCallbackPath=http://localhost:${http.port}/${oauth.callbackPath}プロパティファイルの作成についての詳細は、「プロパティプレースホルダーの設定」を参照してください。
会社 ID を見つける
会社 ID を見つける手順は、次のとおりです。
-
Business Central アカウントにログインし、[Companies (会社)] タブに移動します。
-
使用する会社を選択します。
![[Companies (会社)] タブウィンドウ](_images/company-id-1.png)
-
右上隅にある疑問符ボタンをクリックし、[Help & Support (ヘルプとサポート)] を選択します。
-
トラブルシューティングセクションの下の [Inspect pages and data (ページとデータを調査)] をクリックします。
-
調査内で検索項目に「
Id」と入力すると、最初の結果に会社 ID が含まれています。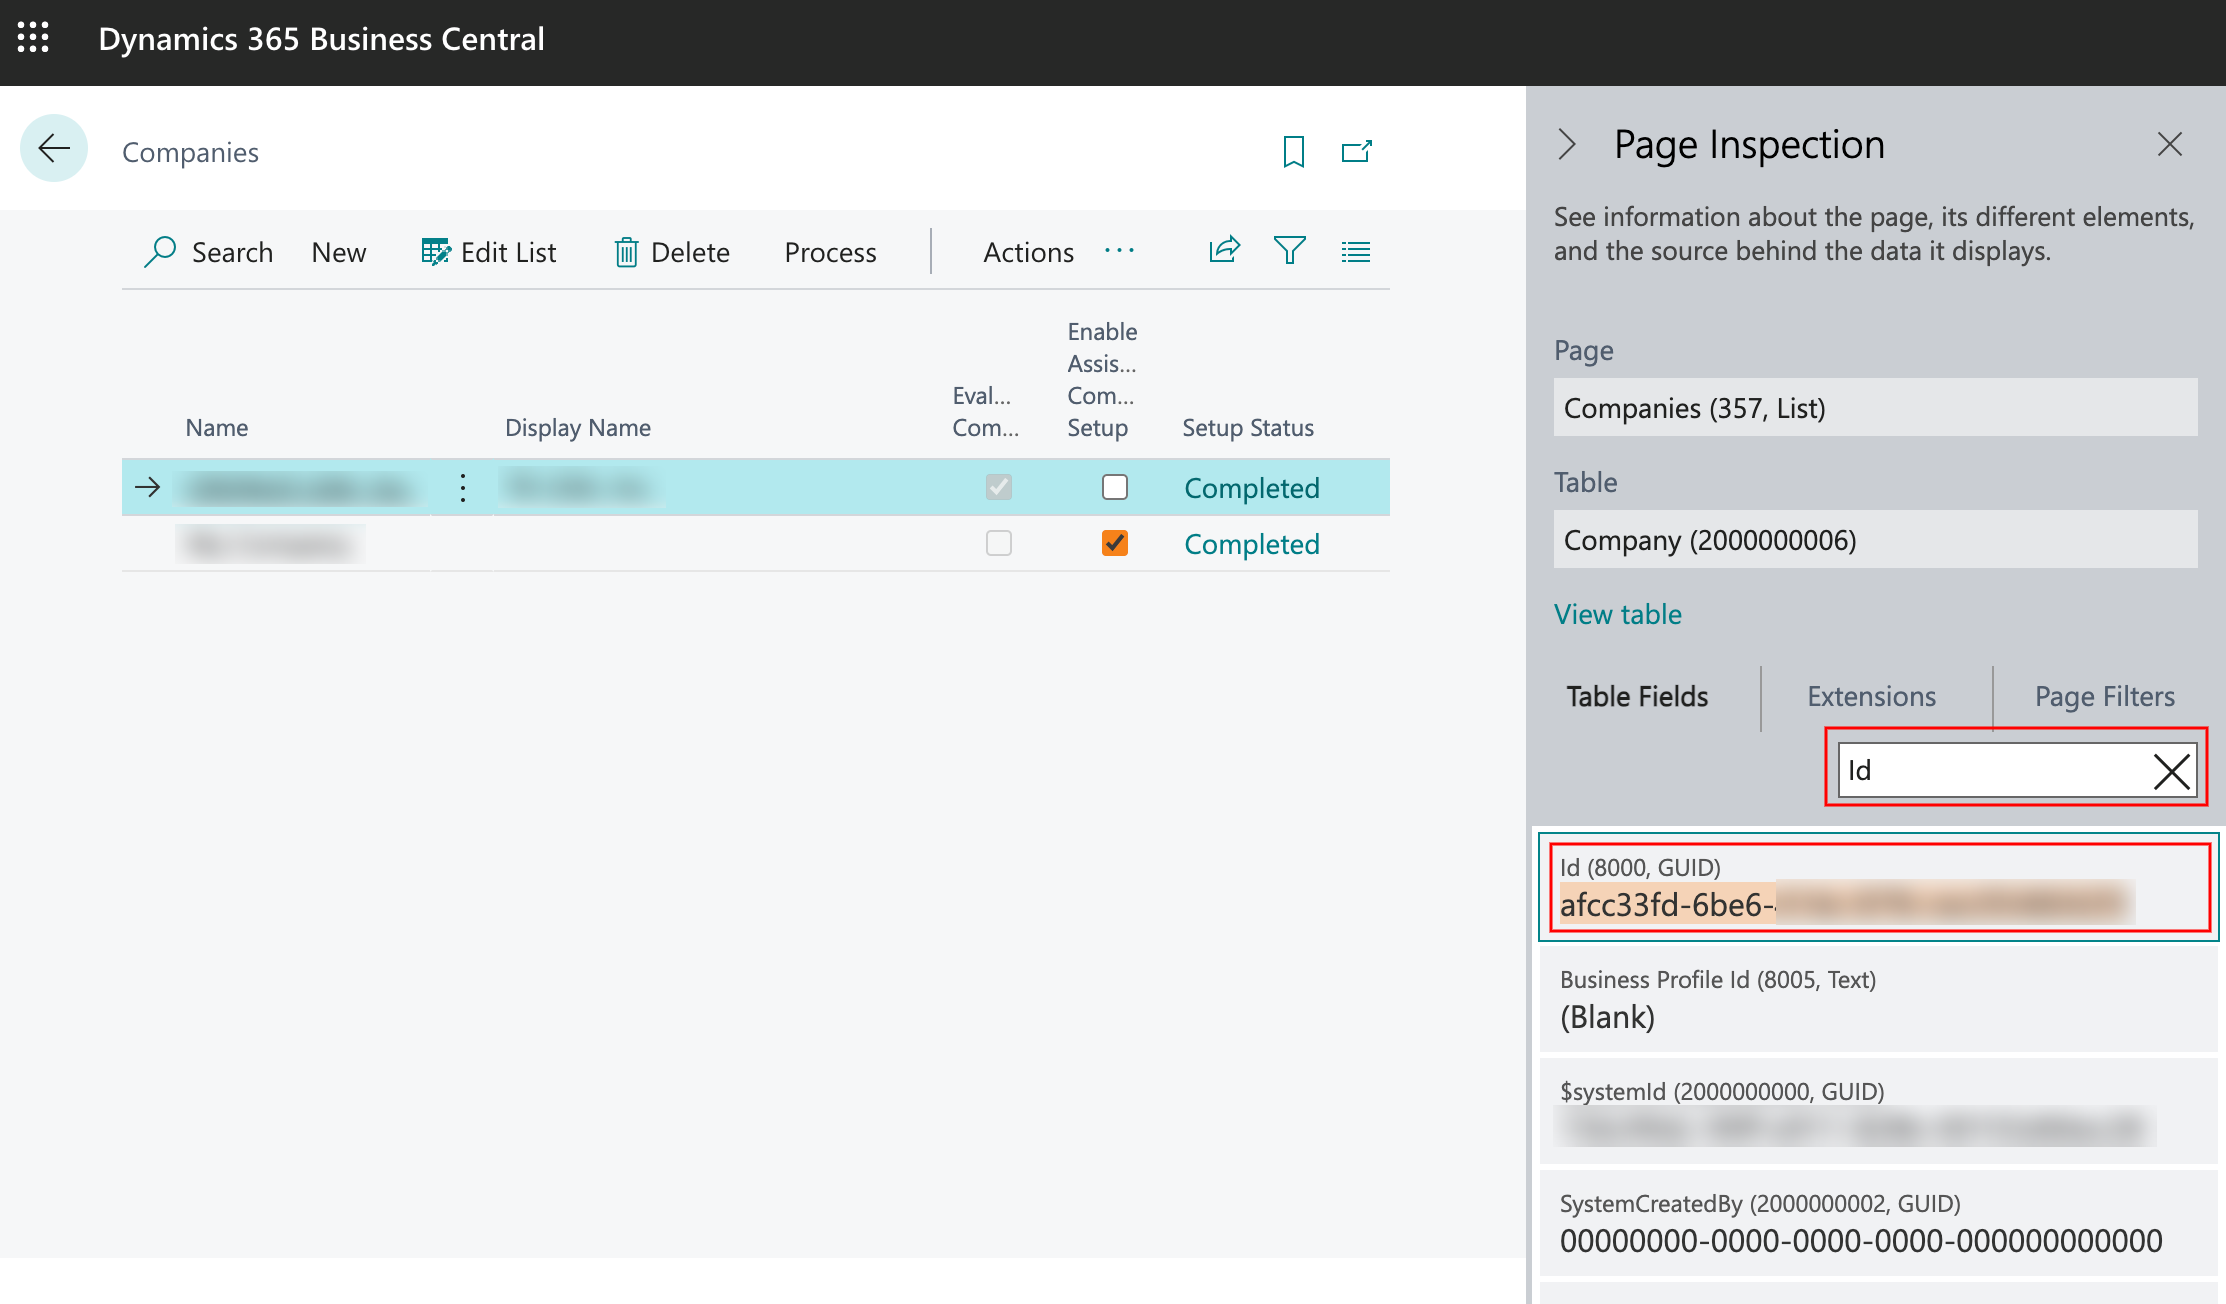
この ID をコピーして
src/main/resources/mule-app.properties ファイルの api.companyId= プロパティに貼り付けることができます。
Business Central Connection グローバル要素を設定する
Basic Auth または OAuth2 のグローバル要素を設定します。
-
新しい Mule プロジェクトを作成します。
-
[Mule Palette (Mule パレット)] ビューで、[Search in Exchange (Exchange 内を検索)] をクリックして「
microsoft dynamics 365 business central」と入力します。 -
[Selected modules (選択したモジュール)] セクションに [Microsoft Dynamics 365 Business Central Connector] を追加し、[Finish (完了)] をクリックします。
-
[Global Elements (グローバル要素)] タブをクリックし、[Create (作成)] をクリックします。
-
[Connector Configuration (コネクタ設定)] > [Basic Auth (基本認証)] または [Connector Configuration (コネクタ設定)] > [OAuth2] を選択し、[OK] をクリックします。
-
次の値を入力します。
-
基本認証の場合は次の値を入力します。
項目 値 名前
Basic AuthUsername (ユーザー名)
要求の認証に使用するユーザー名
-
OAuth2 の場合は次の値を入力します。
項目 値 名前
OAuth2Consumer Key (コンシューマーキー)
サービスプロバイダーに登録されている OAuth コンシューマーキー
Consumer Secret (コンシューマーシークレット)
サービスプロバイダーに登録されている OAuth コンシューマーシークレット
リスナー設定
アクセストークンコールバックエンドポイントで要求をリスンする HTTP リスナー設定
Callback Path (コールバックパス)
アクセストークンコールバックエンドポイントのパス。
Authorize Path (認証パス)
OAuth ダンスをトリガーするローカル HTTP エンドポイントのパス。
-
-
[OK] をクリックします。
プロパティファイルのグローバル要素を設定する
mule-app.properties ファイルのグローバル要素を設定して、Mule がその場所を認識できるようにします。
-
[Global Elements (グローバル要素)] タブをクリックし、[Create (作成)] をクリックします。
-
[Choose Global Type (グローバル種別の選択)] ダイアログで、[Configuration properties (設定プロパティ)] を選択し、[OK] をクリックします。
-
[File (ファイル)] 項目に「
mule.app.properties」と入力します。 -
[OK] をクリックします。
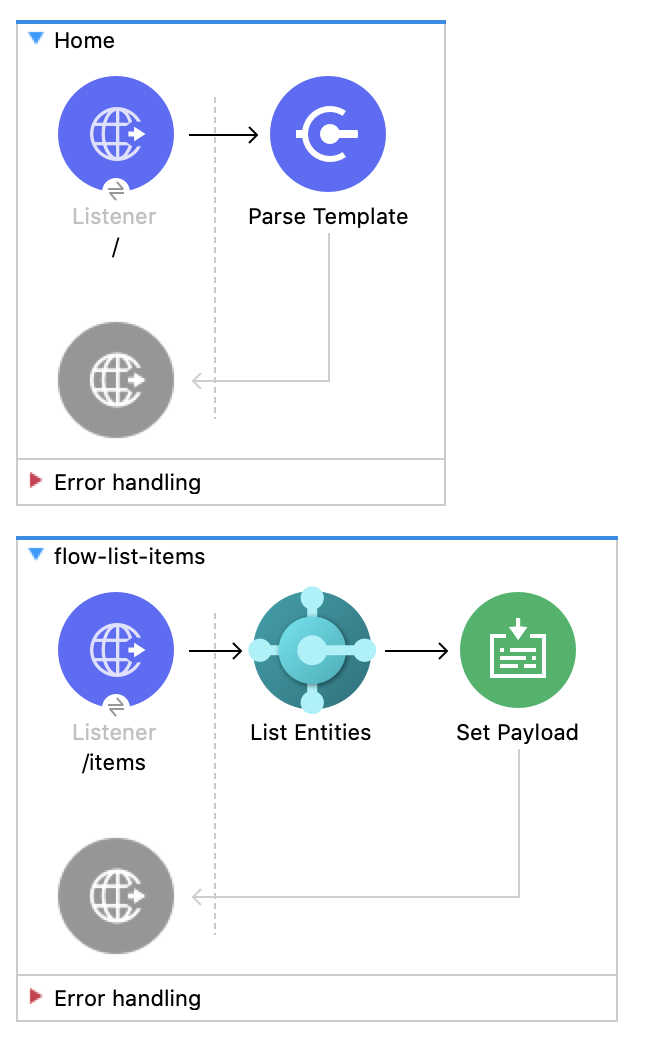
項目をリストする
この Mule フローでは、すべての項目をリストします。
最初のフローは次の操作を使用します。
-
HTTP Listener
HTTP 要求からデータを受け取ります。 -
Parse Template
テンプレートを処理します。
2 番目のフローは次の操作を使用します。
-
HTTP Listener
HTTP 要求からデータを受け取ります。 -
List Entities
エンティティのリストを取得します。 -
Set Payload
ペイロードを設定する方法を定義します。
output application/json
---
payload.payload map (item) -> {
		"id": item.id,
		"name": item.displayName
	}
この例のテンプレート
次の HTML テンプレートを使用してファイルを作成し、コンテンツをコピーすることで、グラフィカルインターフェースを使用してアプリケーションをテストできます。
<!--
    (c) 2003-2022 MuleSoft, Inc. This software is protected under international
    copyright law. All use of this software is subject to MuleSoft's Main
    Services Agreement (or other Terms of Service) separately entered
    into between you and MuleSoft. If such an agreement is not in
    place, you may not use the software.
-->
<!DOCTYPE html>
<html lang="en">
<head>
    <meta charset="utf-8">
    <meta http-equiv="X-UA-Compatible" content="IE=edge">

    <!-- JQuery will be required for this demo -->
    <script src="http://cdnjs.cloudflare.com/ajax/libs/jquery/2.1.0/jquery.js"></script>

    <!-- Import Twitter bootstrap libs + css -->
    <link rel="stylesheet" type="text/css"
          href="http://cdnjs.cloudflare.com/ajax/libs/twitter-bootstrap/3.1.1/css/bootstrap.css">
    <script src="http://cdnjs.cloudflare.com/ajax/libs/twitter-bootstrap/3.1.1/js/bootstrap.js"></script>
</head>
<body>
<!-- Keep this simple ... define CSS for this simple webpage in the same file -->
<style>
    body {
    padding-top: 40px;
    padding-bottom: 40px;
    background-color: #eee;
    }
    .demo-form {
    max-width: 500px;
    padding: 15px;
    margin: 0 auto;
    }
    .demo-form .demo-heading,
    .demo-form .checkbox {
    margin-bottom: 10px;
    }
    .demo-form .checkbox {
    font-weight: normal;
    }
    .demo-form .form-control {
    position: relative;
    height: auto;
    -webkit-box-sizing: border-box;
    -moz-box-sizing: border-box;
    box-sizing: border-box;
    padding: 10px;
    font-size: 16px;
    }
    .demo-form .form-control:focus {
    z-index: 2;
    }
</style>
<script type="text/javascript">
		$(document).ready( function() {

			var operationOneForm 	= $('#operationOneForm');

			handleSubmit = function(e) {
			  form = $(this);
              $.ajax({
                type: 'GET',							  	// Submit an HTTP POST request
                url: form.data('url'), 			      		// The URL where your endpoint is listening
                data: form.serialize(),	              		// Serialized form URL-encoded input
                success: function(data) {				  	// Success function called if request succeeds
                  alert("Operation Response : " + JSON.stringify(data));
                  if (form.data('ref-target')) {
                  	const fieldName = form.data('ref');
                  	const target = form.data('ref-target');
                  	$(target).html(data[fieldName]);
                  }
                },
                error: function(request, status, error){  // Error function is executed if an exception occurs in the flow
              	  alert(request.responseText);			  // Alert the user of any errors
              	}
              });

              return false;								  // Let jQuery handle the form submission
            };

			operationOneForm.submit(handleSubmit);
		});


</script>
<div class="container">
    <div class="panel-group" id="accordion">

        <div class="panel panel-default">
            <div class="panel-heading">
                <h2 class="panel-title demo-heading">
                    <a data-toggle="collapse" data-parent="#accordion" href="#operationOne">List Items</a>
                </h2>
            </div>
            <div id="operationOne" class="panel-collapse collapse in">
                <div class="panel-body">
                    <form id="operationOneForm" class="demo-form" role="form" data-url="/items">
                        <input class="btn btn-lg btn-primary btn-block" type="submit" value="List"><br>
                    </form>
                </div>
            </div>
        </div>

    </div>
</div>
</body>
</html>
この例の XML
この例のフローをすばやく Mule アプリケーションに読み込むには、次のコードを Studio XML エディターに貼り付けます。
<?xml version="1.0" encoding="UTF-8"?>
<mule xmlns:dynamics365-bc="http://www.mulesoft.org/schema/mule/dynamics365-bc" xmlns:http="http://www.mulesoft.org/schema/mule/http"
xmlns="http://www.mulesoft.org/schema/mule/core"
xmlns:doc="http://www.mulesoft.org/schema/mule/documentation" xmlns:xsi="http://www.w3.org/2001/XMLSchema-instance" xsi:schemaLocation="http://www.mulesoft.org/schema/mule/core http://www.mulesoft.org/schema/mule/core/current/mule.xsd
http://www.mulesoft.org/schema/mule/http http://www.mulesoft.org/schema/mule/http/current/mule-http.xsd
http://www.mulesoft.org/schema/mule/dynamics365-bc http://www.mulesoft.org/schema/mule/dynamics365-bc/current/mule-dynamics365-bc.xsd">
<configuration-properties file="mule-app.properties"/>
<configuration-properties file="advanced.properties"/>
<http:listener-config name="HTTP_Listener_config" doc:name="HTTP Listener config" basePath="/">
<http:listener-connection host="0.0.0.0" port="8081" />
</http:listener-config>
<dynamics365-bc:config name="Business_Central_BasicAuth" doc:name="Microsoft Dynamics 365 - Business Central Config" >
<dynamics365-bc:basic-connection baseUri="${config.baseUri}" username="${auth.username}" password="${auth.password}" />
</dynamics365-bc:config>
<flow name="Home" >
<http:listener doc:name="/" config-ref="HTTP_Listener_config" path="/" />
<parse-template doc:name="Parse Template" location="dynamics365-bc-demo-template.html" />
</flow>
<flow name="flow-list-items" >
<http:listener doc:name="/items" config-ref="HTTP_Listener_config" path="/items"/>
<dynamics365-bc:list-entities doc:name="List Entities" config-ref="Business_Central_BasicAuth" companyId="${api.companyId}" entity="items"/>
<set-payload value='#[output application/json --- payload.payload map (item) -> { "id": item.id, "name": item.displayName }]' doc:name="Set Payload" />
</flow>
</mule>![[List (リスト)] ボタン](_images/list-button.png)
![[List (リスト)] ボタンからの応答](_images/list-response.png)
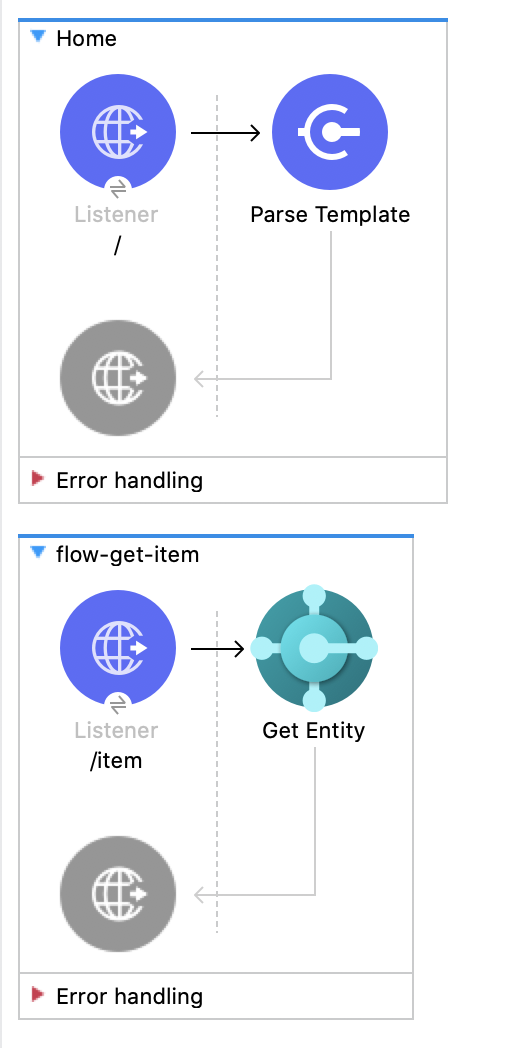
項目を取得する
この Mule フローでは、項目を取得します。
最初のフローは次の操作を使用します。
-
HTTP Listener
HTTP 要求からデータを受け取ります。 -
Parse Template
テンプレートを処理します。
2 番目のフローは次の操作を使用します。
-
HTTP Listener
HTTP 要求からデータを受け取ります。 -
Get Entity
ID によって 1 つのエンティティ (存在する場合) を取得します。
この例のテンプレート
次の HTML テンプレートを使用してファイルを作成し、コンテンツをコピーすることで、グラフィカルインターフェースを使用してアプリケーションをテストできます。
<!--
    (c) 2003-2022 MuleSoft, Inc. This software is protected under international
    copyright law. All use of this software is subject to MuleSoft's Main
    Services Agreement (or other Terms of Service) separately entered
    into between you and MuleSoft. If such an agreement is not in
    place, you may not use the software.
-->
<!DOCTYPE html>
<html lang="en">
<head>
    <meta charset="utf-8">
    <meta http-equiv="X-UA-Compatible" content="IE=edge">

    <!-- JQuery will be required for this demo -->
    <script src="http://cdnjs.cloudflare.com/ajax/libs/jquery/2.1.0/jquery.js"></script>

    <!-- Import Twitter bootstrap libs + css -->
    <link rel="stylesheet" type="text/css"
          href="http://cdnjs.cloudflare.com/ajax/libs/twitter-bootstrap/3.1.1/css/bootstrap.css">
    <script src="http://cdnjs.cloudflare.com/ajax/libs/twitter-bootstrap/3.1.1/js/bootstrap.js"></script>
</head>
<body>
<!-- Keep this simple ... define CSS for this simple webpage in the same file -->
<style>
    body {
    padding-top: 40px;
    padding-bottom: 40px;
    background-color: #eee;
    }
    .demo-form {
    max-width: 500px;
    padding: 15px;
    margin: 0 auto;
    }
    .demo-form .demo-heading,
    .demo-form .checkbox {
    margin-bottom: 10px;
    }
    .demo-form .checkbox {
    font-weight: normal;
    }
    .demo-form .form-control {
    position: relative;
    height: auto;
    -webkit-box-sizing: border-box;
    -moz-box-sizing: border-box;
    box-sizing: border-box;
    padding: 10px;
    font-size: 16px;
    }
    .demo-form .form-control:focus {
    z-index: 2;
    }
</style>
<script type="text/javascript">
		$(document).ready( function() {

			var operationTwoForm 	= $('#operationTwoForm');

			handleSubmit = function(e) {
			  form = $(this);
              $.ajax({
                type: 'GET',							  	// Submit an HTTP POST request
                url: form.data('url'), 			      		// The URL where your endpoint is listening
                data: form.serialize(),	              		// Serialized form URL-encoded input
                success: function(data) {				  	// Success function called if request succeeds
                  alert("Operation Response : " + JSON.stringify(data));
                  if (form.data('ref-target')) {
                  	const fieldName = form.data('ref');
                  	const target = form.data('ref-target');
                  	$(target).html(data[fieldName]);
                  }
                },
                error: function(request, status, error){  // Error function is executed if an exception occurs in the flow
              	  alert(request.responseText);			  // Alert the user of any errors
              	}
              });

              return false;								  // Let jQuery handle the form submission
            };

			operationTwoForm.submit(handleSubmit);
		});


</script>
<div class="container">
    <div class="panel-group" id="accordion">

        <div class="panel panel-default">
            <div class="panel-heading">
                <h2 class="panel-title demo-heading">
                    <a data-toggle="collapse" data-parent="#accordion" href="#operationTwo">Get Item</a>
                </h2>
            </div>
            <div id="operationTwo" class="panel-collapse collapse">
                <div class="panel-body">
                    <form id="operationTwoForm" class="demo-form" role="form" data-url="/item">
                        <label>ID of any Item</label>
                        <input type="text" name="id" placeholder="00000000-0000-0000-0000-000000000000" value="" required class="form-control"><br>
                        <input class="btn btn-lg btn-primary btn-block" type="submit" value="Get"><br>
                    </form>
                </div>
            </div>
        </div>

    </div>
</div>
</body>
</html>
この例の XML
この例のフローをすばやく Mule アプリケーションに読み込むには、次のコードを Studio XML エディターに貼り付けます。
<?xml version="1.0" encoding="UTF-8"?>

<mule xmlns:dynamics365-bc="http://www.mulesoft.org/schema/mule/dynamics365-bc" xmlns:http="http://www.mulesoft.org/schema/mule/http"
      xmlns="http://www.mulesoft.org/schema/mule/core"
      xmlns:doc="http://www.mulesoft.org/schema/mule/documentation" xmlns:xsi="http://www.w3.org/2001/XMLSchema-instance" xsi:schemaLocation="http://www.mulesoft.org/schema/mule/core http://www.mulesoft.org/schema/mule/core/current/mule.xsd
http://www.mulesoft.org/schema/mule/http http://www.mulesoft.org/schema/mule/http/current/mule-http.xsd
http://www.mulesoft.org/schema/mule/dynamics365-bc http://www.mulesoft.org/schema/mule/dynamics365-bc/current/mule-dynamics365-bc.xsd">
    <configuration-properties file="mule-app.properties"/>
    <configuration-properties file="advanced.properties"/>

    <http:listener-config name="HTTP_Listener_config" doc:name="HTTP Listener config" basePath="/">
        <http:listener-connection host="0.0.0.0" port="8081" />
    </http:listener-config>

    <dynamics365-bc:config name="Business_Central_BasicAuth" doc:name="Microsoft Dynamics 365 - Business Central Config" >
        <dynamics365-bc:basic-connection baseUri="${config.baseUri}" username="${auth.username}" password="${auth.password}" />
    </dynamics365-bc:config>

    <flow name="Home" >
        <http:listener doc:name="/" config-ref="HTTP_Listener_config" path="/" />
        <parse-template doc:name="Parse Template" location="dynamics365-bc-demo-template.html" />
    </flow>

    <flow name="flow-get-item" >
        <http:listener doc:name="/item" config-ref="HTTP_Listener_config" path="/item"/>
        <dynamics365-bc:get-entity entity="items" doc:name="Get Entity" config-ref="Business_Central_BasicAuth" companyId="${api.companyId}" entityId="#[attributes.queryParams.id]"/>
    </flow>
</mule>![[Get Item (項目を取得)] フォーム](_images/get-item-form.png)
![[Get Item (項目を取得)] フォームからの応答](_images/get-item-response.png)
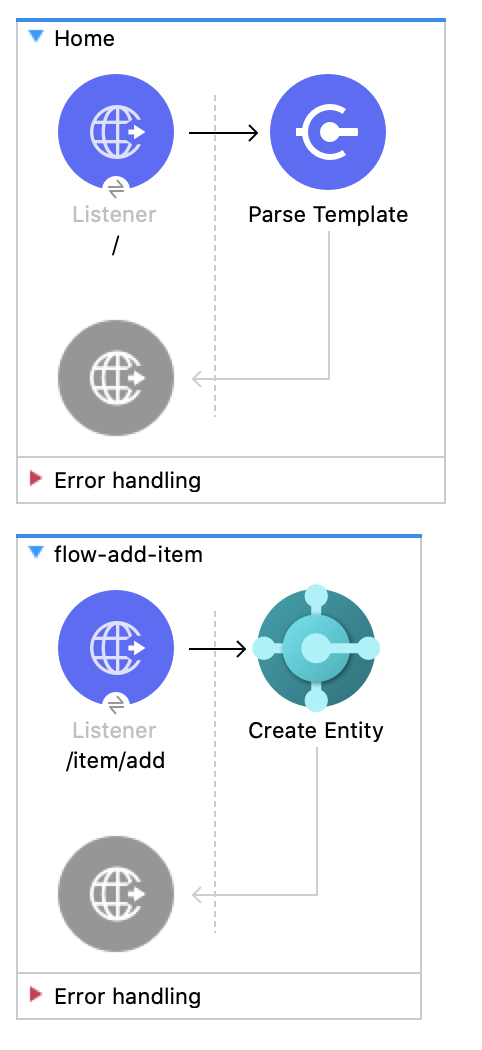
項目を追加する
この Mule フローでは、項目を追加します。
最初のフローは次の操作を使用します。
-
HTTP Listener
HTTP 要求からデータを受け取ります。 -
Parse Template
テンプレートを処理します。
2 番目のフローは次の操作を使用します。
-
HTTP Listener
HTTP 要求からデータを受け取ります。 -
Create Entity
1 つの新しいエンティティを作成します。
この例のテンプレート
次の HTML テンプレートを使用してファイルを作成し、コンテンツをコピーすることで、グラフィカルインターフェースを使用してアプリケーションをテストできます。
<!--
    (c) 2003-2022 MuleSoft, Inc. This software is protected under international
    copyright law. All use of this software is subject to MuleSoft's Main
    Services Agreement (or other Terms of Service) separately entered
    into between you and MuleSoft. If such an agreement is not in
    place, you may not use the software.
-->
<!DOCTYPE html>
<html lang="en">
<head>
    <meta charset="utf-8">
    <meta http-equiv="X-UA-Compatible" content="IE=edge">

    <!-- JQuery will be required for this demo -->
    <script src="http://cdnjs.cloudflare.com/ajax/libs/jquery/2.1.0/jquery.js"></script>

    <!-- Import Twitter bootstrap libs + css -->
    <link rel="stylesheet" type="text/css"
          href="http://cdnjs.cloudflare.com/ajax/libs/twitter-bootstrap/3.1.1/css/bootstrap.css">
    <script src="http://cdnjs.cloudflare.com/ajax/libs/twitter-bootstrap/3.1.1/js/bootstrap.js"></script>
</head>
<body>
<!-- Keep this simple ... define CSS for this simple webpage in the same file -->
<style>
    body {
    padding-top: 40px;
    padding-bottom: 40px;
    background-color: #eee;
    }
    .demo-form {
    max-width: 500px;
    padding: 15px;
    margin: 0 auto;
    }
    .demo-form .demo-heading,
    .demo-form .checkbox {
    margin-bottom: 10px;
    }
    .demo-form .checkbox {
    font-weight: normal;
    }
    .demo-form .form-control {
    position: relative;
    height: auto;
    -webkit-box-sizing: border-box;
    -moz-box-sizing: border-box;
    box-sizing: border-box;
    padding: 10px;
    font-size: 16px;
    }
    .demo-form .form-control:focus {
    z-index: 2;
    }
</style>
<script type="text/javascript">
		$(document).ready( function() {

			var operationThreeForm 	= $('#operationThreeForm');

			handleSubmit = function(e) {
			  form = $(this);
              $.ajax({
                type: 'GET',							  	// Submit an HTTP POST request
                url: form.data('url'), 			      		// The URL where your endpoint is listening
                data: form.serialize(),	              		// Serialized form URL-encoded input
                success: function(data) {				  	// Success function called if request succeeds
                  alert("Operation Response : " + JSON.stringify(data));
                  if (form.data('ref-target')) {
                  	const fieldName = form.data('ref');
                  	const target = form.data('ref-target');
                  	$(target).html(data[fieldName]);
                  }
                },
                error: function(request, status, error){  // Error function is executed if an exception occurs in the flow
              	  alert(request.responseText);			  // Alert the user of any errors
              	}
              });

              return false;								  // Let jQuery handle the form submission
            };

			operationThreeForm.submit(handleSubmit);
		});


</script>
<div class="container">
    <div class="panel-group" id="accordion">

        <div class="panel panel-default">
            <div class="panel-heading">
                <h2 class="panel-title demo-heading">
                    <a data-toggle="collapse" data-parent="#accordion" href="#operationThree">Add Item</a>
                </h2>
            </div>
            <div id="operationThree" class="panel-collapse collapse">
                <div class="panel-body">
                    <form id="operationThreeForm" class="demo-form" role="form" data-url="/item/add" data-ref="id" data-ref-target="#createdId">
                        <label>Number</label>
                        <input type="text" name="number" placeholder="My Item Number" maxlength=20 value="" required class="form-control">
                        <small id="numberNote" class="text-muted">At most 20 characters long</small><br>
                        <label>Display Name</label>
                        <input type="text" name="name" placeholder="My Item Name" maxlength=100 value="" required class="form-control">
                        <small id="displayNameNote" class="text-muted">At most 100 characters long</small><br><br>
                        <input class="btn btn-lg btn-primary btn-block" type="submit" value="Create"><br>
                    </form>
                    <div>Created ID: <div id="createdId"></div></div>
                </div>
            </div>
        </div>

    </div>
</div>
</body>
</html>
この例の XML
この例のフローをすばやく Mule アプリケーションに読み込むには、次のコードを Studio XML エディターに貼り付けます。
<?xml version="1.0" encoding="UTF-8"?>

<mule xmlns:dynamics365-bc="http://www.mulesoft.org/schema/mule/dynamics365-bc" xmlns:http="http://www.mulesoft.org/schema/mule/http"
      xmlns="http://www.mulesoft.org/schema/mule/core"
      xmlns:doc="http://www.mulesoft.org/schema/mule/documentation" xmlns:xsi="http://www.w3.org/2001/XMLSchema-instance" xsi:schemaLocation="http://www.mulesoft.org/schema/mule/core http://www.mulesoft.org/schema/mule/core/current/mule.xsd
http://www.mulesoft.org/schema/mule/http http://www.mulesoft.org/schema/mule/http/current/mule-http.xsd
http://www.mulesoft.org/schema/mule/dynamics365-bc http://www.mulesoft.org/schema/mule/dynamics365-bc/current/mule-dynamics365-bc.xsd">
    <configuration-properties file="mule-app.properties"/>
    <configuration-properties file="advanced.properties"/>

    <http:listener-config name="HTTP_Listener_config" doc:name="HTTP Listener config" basePath="/">
        <http:listener-connection host="0.0.0.0" port="8081" />
    </http:listener-config>

    <dynamics365-bc:config name="Business_Central_BasicAuth" doc:name="Microsoft Dynamics 365 - Business Central Config" >
        <dynamics365-bc:basic-connection baseUri="${config.baseUri}" username="${auth.username}" password="${auth.password}" />
    </dynamics365-bc:config>

    <flow name="Home" >
        <http:listener doc:name="/" config-ref="HTTP_Listener_config" path="/" />
        <parse-template doc:name="Parse Template" location="dynamics365-bc-demo-template.html" />
    </flow>

    <flow name="flow-add-item" >
        <http:listener doc:name="/item/add" config-ref="HTTP_Listener_config" path="/item/add"/>
        <dynamics365-bc:create-entity entity="items" doc:name="Create Entity" config-ref="Business_Central_BasicAuth" companyId="${api.companyId}">
            <dynamics365-bc:body ><![CDATA[#[output application/json
---
{
	number: attributes.queryParams.number,
	displayName: attributes.queryParams.name
}]]]></dynamics365-bc:body>
        </dynamics365-bc:create-entity>
    </flow>
</mule>![[Create Item (項目を作成)] フォーム](_images/create-item-form.png)
![[Create Item (項目を作成)] フォームからの応答](_images/create-item-response.png)
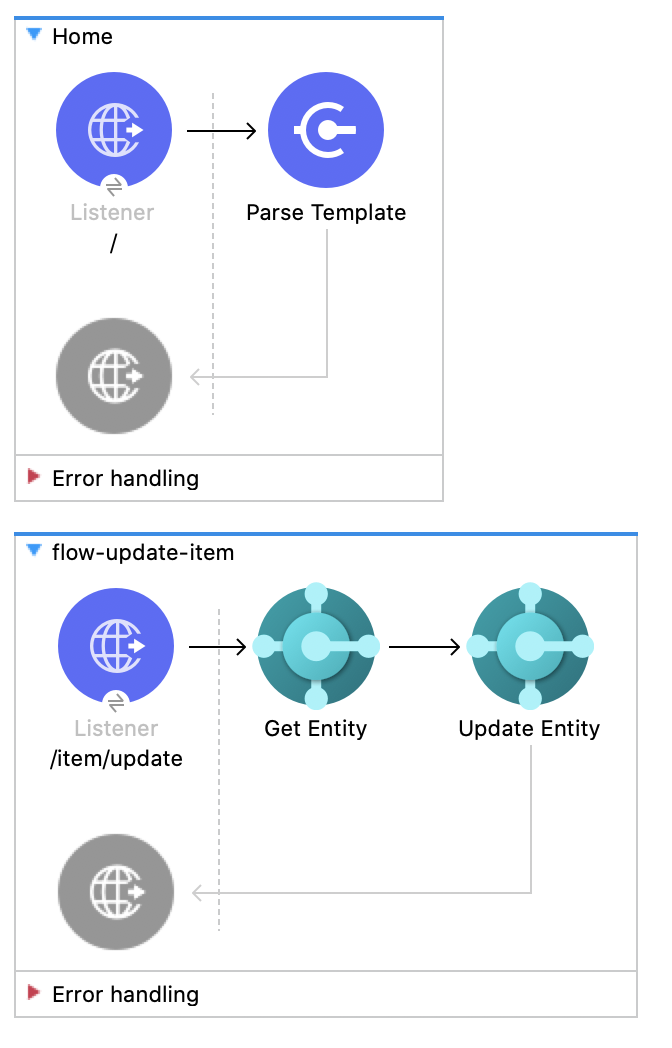
項目を更新する
この Mule フローでは、項目を更新します。
最初のフローは次の操作を使用します。
-
HTTP Listener
HTTP 要求からデータを受け取ります。 -
Parse Template
テンプレートを処理します。
2 番目のフローは次の操作を使用します。
-
HTTP Listener
HTTP 要求からデータを受け取ります。 -
Get Entity
ID によって 1 つのエンティティ (存在する場合) を取得します。 -
Update Entity
ID によって 1 つのエンティティを更新します。
この例のテンプレート
次の HTML テンプレートを使用してファイルを作成し、コンテンツをコピーすることで、グラフィカルインターフェースを使用してアプリケーションをテストできます。
<!--
    (c) 2003-2022 MuleSoft, Inc. This software is protected under international
    copyright law. All use of this software is subject to MuleSoft's Main
    Services Agreement (or other Terms of Service) separately entered
    into between you and MuleSoft. If such an agreement is not in
    place, you may not use the software.
-->
<!DOCTYPE html>
<html lang="en">
<head>
    <meta charset="utf-8">
    <meta http-equiv="X-UA-Compatible" content="IE=edge">

    <!-- JQuery will be required for this demo -->
    <script src="http://cdnjs.cloudflare.com/ajax/libs/jquery/2.1.0/jquery.js"></script>

    <!-- Import Twitter bootstrap libs + css -->
    <link rel="stylesheet" type="text/css"
          href="http://cdnjs.cloudflare.com/ajax/libs/twitter-bootstrap/3.1.1/css/bootstrap.css">
    <script src="http://cdnjs.cloudflare.com/ajax/libs/twitter-bootstrap/3.1.1/js/bootstrap.js"></script>
</head>
<body>
<!-- Keep this simple ... define CSS for this simple webpage in the same file -->
<style>
    body {
    padding-top: 40px;
    padding-bottom: 40px;
    background-color: #eee;
    }
    .demo-form {
    max-width: 500px;
    padding: 15px;
    margin: 0 auto;
    }
    .demo-form .demo-heading,
    .demo-form .checkbox {
    margin-bottom: 10px;
    }
    .demo-form .checkbox {
    font-weight: normal;
    }
    .demo-form .form-control {
    position: relative;
    height: auto;
    -webkit-box-sizing: border-box;
    -moz-box-sizing: border-box;
    box-sizing: border-box;
    padding: 10px;
    font-size: 16px;
    }
    .demo-form .form-control:focus {
    z-index: 2;
    }
</style>
<script type="text/javascript">
		$(document).ready( function() {

			var operationFourForm 	= $('#operationFourForm');

			handleSubmit = function(e) {
			  form = $(this);
              $.ajax({
                type: 'GET',							  	// Submit an HTTP POST request
                url: form.data('url'), 			      		// The URL where your endpoint is listening
                data: form.serialize(),	              		// Serialized form URL-encoded input
                success: function(data) {				  	// Success function called if request succeeds
                  alert("Operation Response : " + JSON.stringify(data));
                  if (form.data('ref-target')) {
                  	const fieldName = form.data('ref');
                  	const target = form.data('ref-target');
                  	$(target).html(data[fieldName]);
                  }
                },
                error: function(request, status, error){  // Error function is executed if an exception occurs in the flow
              	  alert(request.responseText);			  // Alert the user of any errors
              	}
              });

              return false;								  // Let jQuery handle the form submission
            };

			operationFourForm.submit(handleSubmit);
		});


</script>
<div class="container">
    <div class="panel-group" id="accordion">

        <div class="panel panel-default">
            <div class="panel-heading">
                <h2 class="panel-title demo-heading">
                    <a data-toggle="collapse" data-parent="#accordion" href="#operationFour">Update Item</a>
                </h2>
            </div>
            <div id="operationFour" class="panel-collapse collapse">
                <div class="panel-body">
                    <form id="operationFourForm" class="demo-form" role="form" data-url="/item/update">
                        <label>ID of item to update</label>
                        <input type="text" name="id" placeholder="00000000-0000-0000-0000-000000000000" value="" required class="form-control"><br>
                        <label>New Name</label>
                        <input type="text" name="name" placeholder="New Item Name" value="" required class="form-control">
                        <small id="displayNameNote" class="text-muted">At most 100 characters long</small><br><br>
                        <input class="btn btn-lg btn-primary btn-block" type="submit" value="Update"><br>
                    </form>
                </div>
            </div>
        </div>

    </div>
</div>
</body>
</html>
この例の XML
この例のフローをすばやく Mule アプリケーションに読み込むには、次のコードを Studio XML エディターに貼り付けます。
<?xml version="1.0" encoding="UTF-8"?>

<mule xmlns:dynamics365-bc="http://www.mulesoft.org/schema/mule/dynamics365-bc" xmlns:http="http://www.mulesoft.org/schema/mule/http"
      xmlns="http://www.mulesoft.org/schema/mule/core"
      xmlns:doc="http://www.mulesoft.org/schema/mule/documentation" xmlns:xsi="http://www.w3.org/2001/XMLSchema-instance" xsi:schemaLocation="http://www.mulesoft.org/schema/mule/core http://www.mulesoft.org/schema/mule/core/current/mule.xsd
http://www.mulesoft.org/schema/mule/http http://www.mulesoft.org/schema/mule/http/current/mule-http.xsd
http://www.mulesoft.org/schema/mule/dynamics365-bc http://www.mulesoft.org/schema/mule/dynamics365-bc/current/mule-dynamics365-bc.xsd">
    <configuration-properties file="mule-app.properties"/>
    <configuration-properties file="advanced.properties"/>

    <http:listener-config name="HTTP_Listener_config" doc:name="HTTP Listener config" basePath="/">
        <http:listener-connection host="0.0.0.0" port="8081" />
    </http:listener-config>

    <dynamics365-bc:config name="Business_Central_BasicAuth" doc:name="Microsoft Dynamics 365 - Business Central Config" >
        <dynamics365-bc:basic-connection baseUri="${config.baseUri}" username="${auth.username}" password="${auth.password}" />
    </dynamics365-bc:config>

    <flow name="Home" >
        <http:listener doc:name="/" config-ref="HTTP_Listener_config" path="/" />
        <parse-template doc:name="Parse Template" location="dynamics365-bc-demo-template.html" />
    </flow>

    <flow name="flow-update-item" >
        <http:listener doc:name="/item/update" config-ref="HTTP_Listener_config" path="/item/update"/>
        <dynamics365-bc:get-entity entity="items" doc:name="Get Entity" config-ref="Business_Central_BasicAuth" companyId="${api.companyId}" entityId="#[attributes.queryParams.id]" target="entity">
            <dynamics365-bc:select-query-params >
                <dynamics365-bc:select-query-param value="id" />
            </dynamics365-bc:select-query-params>
        </dynamics365-bc:get-entity>
        <dynamics365-bc:update-entity entity="items" doc:name="Update Entity" config-ref="Business_Central_BasicAuth" companyId="${api.companyId}" entityId="#[attributes.queryParams.id]" etag="#[vars.entity.'@odata.etag']">
            <dynamics365-bc:body ><![CDATA[#[output application/json
---
{
	displayName: attributes.queryParams.name
}]]]></dynamics365-bc:body>
        </dynamics365-bc:update-entity>
    </flow>
</mule>![[Update Item (項目を更新)] フォーム](_images/update-item-form.png)
![[Update Item (項目を更新)] フォームからの応答](_images/update-item-response.png)
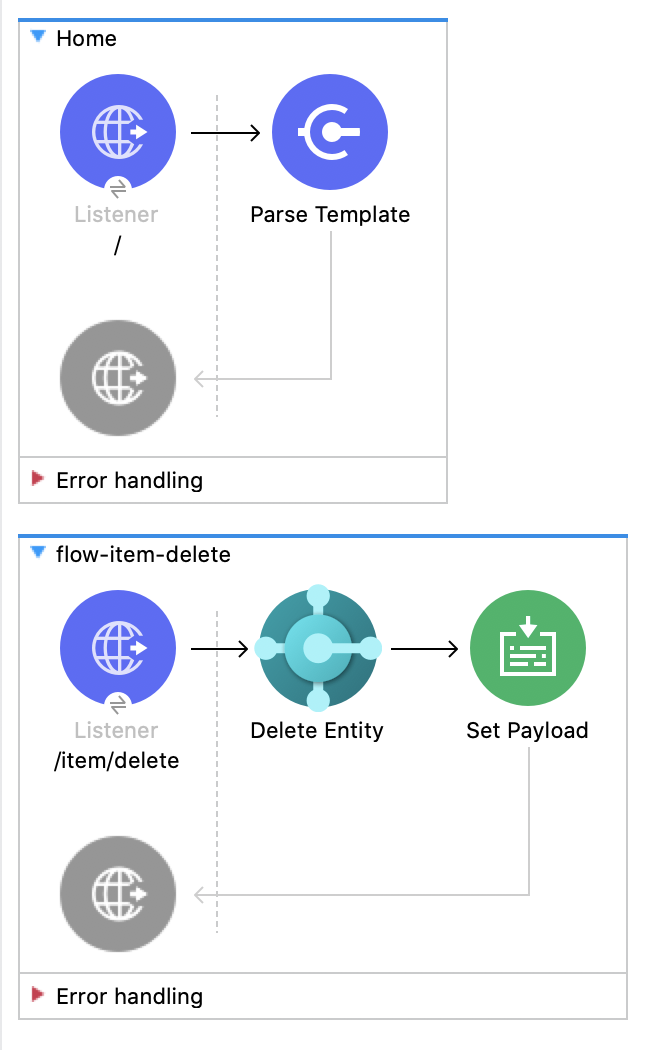
項目を削除する
この Mule フローでは、項目を削除します。
最初のフローは次の操作を使用します。
-
HTTP Listener
HTTP 要求からデータを受け取ります。 -
Parse Template
テンプレートを処理します。
2 番目のフローは次の操作を使用します。
-
HTTP Listener
HTTP 要求からデータを受け取ります。 -
Delete Entity
ID によって 1 つのエンティティを削除します。 -
Set Payload
ペイロードを設定する方法を定義します。Item deleted
この例のテンプレート
次の HTML テンプレートを使用してファイルを作成し、コンテンツをコピーすることで、グラフィカルインターフェースを使用してアプリケーションをテストできます。
<!--
    (c) 2003-2022 MuleSoft, Inc. This software is protected under international
    copyright law. All use of this software is subject to MuleSoft's Main
    Services Agreement (or other Terms of Service) separately entered
    into between you and MuleSoft. If such an agreement is not in
    place, you may not use the software.
-->
<!DOCTYPE html>
<html lang="en">
<head>
    <meta charset="utf-8">
    <meta http-equiv="X-UA-Compatible" content="IE=edge">

    <!-- JQuery will be required for this demo -->
    <script src="http://cdnjs.cloudflare.com/ajax/libs/jquery/2.1.0/jquery.js"></script>

    <!-- Import Twitter bootstrap libs + css -->
    <link rel="stylesheet" type="text/css"
          href="http://cdnjs.cloudflare.com/ajax/libs/twitter-bootstrap/3.1.1/css/bootstrap.css">
    <script src="http://cdnjs.cloudflare.com/ajax/libs/twitter-bootstrap/3.1.1/js/bootstrap.js"></script>
</head>
<body>
<!-- Keep this simple ... define CSS for this simple webpage in the same file -->
<style>
    body {
    padding-top: 40px;
    padding-bottom: 40px;
    background-color: #eee;
    }
    .demo-form {
    max-width: 500px;
    padding: 15px;
    margin: 0 auto;
    }
    .demo-form .demo-heading,
    .demo-form .checkbox {
    margin-bottom: 10px;
    }
    .demo-form .checkbox {
    font-weight: normal;
    }
    .demo-form .form-control {
    position: relative;
    height: auto;
    -webkit-box-sizing: border-box;
    -moz-box-sizing: border-box;
    box-sizing: border-box;
    padding: 10px;
    font-size: 16px;
    }
    .demo-form .form-control:focus {
    z-index: 2;
    }
</style>
<script type="text/javascript">
		$(document).ready( function() {

			var operationFiveForm 	= $('#operationFiveForm');

			handleSubmit = function(e) {
			  form = $(this);
              $.ajax({
                type: 'GET',							  	// Submit an HTTP POST request
                url: form.data('url'), 			      		// The URL where your endpoint is listening
                data: form.serialize(),	              		// Serialized form URL-encoded input
                success: function(data) {				  	// Success function called if request succeeds
                  alert("Operation Response : " + JSON.stringify(data));
                  if (form.data('ref-target')) {
                  	const fieldName = form.data('ref');
                  	const target = form.data('ref-target');
                  	$(target).html(data[fieldName]);
                  }
                },
                error: function(request, status, error){  // Error function is executed if an exception occurs in the flow
              	  alert(request.responseText);			  // Alert the user of any errors
              	}
              });

              return false;								  // Let jQuery handle the form submission
            };

			operationFiveForm.submit(handleSubmit);
		});


</script>
<div class="container">
    <div class="panel-group" id="accordion">

        <div class="panel panel-default">
            <div class="panel-heading">
                <h2 class="panel-title demo-heading">
                    <a data-toggle="collapse" data-parent="#accordion" href="#operationFive">Delete Item</a>
                </h2>
            </div>
            <div id="operationFive" class="panel-collapse collapse">
                <div class="panel-body">
                    <form id="operationFiveForm" class="demo-form" role="form" data-url="/item/delete">
                        <label>ID of item to delete</label>
                        <input type="text" name="id" placeholder="00000000-0000-0000-0000-000000000000" value="" required class="form-control"><br>
                        <input class="btn btn-lg btn-primary btn-block" type="submit" value="Delete">
                        <small id="deleteNote" class="text-muted">This action is irreversible.</small><br>
                    </form>
                </div>
            </div>
        </div>

    </div>
</div>
</body>
</html>
この例の XML
この例のフローをすばやく Mule アプリケーションに読み込むには、次のコードを Studio XML エディターに貼り付けます。
<?xml version="1.0" encoding="UTF-8"?>

<mule xmlns:dynamics365-bc="http://www.mulesoft.org/schema/mule/dynamics365-bc" xmlns:http="http://www.mulesoft.org/schema/mule/http"
      xmlns="http://www.mulesoft.org/schema/mule/core"
      xmlns:doc="http://www.mulesoft.org/schema/mule/documentation" xmlns:xsi="http://www.w3.org/2001/XMLSchema-instance" xsi:schemaLocation="http://www.mulesoft.org/schema/mule/core http://www.mulesoft.org/schema/mule/core/current/mule.xsd
http://www.mulesoft.org/schema/mule/http http://www.mulesoft.org/schema/mule/http/current/mule-http.xsd
http://www.mulesoft.org/schema/mule/dynamics365-bc http://www.mulesoft.org/schema/mule/dynamics365-bc/current/mule-dynamics365-bc.xsd">
    <configuration-properties file="mule-app.properties"/>
    <configuration-properties file="advanced.properties"/>

    <http:listener-config name="HTTP_Listener_config" doc:name="HTTP Listener config" basePath="/">
        <http:listener-connection host="0.0.0.0" port="8081" />
    </http:listener-config>

    <dynamics365-bc:config name="Business_Central_BasicAuth" doc:name="Microsoft Dynamics 365 - Business Central Config" >
        <dynamics365-bc:basic-connection baseUri="${config.baseUri}" username="${auth.username}" password="${auth.password}" />
    </dynamics365-bc:config>

    <flow name="Home" >
        <http:listener doc:name="/" config-ref="HTTP_Listener_config" path="/" />
        <parse-template doc:name="Parse Template" location="dynamics365-bc-demo-template.html" />
    </flow>

    <flow name="flow-item-delete" >
        <http:listener doc:name="/item/delete" config-ref="HTTP_Listener_config" path="/item/delete"/>
        <dynamics365-bc:delete-entity entity="items" doc:name="Delete Entity" config-ref="Business_Central_BasicAuth" companyId="${api.companyId}" entityId="#[attributes.queryParams.id]"/>
        <set-payload value="Item deleted" doc:name="Set Payload" />
    </flow>
</mule>![[Delete Item (項目を削除)] フォーム](_images/delete-item-form.png)
![[Delete Item (項目を削除)] フォームからの応答](_images/delete-item-response.png)