Tableau Connector 1.1 の例
次の例は、Tableau Connector で Hyper Configuration 操作および Rest Configuration 操作を実行する方法を示しています。
-
次のような Hyper Configuration 操作があります。
-
次のような Rest Configuration 操作があります。
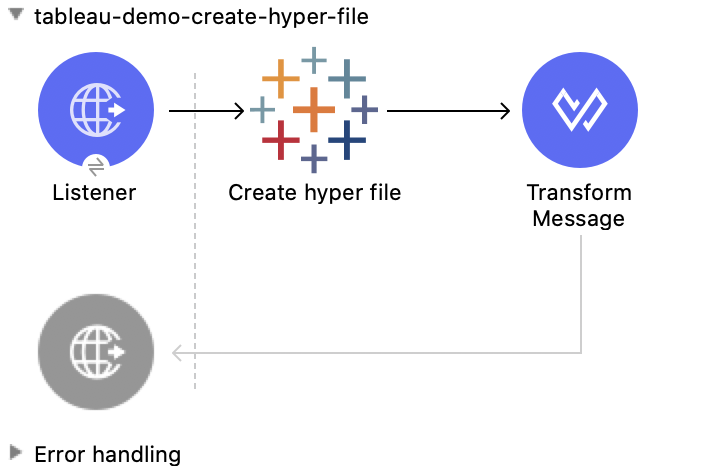
Create Hyper File - Hyper Configuration
この Mule フローでは、指定されたテーブルプロパティで hyper ファイルを作成します。
この例では、次の操作を使用します。
-
HTTP Listener
HTTP 要求からデータを受け取ります。 -
Create hyper file
ユーザーが指定した列定義に基づいて空の hyper ファイルを作成する -
Transform Message
Create hyper file 操作の結果を JSON 形式で出力する
この例の XML
この例のフローをすばやく Mule アプリケーションに読み込むには、次のコードを Studio XML エディターに貼り付けます。
<?xml version="1.0" encoding="UTF-8"?>

<mule xmlns:file="http://www.mulesoft.org/schema/mule/file" xmlns:ee="http://www.mulesoft.org/schema/mule/ee/core"
	xmlns:http="http://www.mulesoft.org/schema/mule/http"
	xmlns:tableau-specialist="http://www.mulesoft.org/schema/mule/tableau-specialist" xmlns="http://www.mulesoft.org/schema/mule/core" xmlns:doc="http://www.mulesoft.org/schema/mule/documentation" xmlns:xsi="http://www.w3.org/2001/XMLSchema-instance" xsi:schemaLocation="http://www.mulesoft.org/schema/mule/core http://www.mulesoft.org/schema/mule/core/current/mule.xsd
http://www.mulesoft.org/schema/mule/tableau-specialist http://www.mulesoft.org/schema/mule/tableau-specialist/current/mule-tableau-specialist.xsd
http://www.mulesoft.org/schema/mule/http http://www.mulesoft.org/schema/mule/http/current/mule-http.xsd
http://www.mulesoft.org/schema/mule/ee/core http://www.mulesoft.org/schema/mule/ee/core/current/mule-ee.xsd
http://www.mulesoft.org/schema/mule/file http://www.mulesoft.org/schema/mule/file/current/mule-file.xsd">
	<http:listener-config name="HTTP_Listener_config" doc:name="HTTP Listener config" doc:id="d784f0fb-88c2-42ac-a729-199268071485" >
		<http:listener-connection host="0.0.0.0" port="8081" />
	</http:listener-config>
	<tableau-specialist:tableau-hyper-config name="Tableau_Specialist_Hyper_configuration" doc:name="Tableau Specialist Hyper configuration" doc:id="dd5a868e-8b70-4296-b4a4-b6c8c6479410" >
		<tableau-specialist:connection telemetry="DO_NOT_SEND_USAGE_DATA_TO_TABLEAU"/>
	</tableau-specialist:tableau-hyper-config>
		<flow name="tableau-demo-create-hyper-file" doc:id="615f59de-2e3f-48fc-ae09-4f4ab893aaef" >
		<http:listener doc:name="Listener" doc:id="1417bfaa-e778-465f-a95d-a7cea478d092" config-ref="HTTP_Listener_config" path="/create-hyper-file"/>
		<tableau-specialist:create-hyper-file doc:name="Create hyper file" doc:id="cd6303c9-e42e-4d75-a1c1-9ce92054f4f0" config-ref="Tableau_Specialist_Hyper_configuration" hyperFileName="hyperFileDemo.hyper" schemaName="schemademo" tableName="tabledemo">
			<tableau-specialist:columns>
				<tableau-specialist:column-definition columnName="Customer ID" columnType="TEXT" columnNullability="NOT_NULLABLE" />
				<tableau-specialist:column-definition columnName="Customer Name" columnType="TEXT" columnNullability="NOT_NULLABLE" />
				<tableau-specialist:column-definition columnName="Loyalty Reward Points" columnType="BIG_INT" columnNullability="NOT_NULLABLE" />
				<tableau-specialist:column-definition columnName="Segment" columnType="TEXT" columnNullability="NOT_NULLABLE" />
			</tableau-specialist:columns>
		</tableau-specialist:create-hyper-file>
		<ee:transform doc:name="Transform Message" doc:id="d1415eb0-1fd0-4bef-aa60-0fee97b28e61">
			<ee:message>
				<ee:set-payload><![CDATA[%dw 2.0
output application/json
---
payload]]></ee:set-payload>
			</ee:message>
		</ee:transform>
	</flow>
</mule>
この例の実行手順
-
コネクタが設定されていることを確認します。
-
プロジェクトを保存します。
-
Web ブラウザーから「
http://localhost:8081/create-hyper-file-from-csv」と入力してアプリケーションをテストします。
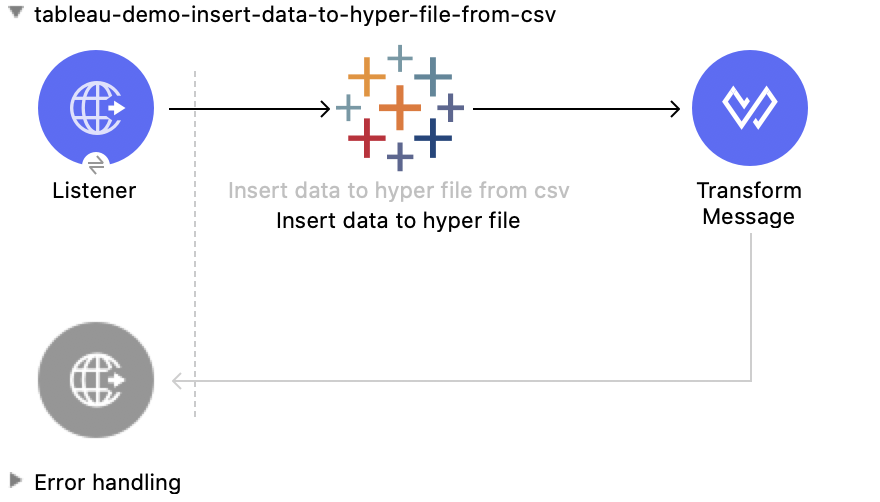
Insert Data to Hyper File from CSV - Hyper Configuration
この Mule フローでは、hyper テーブルを作成し、CSV ファイルのデータをテーブルに入力します。このフローを使用するには、Create Hyper File フローを実行して hyper テーブルを作成し、src/main/resources/customers.csv ファイルを使用してテーブルを入力します。
この例では、次の操作を使用します。
-
HTTP Listener
HTTP 要求からデータを受け取ります。 -
Insert data to hyper file from csv
既存の CSV ドキュメントから hyper ファイルを入力する -
Transform Message
JSON 形式で Insert data to hyper file from csv 操作の結果を出力する
この例の XML
この例のフローをすばやく Mule アプリケーションに読み込むには、次のコードを Studio XML エディターに貼り付けます。
<?xml version="1.0" encoding="UTF-8"?>

<mule xmlns:file="http://www.mulesoft.org/schema/mule/file" xmlns:ee="http://www.mulesoft.org/schema/mule/ee/core"
	xmlns:http="http://www.mulesoft.org/schema/mule/http"
	xmlns:tableau-specialist="http://www.mulesoft.org/schema/mule/tableau-specialist" xmlns="http://www.mulesoft.org/schema/mule/core" xmlns:doc="http://www.mulesoft.org/schema/mule/documentation" xmlns:xsi="http://www.w3.org/2001/XMLSchema-instance" xsi:schemaLocation="http://www.mulesoft.org/schema/mule/core http://www.mulesoft.org/schema/mule/core/current/mule.xsd
http://www.mulesoft.org/schema/mule/tableau-specialist http://www.mulesoft.org/schema/mule/tableau-specialist/current/mule-tableau-specialist.xsd
http://www.mulesoft.org/schema/mule/http http://www.mulesoft.org/schema/mule/http/current/mule-http.xsd
http://www.mulesoft.org/schema/mule/ee/core http://www.mulesoft.org/schema/mule/ee/core/current/mule-ee.xsd
http://www.mulesoft.org/schema/mule/file http://www.mulesoft.org/schema/mule/file/current/mule-file.xsd">
	<http:listener-config name="HTTP_Listener_config" doc:name="HTTP Listener config" doc:id="d784f0fb-88c2-42ac-a729-199268071485" >
		<http:listener-connection host="0.0.0.0" port="8081" />
	</http:listener-config>
	<tableau-specialist:tableau-hyper-config name="Tableau_Specialist_Hyper_configuration" doc:name="Tableau Specialist Hyper configuration" doc:id="dd5a868e-8b70-4296-b4a4-b6c8c6479410" >
		<tableau-specialist:connection telemetry="DO_NOT_SEND_USAGE_DATA_TO_TABLEAU"/>
	</tableau-specialist:tableau-hyper-config>
	<flow name="tableau-demo-insert-data-to-hyper-file-from-csv" doc:id="0c21c1b1-8320-4d5e-bd43-8b7bb4441120" >
		<http:listener doc:name="Listener" doc:id="45f9c1a0-ce2a-4265-9319-cdad8a685a8b" config-ref="HTTP_Listener_config" path="/create-hyper-file-from-csv"/>
		<tableau-specialist:insert-data-to-hyper-file-from-csv doc:name="Insert data to hyper file" config-ref="Tableau_Specialist_Hyper_configuration" hyperFileName="hyperFileDemo.hyper" schemaName="schemademo" tableName="tabledemo" csvNullColumn="NULL" csvDelimiter="," csvHeader="true" csvFilePath="The csv file that contains the records">
                <tableau-specialist:columns >
                    <tableau-specialist:column-definition columnName="Customer ID" columnType="TEXT" columnNullability="NOT_NULLABLE" />
                    <tableau-specialist:column-definition columnName="Customer Name" columnType="TEXT" columnNullability="NOT_NULLABLE" />
                    <tableau-specialist:column-definition columnName="Loyalty Reward Points" columnType="BIG_INT" columnNullability="NOT_NULLABLE" />
                    <tableau-specialist:column-definition columnName="Segment" columnType="TEXT" columnNullability="NOT_NULLABLE" />
                </tableau-specialist:columns>
            </tableau-specialist:insert-data-to-hyper-file-from-csv>
		<ee:transform doc:name="Transform Message" doc:id="73408a47-9b24-4209-a549-a0c54bb6e666" >
			<ee:message >
				<ee:set-payload ><![CDATA[%dw 2.0
output application/json
---
payload]]></ee:set-payload>
			</ee:message>
		</ee:transform>
	</flow>
</mule>
この例の実行手順
-
コネクタが設定されていることを確認します。
-
プロジェクトを保存します。
-
Web ブラウザーから「
http://localhost:8081//create-hyper-file」と入力してアプリケーションをテストします。
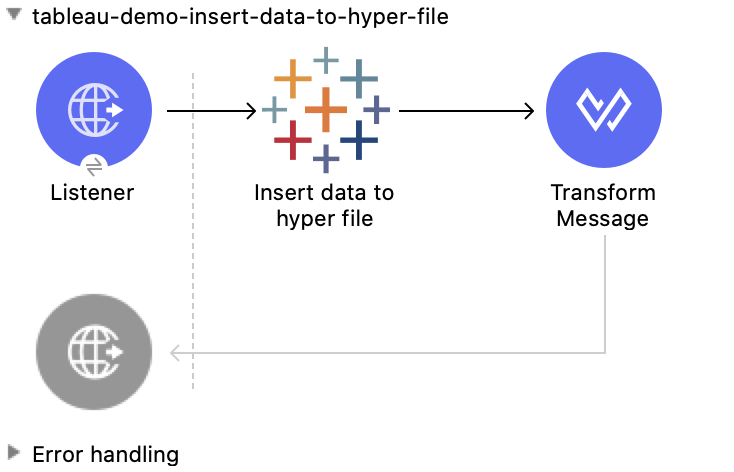
Insert Data to Hyper File - Hyper Configuration
この Mule フローでは、hyper ファイルに属するテーブルにデータを挿入します。このフローを使用するには、Create Hyper File フローを実行して hyper テーブルを作成し、提供される SQL を使用してデータを挿入します。
この例では、次の操作を使用します。
-
HTTP Listener
HTTP 要求からデータを受け取ります。 -
Insert data to hyper file
hyper ファイルに属するテーブルにデータを挿入する -
Transform Message
Insert data to hyper file 操作の結果を JSON 形式で出力する
この例の XML
この例のフローをすばやく Mule アプリケーションに読み込むには、次のコードを Studio XML エディターに貼り付けます。
<?xml version="1.0" encoding="UTF-8"?>

<mule xmlns:file="http://www.mulesoft.org/schema/mule/file" xmlns:ee="http://www.mulesoft.org/schema/mule/ee/core"
	xmlns:http="http://www.mulesoft.org/schema/mule/http"
	xmlns:tableau-specialist="http://www.mulesoft.org/schema/mule/tableau-specialist" xmlns="http://www.mulesoft.org/schema/mule/core" xmlns:doc="http://www.mulesoft.org/schema/mule/documentation" xmlns:xsi="http://www.w3.org/2001/XMLSchema-instance" xsi:schemaLocation="http://www.mulesoft.org/schema/mule/core http://www.mulesoft.org/schema/mule/core/current/mule.xsd
http://www.mulesoft.org/schema/mule/tableau-specialist http://www.mulesoft.org/schema/mule/tableau-specialist/current/mule-tableau-specialist.xsd
http://www.mulesoft.org/schema/mule/http http://www.mulesoft.org/schema/mule/http/current/mule-http.xsd
http://www.mulesoft.org/schema/mule/ee/core http://www.mulesoft.org/schema/mule/ee/core/current/mule-ee.xsd
http://www.mulesoft.org/schema/mule/file http://www.mulesoft.org/schema/mule/file/current/mule-file.xsd">
	<http:listener-config name="HTTP_Listener_config" doc:name="HTTP Listener config" doc:id="d784f0fb-88c2-42ac-a729-199268071485" >
		<http:listener-connection host="0.0.0.0" port="8081" />
	</http:listener-config>
	<tableau-specialist:tableau-hyper-config name="Tableau_Specialist_Hyper_configuration" doc:name="Tableau Specialist Hyper configuration" doc:id="dd5a868e-8b70-4296-b4a4-b6c8c6479410" >
		<tableau-specialist:connection telemetry="DO_NOT_SEND_USAGE_DATA_TO_TABLEAU"/>
	</tableau-specialist:tableau-hyper-config>
	<flow name="tableau-demo-insert-data-to-hyper-file" doc:id="f3ea2c94-c19f-4abd-94b7-1664e3ddefd9" >
		<http:listener doc:name="Listener" doc:id="726f3a96-ba6c-45f3-8ac0-701eda923d7e" config-ref="HTTP_Listener_config" path="/insert-data-to-hyper-file"/>
		<tableau-specialist:insert-data-to-hyper-file doc:name="Insert data to hyper file" doc:id="5df6d16d-478e-4e56-bb5a-3e30df47dd41" config-ref="Tableau_Specialist_Hyper_configuration" hyperFileName="hyperFileDemo.hyper">
			<tableau-specialist:insert-command ><![CDATA[INSERT INTO schemademo.tabledemo VALUES ('insert', 'data', 1, 'operation')]]></tableau-specialist:insert-command>
		</tableau-specialist:insert-data-to-hyper-file>
		<ee:transform doc:name="Transform Message" doc:id="b3191066-f573-40be-b8dd-5ca2b10b4e3b" >
			<ee:message >
				<ee:set-payload ><![CDATA[%dw 2.0
output application/json
---
payload]]></ee:set-payload>
			</ee:message>
		</ee:transform>
	</flow>
</mule>
この例の実行手順
-
コネクタが設定されていることを確認します。
-
プロジェクトを保存します。
-
Web ブラウザーから「
http://localhost:8081/insert-data-to-hyper-file」と入力してアプリケーションをテストします。
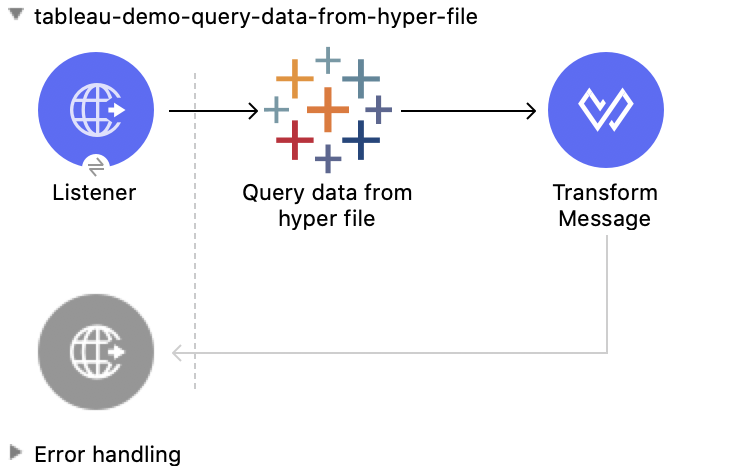
Query Data from Hyper File - Hyper Configuration
この Mule フローでは、hyper ファイルに属するテーブルのデータを照会します。このフローを使用するには、Create Hyper File フローを実行して、テーブルにデータを入力します。このフローでは、指定された hyper テーブルのすべてのデータを返します。
この例では、次の操作を使用します。
-
HTTP Listener
HTTP 要求からデータを受け取ります。 -
Query data from hyper file
hyper ファイルに属するテーブルのデータを照会する -
Transform Message
Query data from hyper file 操作の結果を JSON 形式で出力する
この例の XML
この例のフローをすばやく Mule アプリケーションに読み込むには、次のコードを Studio XML エディターに貼り付けます。
<?xml version="1.0" encoding="UTF-8"?>

<mule xmlns:file="http://www.mulesoft.org/schema/mule/file" xmlns:ee="http://www.mulesoft.org/schema/mule/ee/core"
	xmlns:http="http://www.mulesoft.org/schema/mule/http"
	xmlns:tableau-specialist="http://www.mulesoft.org/schema/mule/tableau-specialist" xmlns="http://www.mulesoft.org/schema/mule/core" xmlns:doc="http://www.mulesoft.org/schema/mule/documentation" xmlns:xsi="http://www.w3.org/2001/XMLSchema-instance" xsi:schemaLocation="http://www.mulesoft.org/schema/mule/core http://www.mulesoft.org/schema/mule/core/current/mule.xsd
http://www.mulesoft.org/schema/mule/tableau-specialist http://www.mulesoft.org/schema/mule/tableau-specialist/current/mule-tableau-specialist.xsd
http://www.mulesoft.org/schema/mule/http http://www.mulesoft.org/schema/mule/http/current/mule-http.xsd
http://www.mulesoft.org/schema/mule/ee/core http://www.mulesoft.org/schema/mule/ee/core/current/mule-ee.xsd
http://www.mulesoft.org/schema/mule/file http://www.mulesoft.org/schema/mule/file/current/mule-file.xsd">
	<http:listener-config name="HTTP_Listener_config" doc:name="HTTP Listener config" doc:id="6e854c70-b5c7-4487-b594-7e9005696065" >
		<http:listener-connection host="0.0.0.0" port="8081" />
	</http:listener-config>
	<tableau-specialist:tableau-hyper-config name="Tableau_Specialist_Hyper_configuration" doc:name="Tableau Specialist Hyper configuration" doc:id="82d48441-af0b-48bb-a008-5d0347fc4e75" >
		<tableau-specialist:connection telemetry="DO_NOT_SEND_USAGE_DATA_TO_TABLEAU"/>
	</tableau-specialist:tableau-hyper-config>
	<flow name="tableau-demo-query-data-from-hyper-file" doc:id="e80f6bd0-6a42-49be-b231-1a3cce42a810" >
		<http:listener doc:name="Listener" doc:id="a589a1c0-8e81-47c4-8f29-6c5f74bcea18" config-ref="HTTP_Listener_config" path="/query-data-from-hyper-file"/>
		<tableau-specialist:query-data-from-hyper-file doc:name="Query data from hyper file" doc:id="5cfaf771-00c5-46ce-be52-05ca44545169" config-ref="Tableau_Specialist_Hyper_configuration" hyperFileName="hyperFileDemo.hyper">
			<tableau-specialist:query ><![CDATA[SELECT * FROM schemademo.tabledemo]]></tableau-specialist:query>
		</tableau-specialist:query-data-from-hyper-file>
		<ee:transform doc:name="Transform Message" doc:id="ec5a0311-c920-475b-a8b1-b19de6e2ad8c" >
			<ee:message >
				<ee:set-payload ><![CDATA[%dw 2.0
output application/json
---
payload]]></ee:set-payload>
			</ee:message>
		</ee:transform>
	</flow>
</mule>
この例の実行手順
-
コネクタが設定されていることを確認します。
-
プロジェクトを保存します。
-
Web ブラウザーから「
http://localhost:8081/query-data-from-hyper-file」と入力してアプリケーションをテストします。
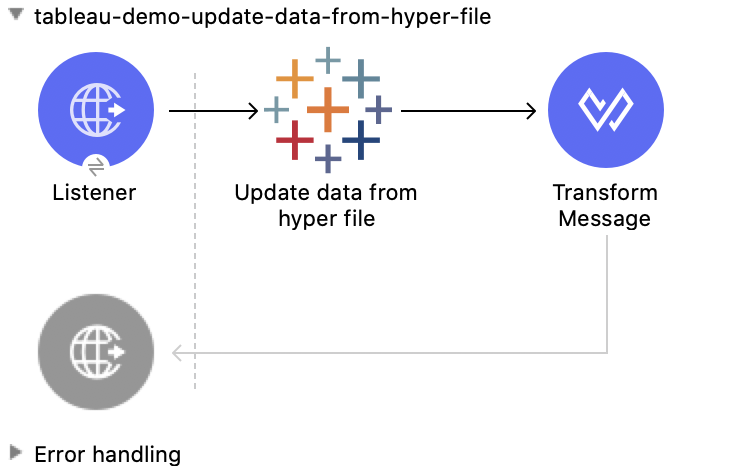
Update Data from Hyper File - Hyper Configuration
この Mule フローでは、SQL クエリを送信してテーブルから .hyper ファイルにデータを更新します。 このフローを使用するには、Create Hyper File フローと Insert Data to Hyper File フローを実行し、hyper テーブルを作成してデータをテーブルに挿入します。このフローでは、以前にテーブルに挿入したデータを更新します。
この例では、次の操作を使用します。
-
HTTP Listener
HTTP 要求からデータを受け取ります。 -
Update data from hyper file
SQL クエリを送信してテーブルから .hyper ファイルにデータを更新します。 -
Transform Message
Update data from hyper file 操作の結果を JSON 形式で出力する
この例の XML
この例のフローをすばやく Mule アプリケーションに読み込むには、次のコードを Studio XML エディターに貼り付けます。
<?xml version="1.0" encoding="UTF-8"?>

<mule xmlns:file="http://www.mulesoft.org/schema/mule/file" xmlns:ee="http://www.mulesoft.org/schema/mule/ee/core"
	xmlns:http="http://www.mulesoft.org/schema/mule/http"
	xmlns:tableau-specialist="http://www.mulesoft.org/schema/mule/tableau-specialist" xmlns="http://www.mulesoft.org/schema/mule/core" xmlns:doc="http://www.mulesoft.org/schema/mule/documentation" xmlns:xsi="http://www.w3.org/2001/XMLSchema-instance" xsi:schemaLocation="http://www.mulesoft.org/schema/mule/core http://www.mulesoft.org/schema/mule/core/current/mule.xsd
http://www.mulesoft.org/schema/mule/tableau-specialist http://www.mulesoft.org/schema/mule/tableau-specialist/current/mule-tableau-specialist.xsd
http://www.mulesoft.org/schema/mule/http http://www.mulesoft.org/schema/mule/http/current/mule-http.xsd
http://www.mulesoft.org/schema/mule/ee/core http://www.mulesoft.org/schema/mule/ee/core/current/mule-ee.xsd
http://www.mulesoft.org/schema/mule/file http://www.mulesoft.org/schema/mule/file/current/mule-file.xsd">
	<http:listener-config name="HTTP_Listener_config" doc:name="HTTP Listener config" doc:id="6e854c70-b5c7-4487-b594-7e9005696065" >
		<http:listener-connection host="0.0.0.0" port="8081" />
	</http:listener-config>
	<tableau-specialist:tableau-hyper-config name="Tableau_Specialist_Hyper_configuration" doc:name="Tableau Specialist Hyper configuration" doc:id="82d48441-af0b-48bb-a008-5d0347fc4e75" >
		<tableau-specialist:connection telemetry="DO_NOT_SEND_USAGE_DATA_TO_TABLEAU"/>
	</tableau-specialist:tableau-hyper-config>
	<flow name="tableau-demo-update-data-from-hyper-file" doc:id="d179e972-ff36-4909-bc89-e399a526e602" >
		<http:listener doc:name="Listener" doc:id="03ffc8a6-55c6-420e-bca7-a17498533271" config-ref="HTTP_Listener_config" path="/update-data-from-hyper-file"/>
		<tableau-specialist:update-data-from-hyper-file doc:name="Update data from hyper file" doc:id="ef1859fc-dfec-41b4-bf3b-c833ce7ab167" config-ref="Tableau_Specialist_Hyper_configuration" hyperFileName="hyperFileDemo.hyper">
			<tableau-specialist:update-command ><![CDATA[UPDATE schemademo.tabledemo
SET "Customer Name"='updatedName'
WHERE "Customer ID"='insert']]></tableau-specialist:update-command>
		</tableau-specialist:update-data-from-hyper-file>
		<ee:transform doc:name="Transform Message" doc:id="b5395963-4001-4241-b3e8-f511dc9caa92" >
			<ee:message >
				<ee:set-payload ><![CDATA[%dw 2.0
output application/json
---
payload]]></ee:set-payload>
			</ee:message>
		</ee:transform>
	</flow>
</mule>
この例の実行手順
-
コネクタが設定されていることを確認します。
-
プロジェクトを保存します。
-
Web ブラウザーから「
http://localhost:8081/update-data-from-hyper-file」と入力してアプリケーションをテストします。
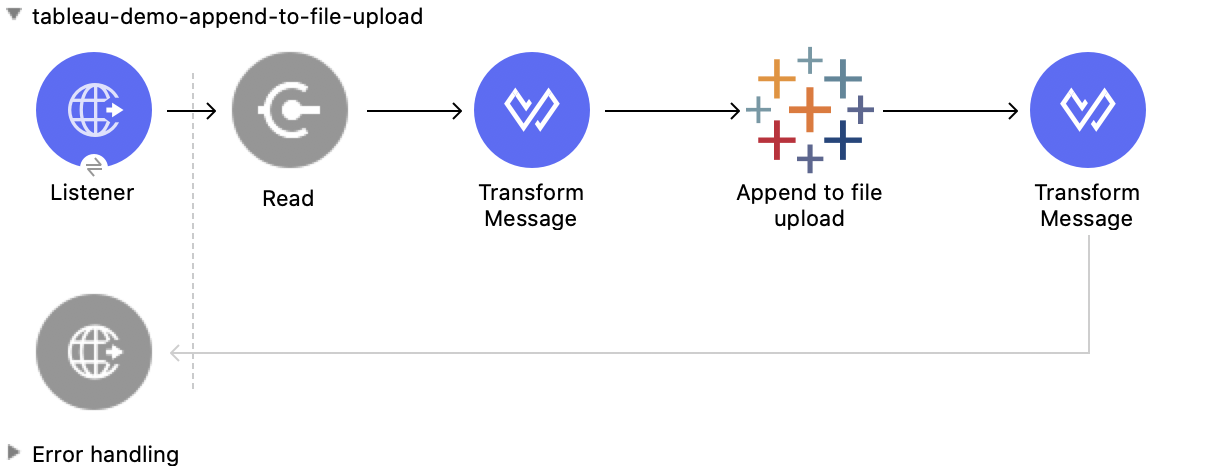
Append to File Upload - Rest Configuration
この Mule フローでは、データのブロックをアップロードして、すでにアップロードされているデータに追加します。アップロードセッション ID を取得するには、Initiate file upload 操作を実行します。
この例では、次の操作を使用します。
-
HTTP Listener
HTTP 要求からデータを受け取ります。 -
参照
ファイルを読み取る -
Transform Message
HTTP 入力を変換します。 -
Append to file upload
データのブロックをアップロードして、すでにアップロードされているデータに追加する -
Transform Message
Append to file upload 操作の結果を JSON 形式で出力する
この例の XML
この例のフローをすばやく Mule アプリケーションに読み込むには、次のコードを Studio XML エディターに貼り付けます。
<?xml version="1.0" encoding="UTF-8"?>

<mule xmlns:tableau="http://www.mulesoft.org/schema/mule/tableau" xmlns:file="http://www.mulesoft.org/schema/mule/file"
	xmlns:ee="http://www.mulesoft.org/schema/mule/ee/core"
	xmlns:http="http://www.mulesoft.org/schema/mule/http" xmlns:tableau-specialist="http://www.mulesoft.org/schema/mule/tableau-specialist" xmlns="http://www.mulesoft.org/schema/mule/core" xmlns:doc="http://www.mulesoft.org/schema/mule/documentation" xmlns:xsi="http://www.w3.org/2001/XMLSchema-instance" xsi:schemaLocation="http://www.mulesoft.org/schema/mule/core http://www.mulesoft.org/schema/mule/core/current/mule.xsd
http://www.mulesoft.org/schema/mule/tableau-specialist http://www.mulesoft.org/schema/mule/tableau-specialist/current/mule-tableau-specialist.xsd
http://www.mulesoft.org/schema/mule/http http://www.mulesoft.org/schema/mule/http/current/mule-http.xsd
http://www.mulesoft.org/schema/mule/ee/core http://www.mulesoft.org/schema/mule/ee/core/current/mule-ee.xsd
http://www.mulesoft.org/schema/mule/file http://www.mulesoft.org/schema/mule/file/current/mule-file.xsd
http://www.mulesoft.org/schema/mule/tableau http://www.mulesoft.org/schema/mule/tableau/current/mule-tableau.xsd">
	<configuration-properties file="project-properties.properties"/>
	<tableau-specialist:tableau-specialist-config name="Tableau_Specialist_Configuration" doc:name="Tableau Specialist Configuration" doc:id="0086ca3c-2ec6-4940-96e5-d319c5d35c15" >
		<tableau-specialist:basic-username-password-connection serverUrl="${credentials.serverUrl}" apiVersion="${credentials.apiVersion}" contentUrl="${credentials.contentUrl}" username="${credentials.username}" password="${credentials.password}" />
	</tableau-specialist:tableau-specialist-config>
	<http:listener-config name="HTTP_Listener_config" doc:name="HTTP Listener config" doc:id="fa83ce28-e898-4ac9-b524-3fdef2ad15f6" >
		<http:listener-connection host="0.0.0.0" port="8081" />
	</http:listener-config>
	<flow name="tableau-demo-append-to-file-upload" doc:id="4dc68be9-5aeb-4ac0-bb7a-21e0ae9bd60a" >
		<http:listener doc:name="Listener" doc:id="59db6c98-5a3d-4b7e-9a48-618367c27431" config-ref="HTTP_Listener_config" path="/append-to-file-upload"/>
		<file:read doc:name="Read" doc:id="46317ac5-ac57-4481-9872-4e794f9dd95d" config-ref="File_Config" path="customers.hyper" />
		<ee:transform doc:name="Transform Message" doc:id="94e523a5-e86e-482f-a45f-0257c6896247">
			<ee:variables>
				<ee:set-variable variableName="fileContent"><![CDATA[%dw 2.0
output application/java
---
payload]]></ee:set-variable>
			</ee:variables>
		</ee:transform>
		<tableau-specialist:append-to-file-upload doc:name="Append to file upload" doc:id="b9439947-1577-4443-a0bc-1a8583e3a3a8" config-ref="Tableau_Specialist_Configuration" uploadSessionId="Upload session id"/>
		<ee:transform doc:name="Transform Message" doc:id="20359447-a8b0-46a6-8a01-fc708e816557" >
			<ee:message >
				<ee:set-payload ><![CDATA[%dw 2.0
output application/json
---
payload]]></ee:set-payload>
			</ee:message>
		</ee:transform>
	</flow>
</mule>
この例の実行手順
-
コネクタが設定されていることを確認します。
-
プロジェクトを保存します。
-
Web ブラウザーから「
http://localhost:8081/append-to-file-upload」と入力してアプリケーションをテストします。
Create Project - Rest Configuration
この Mule フローでは、指定されたサイトにプロジェクトを作成します。
この例では、次の操作を使用します。
-
HTTP Listener
HTTP 要求からデータを受け取ります。 -
Create project
サイトにプロジェクトを作成する -
Transform Message
Create project 操作の結果を JSON 形式で出力する

この例の XML
この例のフローをすばやく Mule アプリケーションに読み込むには、次のコードを Studio XML エディターに貼り付けます。
<?xml version="1.0" encoding="UTF-8"?>

<mule xmlns:tableau="http://www.mulesoft.org/schema/mule/tableau" xmlns:file="http://www.mulesoft.org/schema/mule/file"
	xmlns:ee="http://www.mulesoft.org/schema/mule/ee/core"
	xmlns:http="http://www.mulesoft.org/schema/mule/http" xmlns:tableau-specialist="http://www.mulesoft.org/schema/mule/tableau-specialist" xmlns="http://www.mulesoft.org/schema/mule/core" xmlns:doc="http://www.mulesoft.org/schema/mule/documentation" xmlns:xsi="http://www.w3.org/2001/XMLSchema-instance" xsi:schemaLocation="http://www.mulesoft.org/schema/mule/core http://www.mulesoft.org/schema/mule/core/current/mule.xsd
http://www.mulesoft.org/schema/mule/tableau-specialist http://www.mulesoft.org/schema/mule/tableau-specialist/current/mule-tableau-specialist.xsd
http://www.mulesoft.org/schema/mule/http http://www.mulesoft.org/schema/mule/http/current/mule-http.xsd
http://www.mulesoft.org/schema/mule/ee/core http://www.mulesoft.org/schema/mule/ee/core/current/mule-ee.xsd
http://www.mulesoft.org/schema/mule/file http://www.mulesoft.org/schema/mule/file/current/mule-file.xsd
http://www.mulesoft.org/schema/mule/tableau http://www.mulesoft.org/schema/mule/tableau/current/mule-tableau.xsd">
	<configuration-properties file="project-properties.properties"/>
	<tableau-specialist:tableau-specialist-config name="Tableau_Specialist_Configuration" doc:name="Tableau Specialist Configuration" doc:id="0086ca3c-2ec6-4940-96e5-d319c5d35c15" >
		<tableau-specialist:basic-username-password-connection serverUrl="${credentials.serverUrl}" apiVersion="${credentials.apiVersion}" contentUrl="${credentials.contentUrl}" username="${credentials.username}" password="${credentials.password}" />
	</tableau-specialist:tableau-specialist-config>
	<http:listener-config name="HTTP_Listener_config" doc:name="HTTP Listener config" doc:id="fa83ce28-e898-4ac9-b524-3fdef2ad15f6" >
		<http:listener-connection host="0.0.0.0" port="8081" />
	</http:listener-config>
<flow name="tableau-demo-create-project" doc:id="21de738a-6777-4305-aced-c8ce22f93062" >
		<http:listener doc:name="Listener" doc:id="b189857b-6fbe-4f8b-b50a-274d4f9c738b" config-ref="HTTP_Listener_config" path="/create-project"/>
		<tableau-specialist:create-project doc:name="Create project" doc:id="95f6ddb3-f33b-4f46-a694-5f918766a38f" config-ref="Tableau_Specialist_Configuration">
			<tableau-specialist:content ><![CDATA[#[output application/json
---
{
	project: {
		name: "demo-test",
		description: "demo-description"
	}
}]]]></tableau-specialist:content>
		</tableau-specialist:create-project>
		<ee:transform doc:name="Transform Message" doc:id="1dbb0073-df1a-46db-bde7-7e7157b96572" >
			<ee:message >
				<ee:set-payload ><![CDATA[%dw 2.0
output application/json
---
payload]]></ee:set-payload>
			</ee:message>
		</ee:transform>
	</flow>
</mule>
この例の実行手順
-
コネクタが設定されていることを確認します。
-
プロジェクトを保存します。
-
Web ブラウザーから「
http://localhost:8081/create-project」と入力してアプリケーションをテストします。
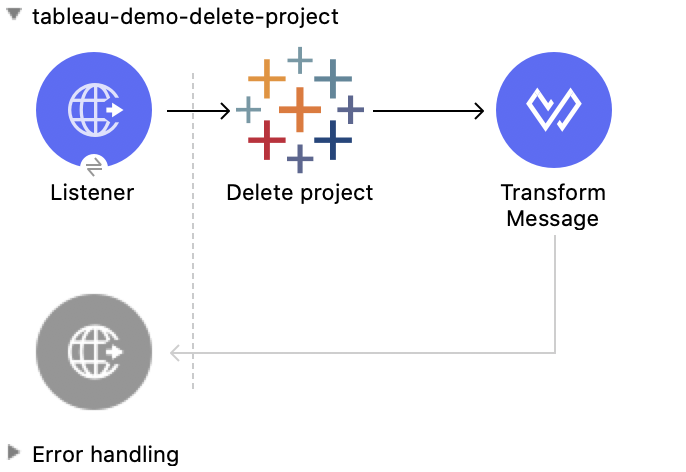
Delete Project - Rest Configuration
この Mule フローでは、指定されたサイトからプロジェクトを削除します。プロジェクトが削除されると、そのすべてのアセット (関連付けられているワークブック、データソース、プロジェクトビューオプション、権限など) も削除されます。この操作を使用する場合は注意が必要です。
この例では、次の操作を使用します。
-
HTTP Listener
HTTP 要求からデータを受け取ります。 -
Delete project
サイトからプロジェクトを削除する -
Transform Message
Delete project 操作の結果を JSON 形式で出力する
この例の XML
この例のフローをすばやく Mule アプリケーションに読み込むには、次のコードを Studio XML エディターに貼り付けます。
<?xml version="1.0" encoding="UTF-8"?>

<mule xmlns:tableau="http://www.mulesoft.org/schema/mule/tableau" xmlns:file="http://www.mulesoft.org/schema/mule/file"
	xmlns:ee="http://www.mulesoft.org/schema/mule/ee/core"
	xmlns:http="http://www.mulesoft.org/schema/mule/http" xmlns:tableau-specialist="http://www.mulesoft.org/schema/mule/tableau-specialist" xmlns="http://www.mulesoft.org/schema/mule/core" xmlns:doc="http://www.mulesoft.org/schema/mule/documentation" xmlns:xsi="http://www.w3.org/2001/XMLSchema-instance" xsi:schemaLocation="http://www.mulesoft.org/schema/mule/core http://www.mulesoft.org/schema/mule/core/current/mule.xsd
http://www.mulesoft.org/schema/mule/tableau-specialist http://www.mulesoft.org/schema/mule/tableau-specialist/current/mule-tableau-specialist.xsd
http://www.mulesoft.org/schema/mule/http http://www.mulesoft.org/schema/mule/http/current/mule-http.xsd
http://www.mulesoft.org/schema/mule/ee/core http://www.mulesoft.org/schema/mule/ee/core/current/mule-ee.xsd
http://www.mulesoft.org/schema/mule/file http://www.mulesoft.org/schema/mule/file/current/mule-file.xsd
http://www.mulesoft.org/schema/mule/tableau http://www.mulesoft.org/schema/mule/tableau/current/mule-tableau.xsd">
	<configuration-properties file="project-properties.properties"/>
	<tableau-specialist:tableau-specialist-config name="Tableau_Specialist_Configuration" doc:name="Tableau Specialist Configuration" doc:id="cb468146-0f1e-4582-823f-931301fe573e" >
		<tableau-specialist:basic-username-password-connection serverUrl="${credentials.serverUrl}" apiVersion="${credentials.apiVersion}" contentUrl="${credentials.contentUrl}" username="${credentials.username}" password="${credentials.password}" />
	</tableau-specialist:tableau-specialist-config>
	<http:listener-config name="HTTP_Listener_config" doc:name="HTTP Listener config" doc:id="a5594c7d-a121-4db2-a96b-09b935af2550" >
		<http:listener-connection host="0.0.0.0" port="8081" />
	</http:listener-config>
	<flow name="tableau-demo-delete-project" doc:id="96cf801d-bcae-4f2c-91c2-973feb4eb9bc" >
		<http:listener doc:name="Listener" doc:id="fb1582e1-4445-48c5-b53f-adda3ab50592" config-ref="HTTP_Listener_config" path="/delete-project"/>
		<tableau-specialist:delete-project doc:name="Delete project" doc:id="7e135059-0ccd-4d51-b10d-fc38bc4f304d" config-ref="Tableau_Specialist_Configuration" projectId="Id of the project to be deleted"/>
		<ee:transform doc:name="Transform Message" doc:id="b69f9dd5-9a97-47a3-a7ad-6fae4056d396" >
			<ee:message >
				<ee:set-payload ><![CDATA[%dw 2.0
output application/json
---
payload]]></ee:set-payload>
			</ee:message>
		</ee:transform>
	</flow>
</mule>
この例の実行手順
-
コネクタが設定されていることを確認します。
-
プロジェクトを保存します。
-
Web ブラウザーから「
http://localhost:8081/delete-project」と入力してアプリケーションをテストします。
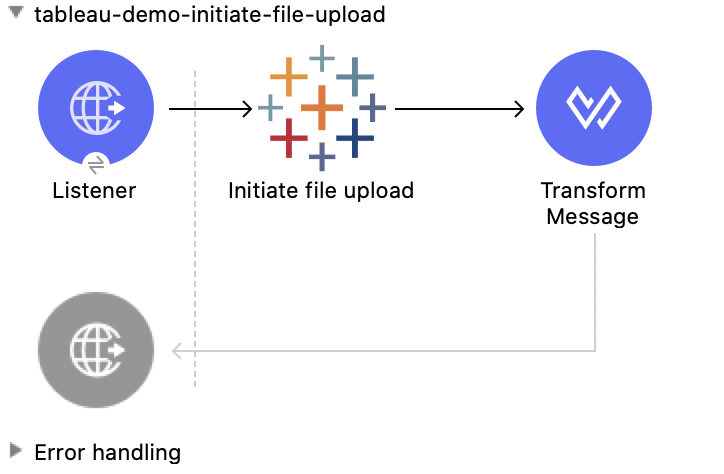
Initiate File Upload - Rest Configuration
この Mule フローでは、ファイルのアップロードプロセスを開始します。
この例では、次の操作を使用します。
-
HTTP Listener
HTTP 要求からデータを受け取ります。 -
Initiate file upload
ファイルのアップロードプロセスを開始する -
Transform Message
Initiate file upload 操作の結果を JSON 形式で出力する
この例の XML
この例のフローをすばやく Mule アプリケーションに読み込むには、次のコードを Studio XML エディターに貼り付けます。
<?xml version="1.0" encoding="UTF-8"?>

<mule xmlns:tableau="http://www.mulesoft.org/schema/mule/tableau" xmlns:file="http://www.mulesoft.org/schema/mule/file"
	xmlns:ee="http://www.mulesoft.org/schema/mule/ee/core"
	xmlns:http="http://www.mulesoft.org/schema/mule/http" xmlns:tableau-specialist="http://www.mulesoft.org/schema/mule/tableau-specialist" xmlns="http://www.mulesoft.org/schema/mule/core" xmlns:doc="http://www.mulesoft.org/schema/mule/documentation" xmlns:xsi="http://www.w3.org/2001/XMLSchema-instance" xsi:schemaLocation="http://www.mulesoft.org/schema/mule/core http://www.mulesoft.org/schema/mule/core/current/mule.xsd
http://www.mulesoft.org/schema/mule/tableau-specialist http://www.mulesoft.org/schema/mule/tableau-specialist/current/mule-tableau-specialist.xsd
http://www.mulesoft.org/schema/mule/http http://www.mulesoft.org/schema/mule/http/current/mule-http.xsd
http://www.mulesoft.org/schema/mule/ee/core http://www.mulesoft.org/schema/mule/ee/core/current/mule-ee.xsd
http://www.mulesoft.org/schema/mule/file http://www.mulesoft.org/schema/mule/file/current/mule-file.xsd
http://www.mulesoft.org/schema/mule/tableau http://www.mulesoft.org/schema/mule/tableau/current/mule-tableau.xsd">
	<configuration-properties file="project-properties.properties"/>
	<tableau-specialist:tableau-specialist-config name="Tableau_Specialist_Configuration" doc:name="Tableau Specialist Configuration" doc:id="6c0dc7f6-facd-4f38-acbe-b598686b2fb6" >
		<tableau-specialist:basic-username-password-connection serverUrl="${credentials.serverUrl}" apiVersion="${credentials.apiVersion}" contentUrl="${credentials.contentUrl}" username="${credentials.username}" password="${credentials.password}" />
	</tableau-specialist:tableau-specialist-config>
	<http:listener-config name="HTTP_Listener_config" doc:name="HTTP Listener config" doc:id="6dd0ac5f-0a8b-421f-bd81-ceb4f450a792" >
		<http:listener-connection host="0.0.0.0" port="8081" />
	</http:listener-config>
	<flow name="tableau-demo-initiate-file-upload" doc:id="2d565997-700f-4828-b129-ade9777d37f8" >
		<http:listener doc:name="Listener" doc:id="4ca7aa6e-54e6-4b11-b3d9-8cd6c5a35527" config-ref="HTTP_Listener_config" path="/initiate-file-upload"/>
		<tableau-specialist:initiate-file-upload doc:name="Initiate file upload" doc:id="2f6a418d-6122-49f1-83b9-21e37f64a86d" config-ref="Tableau_Specialist_Configuration"/>
		<ee:transform doc:name="Transform Message" doc:id="7e32ae77-622a-4ba8-8b13-5529bbcf5dc1" >
			<ee:message >
				<ee:set-payload ><![CDATA[%dw 2.0
output application/json
---
payload]]></ee:set-payload>
			</ee:message>
		</ee:transform>
	</flow>
</mule>
この例の実行手順
-
コネクタが設定されていることを確認します。
-
プロジェクトを保存します。
-
Web ブラウザーから「
http://localhost:8081/initiate-file-upload」と入力してアプリケーションをテストします。
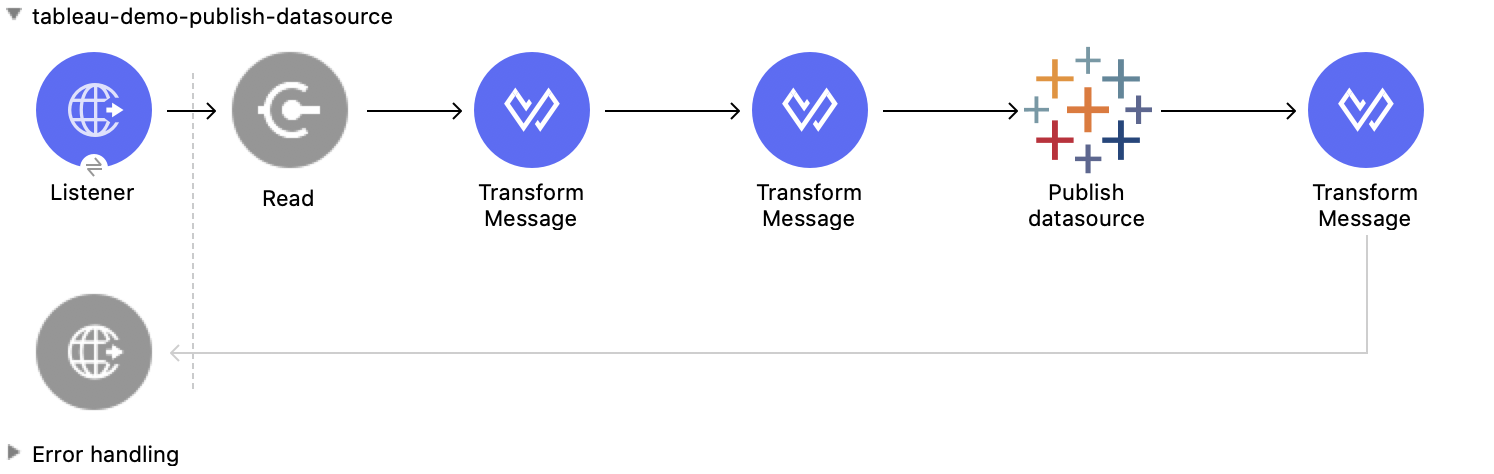
Publish Datasource - Rest Configuration
この Mule フローでは、指定されたサイトにデータソースをパブリッシュ (データを既存のデータソースに追加) します。アップロードするデータソースのサンプルとして customers.hyper を使用できます。
この例では、次の操作を使用します。
-
HTTP Listener
HTTP 要求からデータを受け取ります。 -
参照
ファイルを読み取る -
Transform Message
HTTP 入力を変換します。 -
Transform Message
データソースを Java 形式に変換する -
Publish datasource
サイトにデータソースをパブリッシュする (データを既存のデータソースに追加したりする) -
Transform Message
Publish datasource 操作の結果を JSON 形式で出力する
この例の XML
この例のフローをすばやく Mule アプリケーションに読み込むには、次のコードを Studio XML エディターに貼り付けます。
<?xml version="1.0" encoding="UTF-8"?>

<mule xmlns:tableau="http://www.mulesoft.org/schema/mule/tableau" xmlns:file="http://www.mulesoft.org/schema/mule/file"
	xmlns:ee="http://www.mulesoft.org/schema/mule/ee/core"
	xmlns:http="http://www.mulesoft.org/schema/mule/http" xmlns:tableau-specialist="http://www.mulesoft.org/schema/mule/tableau-specialist" xmlns="http://www.mulesoft.org/schema/mule/core" xmlns:doc="http://www.mulesoft.org/schema/mule/documentation" xmlns:xsi="http://www.w3.org/2001/XMLSchema-instance" xsi:schemaLocation="http://www.mulesoft.org/schema/mule/core http://www.mulesoft.org/schema/mule/core/current/mule.xsd
http://www.mulesoft.org/schema/mule/tableau-specialist http://www.mulesoft.org/schema/mule/tableau-specialist/current/mule-tableau-specialist.xsd
http://www.mulesoft.org/schema/mule/http http://www.mulesoft.org/schema/mule/http/current/mule-http.xsd
http://www.mulesoft.org/schema/mule/ee/core http://www.mulesoft.org/schema/mule/ee/core/current/mule-ee.xsd
http://www.mulesoft.org/schema/mule/file http://www.mulesoft.org/schema/mule/file/current/mule-file.xsd
http://www.mulesoft.org/schema/mule/tableau http://www.mulesoft.org/schema/mule/tableau/current/mule-tableau.xsd">
	<configuration-properties file="project-properties.properties"/>
	<tableau-specialist:tableau-specialist-config name="Tableau_Specialist_Configuration" doc:name="Tableau Specialist Configuration" doc:id="6c0dc7f6-facd-4f38-acbe-b598686b2fb6" >
		<tableau-specialist:basic-username-password-connection serverUrl="${credentials.serverUrl}" apiVersion="${credentials.apiVersion}" contentUrl="${credentials.contentUrl}" username="${credentials.username}" password="${credentials.password}" />
	</tableau-specialist:tableau-specialist-config>
	<http:listener-config name="HTTP_Listener_config" doc:name="HTTP Listener config" doc:id="6dd0ac5f-0a8b-421f-bd81-ceb4f450a792" >
		<http:listener-connection host="0.0.0.0" port="8081" />
	</http:listener-config>
	<flow name="tableau-demo-publish-datasource" doc:id="58868707-a720-4cd1-ba45-80710dc93bb2" >
		<http:listener doc:name="Listener" config-ref="HTTP_Listener_config" path="/publish-datasource"/>
        <file:read doc:name="Read" doc:id="a85bdc0e-605e-419b-9829-0d88962075fd" config-ref="File_Config" path="customers.hyper"/>
		<ee:transform doc:name="Transform Message">
                <ee:variables>
                    <ee:set-variable variableName="fileContent"><![CDATA[%dw 2.0
output application/java
---
payload]]></ee:set-variable>
                </ee:variables>
            </ee:transform>
        <ee:transform doc:name="Transform Message">
                <ee:message>
                    <ee:set-payload><![CDATA[%dw 2.0
output application/json
---
{
	datasource: {
		name: "datasource test",
		description: "test",
		project: {
			id: "Id of the project to publish the datasource."
		}
	}
}]]></ee:set-payload>
                </ee:message>
            </ee:transform>
        <tableau-specialist:publish-datasource doc:name="Publish datasource" config-ref="Tableau_Specialist_Configuration" overwriteFlag="true">
			<tableau-specialist:datasource-request-options >
				 <tableau-specialist:publish-datasource-request-body datasourceFileContent="#[vars.fileContent]" datasourceFileName="myfile.hyper" />
			</tableau-specialist:datasource-request-options>
		</tableau-specialist:publish-datasource>
		<ee:transform doc:name="Transform Message" doc:id="b2fc285a-a384-4c62-b9aa-afabf96d07d6" >
			<ee:message >
				<ee:set-payload ><![CDATA[%dw 2.0
output application/json
---
payload]]></ee:set-payload>
			</ee:message>
		</ee:transform>
	</flow>
</mule>
この例の実行手順
-
コネクタが設定されていることを確認します。
-
プロジェクトを保存します。
-
Web ブラウザーから「
http://localhost:8081/publish-datasource」と入力してアプリケーションをテストします。
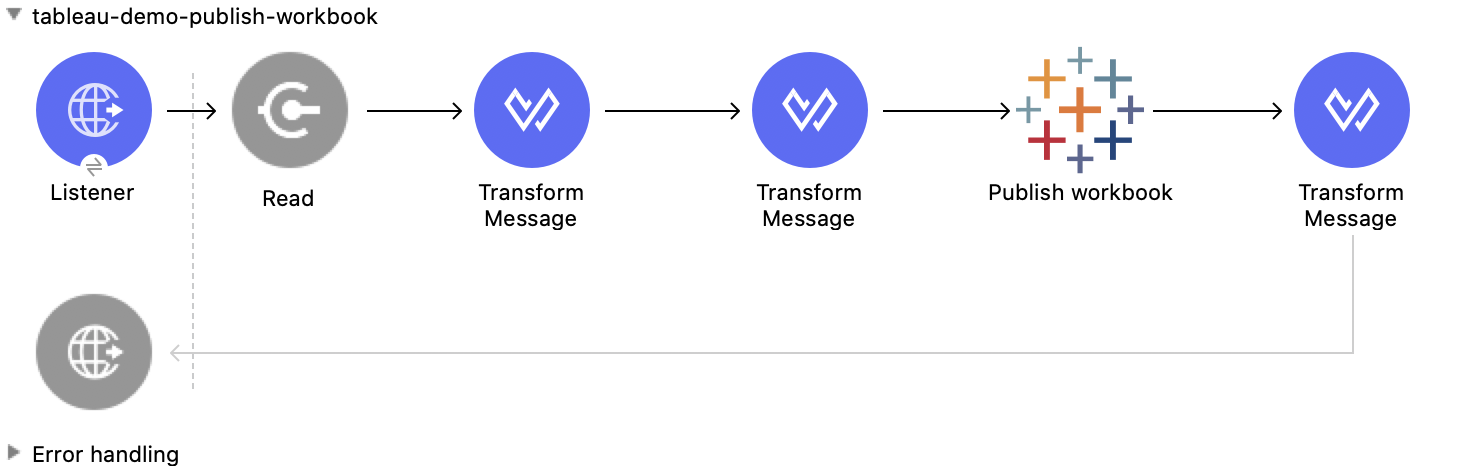
Publish Workbook - Rest Configuration
この Mule フローでは、指定されたサイトにワークブックをパブリッシュします。
この例では、次の操作を使用します。
-
HTTP Listener
HTTP 要求からデータを受け取ります。 -
参照
ファイルを読み取る -
Transform Message
HTTP 入力を変換します。 -
Transform Message
データソースを Java 形式に変換する -
Publish workbook
サイトにワークブックをパブリッシュする -
Transform Message
Publish workbook 操作の結果を JSON 形式で出力する
この例の XML
この例のフローをすばやく Mule アプリケーションに読み込むには、次のコードを Studio XML エディターに貼り付けます。
<?xml version="1.0" encoding="UTF-8"?>

<mule xmlns:tableau="http://www.mulesoft.org/schema/mule/tableau" xmlns:file="http://www.mulesoft.org/schema/mule/file"
	xmlns:ee="http://www.mulesoft.org/schema/mule/ee/core"
	xmlns:http="http://www.mulesoft.org/schema/mule/http" xmlns:tableau-specialist="http://www.mulesoft.org/schema/mule/tableau-specialist" xmlns="http://www.mulesoft.org/schema/mule/core" xmlns:doc="http://www.mulesoft.org/schema/mule/documentation" xmlns:xsi="http://www.w3.org/2001/XMLSchema-instance" xsi:schemaLocation="http://www.mulesoft.org/schema/mule/core http://www.mulesoft.org/schema/mule/core/current/mule.xsd
http://www.mulesoft.org/schema/mule/tableau-specialist http://www.mulesoft.org/schema/mule/tableau-specialist/current/mule-tableau-specialist.xsd
http://www.mulesoft.org/schema/mule/http http://www.mulesoft.org/schema/mule/http/current/mule-http.xsd
http://www.mulesoft.org/schema/mule/ee/core http://www.mulesoft.org/schema/mule/ee/core/current/mule-ee.xsd
http://www.mulesoft.org/schema/mule/file http://www.mulesoft.org/schema/mule/file/current/mule-file.xsd
http://www.mulesoft.org/schema/mule/tableau http://www.mulesoft.org/schema/mule/tableau/current/mule-tableau.xsd">
	<configuration-properties file="project-properties.properties"/>
	<tableau-specialist:tableau-specialist-config name="Tableau_Specialist_Configuration" doc:name="Tableau Specialist Configuration" doc:id="6c0dc7f6-facd-4f38-acbe-b598686b2fb6" >
		<tableau-specialist:basic-username-password-connection serverUrl="${credentials.serverUrl}" apiVersion="${credentials.apiVersion}" contentUrl="${credentials.contentUrl}" username="${credentials.username}" password="${credentials.password}" />
	</tableau-specialist:tableau-specialist-config>
	<http:listener-config name="HTTP_Listener_config" doc:name="HTTP Listener config" doc:id="6dd0ac5f-0a8b-421f-bd81-ceb4f450a792" >
		<http:listener-connection host="0.0.0.0" port="8081" />
	</http:listener-config>
	<flow name="tableau-demo-publish-workbook" doc:id="960ecd4c-91fd-4884-bb94-d2aedbcf94ec" >
		<http:listener doc:name="Listener" doc:id="75a721e3-77fc-4c6c-93b4-6bc5b2e0a1cb" config-ref="HTTP_Listener_config" path="/publish-workbook"/>
		<file:read doc:name="Read" doc:id="e5342f6f-02a1-4c38-982a-b780a7dcaaac" config-ref="File_Config" path="test-workbook.twbx"/>
		<ee:transform doc:name="Transform Message">
                <ee:variables>
                    <ee:set-variable variableName="fileContent"><![CDATA[%dw 2.0
output application/java
---
payload]]></ee:set-variable>
                </ee:variables>
            </ee:transform>
        <ee:transform doc:name="Transform Message">
				<ee:message>
					<ee:set-payload><![CDATA[%dw 2.0
output application/json
---
{
	workbook: {
		name: "Publish_workbook_test"
	}
}]]></ee:set-payload>
				</ee:message>
			</ee:transform>
			<tableau-specialist:publish-workbook doc:name="Publish workbook" doc:id="74fe54f8-8165-4183-b7fd-1a1ed63a9428" config-ref="Tableau_Specialist_Configuration" overwriteFlag="true">
			<tableau-specialist:workbook-request-options >
					<tableau-specialist:publish-workbook-request-body workbookFileContent="#[vars.fileContent]" workbookFileName="test-workbook.twbx" />
			</tableau-specialist:workbook-request-options>
		</tableau-specialist:publish-workbook>
		<ee:transform doc:name="Transform Message" doc:id="bc5a4103-da41-48ac-b08a-8676684d3965" >
			<ee:message >
				<ee:set-payload ><![CDATA[%dw 2.0
output application/json
---
payload]]></ee:set-payload>
			</ee:message>
		</ee:transform>
	</flow>
</mule>
この例の実行手順
-
コネクタが設定されていることを確認します。
-
プロジェクトを保存します。
-
Web ブラウザーから「
http://localhost:8081/publish-workbook」と入力してアプリケーションをテストします。
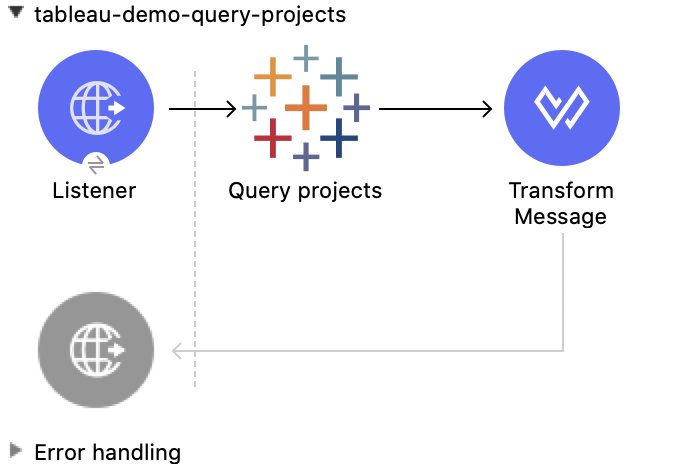
Query Projects - Rest Configuration
この Mule フローでは、指定されたサイトのプロジェクトのリストを返します。省略可能なパラメーターを使用して、大きな結果をページングします。
この例では、次の操作を使用します。
-
HTTP Listener
HTTP 要求からデータを受け取ります。 -
Query projects
サイトのプロジェクトのリストを返す -
Transform Message
Query projects 操作の結果を JSON 形式で出力する
この例の XML
この例のフローをすばやく Mule アプリケーションに読み込むには、次のコードを Studio XML エディターに貼り付けます。
<?xml version="1.0" encoding="UTF-8"?>

<mule xmlns:tableau="http://www.mulesoft.org/schema/mule/tableau" xmlns:file="http://www.mulesoft.org/schema/mule/file"
	xmlns:ee="http://www.mulesoft.org/schema/mule/ee/core"
	xmlns:http="http://www.mulesoft.org/schema/mule/http" xmlns:tableau-specialist="http://www.mulesoft.org/schema/mule/tableau-specialist" xmlns="http://www.mulesoft.org/schema/mule/core" xmlns:doc="http://www.mulesoft.org/schema/mule/documentation" xmlns:xsi="http://www.w3.org/2001/XMLSchema-instance" xsi:schemaLocation="http://www.mulesoft.org/schema/mule/core http://www.mulesoft.org/schema/mule/core/current/mule.xsd
http://www.mulesoft.org/schema/mule/tableau-specialist http://www.mulesoft.org/schema/mule/tableau-specialist/current/mule-tableau-specialist.xsd
http://www.mulesoft.org/schema/mule/http http://www.mulesoft.org/schema/mule/http/current/mule-http.xsd
http://www.mulesoft.org/schema/mule/ee/core http://www.mulesoft.org/schema/mule/ee/core/current/mule-ee.xsd
http://www.mulesoft.org/schema/mule/file http://www.mulesoft.org/schema/mule/file/current/mule-file.xsd
http://www.mulesoft.org/schema/mule/tableau http://www.mulesoft.org/schema/mule/tableau/current/mule-tableau.xsd">
	<configuration-properties file="project-properties.properties"/>
	<tableau-specialist:tableau-specialist-config name="Tableau_Specialist_Configuration" doc:name="Tableau Specialist Configuration" doc:id="6c0dc7f6-facd-4f38-acbe-b598686b2fb6" >
		<tableau-specialist:basic-username-password-connection serverUrl="${credentials.serverUrl}" apiVersion="${credentials.apiVersion}" contentUrl="${credentials.contentUrl}" username="${credentials.username}" password="${credentials.password}" />
	</tableau-specialist:tableau-specialist-config>
	<http:listener-config name="HTTP_Listener_config" doc:name="HTTP Listener config" doc:id="6dd0ac5f-0a8b-421f-bd81-ceb4f450a792" >
		<http:listener-connection host="0.0.0.0" port="8081" />
	</http:listener-config>
	<flow name="tableau-demo-query-projects" doc:id="11b6ccc2-a74a-4c51-bf55-6e218a4d2d2b" >
		<http:listener doc:name="Listener" doc:id="4481b0ce-c317-45ca-9395-30241ec38422" config-ref="HTTP_Listener_config" path="/query-projects"/>
		<tableau-specialist:query-projects doc:name="Query projects" doc:id="fd755a6c-a570-4ee3-b3ab-b5e175b6266e" config-ref="Tableau_Specialist_Configuration"/>
		<ee:transform doc:name="Transform Message" doc:id="28053ee5-5e84-4c72-a771-f0b2a1ea8f15" >
			<ee:message >
				<ee:set-payload ><![CDATA[%dw 2.0
output application/json
---
payload]]></ee:set-payload>
			</ee:message>
		</ee:transform>
	</flow>
</mule>
この例の実行手順
-
コネクタが設定されていることを確認します。
-
プロジェクトを保存します。
-
Web ブラウザーから「
http://localhost:8081/query-projects」と入力してアプリケーションをテストします。
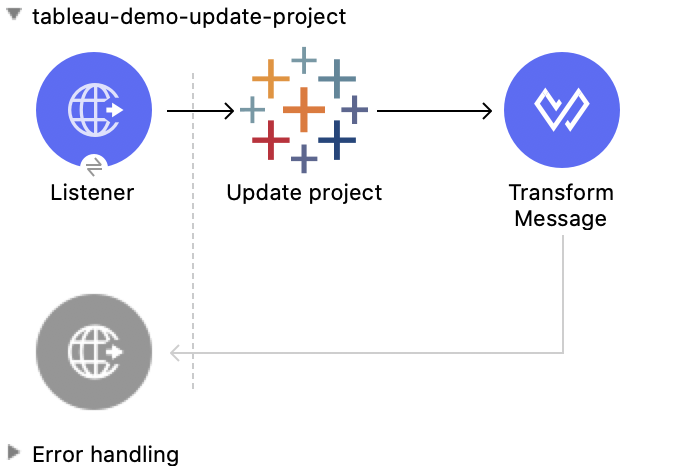
Update Project - Rest Configuration
この Mule フローでは、指定されたサイトのプロジェクトを更新します。
この例では、次の操作を使用します。
-
HTTP Listener
HTTP 要求からデータを受け取ります。 -
Update project
サイトのプロジェクトを更新する -
Transform Message
Update project 操作の結果を JSON 形式で出力する
この例の XML
この例のフローをすばやく Mule アプリケーションに読み込むには、次のコードを Studio XML エディターに貼り付けます。
<?xml version="1.0" encoding="UTF-8"?>

<mule xmlns:tableau="http://www.mulesoft.org/schema/mule/tableau" xmlns:file="http://www.mulesoft.org/schema/mule/file"
	xmlns:ee="http://www.mulesoft.org/schema/mule/ee/core"
	xmlns:http="http://www.mulesoft.org/schema/mule/http" xmlns:tableau-specialist="http://www.mulesoft.org/schema/mule/tableau-specialist" xmlns="http://www.mulesoft.org/schema/mule/core" xmlns:doc="http://www.mulesoft.org/schema/mule/documentation" xmlns:xsi="http://www.w3.org/2001/XMLSchema-instance" xsi:schemaLocation="http://www.mulesoft.org/schema/mule/core http://www.mulesoft.org/schema/mule/core/current/mule.xsd
http://www.mulesoft.org/schema/mule/tableau-specialist http://www.mulesoft.org/schema/mule/tableau-specialist/current/mule-tableau-specialist.xsd
http://www.mulesoft.org/schema/mule/http http://www.mulesoft.org/schema/mule/http/current/mule-http.xsd
http://www.mulesoft.org/schema/mule/ee/core http://www.mulesoft.org/schema/mule/ee/core/current/mule-ee.xsd
http://www.mulesoft.org/schema/mule/file http://www.mulesoft.org/schema/mule/file/current/mule-file.xsd
http://www.mulesoft.org/schema/mule/tableau http://www.mulesoft.org/schema/mule/tableau/current/mule-tableau.xsd">
	<configuration-properties file="project-properties.properties"/>
	<tableau-specialist:tableau-specialist-config name="Tableau_Specialist_Configuration" doc:name="Tableau Specialist Configuration" doc:id="6c0dc7f6-facd-4f38-acbe-b598686b2fb6" >
		<tableau-specialist:basic-username-password-connection serverUrl="${credentials.serverUrl}" apiVersion="${credentials.apiVersion}" contentUrl="${credentials.contentUrl}" username="${credentials.username}" password="${credentials.password}" />
	</tableau-specialist:tableau-specialist-config>
	<http:listener-config name="HTTP_Listener_config" doc:name="HTTP Listener config" doc:id="6dd0ac5f-0a8b-421f-bd81-ceb4f450a792" >
		<http:listener-connection host="0.0.0.0" port="8081" />
	</http:listener-config>
	<flow name="tableau-demo-update-project" doc:id="3c7e74d4-0992-47a6-b4ce-5cf550af0c85" >
		<http:listener doc:name="Listener" doc:id="b78ce590-c90b-4274-9347-312e6f4f6568" config-ref="HTTP_Listener_config" path="/update-project"/>
            <tableau-specialist:update-project doc:name="Update project" doc:id="b27c3751-14a0-436d-8f47-dbb9d72360cc" config-ref="Tableau_Specialist_Configuration" projectId="Id of the project to update">
			<tableau-specialist:content ><![CDATA[#[output application/json
---
{
	project: {
		name: "Update test",
		description: "Update description"
	}
}]]]></tableau-specialist:content>
		</tableau-specialist:update-project>
		<ee:transform doc:name="Transform Message" doc:id="45cdd3cd-51a8-4ed7-a364-07650c8fda10" >
			<ee:message >
				<ee:set-payload ><![CDATA[%dw 2.0
output application/json
---
payload]]></ee:set-payload>
			</ee:message>
		</ee:transform>
	</flow>
</mule>
この例の実行手順
-
コネクタが設定されていることを確認します。
-
プロジェクトを保存します。
-
Web ブラウザーから「
http://localhost:8081/update-project」と入力してアプリケーションをテストします。