Manage Schedules
You can use Runtime Manager to view and control the Scheduler components within the flows in your deployed applications. Use the Schedules tab in the left navigation menu to enable or disable Scheduler elements, change the frequency, or run the scheduled job immediately, all without changing the running application.
The Schedules tab is useful in the following scenarios:
-
You have a job that runs nightly but you want to debug it now.
You can trigger the job while it’s running without updating the schedule in your application.
-
You want to change the schedules in your application at runtime without redeploying.
-
You want to disable a scheduled job while one of the applications you are connecting to is undergoing maintenance.
-
You want runtime visibility into the schedules in your application.
The CloudHub scheduler reads the job configuration every time it runs. When you update the scheduler configuration, the change takes effect the next time the scheduler runs.
| You cannot manage CloudHub schedules using scripts. Use the Schedules tab or the CloudHub API to manage CloudHub schedules. |
| To view the application schedules, you must have the Exchange Viewer and Read Applications permissions. |
Considerations and Limitations
When designing the schedule, consider the following:
-
Plan for high availability during network failures, infrastructure restarts due to hardware issues or scheduled maintenance, and security updates.
During service updates or security patching, CloudHub waits two minutes for existing schedules to complete. After two minutes, CloudHub retriggers any incomplete schedules. Additionally, during zero downtime deployments, schedules whose trigger time overlaps with the deployment window might be triggered more than once, even if the initial execution completed successfully.
To avoid retriggers with long-running schedules, and duplicate processing during deployment overlaps, make sure that the app executes the flow idempotently.
-
Design your schedules to prevent duplicate data processing, as they can be triggered more than once due to the issues mentioned previously.
-
For multi-worker apps, CloudHub guarantees that the schedule trigger executes on a single worker.
However, subsequent triggers might execute on a different worker. CloudHub distributes multiple concurrent schedules across workers.
-
The minimum recommended frequency between calls is 10 seconds.
-
If a scheduled job is not triggered because the application is not running, CloudHub triggers the job as soon as it restarts.
-
When a Mule 4.x app uses a schedule to trigger a flow with subflow, the scheduler waits until both main flow and subflow complete before scheduling the next run.
Flow names can contain only letters (a-zA-Z), numbers (0-9), hyphen (-), underscore (_), and period (.) characters. The following characters are invalid: slash (/), square brackets ([]), curly brackets ({}), hash (#), and colon (:).
-
All schedules are based in the UTC timezone, regardless of the geographic region where you deploy the app.
View and Manage Application Schedules in Runtime Manager
To use the scheduling feature in Runtime Manager, deploy an application that includes one or more Scheduler elements:
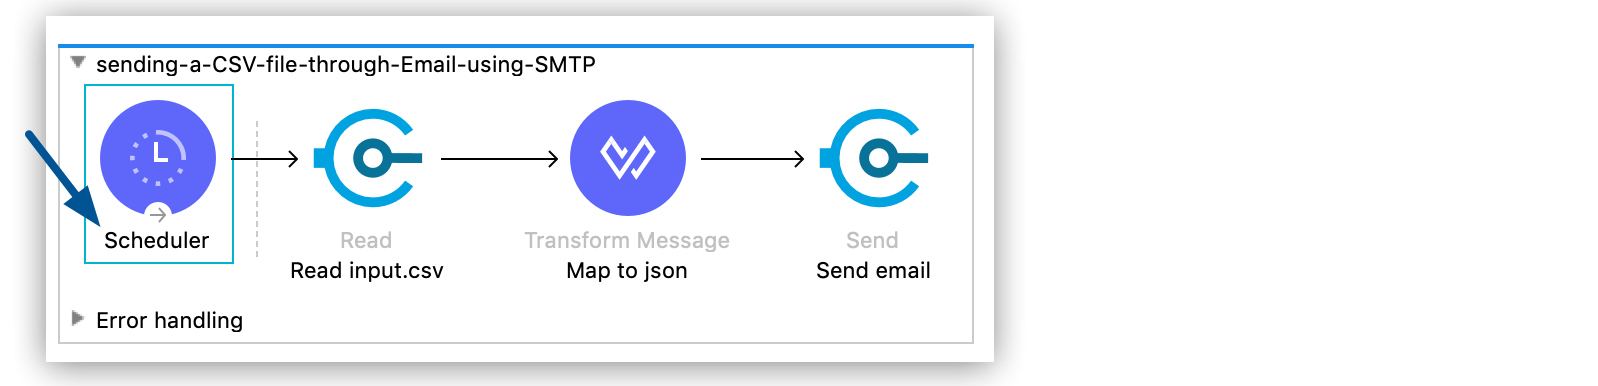
You can download this example app from Exchange.
After deploying an app to CloudHub, view and manage the Scheduler elements in Runtime Manager:
-
Click Applications in the left pane, click the app, and then click Schedules:
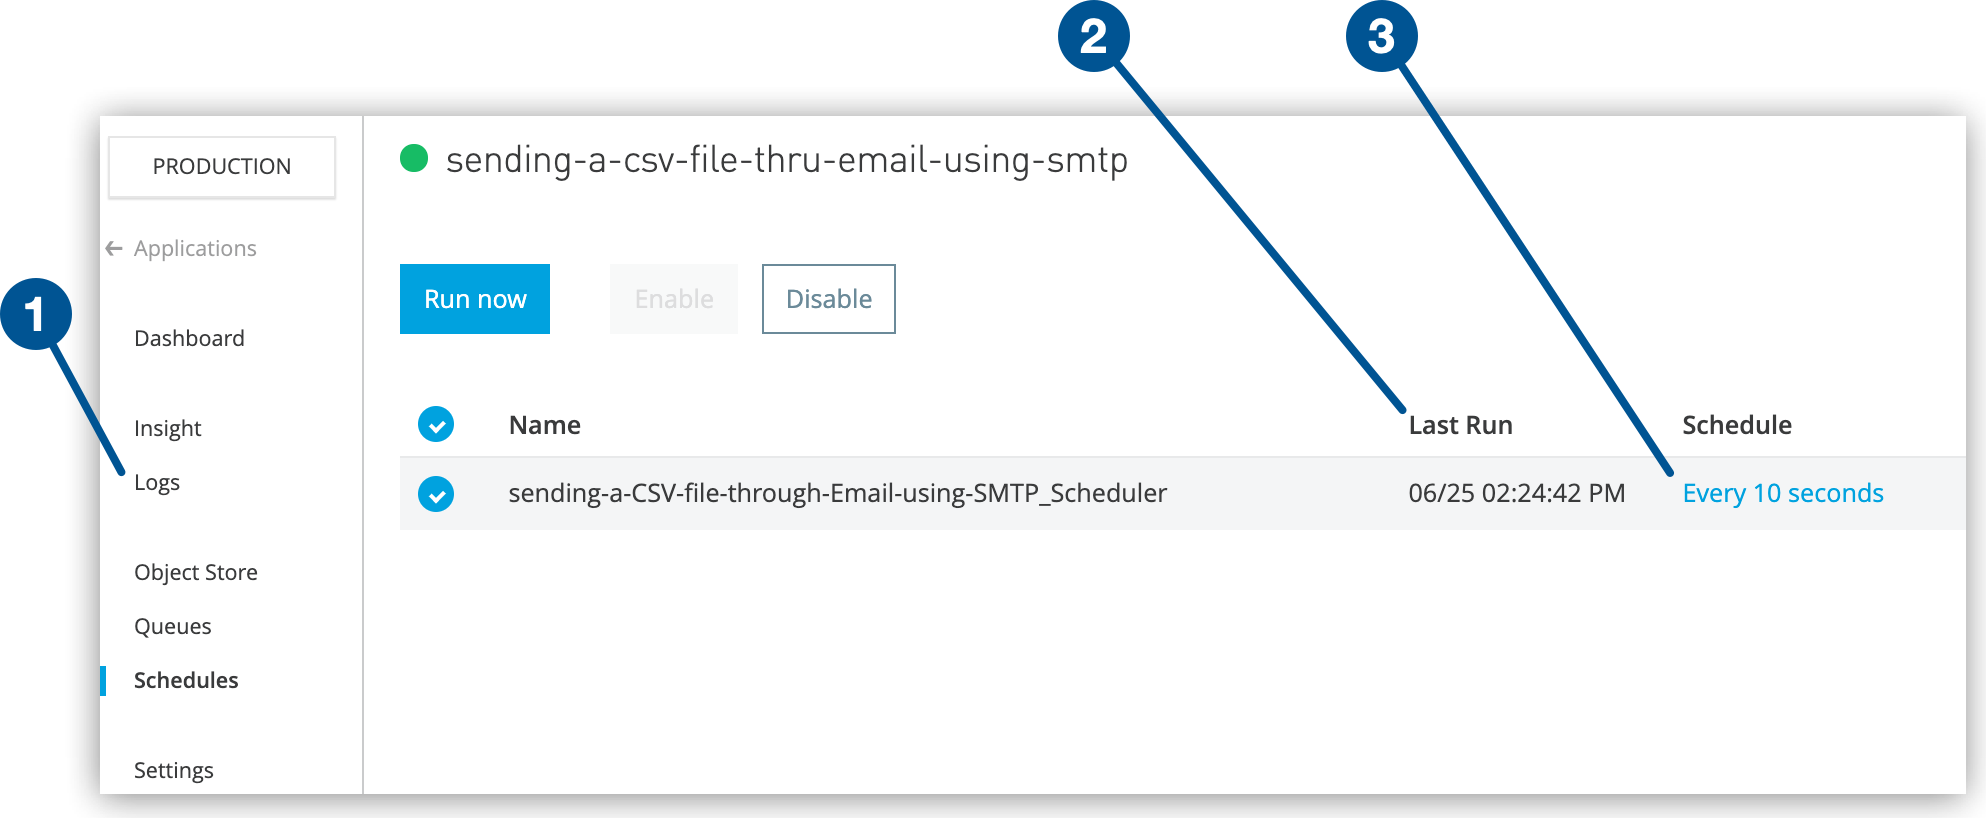 Figure 2. The screenshot shows (1) the Logs option, (2) the Last Run column, and (3) the frequency link on the Schedules page.
The Last Run column shows the date and time each Scheduler element last ran. You can click Logs in the left navigation menu to see more information about when the jobs started and ended scheduled runs.
Runtime Manager lists the Scheduler elements in the order that they appear in your application.
-
Select the elements to manage and then:
-
Click Run now to override the schedule and run the job immediately.
-
Click Disable to suspend a Scheduler element.
CloudHub does not run the scheduled job until you reenable it.
-
Click the frequency link in the Schedule column to open the schedule editor:
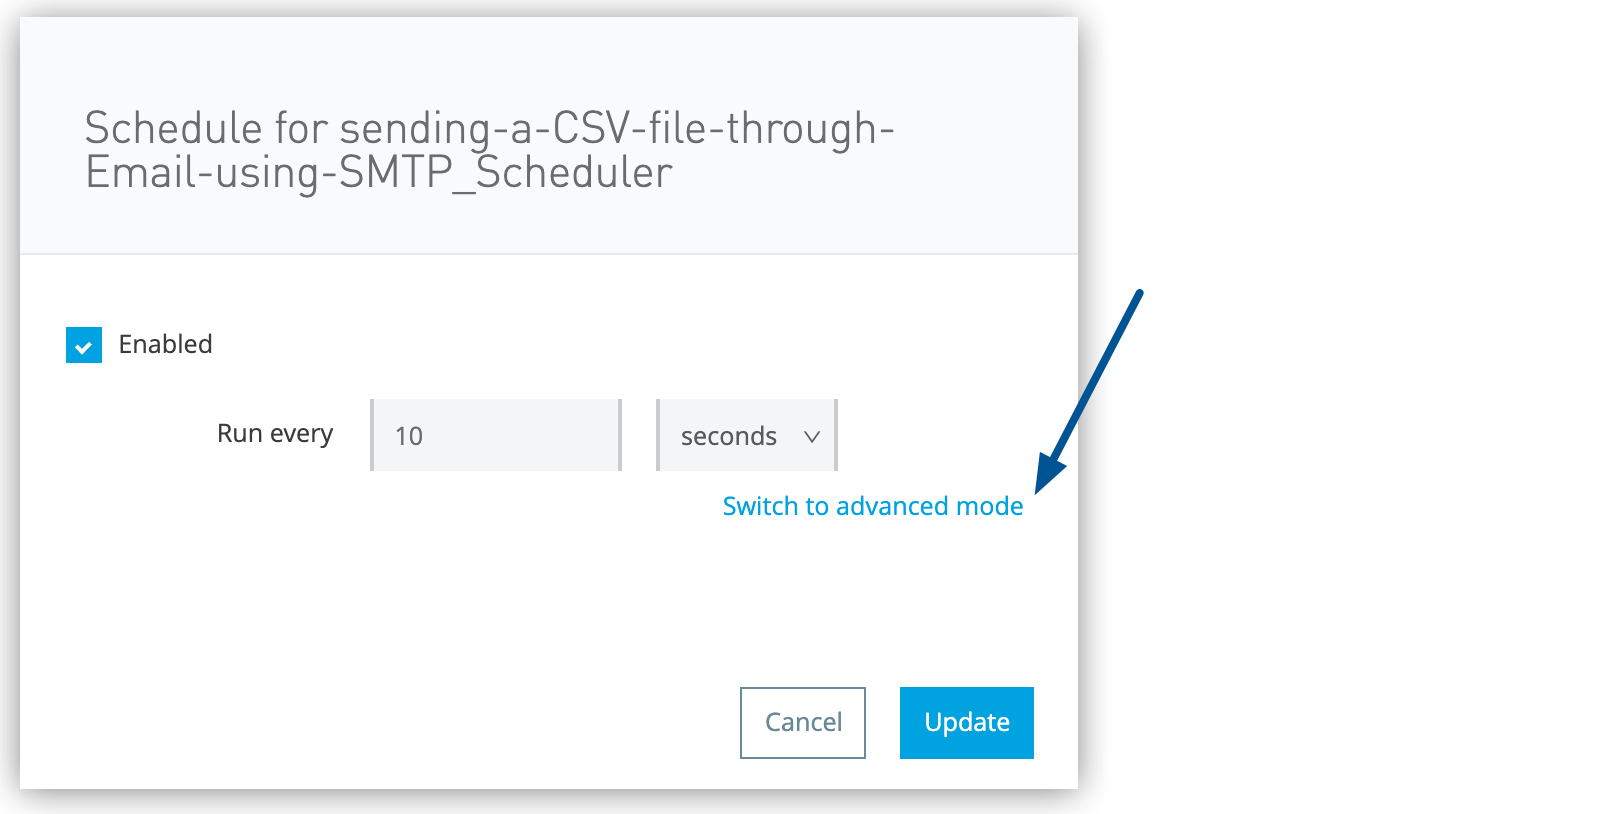 Figure 3. The arrow shows the Switch to advanced mode link in the schedule editor.
In the schedule editor, change the frequency of the schedule or deselect Enabled to disable the schedule.
The value for the frequency can be between 10 and 100 seconds.
You can also switch to advanced mode to use cron expressions to create more specific schedules, such as every Thursday at 3:00 pm.
By default, schedules run at the frequency defined in the application. When you change the frequency of a schedule from Runtime Manager, the schedule runs at the frequency configured in Runtime Manager even if you update and redeploy the same schedule in the application JAR file.
-
-
Click Update to save changed settings or click Cancel to exit without saving.
Use Cron Expressions
With cron expressions, you can create more complex schedule frequencies, such as every 5 minutes between 9:00 am and 10:00 on Fridays.
To use cron expressions to specify the schedule frequency:
-
In the schedule editor, click Switch to advanced mode.
-
In the advanced mode page, click Quick reference to expand or collapse the table that lists required fields and allowed values:
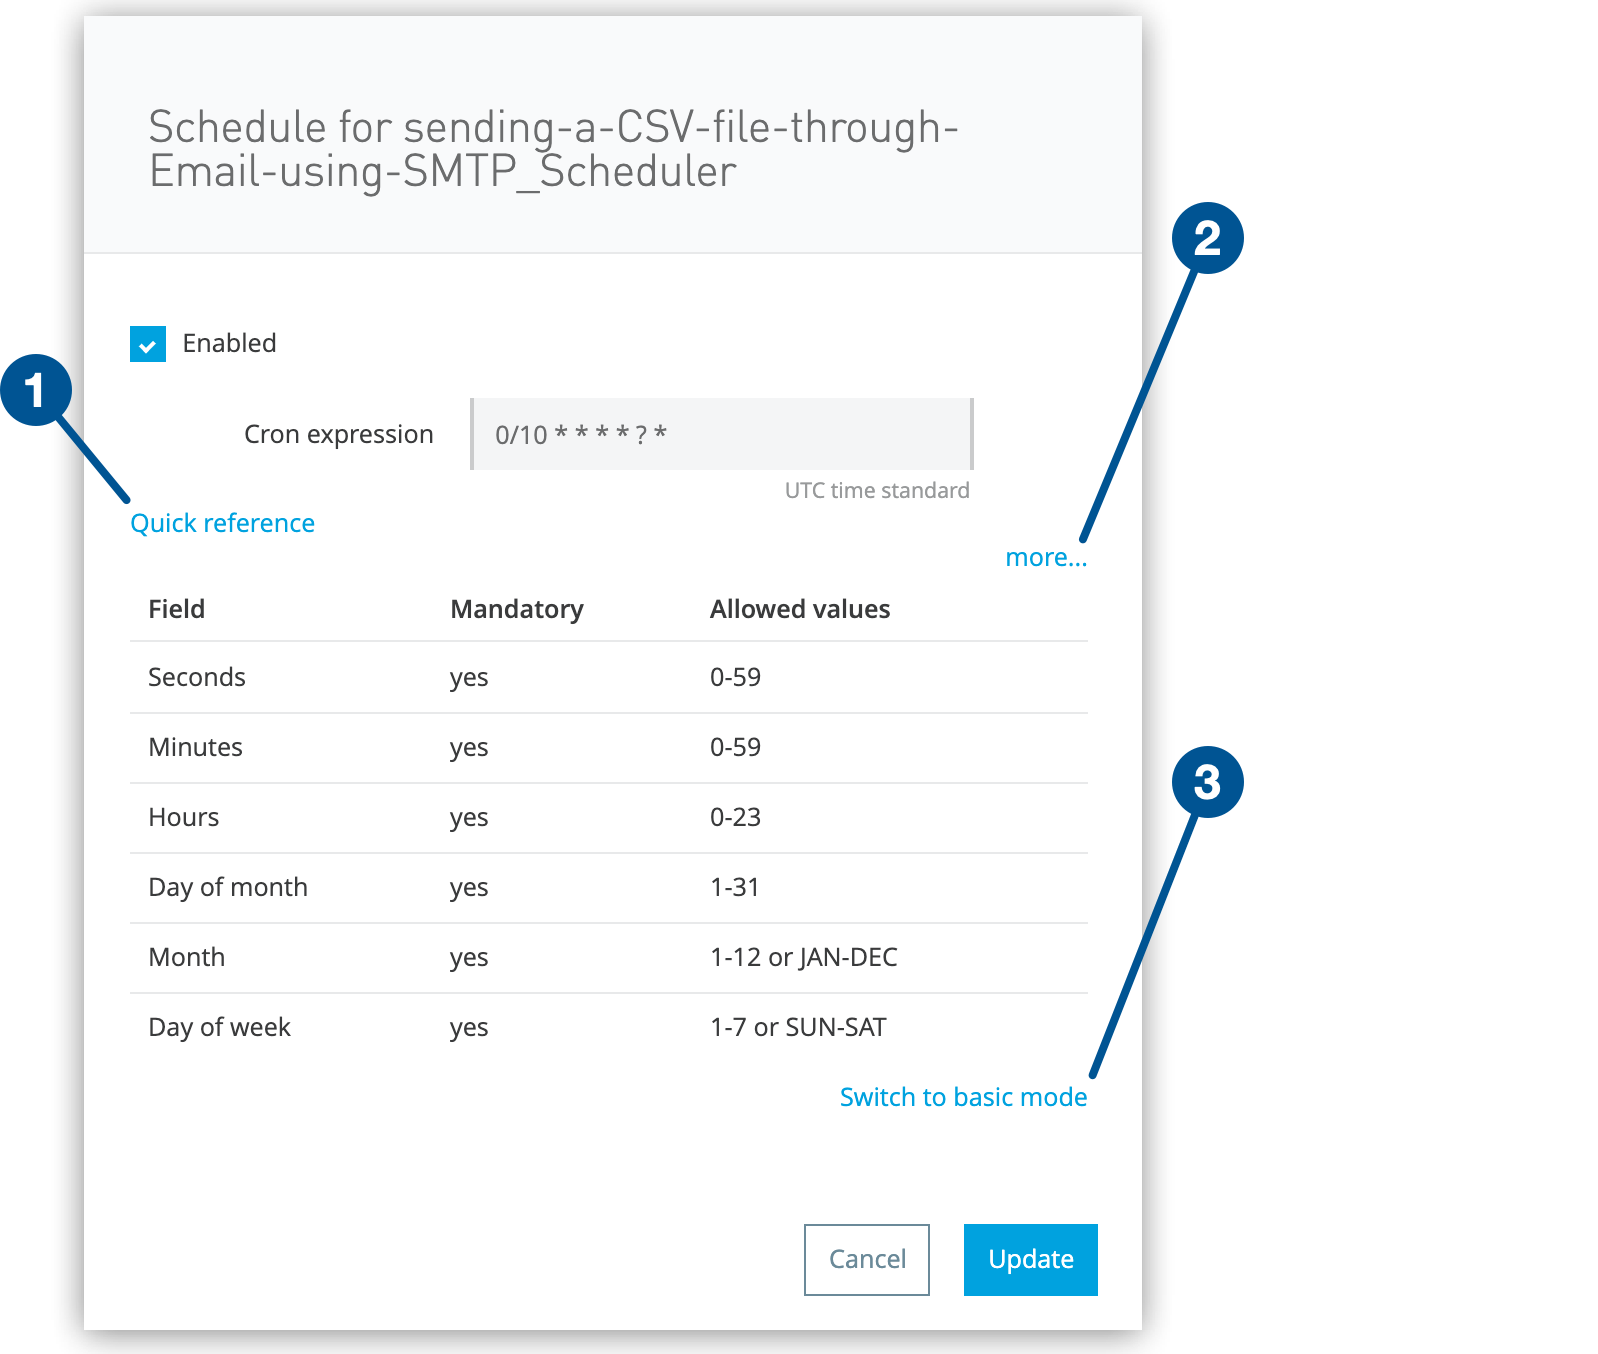 Figure 4. The screenshot shows (1) the Quick reference toggle, (2) the more link, and the Switch to basic mode link on the advanced mode page.
The cron expression in this example sets the schedule to every 10 seconds, which is the minimum supported frequency.
On this page:
-
Click more to view the Quartz documentation for information about building cron triggers.
Select a version, click Documentation > User’s Guide > Tutorial, and then click the CronTrigger lesson.
Because all schedules are based on the UTC timezone, the timezone configuration is ignored.
Due to the current library implementation, you can’t specify both a day-of-week (DOW) and a day-of-month (DOM) parameter. For example,
0 0 3 1 1 2or0 0 3 * 1 2. As a workaround, you can use the?character, which indicates no specific value. This is useful when you need to specify something in one of the two fields but not the other. For example,0 0 3 1 1 ?. -
Click Switch to basic mode to exit advanced mode.
-
-
Click Update to save changed cron settings or click Cancel to exit without saving.