
Build a Composer Flow
After you collect the information described in the preparation checklist, you can then build, activate, and monitor your flows. Building a flow involves creating a new flow or cloning an existing flow; adding and testing a trigger; adding and testing each action to be performed by the flow, in the order that you want each action performed; and finally testing the completed new flow before activating it.
Test each trigger and action as you add it to your flow.
Flow Details Page
Access the Flow Details page to see details about your flow:

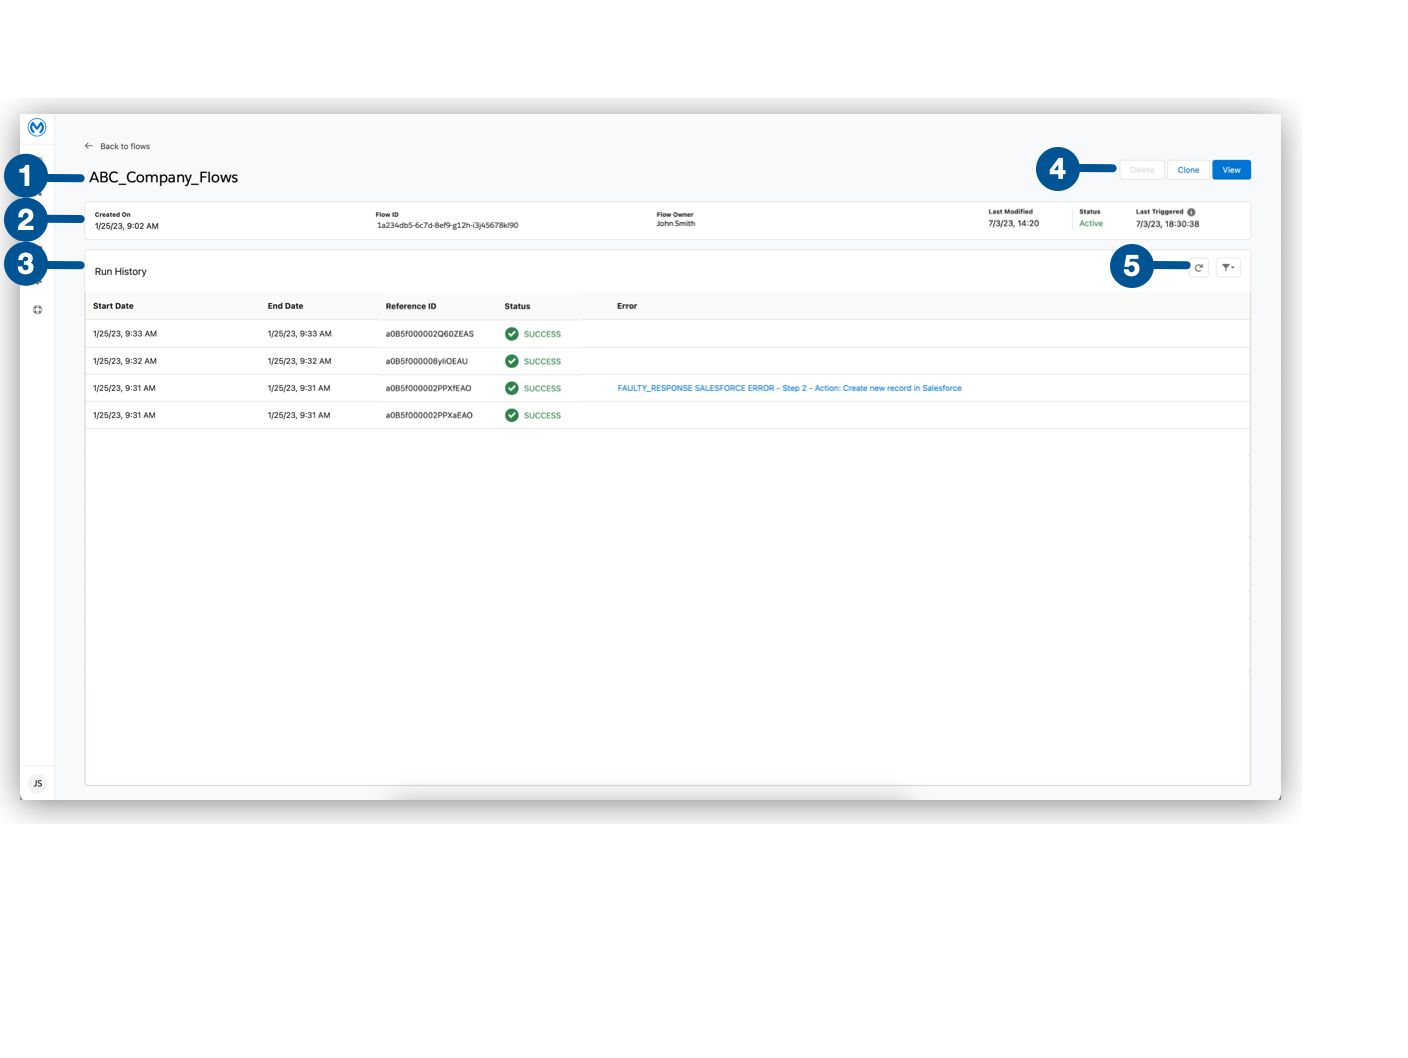
1 | The name of the flow. |
2 | Details about the flow:
|
3 | The Run History of the flow. Composer stores up to 1000 records per flow and can include only the last two weeks of data. For example, for a flow that produces 10 records per day, you can see the Run History for the last two weeks of data (14 x 10 = 140 records). For a flow that produces 100 records per hour, you can see no more than 10 hours of the Run History. Triggering a flow via the Scheduler always creates an entry in the Run History. An entry in the Run History is only added by an Event trigger when a record is either created or updated and passes any filter condition.
|
4 | The flow actions. You can delete, clone, or view an active flow. Note that if the flow is inactive, you can edit the flow. |
5 | The Run History actions. You can refresh the Run History section or filter the section by specified criteria. |
Create a Flow
You can create a new flow (from scratch or from template) or clone an existing flow.
Create a New Flow From Scratch
To create a new flow from scratch:
-
From the Composer Home page, click Create new flow > Create Flow from Scratch.
Your flow is named automatically. -
To change the name automatically created for your new flow, click the pencil icon next to Untitled Flow and create a custom name using any of the characters A-Z, a-z, 0-9, space, hyphen ( - ), dot ( . ), and underscore ( _ ).
-
Click Save.
Now you are ready to create a flow trigger.
Create a New Flow From Template
To create a new flow from template:
-
From the Composer Home page, click Create new Flow > Create Flow from Template.
-
Explore the template options and select the template you want to use.
-
Ensure you meet the prerequisites and if so, click Use this Template.
-
Configure your connections and information required by the flow.
-
Click Create flow.
Now you are ready to use your flow. For more information about templates, refer to Build a Flow Using Templates.
Clone an Existing Flow
To clone an existing flow:
-
From the sidebar, click Flows.
-
On the Flows page, click the name of the flow you want to clone.
-
Click Clone.
Composer copies the existing flow and opens the copy in the Flow Details page. Notice that the flow is named Copy of original flow name.
-
If you want to rename the flow, click the pencil icon next to Copy of original flow name and use any of the characters A-Z, a-z, 0-9, space, hyphen ( - ), dot ( . ), and underscore ( _ ).
-
Click Save.
Export a Flow
To export a flow as a JSON file:
-
Open an existing flow.
The <Flow Name> page appears. -
Click View.
-
Click the wrench icon > Export.
The flow is exported as a JSON file.
Import a Flow
To import a flow as JSON file:
-
Create a new flow or open an existing flow.
The <Flow Name> page appears. -
Click View.
The <Flow Name> page appears. -
Click the wrench icon > Import - Beta.
The Select Flow dialog box appears. -
Click Select flow.
Your files appear. -
Navigate to and select the JSON file that you want to upload and then click Open.
The selected file appears in the Select Flow dialog box. -
In the Connect with <Connector Name> drop down, choose an existing connection or create a new one:
-
Click an existing connection to select it.
-
Click Add new <Connector Name> Connection to create a new connection and select it.
-
-
Click Import Flow. Note that importing a flow will replace the existing flow.
The flow is imported and appears on the <Flow Name> page. -
Click Save.
The flow is imported.
Refresh a Flow
When building a flow, you may need to refresh the flow to view updated data at either the object level or the field level.
To refresh a object:
-
Open the flow.
-
Click the refresh icon in the upper right corner of the trigger or action card that you want to refresh.
The cache for the object type is cleared and the new data is retrieved.
To refresh a field:
-
Open the flow.
-
Click the refresh icon in the bottom left corner of the trigger or action card.
The cache for the field is cleared. The new value providers for the field are retrieved.
Create a Flow Trigger
After you create or clone a flow, define the trigger: the event or time interval that starts the flow. A trigger step is required to test or activate your flow.
To define a trigger based on an event:
-
Open a flow if it is not already open. The What Should Start This Flow? dialog is displayed.
-
Select the connector where the triggering event occurs. Your existing connections are displayed.
You can choose an existing connection or create a new one:
-
Click an existing connection to select it.
-
Click Add new connector name Connection to create a new connection and select it.
You can rename or delete connections from this dialog by clicking the gear icon.
-
-
After you choose a connection, the trigger step displays:
Your trigger is named automatically. All triggers are named by combining the event or operation with the system name. For example, "On new record in Salesforce".
-
Optionally, you can rename the trigger. Valid characters: A-Z, a-z, 0-9, space, hyphen ( - ), dot ( . ), and underscore ( _ ).
-
Choose an event that starts the flow. Supply additional information as requested.
-
Click Save.
-
Change a Connection
You can change connections in a trigger or action. For example, you can create a flow using connections to a Salesforce sandbox org, and then after your flow testing is complete, you can change the connection in your trigger and actions to use a production org.
You can only change to a connection accessing the same system type. You can’t change a Workday connection to a Google Sheets connection, for example.
To change a connection:
-
Open the flow.
-
Click the change icon in the trigger or action that connects to a sandbox:
-
Choose a new connection and click Save.
Repair a Connection
If your OAuth connection is lost, you can repair the connection by refreshing the access token.
To repair a connection:
-
Open the flow.
-
Click Edit.
-
Click the change icon in the trigger or action that requires repair, and then click Change Connection.
-
Click Repair.
Delete a Connection
If you no longer need a specific connection, you can delete it.
To delete a connection:
-
Create a new flow or add a step to an existing flow.
-
If you create a new flow:
-
Select the connector or system to start your flow.
-
In the What Should Start This Flow? window, click the gear icon.
-
-
If you add a step to an existing flow:
-
Select the connector or system to start your flow.
-
In the Next Step window, click the gear icon.
-
-
In the Manage <Connector Name> Connections window, next to the connection that you want to delete, click the trashcan.
A message appears ensuring that you want to delete the selected connection. A window appears, displaying a list of flows currently using that connection. If the connection is:-
Not used in any flows, you can delete the connection.
-
Used in inactive flows, a list containing the name and count of inactive flows using this connection appears. Deleting this connection will affect the listed flows. If you reopen the inactive flow, you must select a new connection.
-
Used in active and inactive flows, a list containing the name, count, and status of active and inactive flows using this connection appears. If you choose to delete the connection, secondary confirmation appears. Prior to deleting the connection, Composer will first attempt to stop the flows.
-
-
Click Delete.
The connection is deleted.
Schedule a Flow
If you don’t choose a connection, you can schedule a flow to start at regular intervals.
To create a flow control:
-
In a new flow, from the What Should Start This Flow? dialog, look in the Flow Control section and click Scheduler.
-
Choose one of the time intervals, from 15 minutes to 30 days.
-
Click Save.
After creating the trigger, add one or more actions to the flow. To apply logic to an action, prepend it with an If/Else block or For Each loop.
Invoke a Flow
You can invoke a Composer flow from external systems, such as Flow Builder, another Composer flow, or an Apex callout, to enable deeper interoperability and integrated capabilities across Salesforce. For more information, refer to Invoke a Composer Flow.
Open Access for Flows
All users can view or manage all flows within your org.
This feature is enabled by default for new customers and disabled by default for existing customers. To disable this feature at the org level, contact Composer Support.
Limitations
-
To filter by owner of the flow, you must use the Flow Owner field and not the Owner field.
-
When filtering using the Flow Owner field, you can use only the starts with, equals, and contains operators. The starts with, equals, and contains operators all mimic the functionality of the contains operator.
-
In orgs of existing customers, Flow Owner is not visible by default in the list view on the Composer Flows tab. New customers, however, can see Flow Owner by default in the list view on the Composer Flows tab.
-
To add Flow Owner to the Recently viewed list:
-
From the Composer Flows tab, select Recently viewed.
-
Go to Setup > Search Layouts > Composer Flow > Default Layout.
-
Add Flow Owner.
-
-
To add Flow Owner to All (or any other view list):
-
From the Composer Flows tab, select All.
-
Go to List View Controls > Select Fields to Display.
-
Move Flow Owner from Available Fields to Visible Fields.
-
-
-
Bulk ownership transfer or changing ownership to a user other than yourself is not supported.
View Flows
You can view all flows within your org and view flow details, such as the status to see if a flow is active or inactive, the last modified date to see flow changes (not activation or deactivation), the flow owner, or the run history.
To view all flows within your org:
-
Go to the Composer Flows tab. You can now view all flows within your org and view flow details, such as Flow Name, Status, and Last Modified Date.
Manage Flows
You can manage all flows within your org. You can activate or deactivate all flows within your org, delete all flows within your org, edit all flows within your org, or change ownership of error email notification flows within your org.
To manage all flows within your org:
-
From the Composer Flows tab, select a flow.
-
Click on the desired button, for example, click Delete to delete a flow or click Transfer ownership to change flow ownership (for error email notification flows only).
Create an Action
To create an action:
-
After the trigger in your flow, click the large plus sign to open the Add Action dialog.
-
Click or create a connection for the action.
For example, if your trigger is "new records created in Salesforce," and you want your action to be "copy new record to a Google Sheet," then you would choose or create a Google Sheet connection.
-
Select an action, and any other values displayed. What you have to specify for an action depends on system type you are connected to for the action.
-
If you want to edit a field, and that field is enabled for a custom expression, click the pencil icon.
Note that you can only enter text or select a single data pill for a field. If you want to enter a complex expression (including functions, math operators, concatenation of text, and special tokens), you must use the Custom Expression Editor. -
Click Save.
When there are null values in custom expressions and are:
-
Fields without attributes, the null value is ignored. If the value in a required field, an error message occurs. If the value is in an optional field, the value is ignored and not sent to the connector.
-
Fields with attributes, the value is ignored and not sent to the connector.
Define a Variable
You can define variables in your Composer flow. Defining a variable enables you to complete certain use cases, such as aggregating calculations and storing values. You define variables locally within a flow and use them anywhere within that flow.
Access the Variable Step
To access the Variable step:
-
Create a new flow or open an existing flow.
-
In the <Flow Name> page, click Edit.
-
Locate the position in your flow where you want access the Variable step and click the plus button.
-
In the Next Step window, click Variable.
The Variable step appears.
Create a Variable Using the Visual Editor
To create one or more new variables using the Visual Editor window:
-
Select Action > Create Variable.
-
From the Variable section, click Add Variable.
-
In the Visual Editor, in the Label field, enter a unique name for the variable.
The name entered is unique only to this step. You can duplicate values in the Label field across different Variable steps.
-
In the Data Type dropdown, select the data type you want to use for the variable. The following data types are supported:
String
,Number
,Boolean
,Date
,DateTime
. -
Optionally, to add additional variables in the Visual Editor, click Add Variable. You can create multiple variables in each Variable step.
-
Click Apply.
The Create Variables window appears, displaying one or more new variables added to the flow. -
Optionally, to change the variables, click Manage Variables to open the Visual Editor or Edit Schema to open the JSON Schema.
-
Specify the initial value for each variable. The default value is defined under each variable. If the field is empty, the value is set to the default value for that data type. You can manually enter a value, select any existing data pill (including variables) from your flow, or select the Custom Expression Editor to create a custom expression.
Create a Variable Using the JSON Schema
To create one or more new variables using the JSON Schema window:
-
Select Action > Create Variable.
-
In the Variable section, click Create Schema.
-
In the JSON Schema window, enter the properties for the variable to create.
Note that each variable is defined within a
Properties
object with aVariable Unique ID
. TheVariable Unique ID
enables the variable to be tracked within your flow. TheVariable Unique ID
can contain only alphanumeric characters, hyphens, and underscores. When using the Visual Editor, this ID is automatically generated for you. Each variable must specify theName
and data type. To set the properties for the variable definition, complete the following:-
Variable Label (Title)
: The display label for the variable. (Required) -
Type
: The data type of the variable. The following data types are supported:String
,Number
, andBoolean
. To define aDate
orDateTime
variable, the data type should be set toString
and theFormat
property should be defined. (Required) -
Format
: The qualifier forString
properties that can specify additional data types not natively supported in JSON. For variables, this value must be set when definingDate
orDateTime
variables asdate
ordate-time
respectively. (Optional)The properties and values appear in the JSON Schema window.
Example: Properties and values in the JSON Schema window
{ "properties": { "var-01": { "type": "string", "title": "My String" }, "var-02": { "type": "number", "title": "My Number" }, "var-03": { "type": "boolean", "title": "My Boolean" }, "var-04": { "type": "string", "title": "My Date", "format": "date" }, "var-05": { "type": "string", "title": "My Datetime", "format": "date-time" } } }
-
-
Optionally, to add variables in the JSON Schema, enter them in the window.
-
Click Apply.
The Create Variables window appears, displaying one or more new variables added to the flow. -
Optionally, to change the variables, click Manage Variables to open the Visual Editor or Edit Schema to open the JSON Schema.
-
Complete the initial value for each variable. The default value is defined under each variable. If the field is empty, the value is set to the default value for that data type. You can enter a value manually, select any existing data pill (including variables) from your flow, or you can select the Custom Expression Editor to create a custom expression.
Update a Variable
To update one or more variables:
-
Select Action > Update Variable.
-
In the Variable section, click Select Variables.
The Select Variables window appears, displaying a list of all variables included in your flow before this step. -
Select the checkbox next to one or more variables or click Select all <Number> variables to select all variables in the list.
-
Click Apply.
The Update Variable step appears. -
Update the value for each variable. You can enter a value manually, select any existing data pill (including variables) from your flow, or you can select the Custom Expression Editor to create a custom expression. Note that if you are updating a variable with a value created from another variable, do not update them in the same step. Variables are not necessarily updated in the same order in which they are listed. To avoid unexpected behavior, update each variable in a separate steps.
Create a Picklist Mapping
Using Picklist Mapping, you can map data from one application to the corresponding data needed by another application and then reuse those mappings in different flows in your organization. This enables you to connect two applications that have different values for similar fields and to align the values in those fields across applications. You can then determine how the possible values of an output field (data pill) map to the possible values of an input field.
For example, you can map a data pill from the Country field in a Salesforce record and provide the same values in the Country field of the NetSuite record.
Country (Salesforce) | Country (NetSuite) |
---|---|
US |
_unitedStates |
CA |
_canada |
DE |
_germany |
AR |
_argentina |
In this example, the Status field in a case in Salesforce is mapped to the Status field in a ticket in Zendesk to create continuity in field values across systems.
Status (Salesforce) | Status (Zendesk) |
---|---|
New |
New |
Working |
Open |
Waiting on Customer |
On-Hold |
Escalated |
Open |
Closed |
Closed |
When mapping source data fields:
-
The source field must be a data pill with a fixed list of values.
-
The target field must be an enumerated data type field or any string field.
-
If any other unmapped value from the source system is found, the default mapping specifies the value in the target system . If you do not specify a default value, the original value from the source field is passed to the target field.
-
The mapping is stored at the organization level and can be reused across flows.
-
The mapping must have a unique name.
-
Mappings are available to everyone in your organization.
To map source data fields to target fields:
-
From the Composer Flows tab, open a flow and click Edit.
-
In an action card, in a field that supports Pick from List or any string field, select Picklist Mapping from the menu.
The Picklist Mapping window appears. -
In the Picklist Source section, in the Source field, select the value from the list that you want to map to the value in the Target field, and then click Next.
-
In the Global Picklist Selection section, create a new picklist or choose an existing picklist.
Create A New Picklist
To create a new picklist:
-
Click Create new picklist.
-
In the Global picklist name field, enter a unique name for the picklist.
-
Optionally, in the Description field, enter a description for the picklist. The following description is populated automatically based on your source and target systems:
This maps [Source Field Name] from [Source Connection Name] to [Target Field Name] from [Target Connection Name]
-
In the table, select the source fields and their target mappings.
-
Optionally, to add additional field mappings, click Add Row and if the additional field mapping is a:
-
Pick from List field, enter the source field values manually (with a row representing each value) and select the target mappings from the dropdown.
-
String field, manually define the value in the target field.
-
-
Once you have added all applicable field mappings, click Create Picklist.
-
Click Apply.
The <Picklist Name> section appears, displaying a table of values and their mappings.
Choose An Existing Picklist
To choose an existing picklist:
-
Select a picklist from the list. Note that all edits made to an existing picklist will impact all flows in which that picklist is currently used.
-
Optionally, in the <Picklist Name> section, to edit the values, click the pencil. Once you have edited the values, click Save Picklist and then click Apply.
-
Optionally, in the <Picklist Name> section, to delete the picklist, click the trashcan. Note that deleting a global picklist will affect all flows currently using that picklist.
-
Click Apply.
The action card appears.
Create a Flow Control
If you need to perform some logic before an action, select a flow control first:
-
After the trigger in your flow, click the large plus sign to open the Add Action dialog.
-
Click either If/Else Block or For Each. An If/Else block is good when you need to do different actions depending on one or more conditions. A For Each loop is good for processing a set of records.
-
Complete the flow control, which usually includes adding an action.
-
Click Save.
Add An If/Else Block
You can create an If/Else block to set conditions and execute actions only when specific criteria are met. This enables you to create flows that cover more than one linear branch, without the need to create separate flows.
Branches are logic-based steps that run vertically in a flow. You can add multiple steps inside each branch. Each branch is then executed in sequential order.
When adding decision steps, the values in the Field list are populated based on values selected when you specify the previous steps of your flow. After the Field value is selected, all compatible value options appear in the Operator list. If the selected Operator requires a second data pill to complete the condition, then the Value field is enabled and the list is populated based on the values you selected when defining the trigger. In the Value field, you can either enter a value manually or you can set it using the existing data from your flow.
For the purposes of comparing flows, if you initiate a date comparison when building a flow and there is no value in one of the date fields, the missing value is updated to 0001-01-01
by default.
The following operators are supported when building conditions in an If/Else block:
Function | Supported Data Type | Value Required? | Notes |
---|---|---|---|
Equals/Does not equal |
All |
Yes |
The value in this field is case-sensitive for strings. |
Contains/Does not contain |
Array, String |
Yes |
None |
Greater than/Less than |
Date, Number |
Yes |
In the Date field, the Greater than value is equal to a later date and the Less than value is equal to an earlier date. |
Greater than or equal/Less than or equal |
Date, Number |
Yes |
In the Date field, the Greater than or equal value is equal to a later date or the current date and the Less than or equal value is equal to an earlier date or the current date. |
Is empty/Is not empty |
Array, String, Object |
No |
None |
Starts with/Ends with |
String |
Yes |
A string value for this field is required. |
Is true/Is false |
Boolean |
No |
None |
Is present/Is not present |
All |
No |
If the value in this field is null or if there is no value selected, then the value in this field is set to Not present by default. |
To create an If/Else block:
-
Click the plus sign after the trigger or the last action in your flow.
-
Click Add Action.
-
Click If/Else Block to define the first branch.
-
Enter the requested criteria. You can specify that
all conditions should be met (AND)
,any condition can be met (OR)
, or customize the order and grouping of your conditions. -
Click + to add an action to that branch. Every branch must have an action, also called a step.
-
If you want to add another branch, click Add If and repeat the previous steps for every If/Else branch you create.
-
If you want to set criteria for how the flow executes if none of the criteria for the existing branches are met, click Add Else and repeat the previous steps for the final branch.
-
If you want to add additional conditions to your If/Else block, click Add condition.
-
After you add all the branches, click Save.
Use Custom Logic
Custom logic uses the row number for each condition in the If statement block of an If/Else statement and OR
, AND
, and NOT
to create complex expressions. When you select the custom logic option, each condition is assigned a number and you can then use that number to customize the order of operations for the conditions.
When using custom logic, all conditions defined must be referenced in the expression for the expression to be validated. For example, if there are three defined conditions and you enter “1 and (2 or 1)”, the expression is invalid because “3” is not referenced.
Using custom logic, you can have up to 20 conditions and a condition can be referenced more than once.
Create A For Each Loop
To create a For Each Loop:
-
Click the plus sign after the trigger or the last action in your flow.
-
Click Add Action.
-
Click For Each.
-
Choose a data pill from the Input list. You must have a trigger or action that returns a set of records or there won’t be anything to choose here.
-
Click the plus sign to add an action.
-
After you complete the action, click Save.
You can add logic and actions in different patterns, depending on what your flow needs to do.
Configure Error Handling
When executing a flow, you can watch for connection or logic errors in specific steps of your flow and then specify logic to handle the errors. You can also configure steps to complete additional actions or to send notifications if an error occurs.
Access Error Handling
To access the error handler:
-
Create a new flow or open an existing flow.
-
If you create a new flow:
-
Select the connector or system to start your flow.
-
Select and configure a trigger.
-
Select and configure an action.
-
Directly before the step to which you want to add an error handler, click the plus button.
-
In the What Should Start This Flow? window, click Error Handler.
-
-
If you add a step to an existing flow:
-
Open your flow.
-
Directly before the step to which you want to add an error handler, click the plus button.
-
In the Next Step window, click Error Handler.
-
-
Watch a Step
You can watch specific steps for connection or logic errors. If an error occurs, the flow stops normal processing and begins processing the steps in the error handler. You can add one or more steps to watch in this section.
To watch a step:
-
In the Error Handler card, in the Watch section, click the plus sign and select the action to watch or drag the step to watch into the Watch section.
The selected action appears in the Watch section. If an error occurs, the flow moves to the actions selected in the On Error section. -
To add additional actions to watch, repeat the previous step.
Configure Composer to Handle Errors
You can configure Composer to handle errors encountered in the Watch section. If an error occurs in a watched action, the On Error section begins processing the flow based on your configuration. You can add one or more steps to run in the On Error section.
Error Handling Behavior
-
By default, the On Error section allows for one condition to be met; however, you can add as many conditions as you want in this section.
-
When adding a new condition, the On Error condition field value is set to
None
by default. Leaving this value set toNone
returns any errors that may occur in the Watch section and processes all steps inside this On Error section. -
When a condition is met in the On Error section, the error handler processes the conditions in sequential order and stops once the first condition is met. After the first condition is met, any subsequent steps are skipped. If you want the process to continue, you can add an additional On Error section branch inside your existing On Error section.
-
When testing your flow, any errors caught by the error handler appear in the right pane of the action card. Successful steps are marked with a green check and failed steps are marked with a red X.
-
When an error occurs in a watched action, the error information is saved as a data pill that can then be used for subsequent notification or record-updating actions. For example, if an error occurs, you can specify an action to send an email to your team containing the error information from the data pill.
-
When configuring error handling, you can establish different sequences to meet your requirements. You can:
-
Add all steps in one error handler.
If you have the same On Error process for any errors or if you can configure multiple On Error processes with error conditions to handle specific types of errors, then add all steps in one error handler. As a result, if any error occurs in the step inside the Watch section, the remaining steps in the same Watch section stop. -
Add more than one error handler in a flow.
You can group steps into seperate error handlers or each step can have its own error handler. This provides the flexibility to configure different steps when errors occur. -
Place an error handler inside a For Each loop.
If an error occurs inside a For Each loop, adding an error handler in the for each loop allows the loop to continue past an error. To set an error handler to continue after an error occurs, in the After running drop down, select Continue. To provide further clarity on the error, add a step to update the failed record for troubleshooting.
-
Add Steps to the On Error Section
To add steps to the On Error section of your flow:
-
In the Error Handler card, in the On Error section:
-
In the Conditions to run this branch dropdown, select one of the following conditions and then enter the requested criteria:
-
AND
: Meets all conditions. -
OR
: Meets any conditions. -
None
: Returns all errors without meeting any conditions. -
Custom Logic
: Specify custom logic to meet conditions.
-
-
In the After Running dropdown, select:
-
Stop: After processing all steps in the On Error section, Composer flags errors and stops the flow. On the Run History page, the Status field of the flow shows
FAILED
. -
Continue: After processing all steps in the On Error section, Composer dismisses errors and the flow continues. If no other errors occur, on the Run History page, the Status field of the flow shows
SUCCESS
.
-
-
-
If you want to add additional conditions to this On Error section, click Add Condition.
-
If you want to look for a specific error condition and specify how it is handled within your existing On Error section, click Add On Error to add a new branch with steps.
When adding a branch to the On Error section, in the After Running section, select:-
Continue: Processes On Error steps and then continues to the next step within the parent step.
-
Propagate: Processes On Error steps and then pushes the error to the parent error handler section. The child step then stops processing and the error handler process returns to the parent step.
-
-
Optionally, in the On Error section, click the plus button to add steps to handle an error:
-
In the Next Step window, select System Action.
-
Select an action to complete when an error occurs. For example, add an action to send a notification email with the Record ID and error information to your team or update the source record with error information.
-
Configure the action.
-
-
Save the flow.