Anypoint DataGraph Quick Start Guide
Use this quick start guide to begin using Anypoint DataGraph. With Anypoint DataGraph, you can query multiple APIs in a single request to get the specific information you need.
Completing this quick start guide involves:
-
Downloading and publishing two APIs
-
Adding those APIs to Anypoint DataGraph
-
Editing their schemas, using various API schema editing tools like linking and merging, for addition to the unified schema
-
Creating a mutation to post data to the unified schema
-
Querying the unified schema to retrieve specific data you posted
Before You Begin
Before getting started, ensure you have:
-
Familiarity with Anypoint Platform and Exchange, including permissions to use Exchange to publish and view RAML or OAS specifications in your business group
-
An Anypoint Platform account
-
Admin or Contribute permissions
For information, see DataGraph Permissions.
-
The correct number of vCores allocated to your business group or organization using Anypoint DataGraph, as specified in your plan. If you haven’t allocated the correct number of vCores to the environment in which you’re attempting to add an API, Anypoint DataGraph raises an error message.
|
If you use an Anypoint Virtual Private Cloud (Anypoint VPC), your browser must have access to the Anypoint VPC to run queries in DataGraph. Without access, you might receive a |
Download and Publish the Order and Product APIs
To follow the quick-start example, download the RAML definitions for two example APIs provided by MuleSoft: the Order Systems API v2.0 and the Product API v2.0.
-
Log into Anypoint platform.
-
In Exchange, click Provided by MuleSoft.
-
Search for product api raml definition and select it from the list of results.
-
In the Product API | RAML Definition, click Download > RAML for asset version 2.0.2
-
Publish the RAML specification to Exchange using your business group ID and an asset name.
The quick-start example uses the API project names Catalyst Product API and Catalyst Order API.
-
Repeat these steps for the Order Systems API | RAML Definition for asset version 2.0.3.
Add the Catalyst Product API to Anypoint DataGraph
After publishing the example APIs in Exchange, add the Catalyst Product API to Anypoint DataGraph:
-
From Anypoint Platform > Anypoint DataGraph, select the appropriate environment from the Unified Data Graph dropdown list, and click +Add API.
-
On the Add API page, select the Catalyst Product API.
-
Click Next: Configure URL.
-
On the Configure URL page, select the API version and asset version, and then click Confirm Selection.
-
Select Add a new URL.
-
In the Add URL field, add the following API URL:
https://anypoint.mulesoft.com/mocking/api/v1/sources/exchange/assets/68ef9520-24e9-4cf2-b2f5-620025690913/catalyst-retail-product-api/2.0.2/m/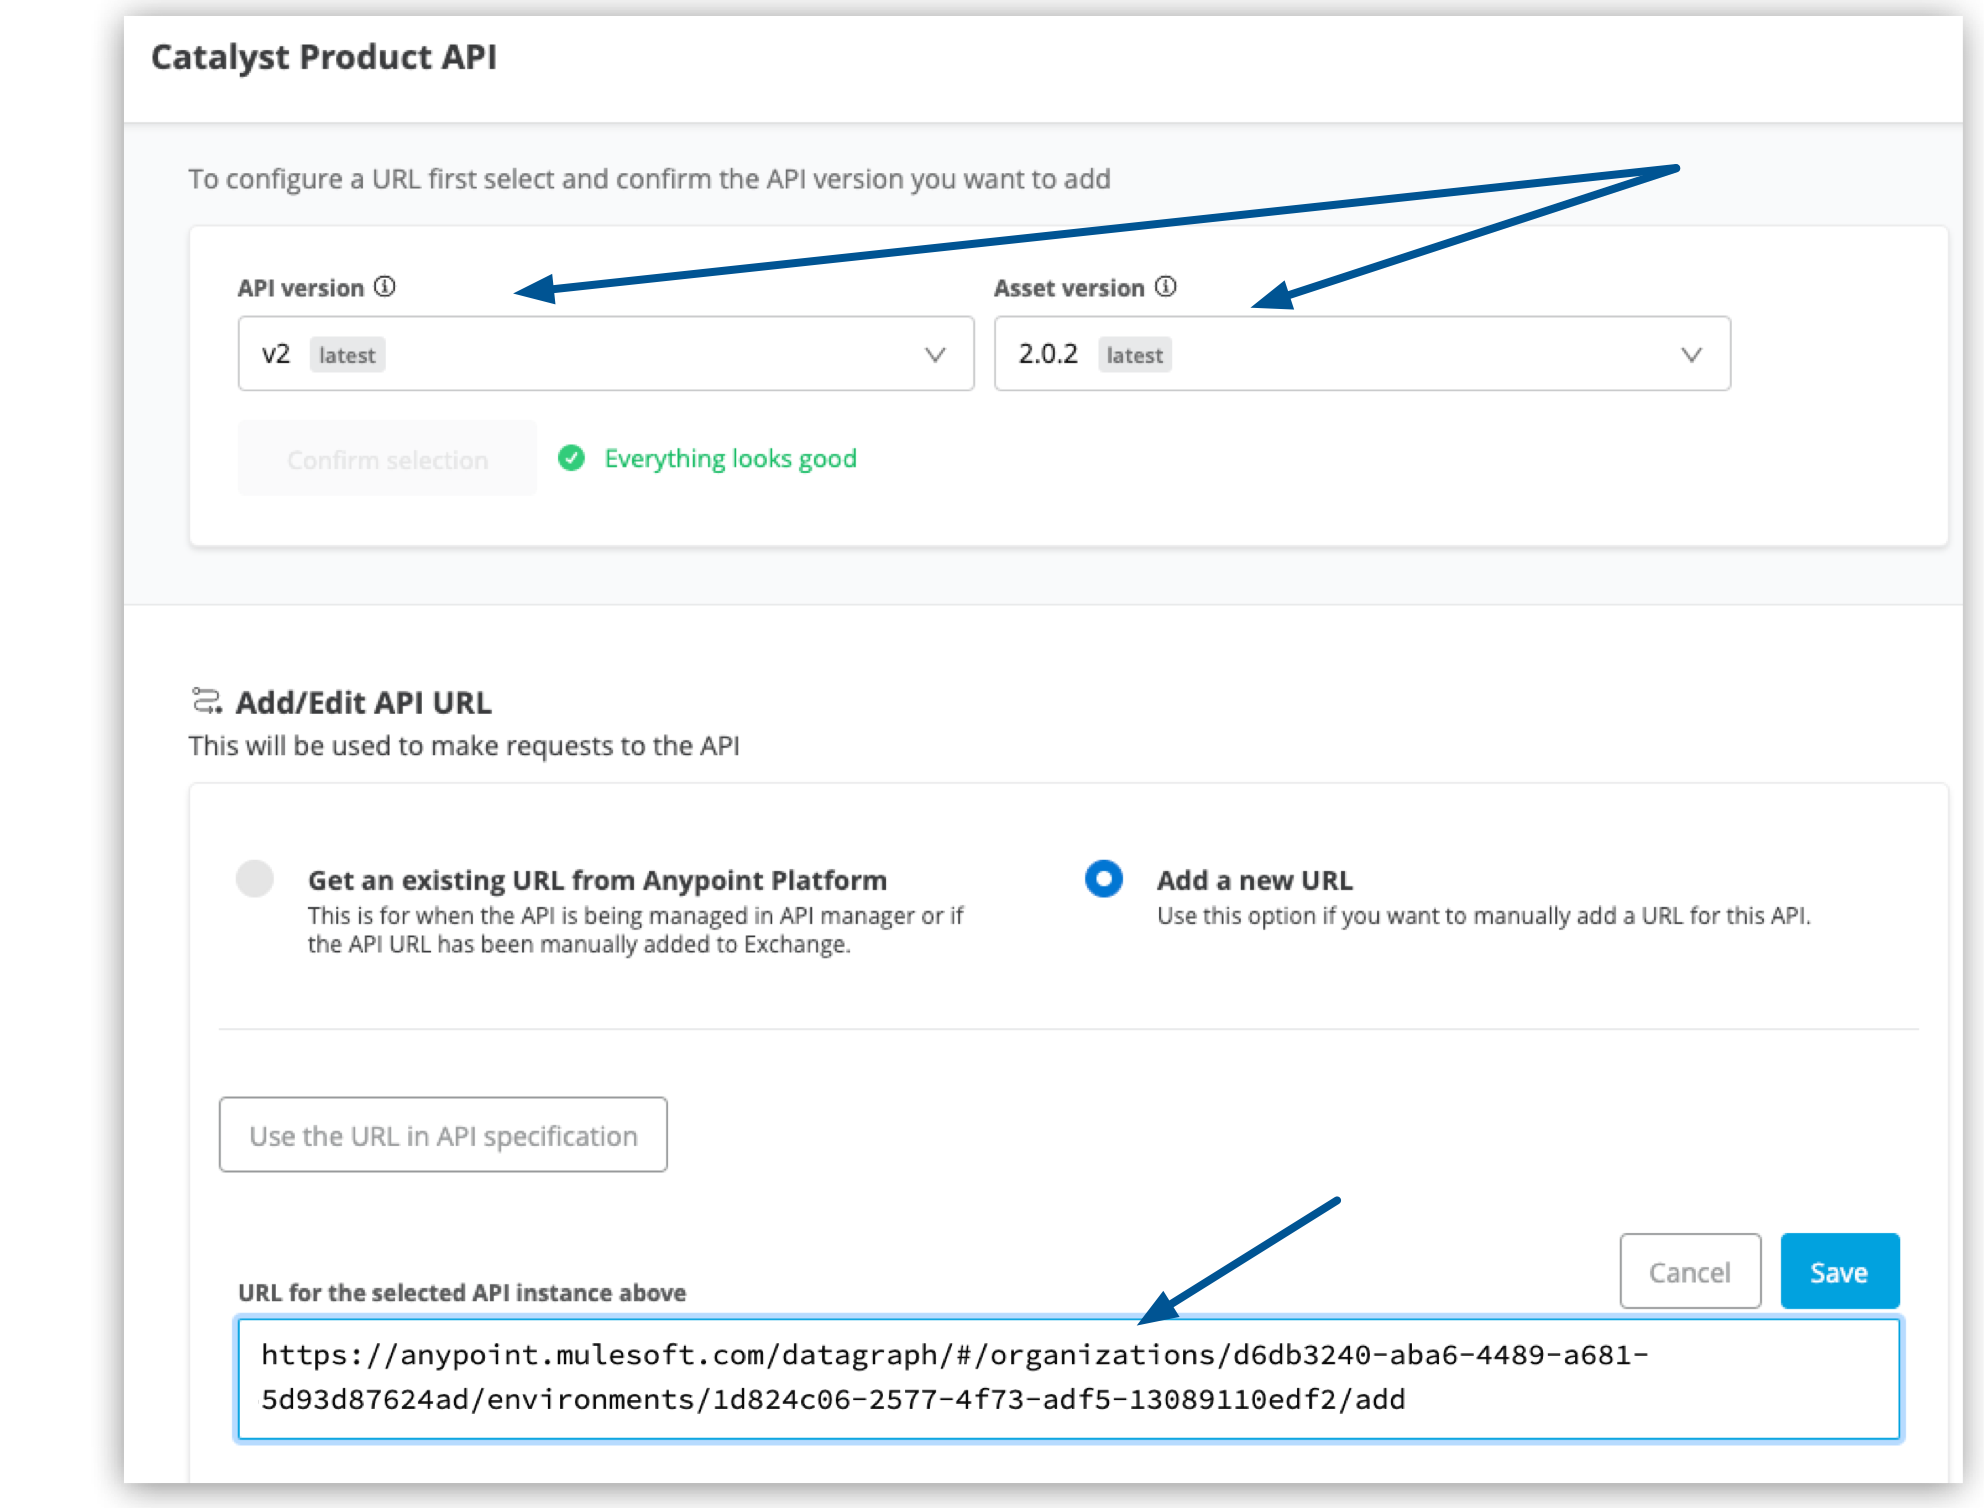
If your API is managed by API Manager, or if you manually added the URL to Exchange, Anypoint DataGraph retrieves the URL. You can also manually add a new URL if it’s included in the API specification.
-
Click Save.
-
Click Next: Configure Security.
-
Provide authentication for the GET endpoints for the API (in this quick-start example, No Auth):
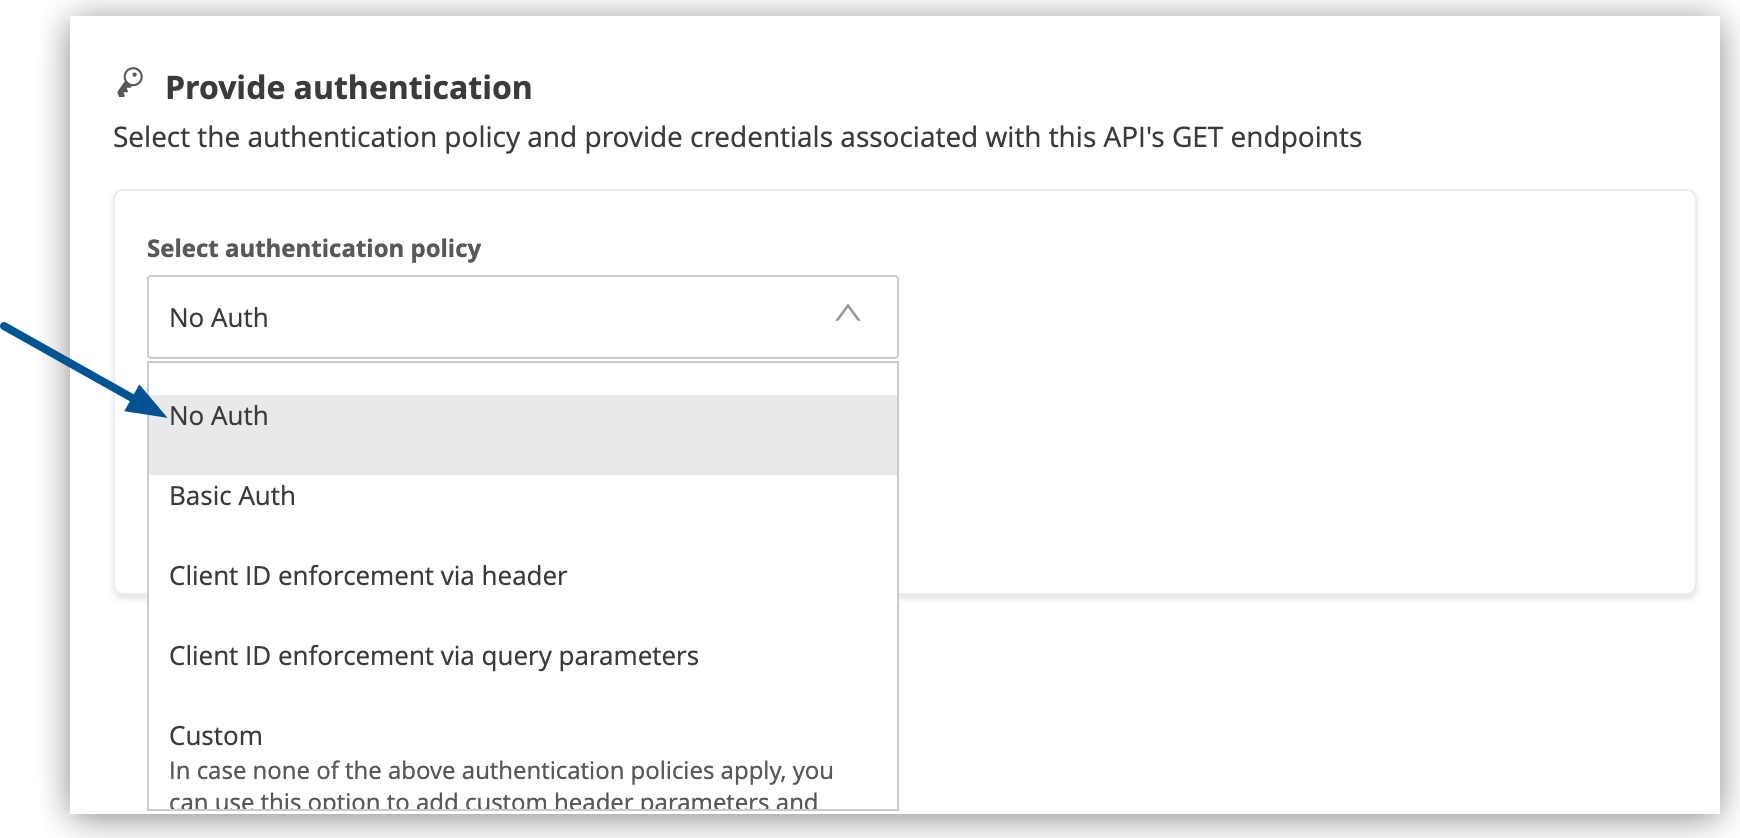
Anypoint DataGraph uses these credentials to make requests to this API.
-
After setting the version and authentication details, click Next: Preview Schema:
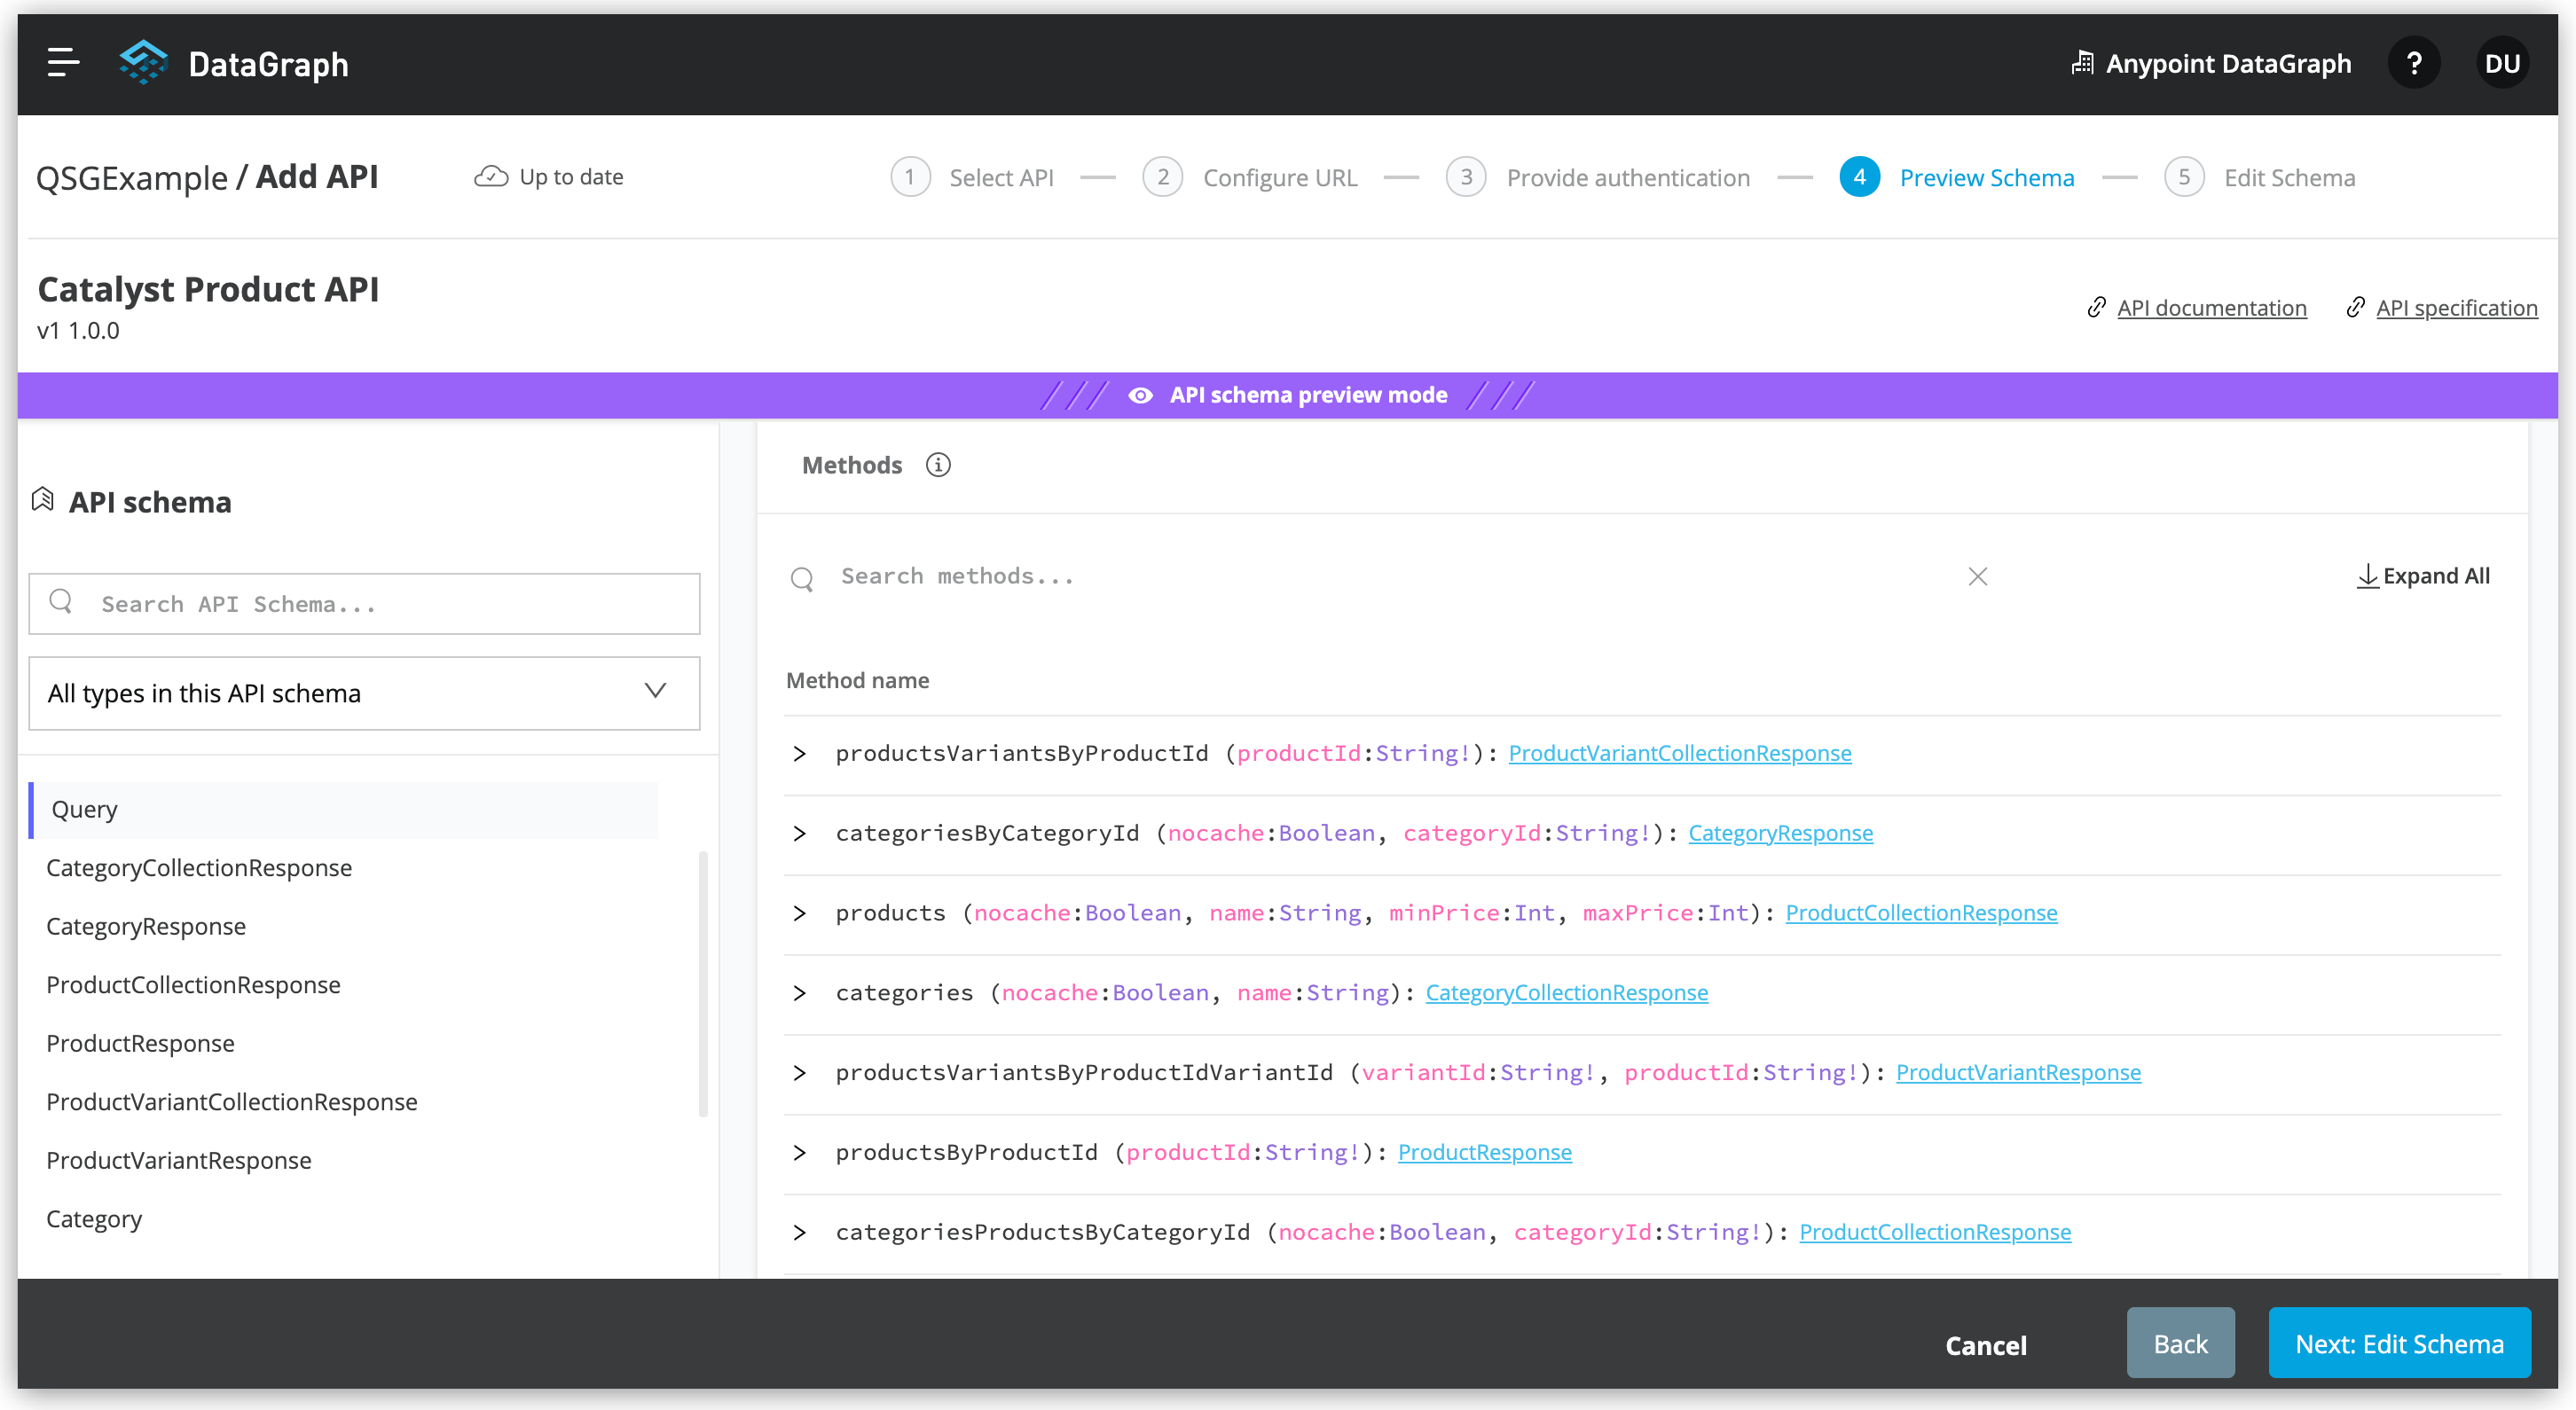
Here the specification of the API you’re adding is automatically transformed to its corresponding API schema. You can explore and familiarize yourself with the generated schema before proceeding to the next step.
For example, you can click through the types to understand the schema hierarchy, or search for a particular element—in this case,
price: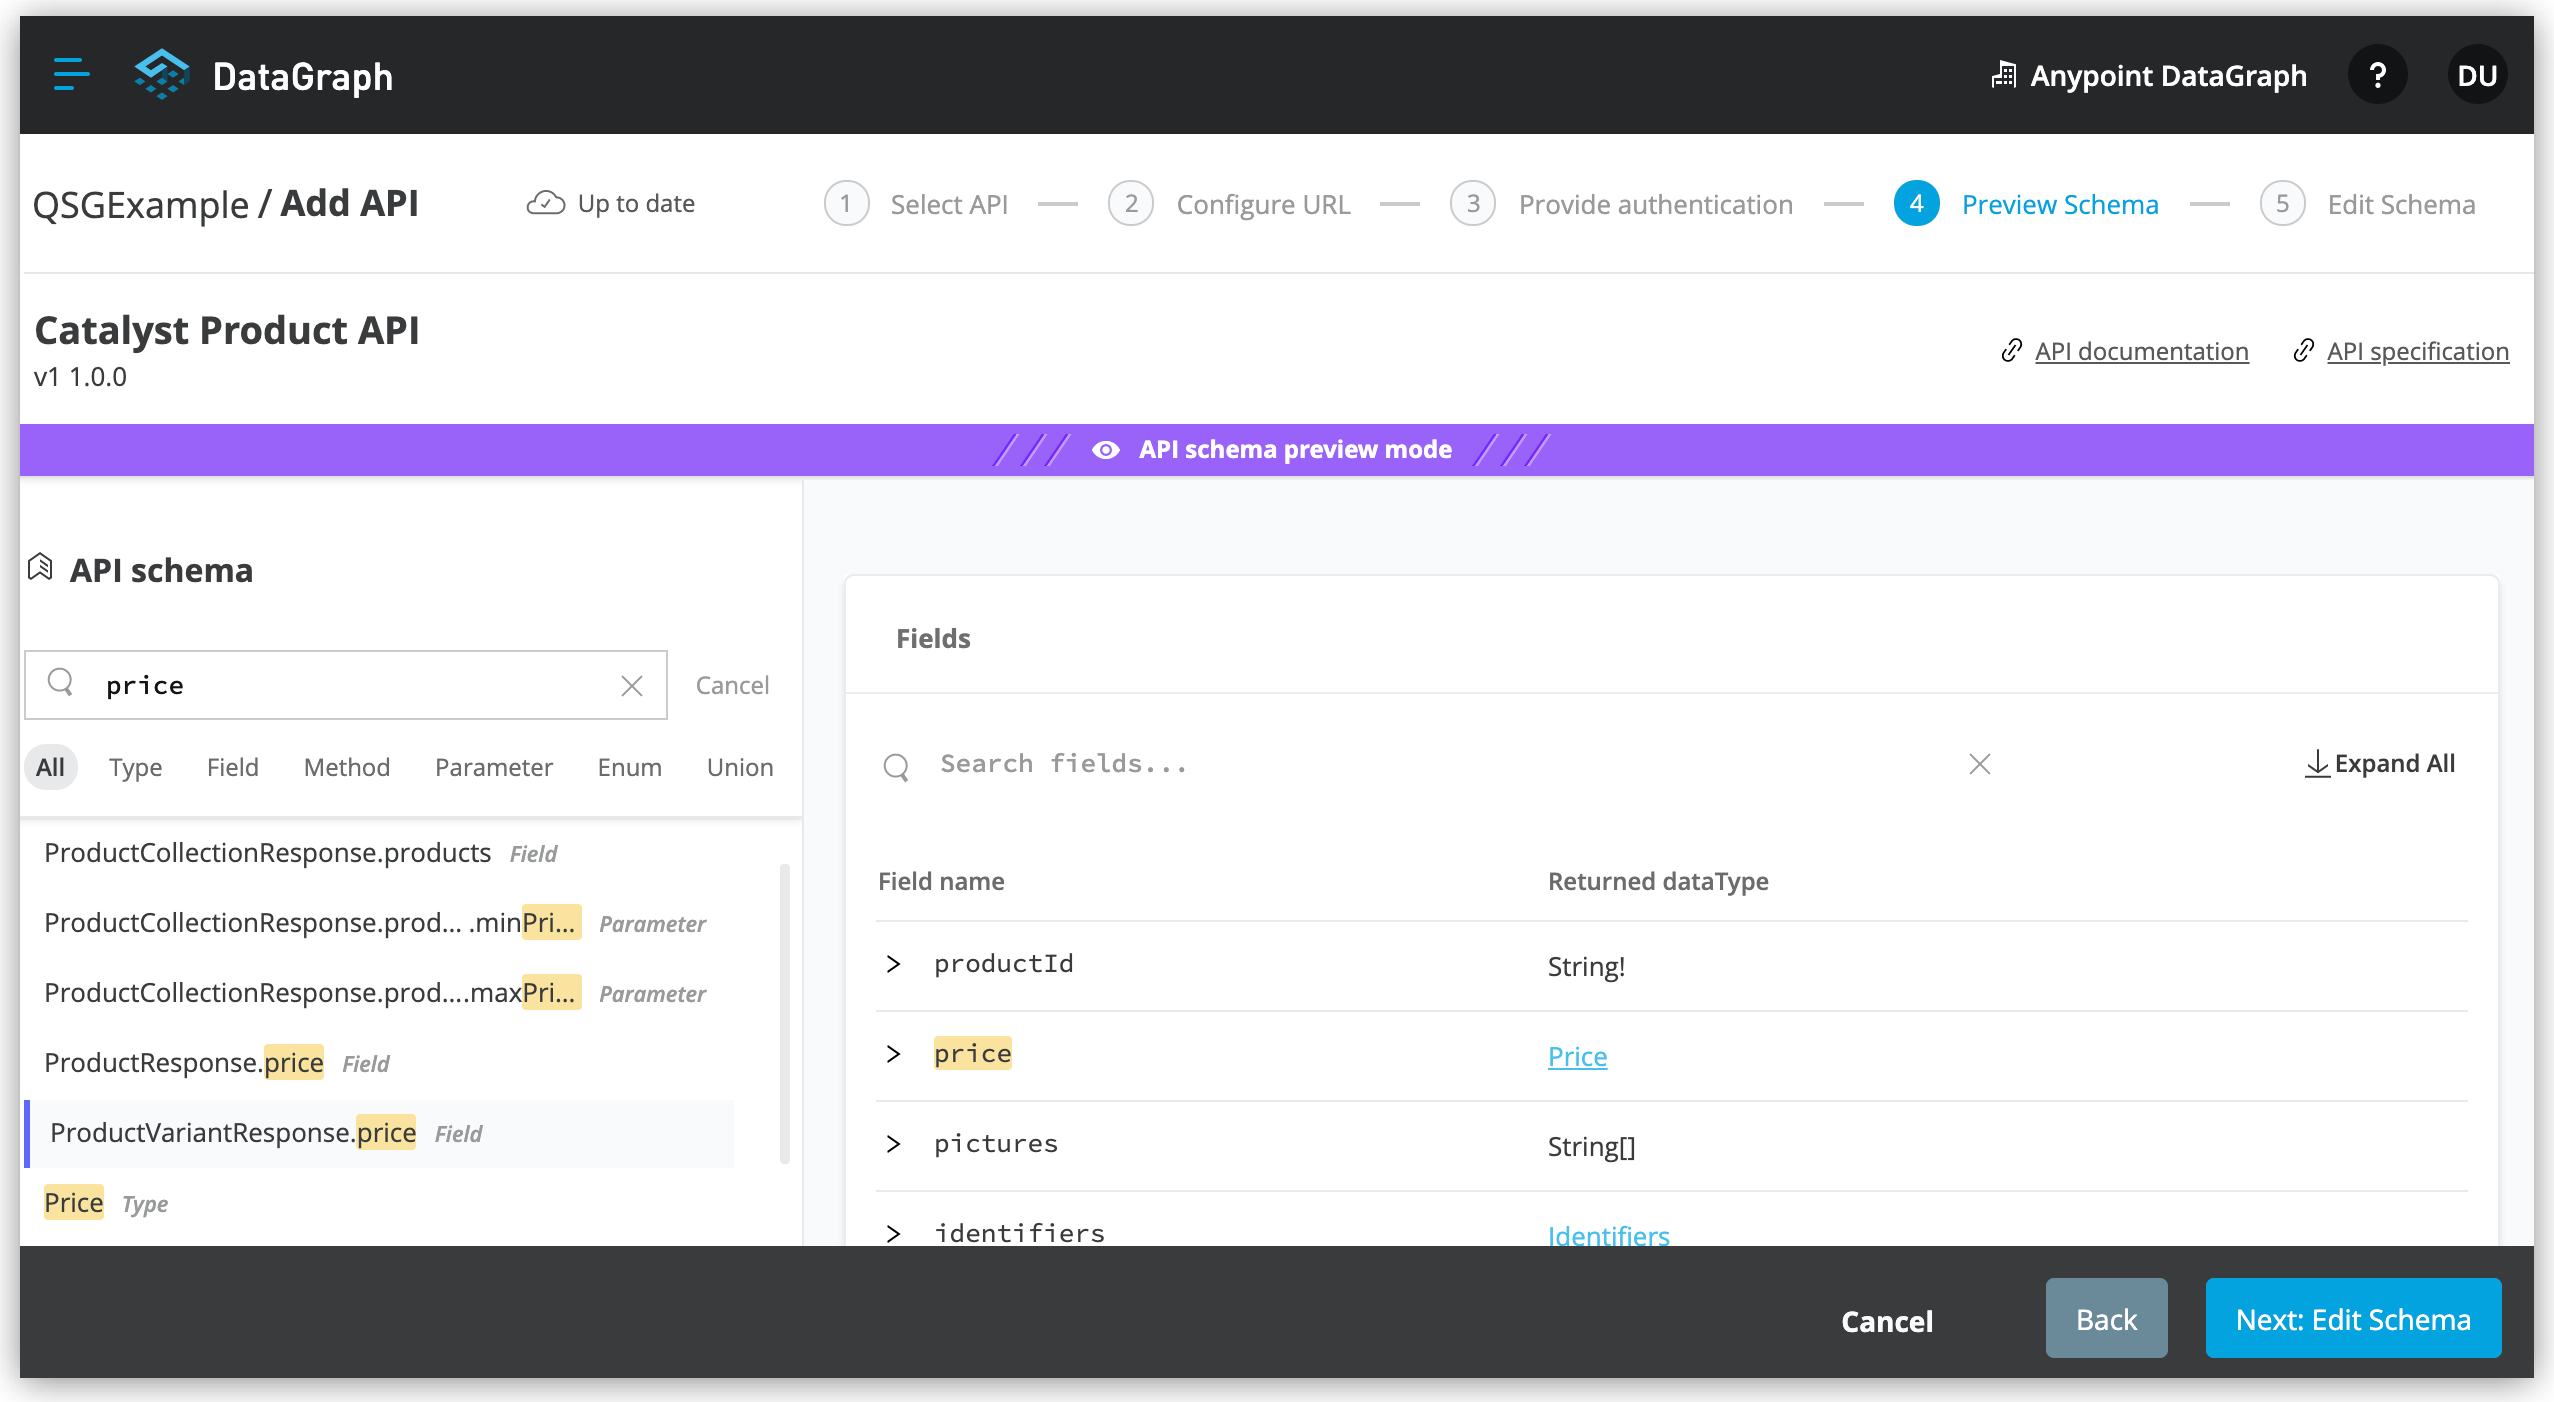
-
When you’re done previewing the schema, click Next: Edit Schema.
Enable Object Type Collaboration in the Catalyst Product API Schema
|
You don’t have to perform edit functions (enable collaboration, rename, hide/unhide, and link and merge object types) before you add an API schema to the unified schema. You can make changes to an API schema even after you’ve added it to the unified schema. However, you must resolve any conflicts raised by Anypoint DataGraph before adding an API schema to the unified schema. |
When adding APIs to the unified schema, you can configure object types, query methods, and fields to produce more useful query results. More specifically, you can hide or unhide, rename, and link and merge these entities.
However, a crucial step to achieving a connected unified schema is enabling collaboration on object types.
When you enable collaboration on a type, the type provides its fields to other types in the unified schema or in the local API schema, enabling you to create links and merges between types.
To enable collaboration on the ProductResponse object type:
-
In the Catalyst Product API schema navigation, click the ProductResponse object type.
-
In the Collaboration permissions pane, click Enable collaboration.
-
To set the default query method, select
productsByProductId (productId:String!): ProductResponse: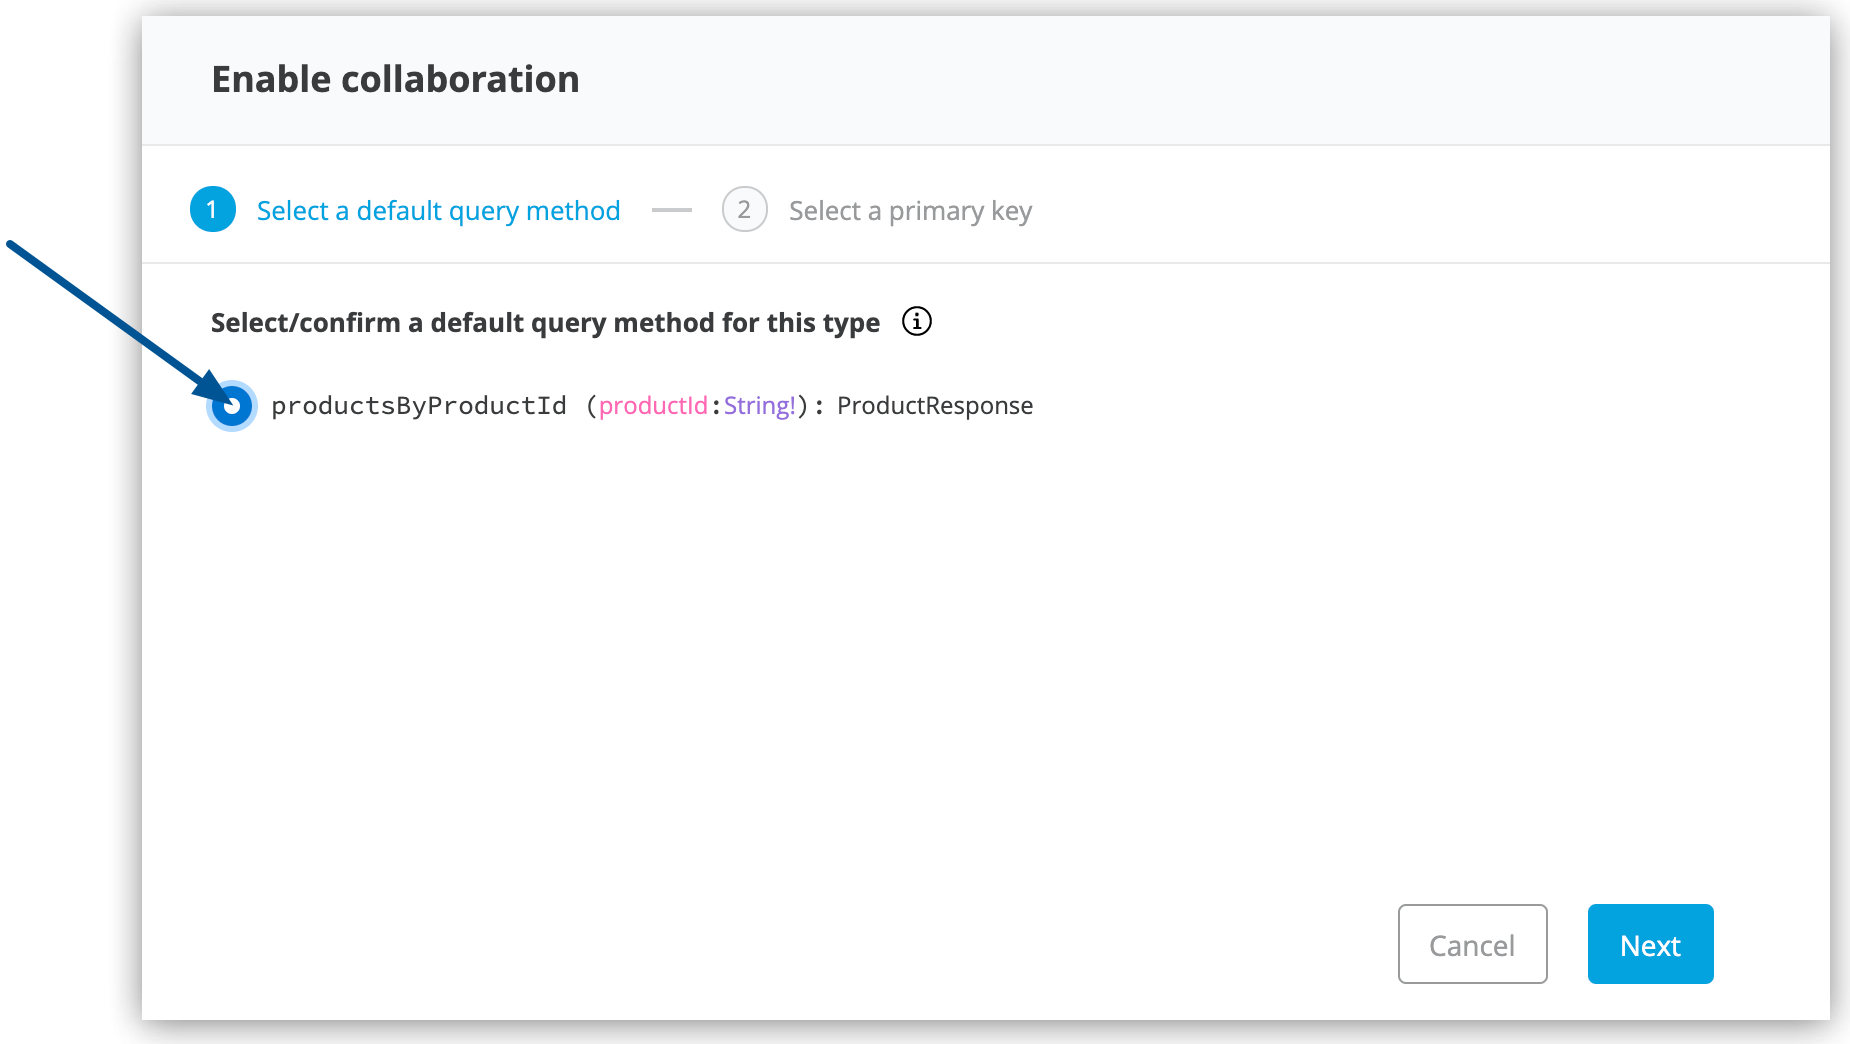
The default query method for an object type is the method that always returns a single record of that object type for which you want to enable collaboration.
-
Click Next.
-
To select a primary key, from the dropdown list, select
identifier (String!)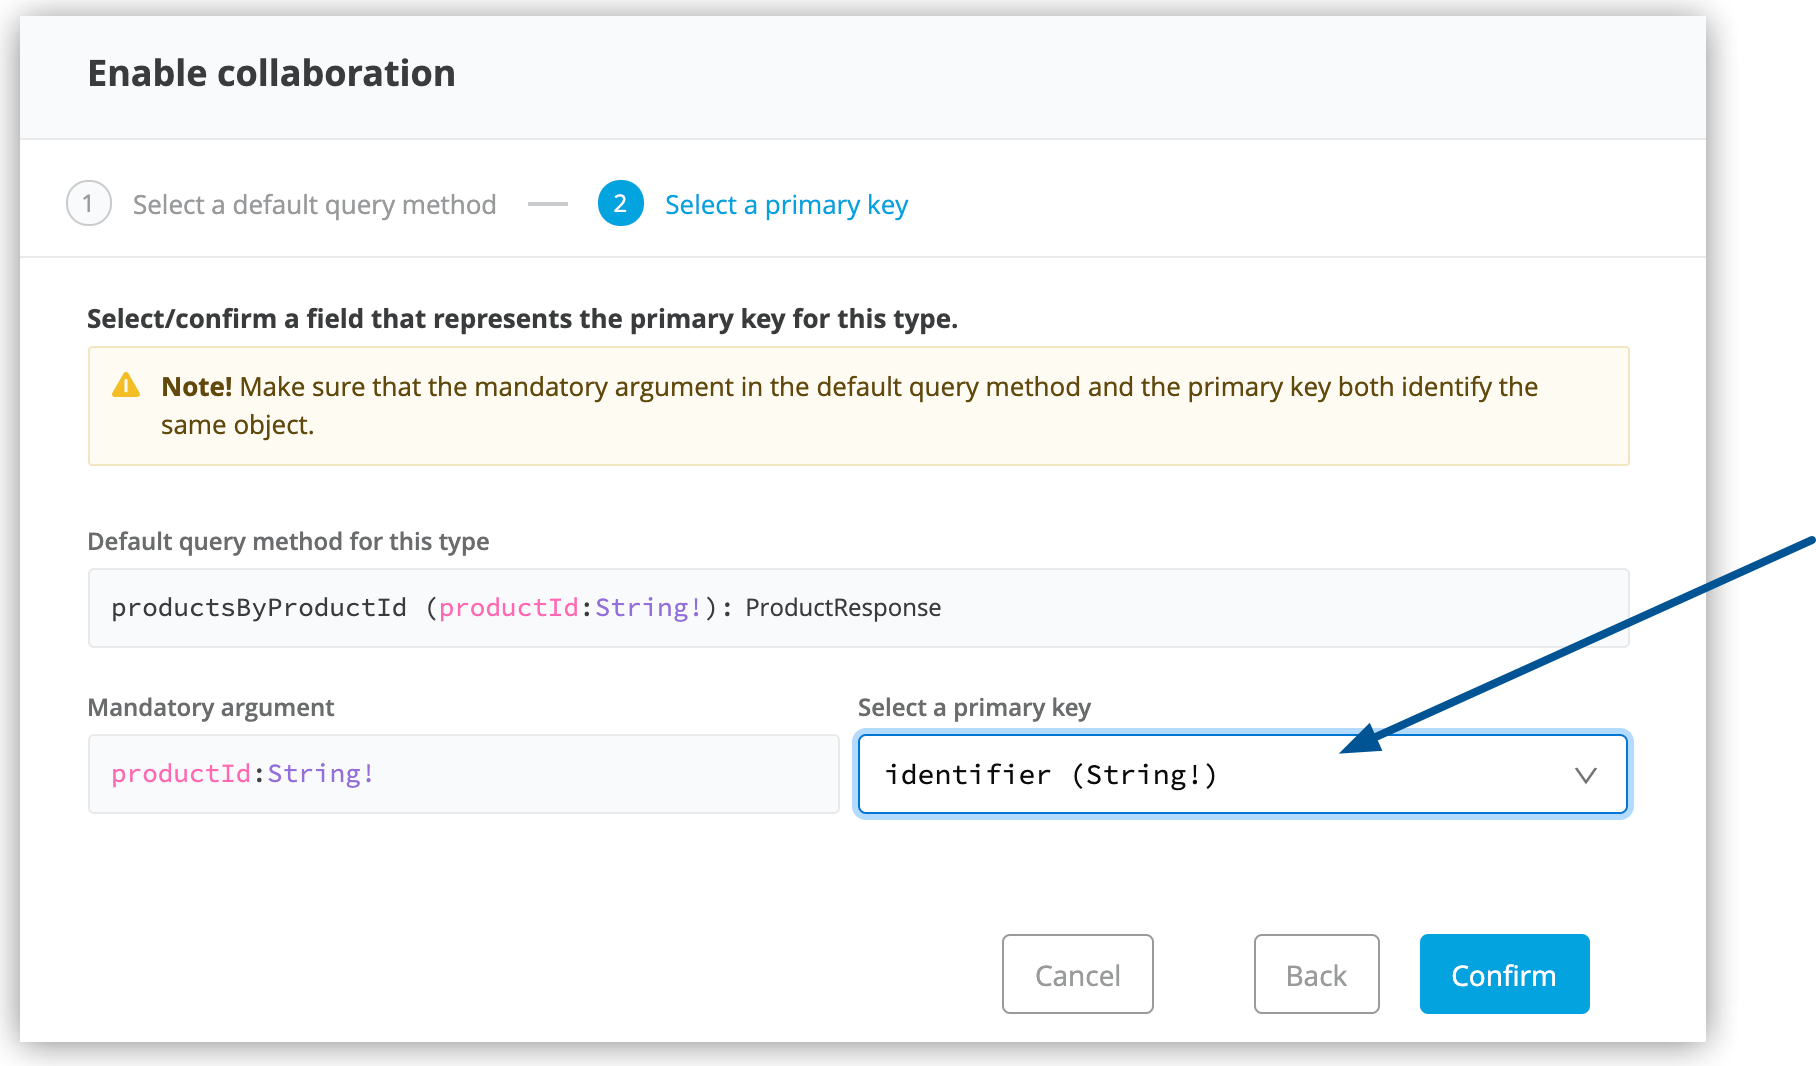
The primary key is one field of your object type that uniquely identifies a single record of that object type. DataGraph also supports object types that use composite keys, but this example uses just one primary key.
-
Click Confirm.
-
In the Edit type name and field settings pane, make all fields visible.
When adding an API, all nested types are hidden from the unified schema. This gives you the flexibility to scale the schema according to your needs and make only those types visible that you want to add to the unified schema. Any fields in Level 1 types that return the nested types are also hidden.
-
Click Next: Add to unified schema.

As Anypoint DataGraph updates the unified schema, you can navigate through the schema to view the changes you just made.
-
Click Proceed to unified schema.
Add the Catalyst Order API to Anypoint DataGraph
Follow the same procedure as for adding the Product Order API, with the following exceptions:
-
Use the URL
https://anypoint.mulesoft.com/mocking/api/v1/sources/exchange/assets/68ef9520-24e9-4cf2-b2f5-620025690913/catalyst-retail-order-system-api/2.0.3/m/ -
Additionally edit the schema by renaming, linking, and merging the object types that you previously enabled for collaboration.
Rename Object Types in the Catalyst Order API Schema
Before you add an API schema to the unified schema, you can edit the schema to rename fields, types, and query methods to make them more intuitive to those consuming the unified schema.
For example, the Catalyst Order API contains a nested type named EnumType0:
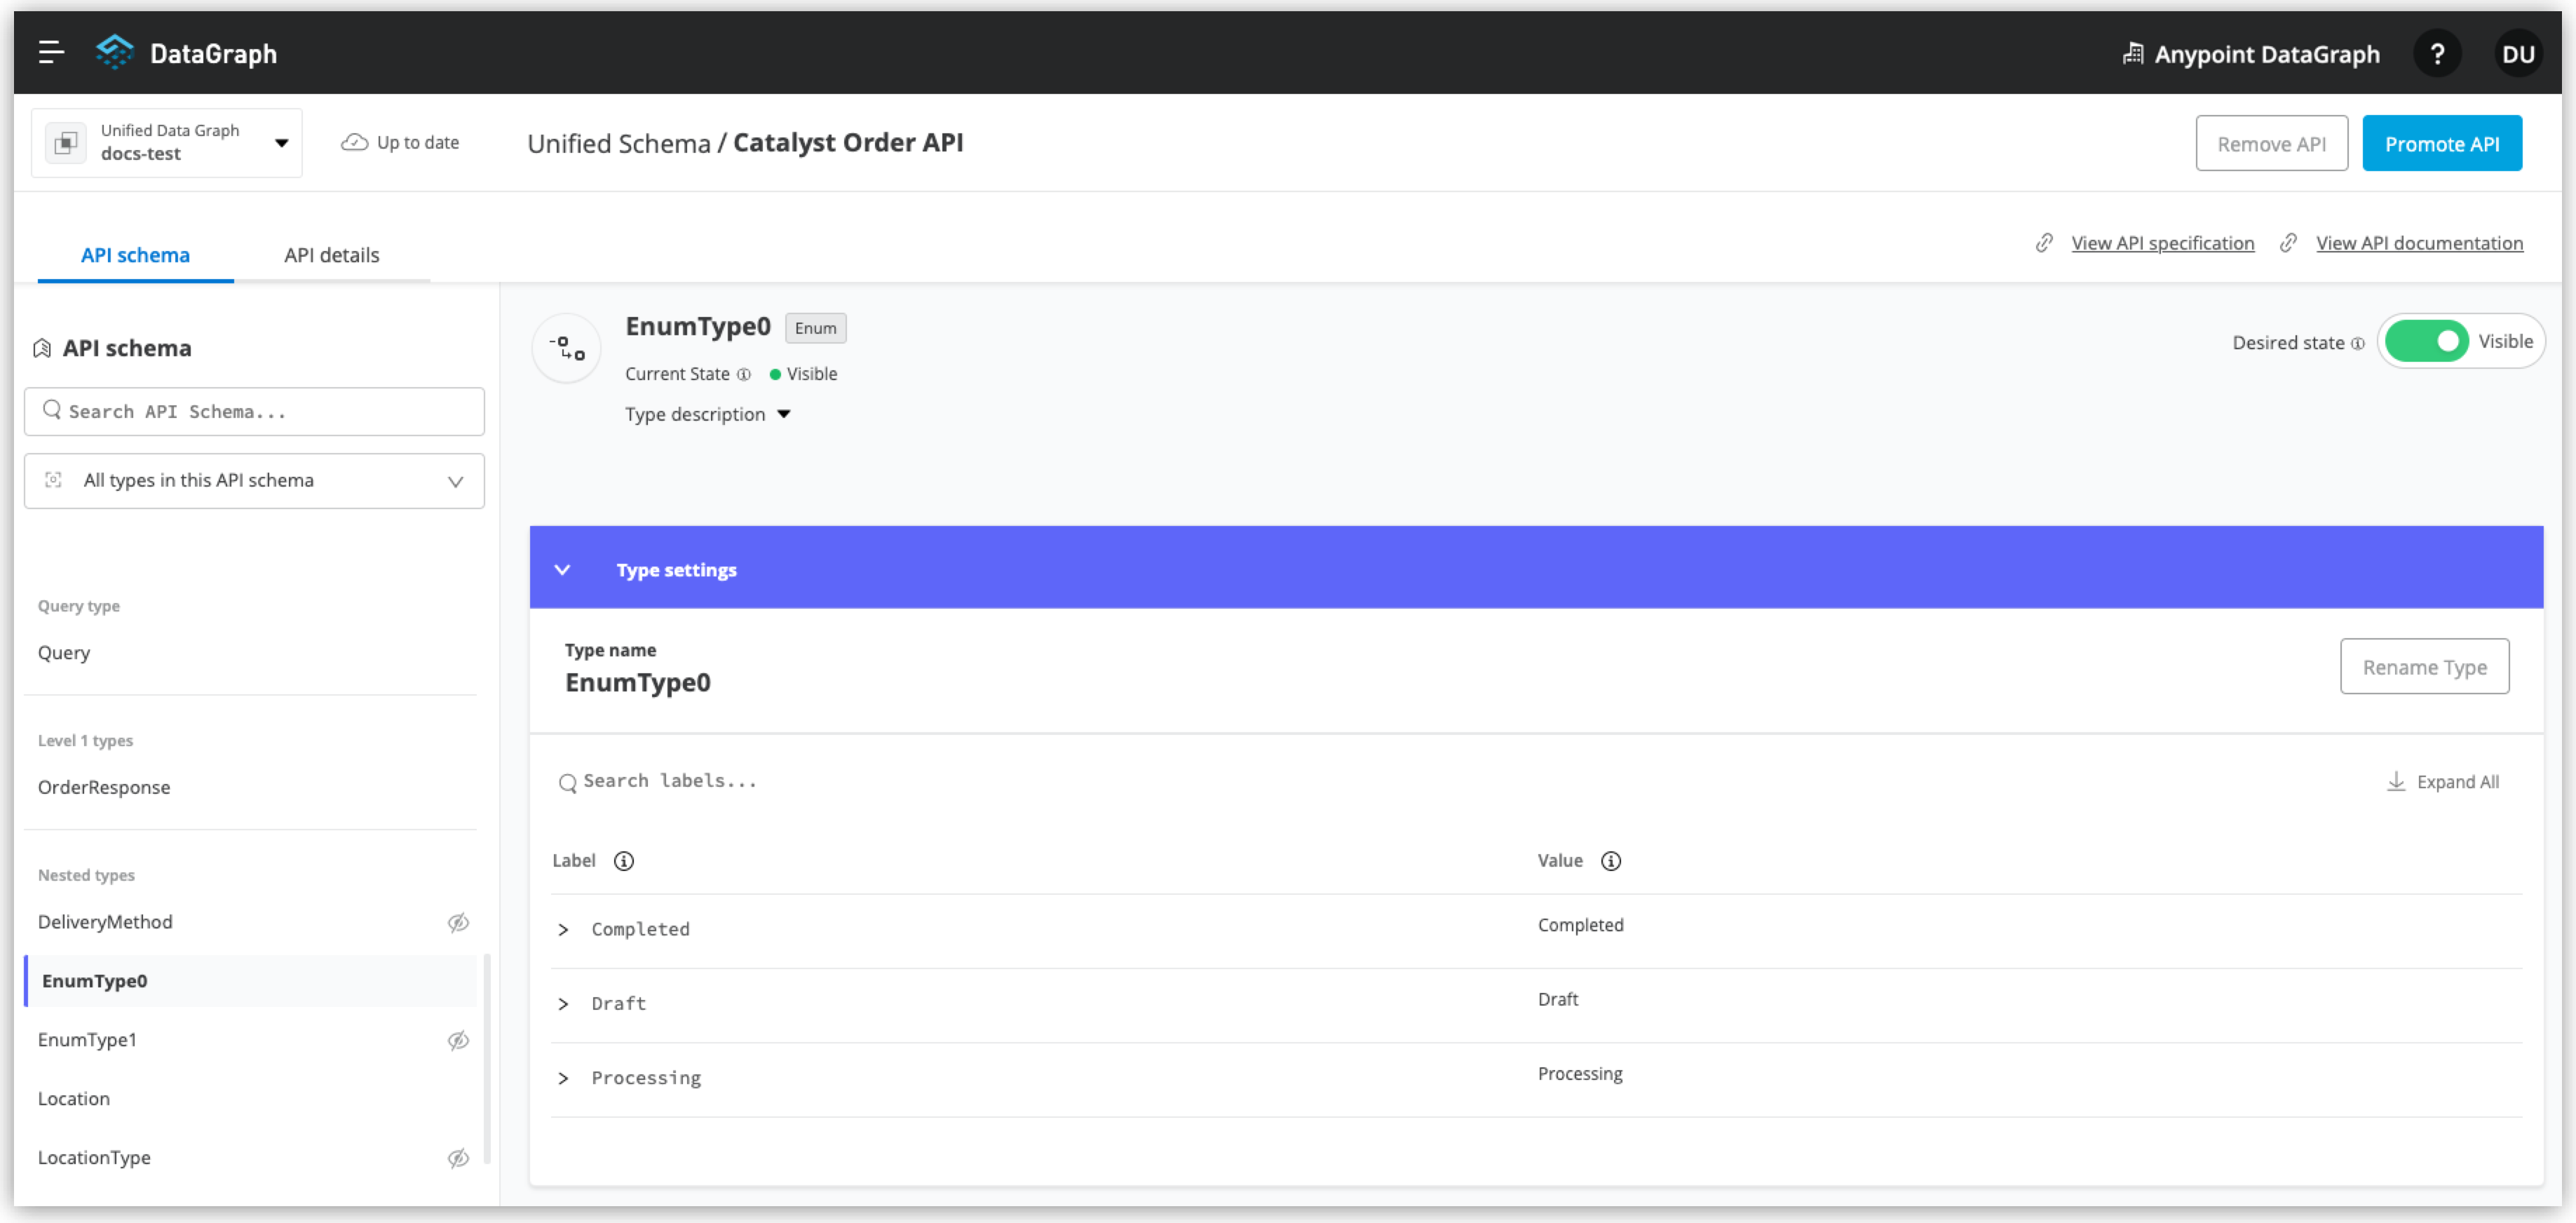
Anypoint DataGraph generated the name EnumType0 because this enum type was unnamed when added. Because this type provides useful order status information, name it appropriately, to OrderStatus.
-
Click EnumType0.
-
Switch the Desired state to Visible.
-
In the Type settings pane, click Rename Type.
-
Rename the type to
OrderStatus, and click Confirm.
The new name is reflected in the type list.
Link Object Types in the Catalyst Order API Schema
You can also edit the unified schema to link your newly added API object types to existing, related types to join fields, which results in a more enriched query result.
For example, as a result of adding the Catalyst Product API, the unified schema now has product description information that came from the ProductResponse object type. The Catalyst Order API schema also has product information as part of the OrderItemSummary object type. You can link these object types to return results from both in one query.
-
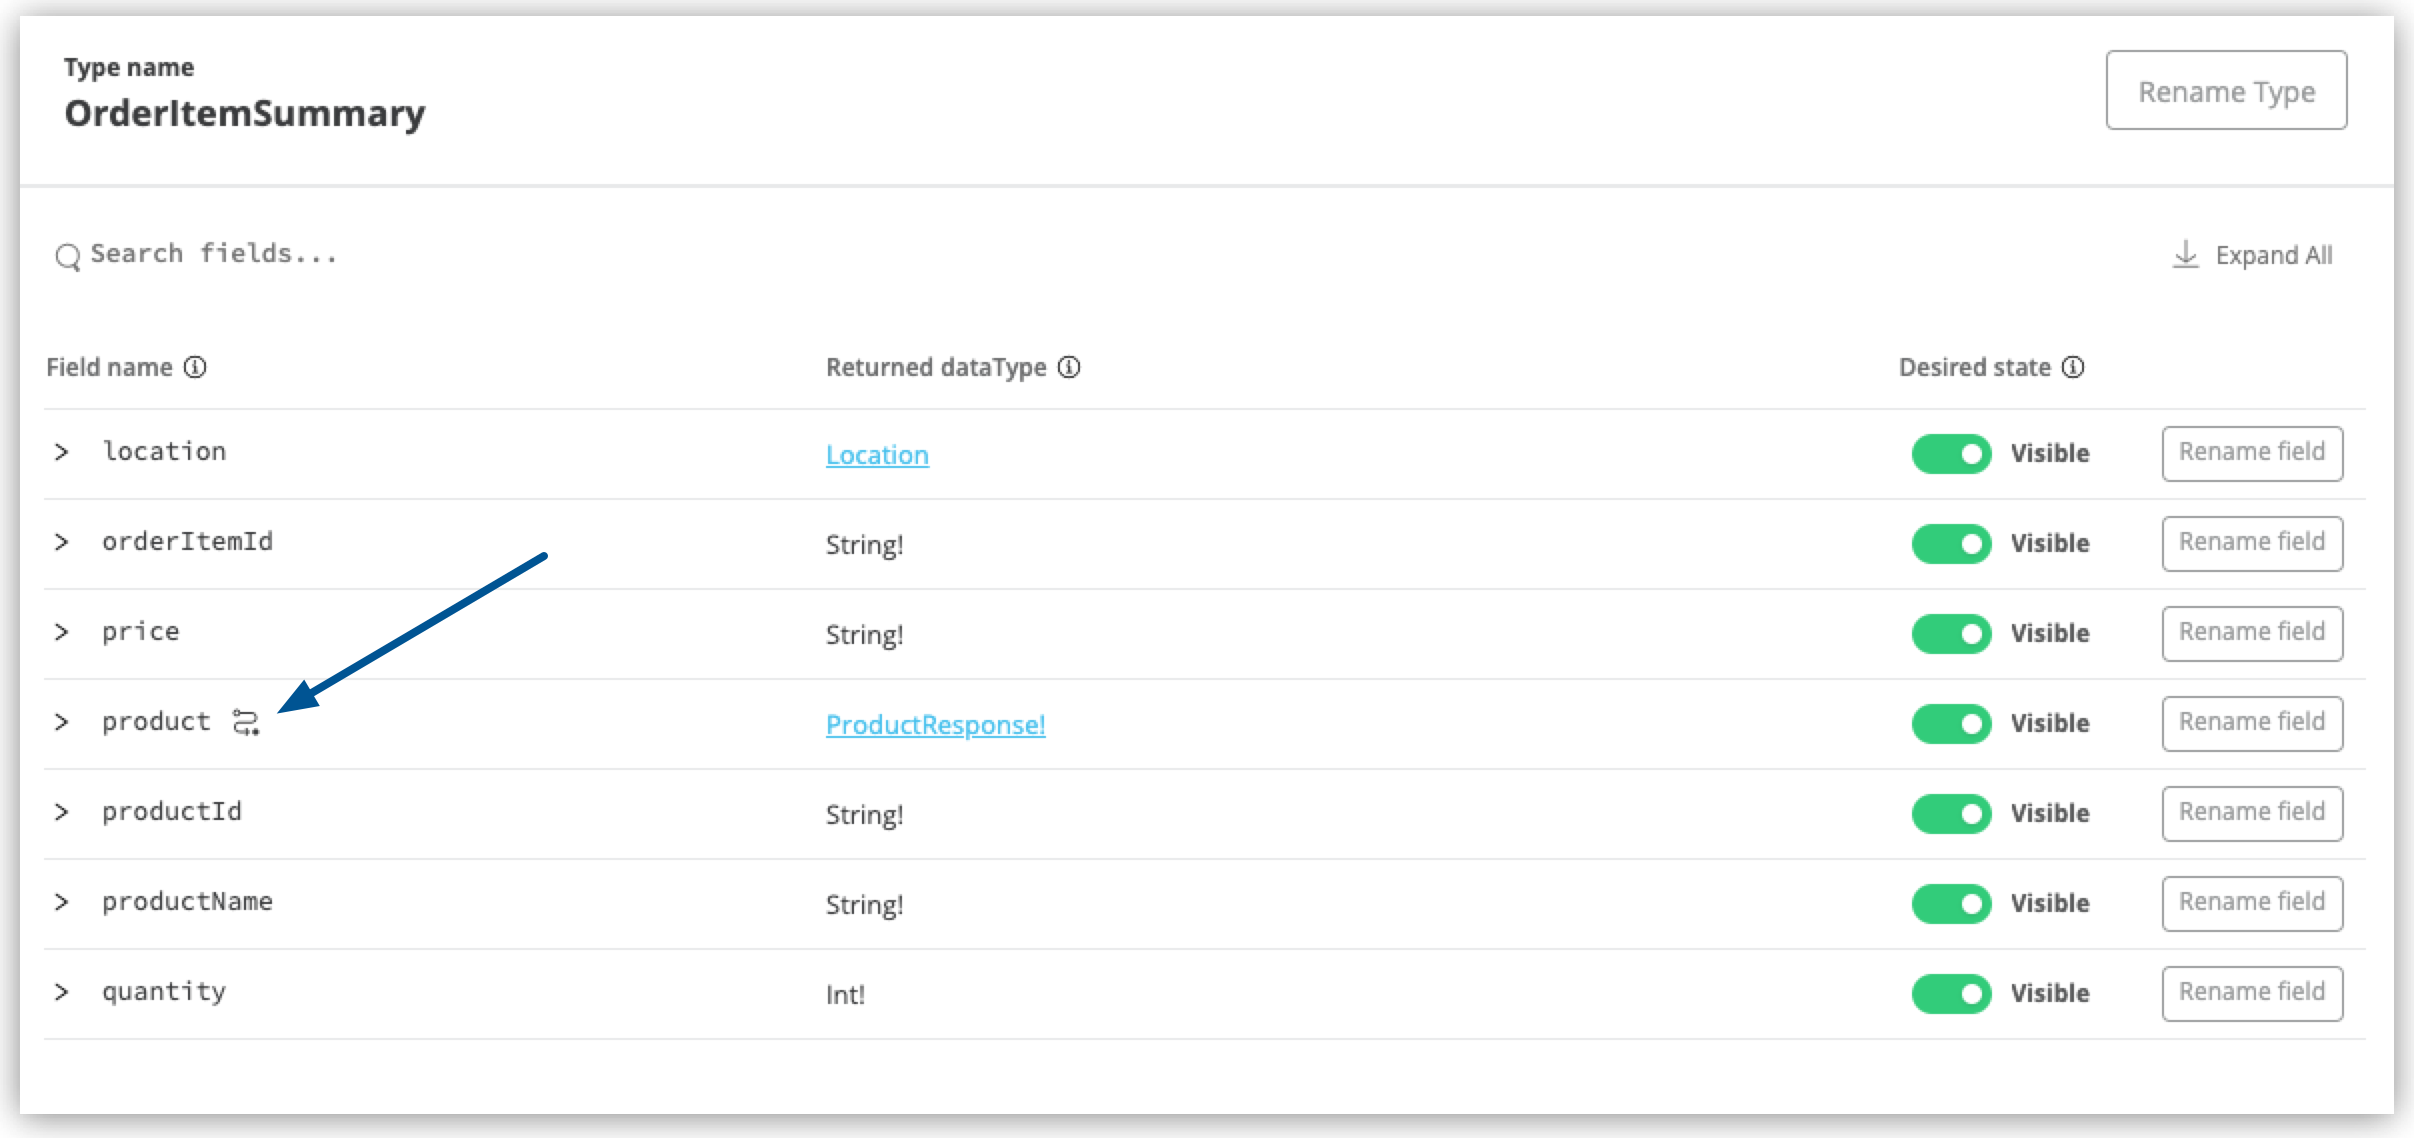
In the Catalyst Order API schema navigation, select the OrderItemSummary object type.
-
If the OrderItemSummary object type and its fields are hidden, use the Hidden/Visible toggle to switch its Desired state value to Visible:

-
Scroll to the Link to another type pane, and in Select the type you want to link to (Target), select ProductResponse.
-
For the foreign key field, set
productId (String!):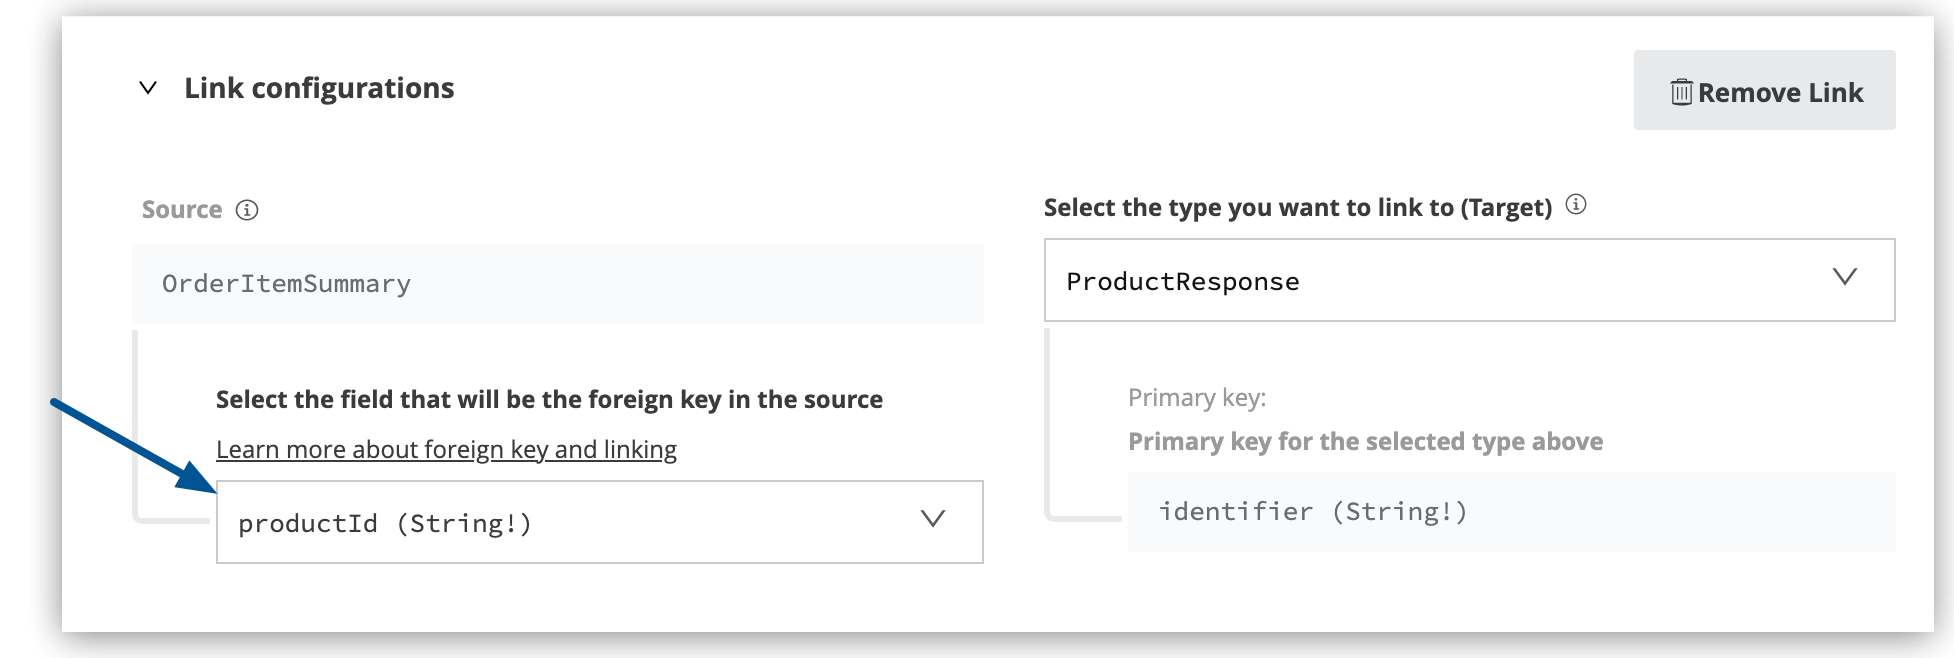
The value returned by the foreign key field and the record of ProductResponse it identifies is exactly the same as the primary key of the target ProductResponse object type.
-
Change the name of the foreign key field from productresponse to product.
You have the option to hide the foreign key field from the unified schema since the newly added field (product) returns the type you’re linking to. For this example, you can change it to Visible.
-
Review the new link configuration and click Save changes.
The OrderItemSummary type is now linked to the ProductResponse! type:
You’re almost ready to finish adding the Catalyst Order API. Before you do that, explore another way to edit an API schema before adding it to the unified schema.
Merge Object Types in the Catalyst Order API Schema
You can merge an object type from your API schema with either another object type in the unified schema or with another object type in the same API schema (known as a local merge). Merging types enables you to combine similar types to extend their fields and datasets for better query results.
In Anypoint DataGraph, there are three merge types:
-
An extension merge, in which merged types join data
-
A reference merge, in which you can retrieve fields only from the target type
-
A composition merge, in which the merged types simplify the unified schema by bringing together types as a single type, but are joined without primary keys
For this example, you perform a local composition merge by merging the OrderSummary object type with the OrderResponse object type:
-
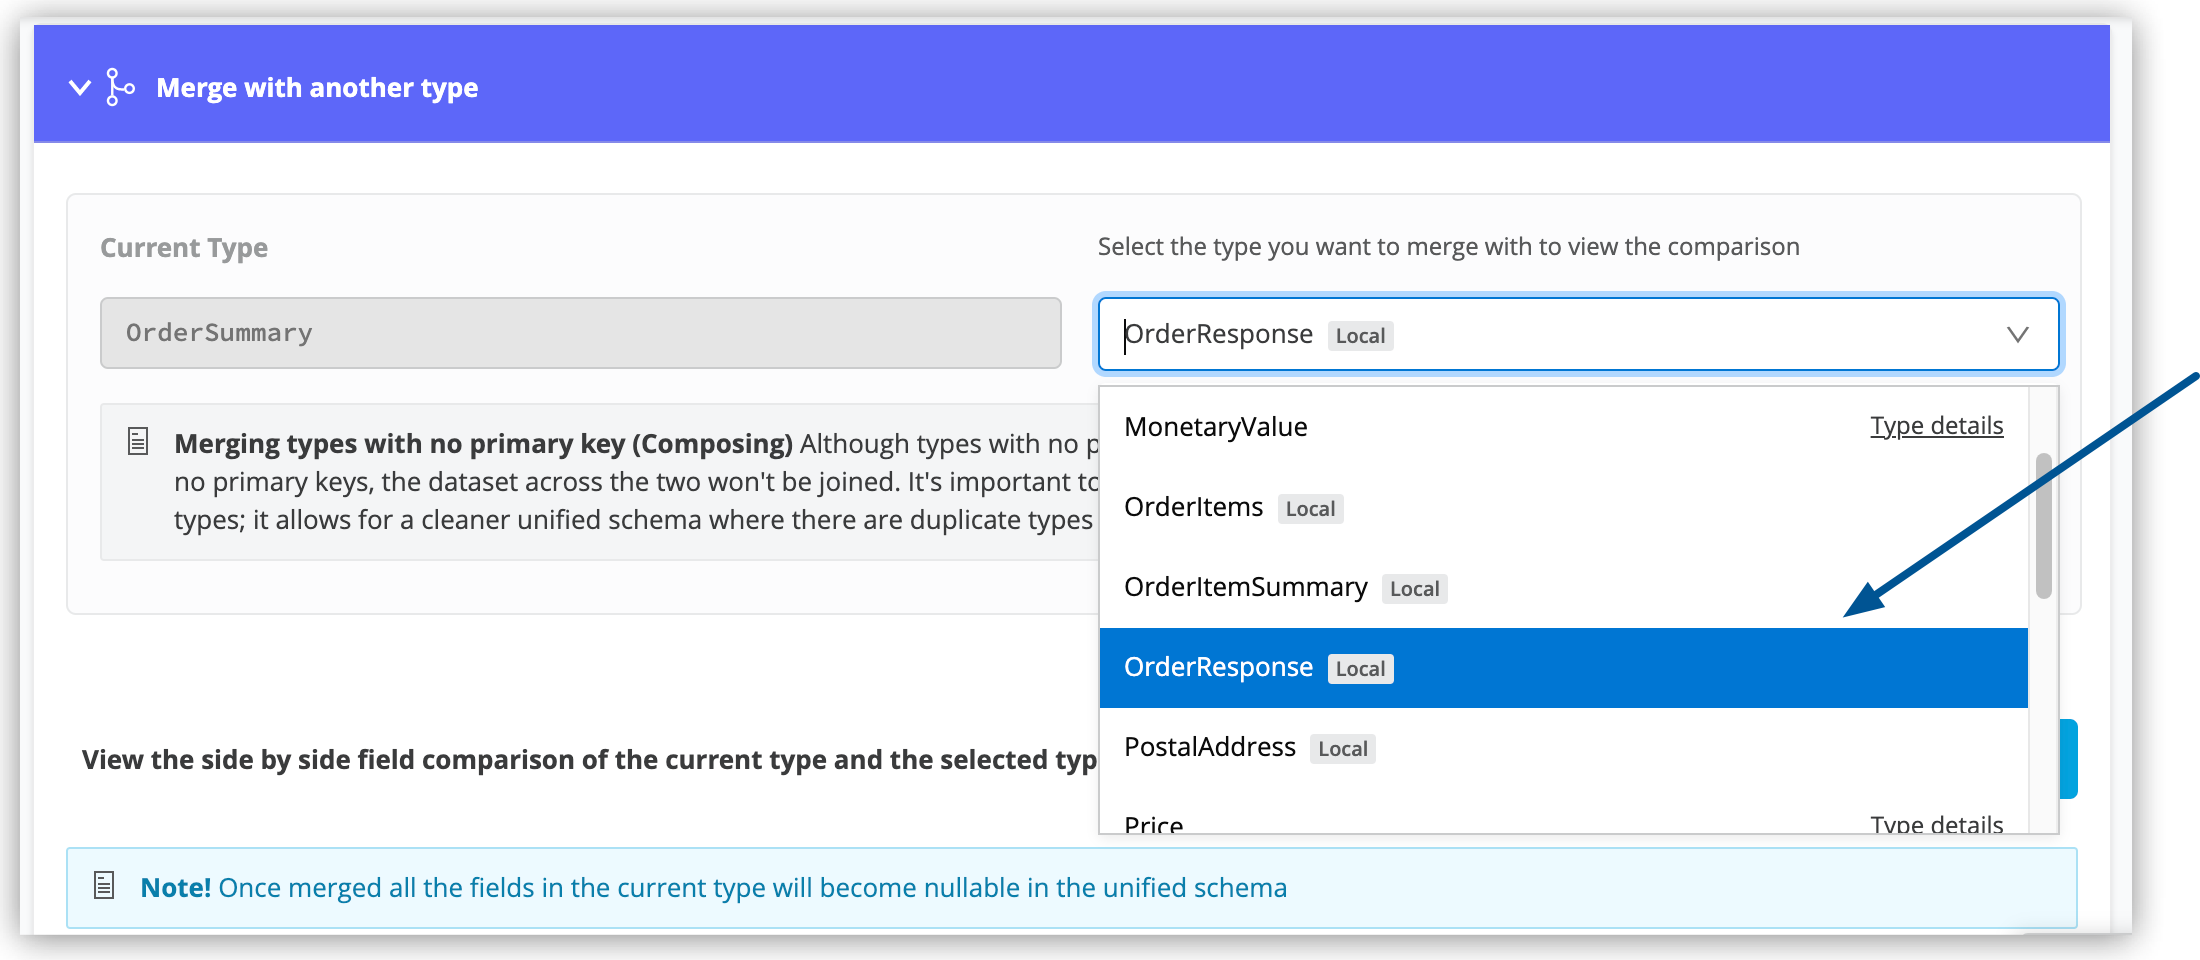
In the Catalyst Order API schema navigation, select the OrderSummary type.
-
In the Merge with another type pane, select the type to merge with (in this case, OrderResponseLocal):
-
Use the diff view to get a side-by-side comparison of the two types in the merge, and if needed, use the toggle to unhide all the fields.
-
Click Preview merge result:
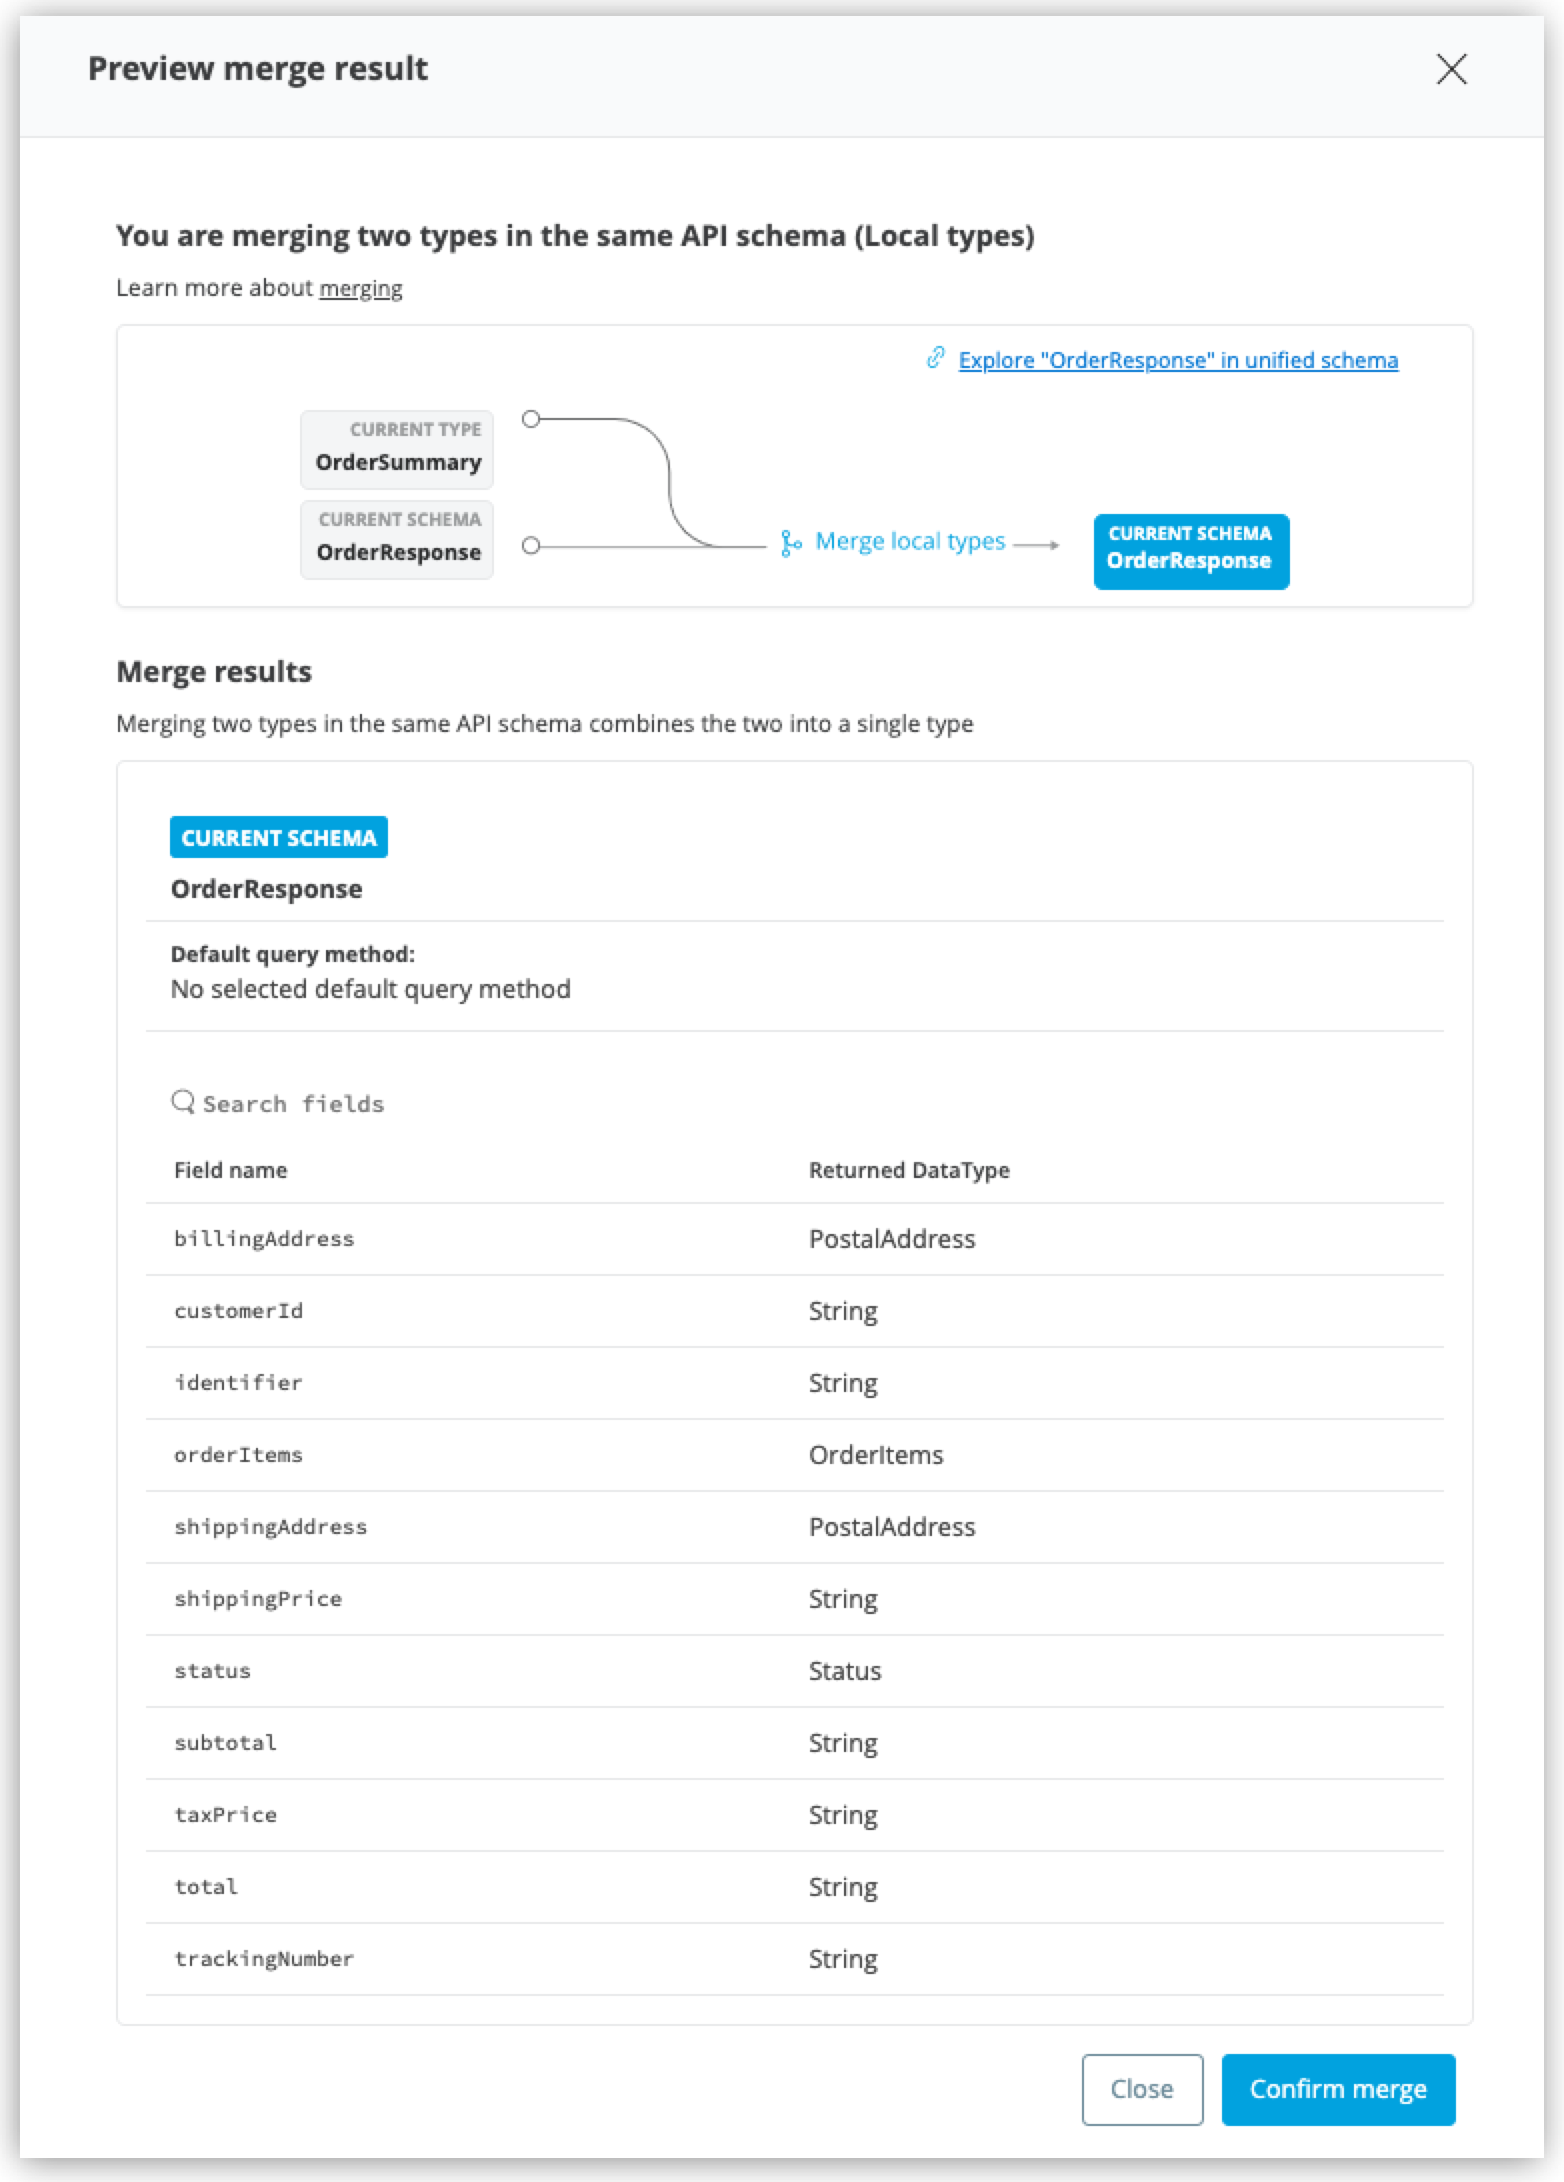
The results show that you’re performing a local merge between the OrderSummary and OrderResponse object types. After the merge, the OrderSummary object type is renamed to OrderResponse in the Catalyst Order API schema, and you query the OrderResponse type in the unified schema.
-
Click Confirm merge.
-
Click Apply Changes.
As Anypoint DataGraph updates the unified schema, you can navigate through the schema to view changes as you make them. When the unified schema status changes to “Up to date”, request access to run queries and mutations.
Request Access to Run Queries and Mutations
After you add the two API schema’s to the unified schema, you’re ready to request permission for access to run an operation.
-
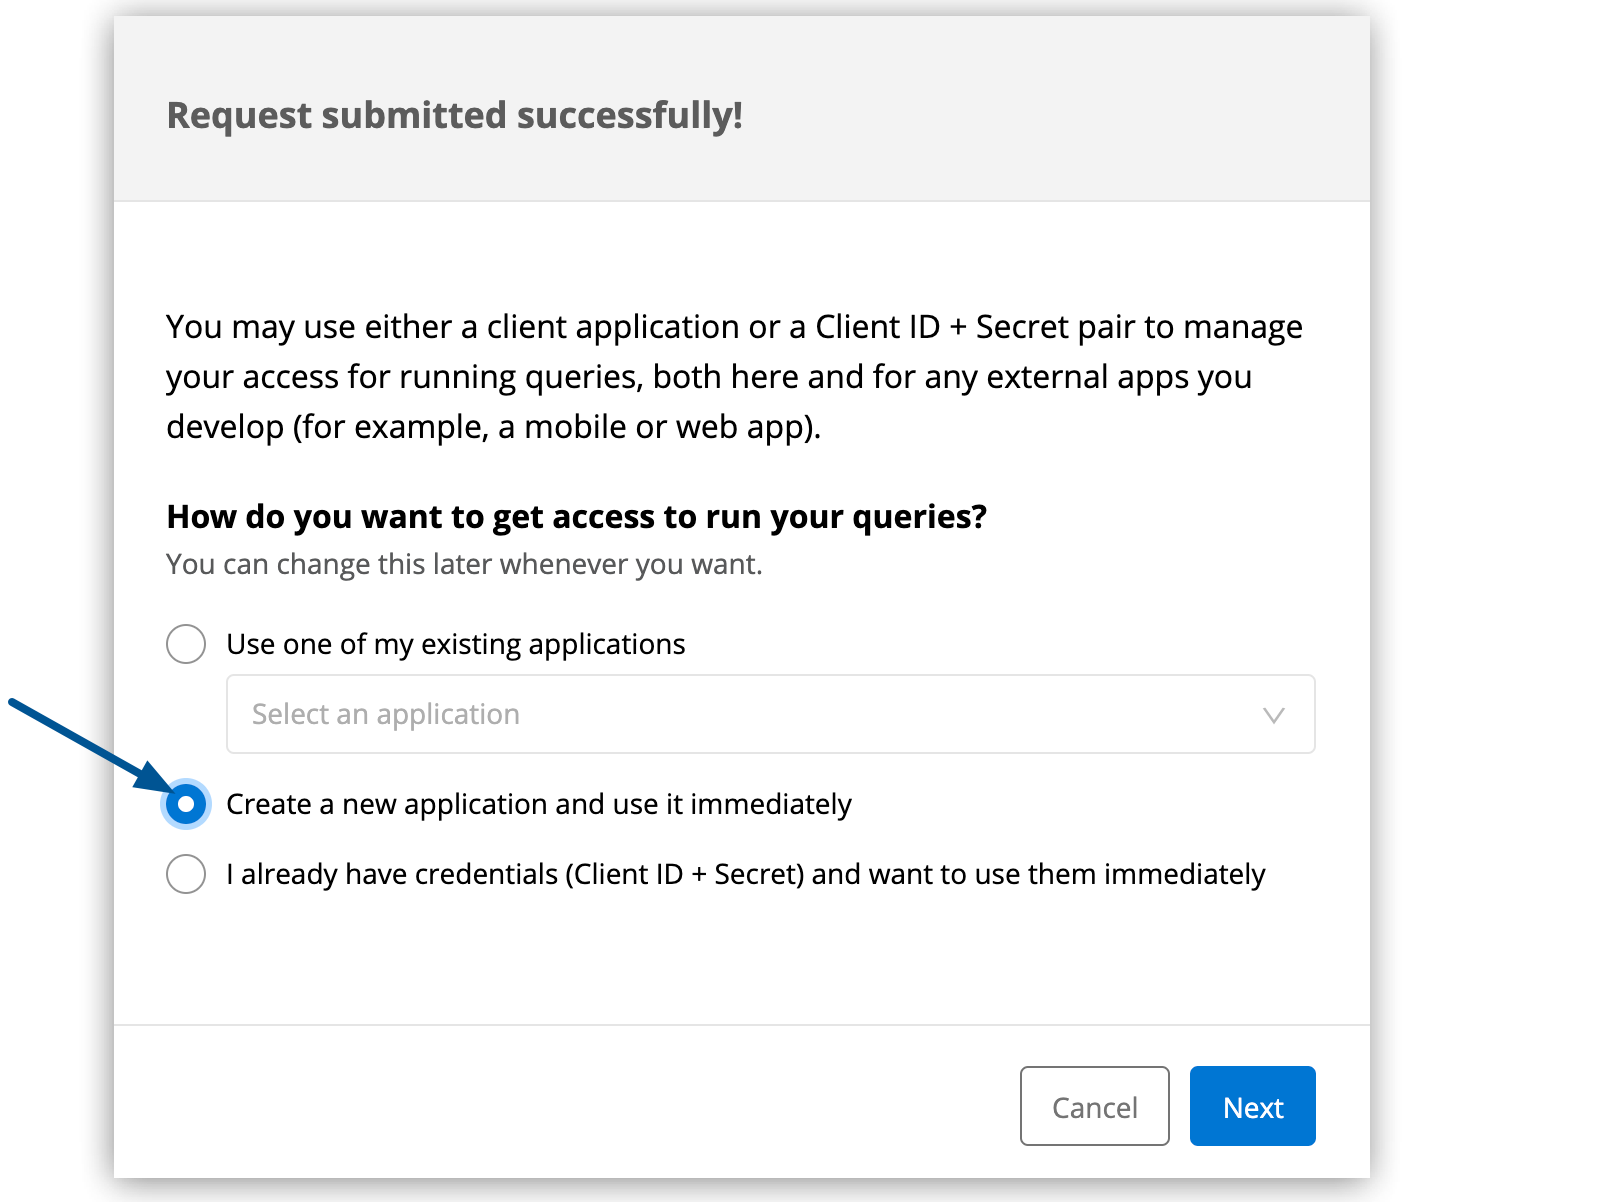
Click Run Operation.
-
Select an access method. For this example, select Create a new application and use it immediately.
-
Click Next.
-
In the Create a new application window, complete the fields, then click Next:
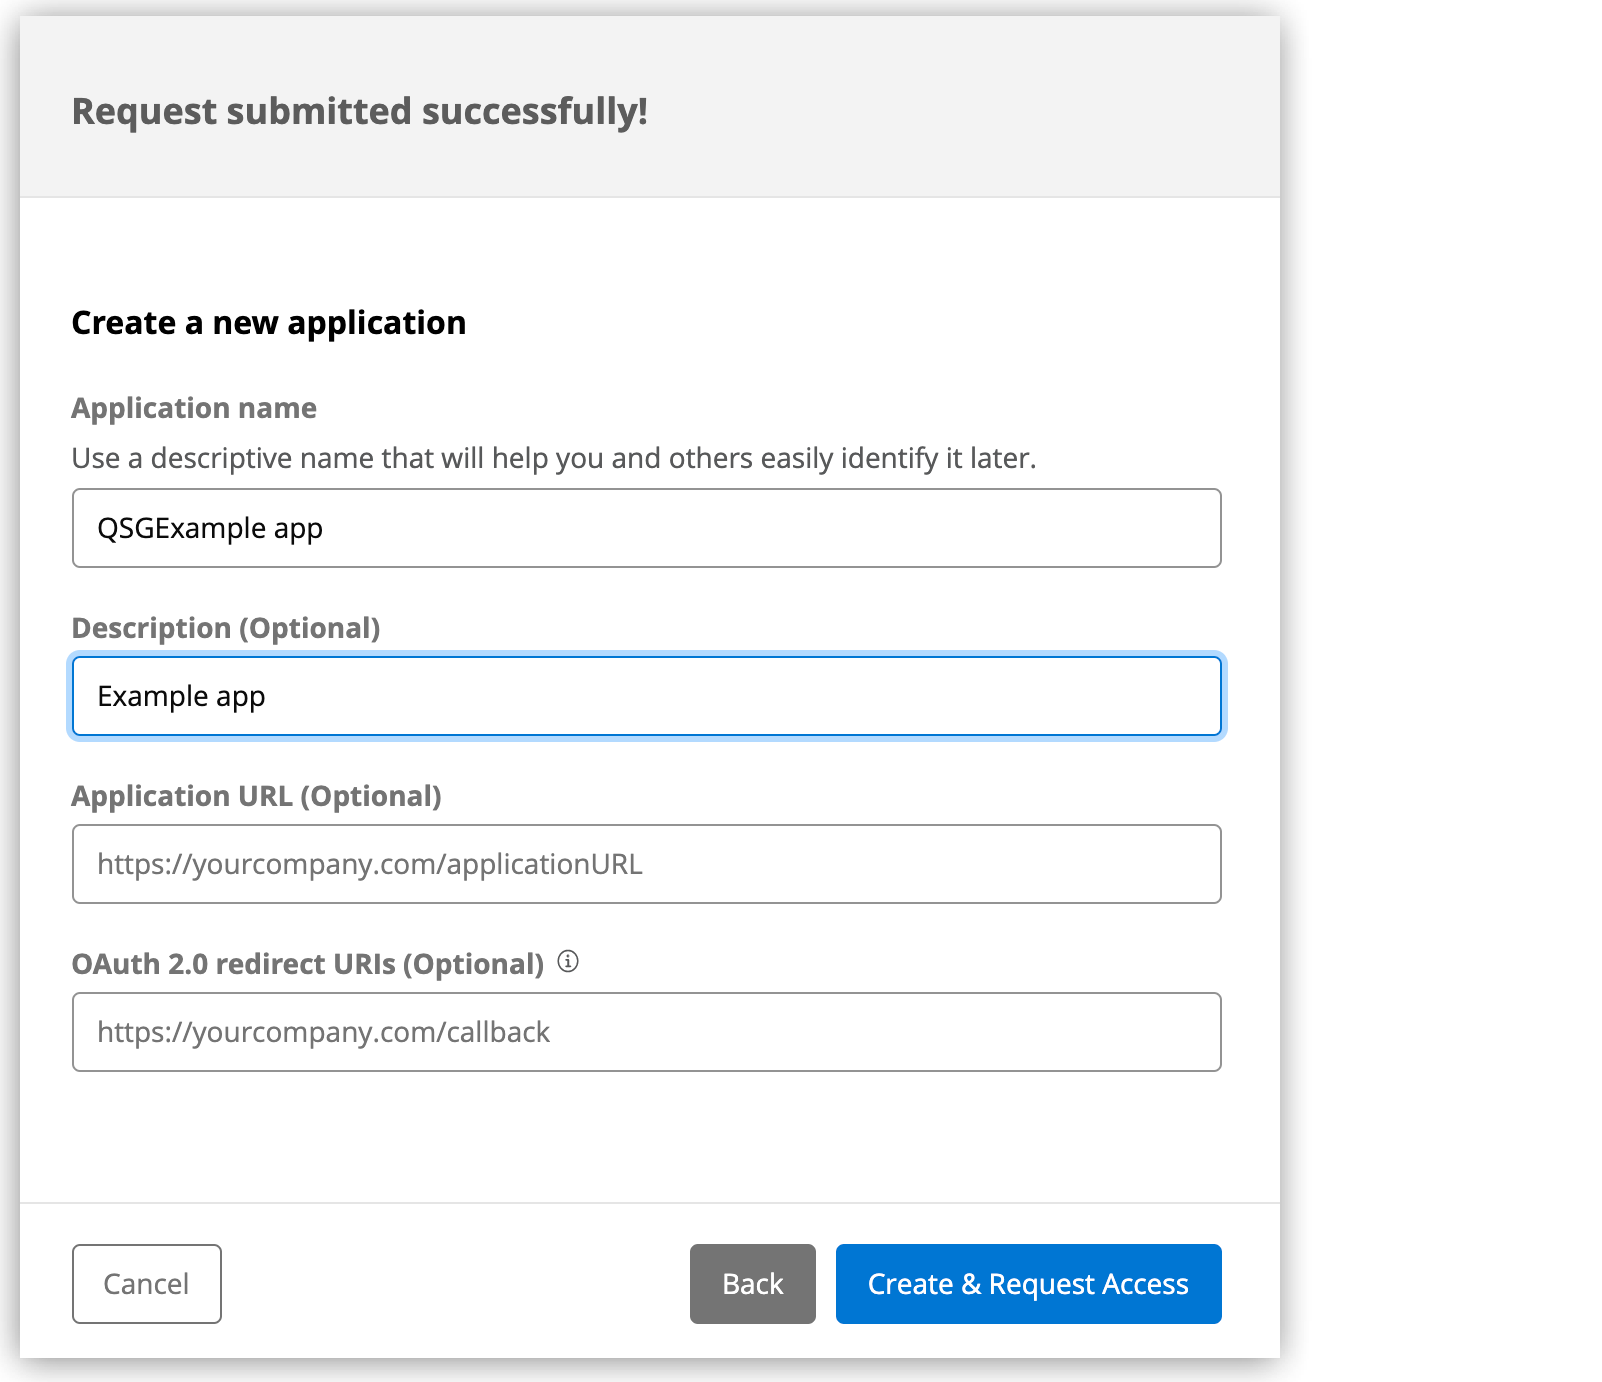
-
Click Create & Request Access.
Explore the Unified Schema
-
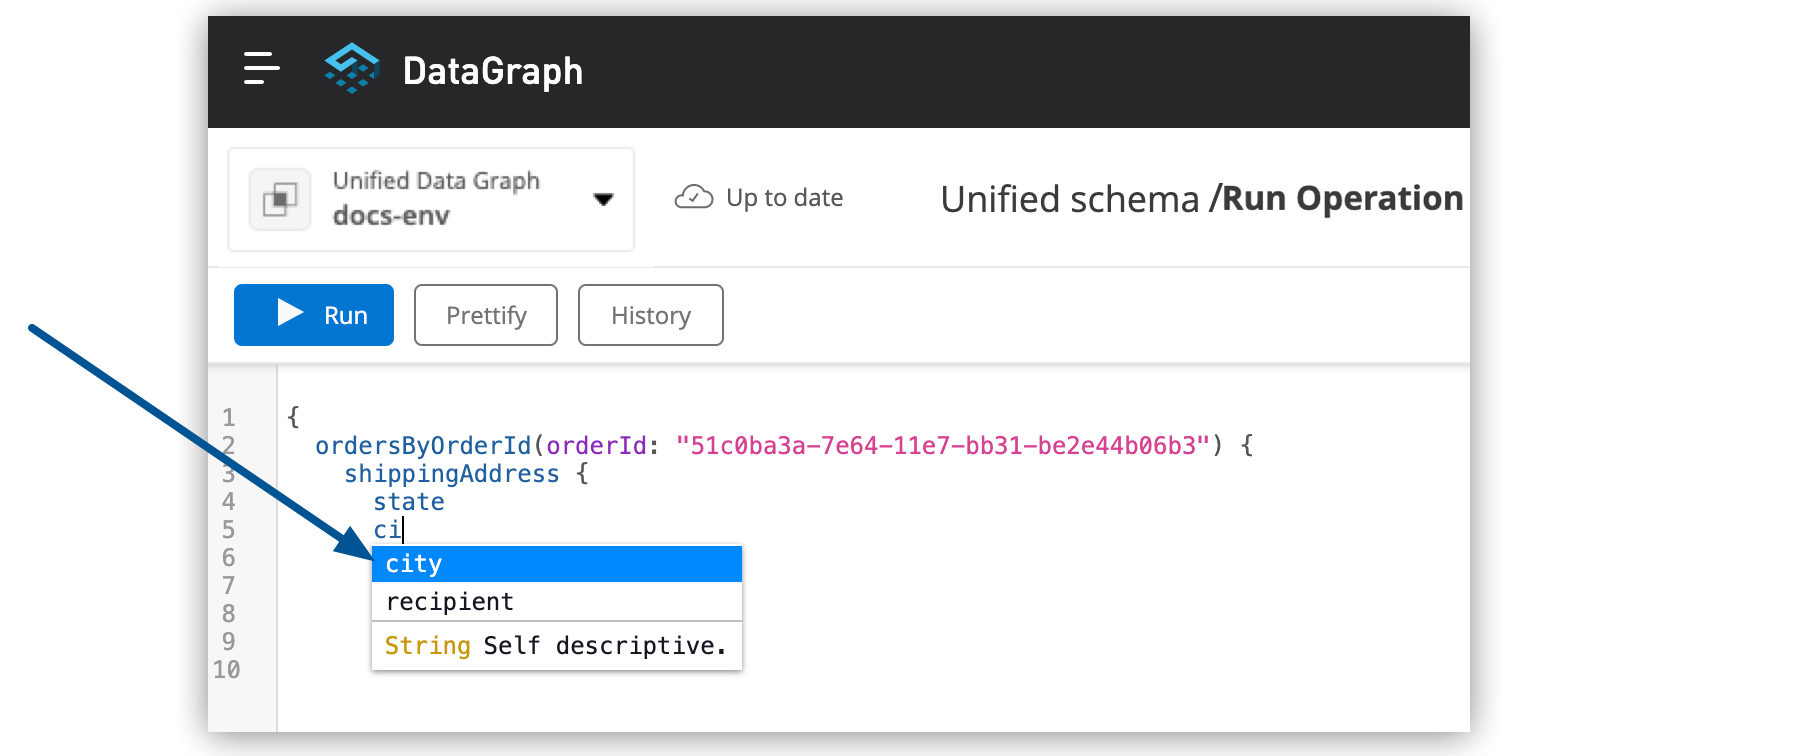
Before writing your mutation and query, take a moment to orient yourself to the unified schema. Click Explore Schema.
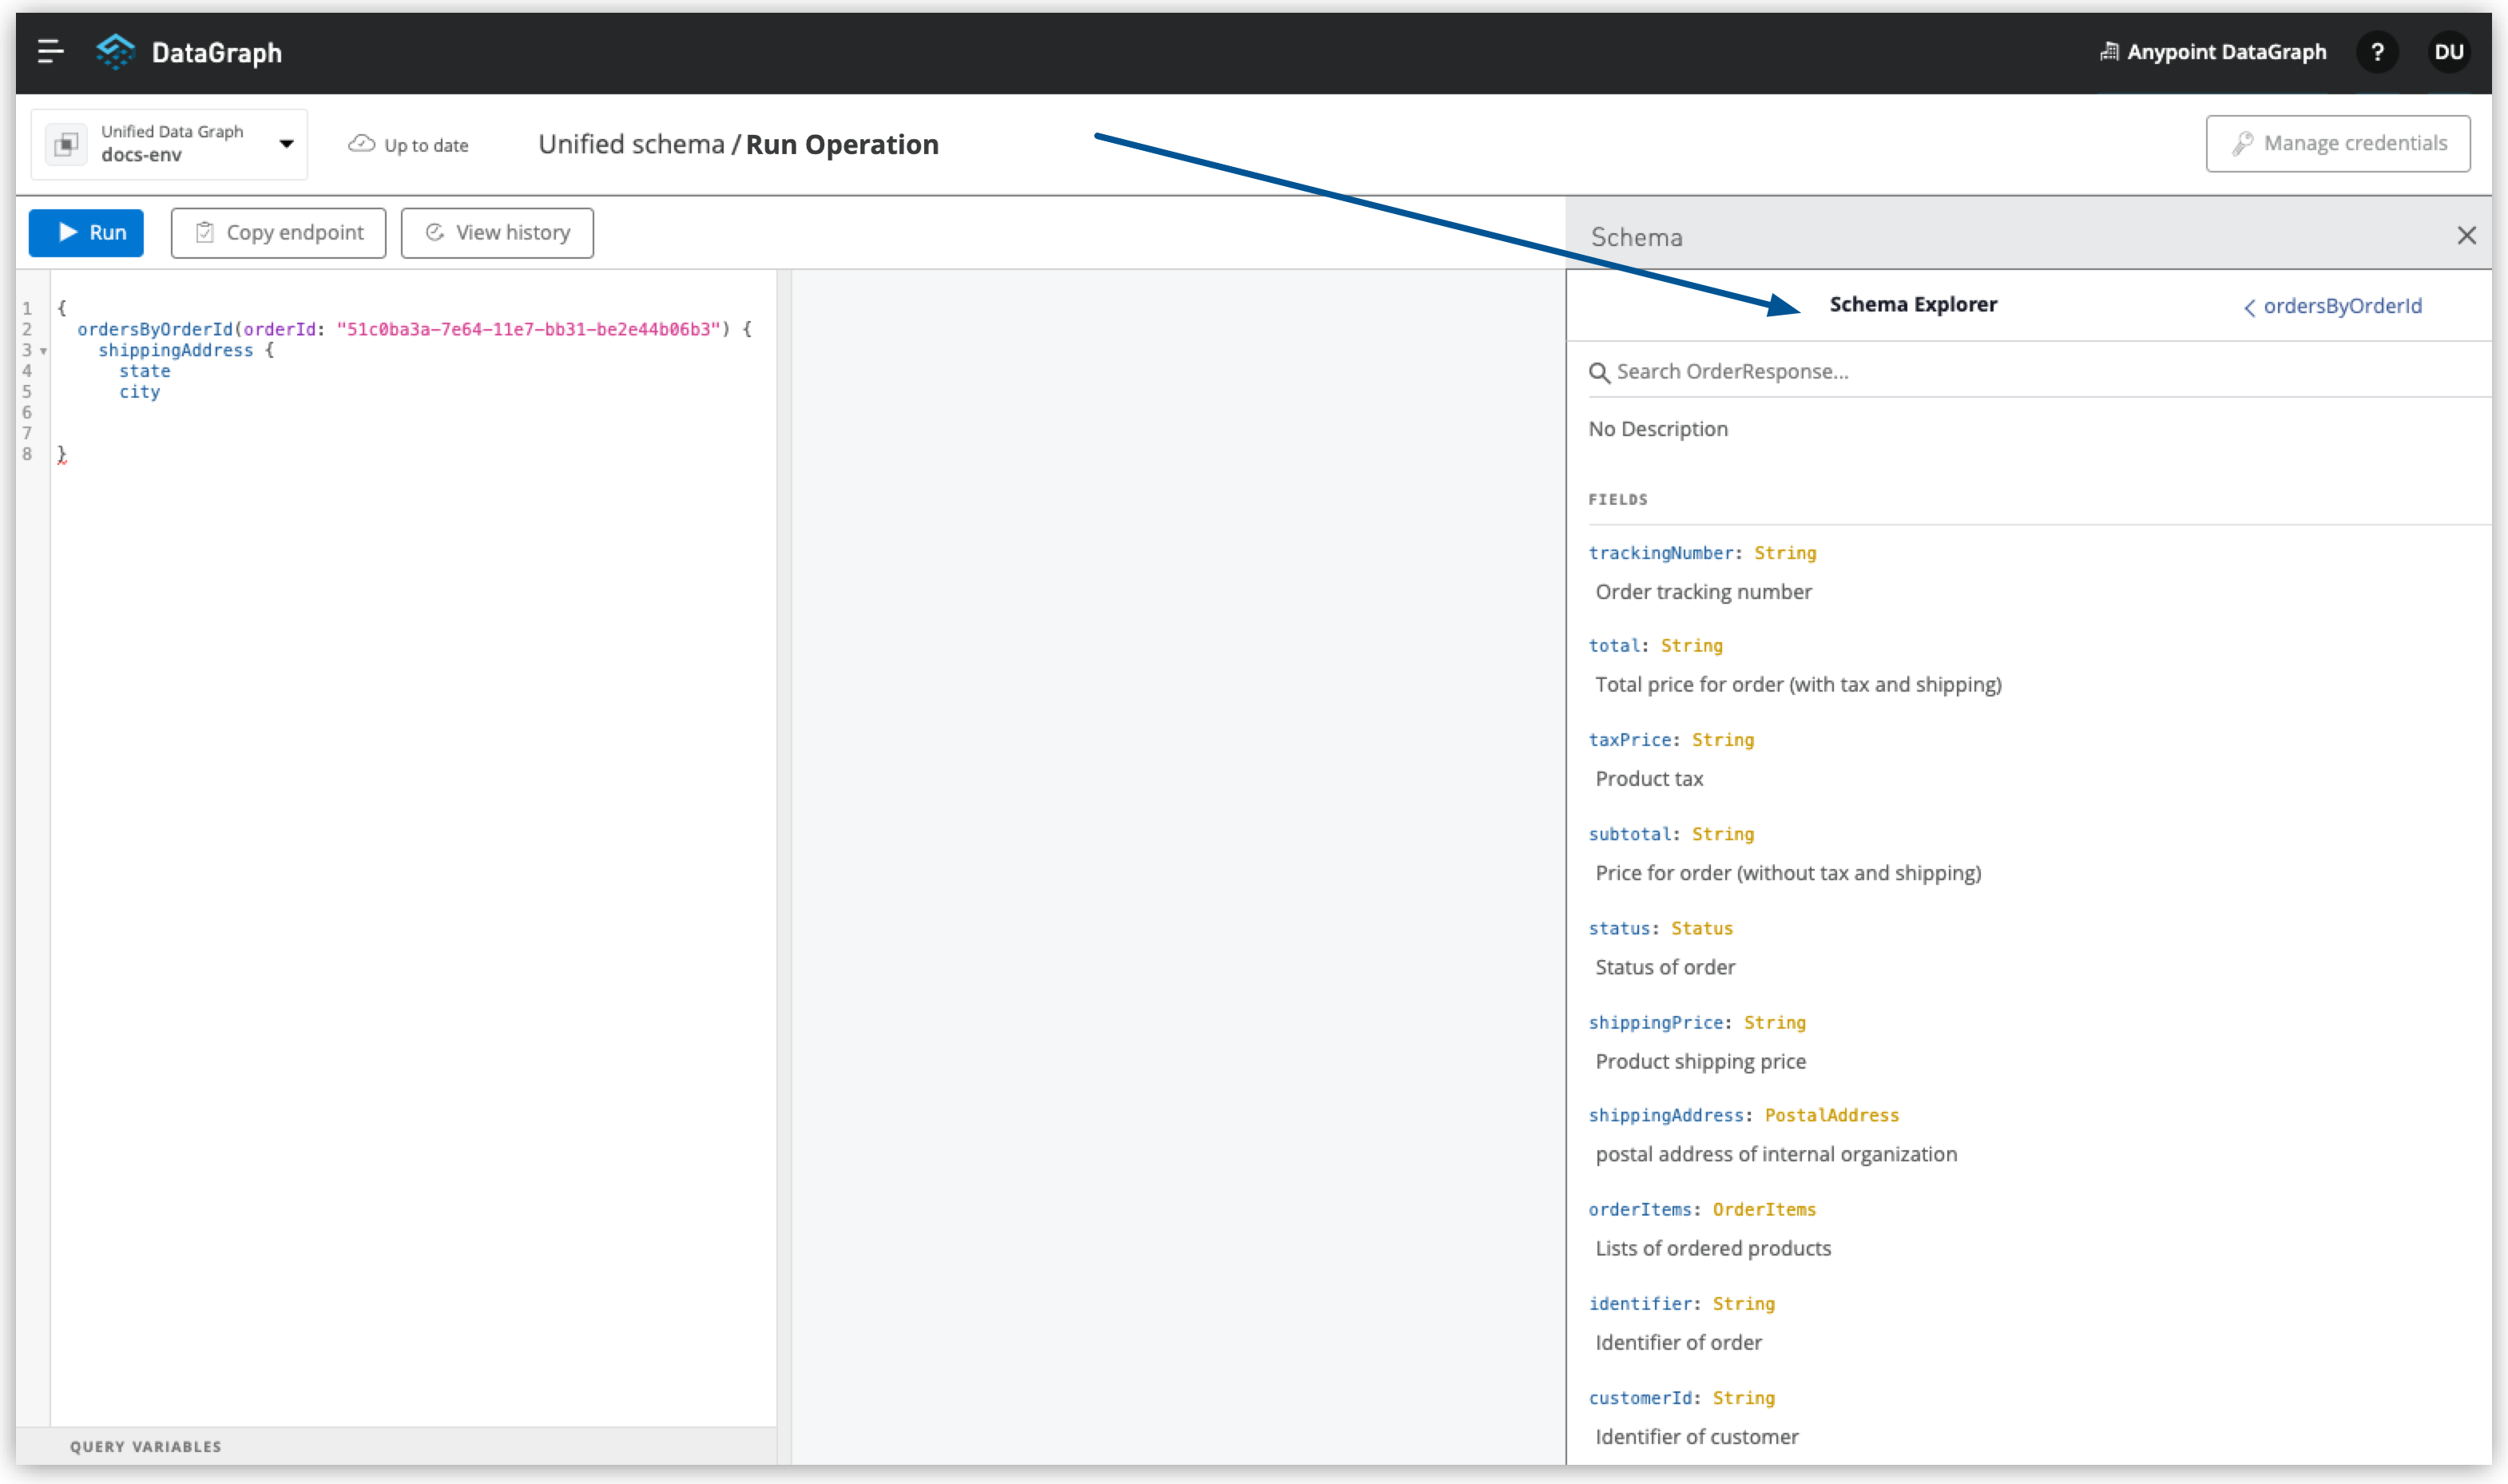
Here you can explore the documentation of the unified schema, which is also available through autocompletion as you write your query:
Write A Mutation
Mutations are operations you use to add, update, and delete data objects. In GraphQL, mutation operations represent the POST, PATCH, PUT, DELETE, and HTTP methods that you’ve defined in your REST API specification.
-
Add the following example mutation:
mutation { createOrdersCustomerByCustomerId( customerId: "1964401a-a8b3-40c1-b86e-d8b9f75b5842", input: { customerId: "1964401a-a8b3-40c1-b86e-d8b9f75b5842", subtotal: "100.21", taxPrice: "15.22", shippingPrice: "10.00", total: "125.43", orderItems: { shipmentItems: [{ orderItemId: "fc3d4900-c5ac-4649-8bc8-cbbef4fe8fde" productId: "e1c515f9-102d-4830-b353-18fe48065732" productName: "Uniforms Modern Fit Short Sleeve Polo Shirt" location: { locationId: "1c9a20dc-c585-42fd-ac1a-1216085b76d2" deliveryMethod: SHIPMENT locationType: PARTNER } price: "50" quantity: 1 }] pickupItems: [{ orderItemId: "88668866-2c6d-4fa6-9e17-4b2c42e0f051", productId: "eb8c8ca7-3c42-4489-a820-3aa138430b75", productName: "Smart Slim Micro Stripe Shirt", location: { locationId: "1c9a20dc-c585-42fd-ac1a-1216085b76d2", deliveryMethod: PICKUP, locationType: STORE }, price: "50", quantity: 1 }], }, shippingAddress: { address: "Street 123", city: "San Francisco", postalCode: "94210", state: "CA", country: "US" }, }) { identifier message } } -
Click Run.
DataGraph returns a result that indicates you’ve created a new order:

Write a Query
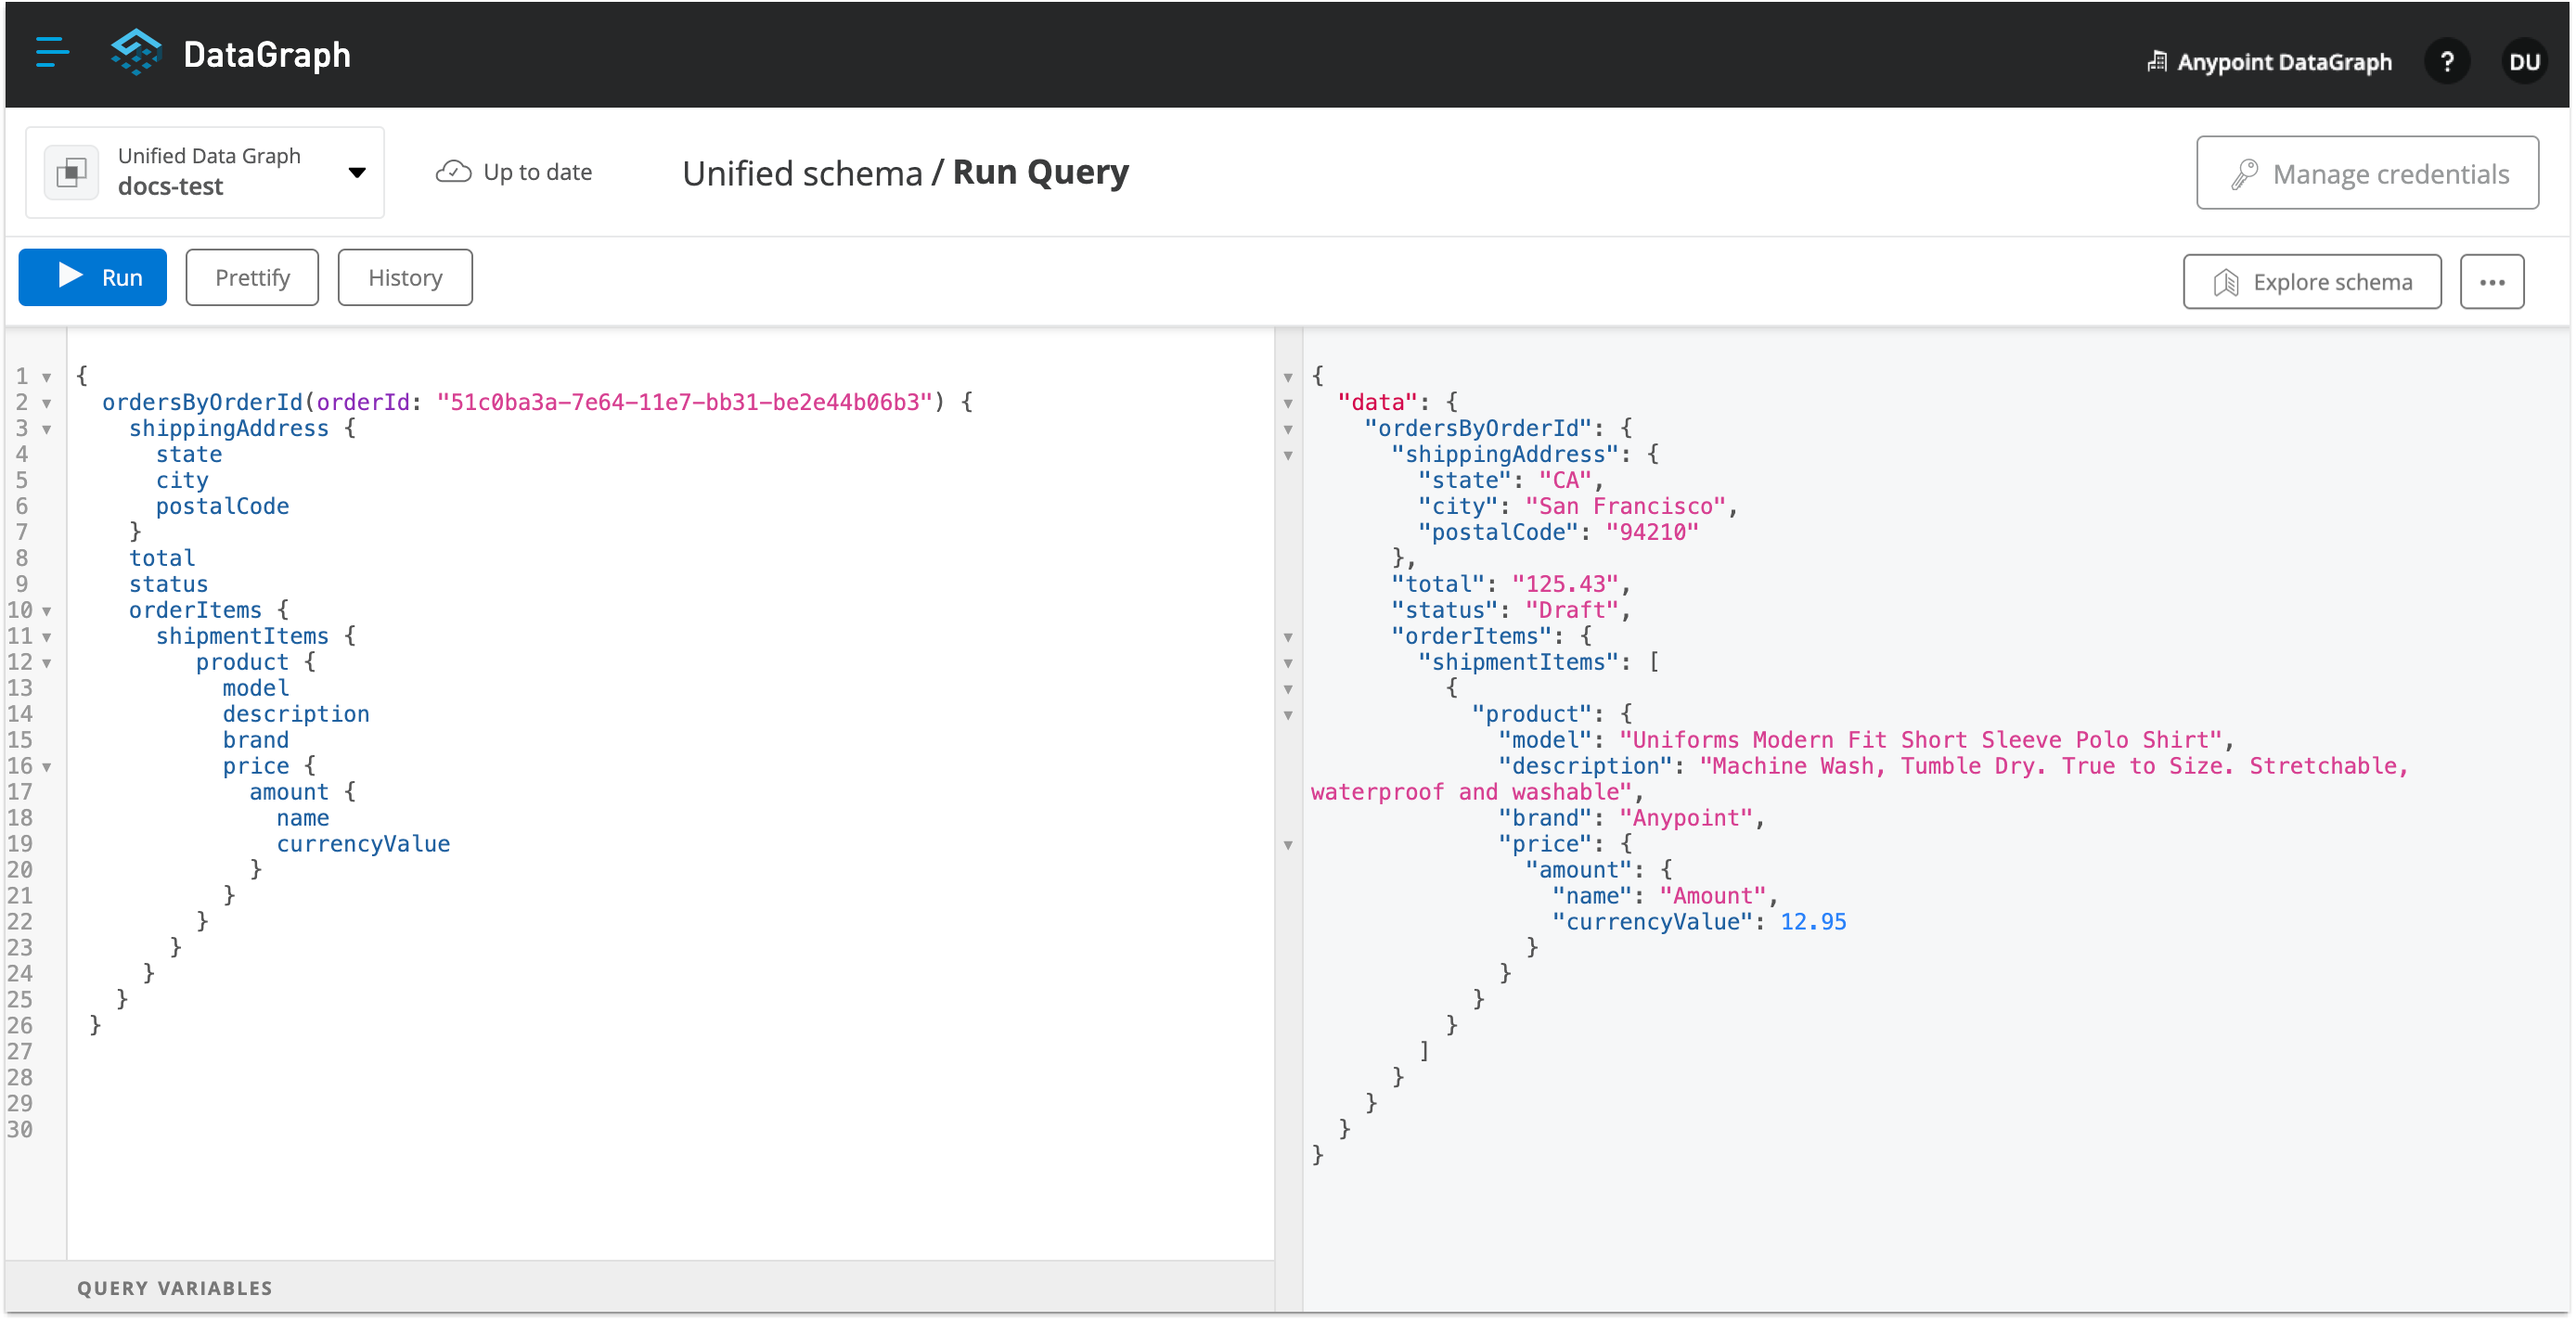
Now you can write a query to retrieve specific information about the order you created. In this case, you can get details about the shipmentItems:
-
When you’re ready, add the following example query:
{
  ordersByOrderId(orderId: "51c0ba3a-7e64-11e7-bb31-be2e44b06b34") {
    shippingAddress {
      state
      city
      postalCode
    }
    total
    status
    orderItems {
      shipmentItems {
         product {
           model
           description
           brand
           price {
             amount {
               name
               currencyValue
             }
           }
         }
       }
     }
   }
 }
Notice that with this one query, you get results from two different APIs:
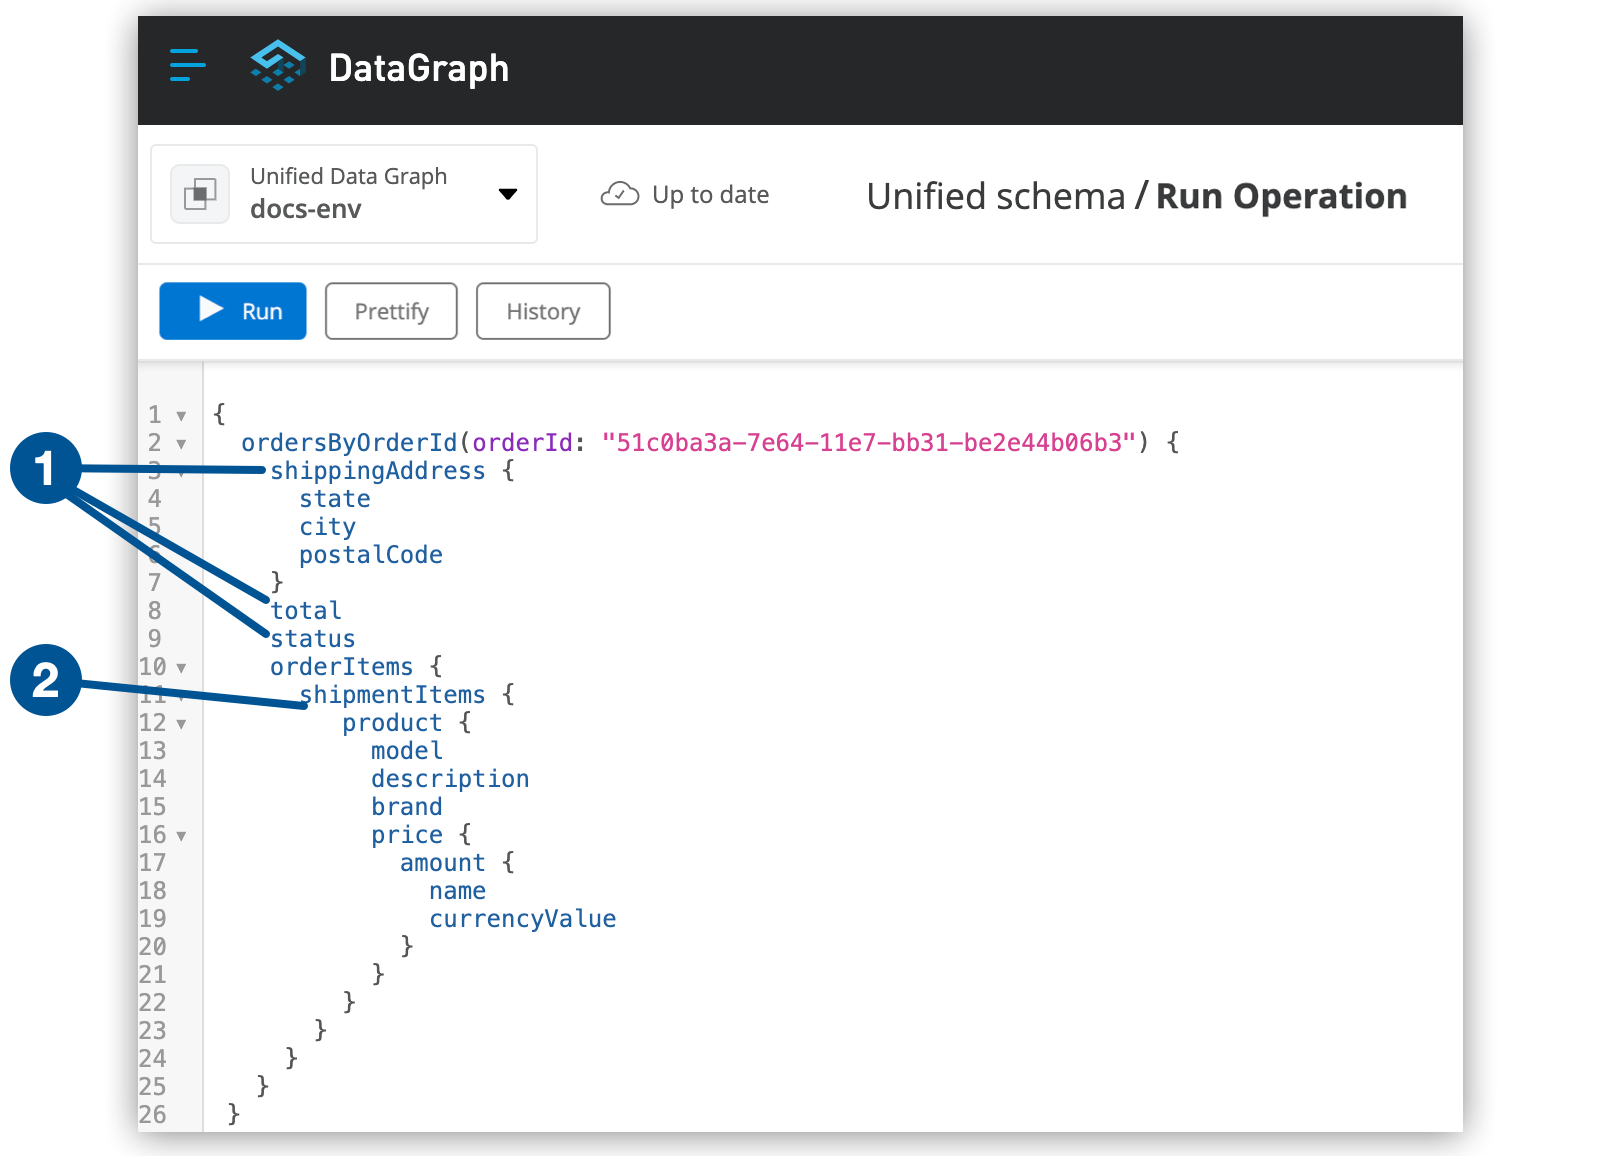
| 1 | shippingAddress, total, and status information is returned from the Catalyst Order API |
| 2 | product details is returned as part of the shipmentItems information from the Catalyst Product API
This is the fundamental utility of Anypoint DataGraph: the ability to query multiple APIs in a single request to get only the information you want. |
-
To run the query without query tracing, click Run:
-
To run the query with query tracing, from the actions menu (…), select Trace Query, and then click Run.
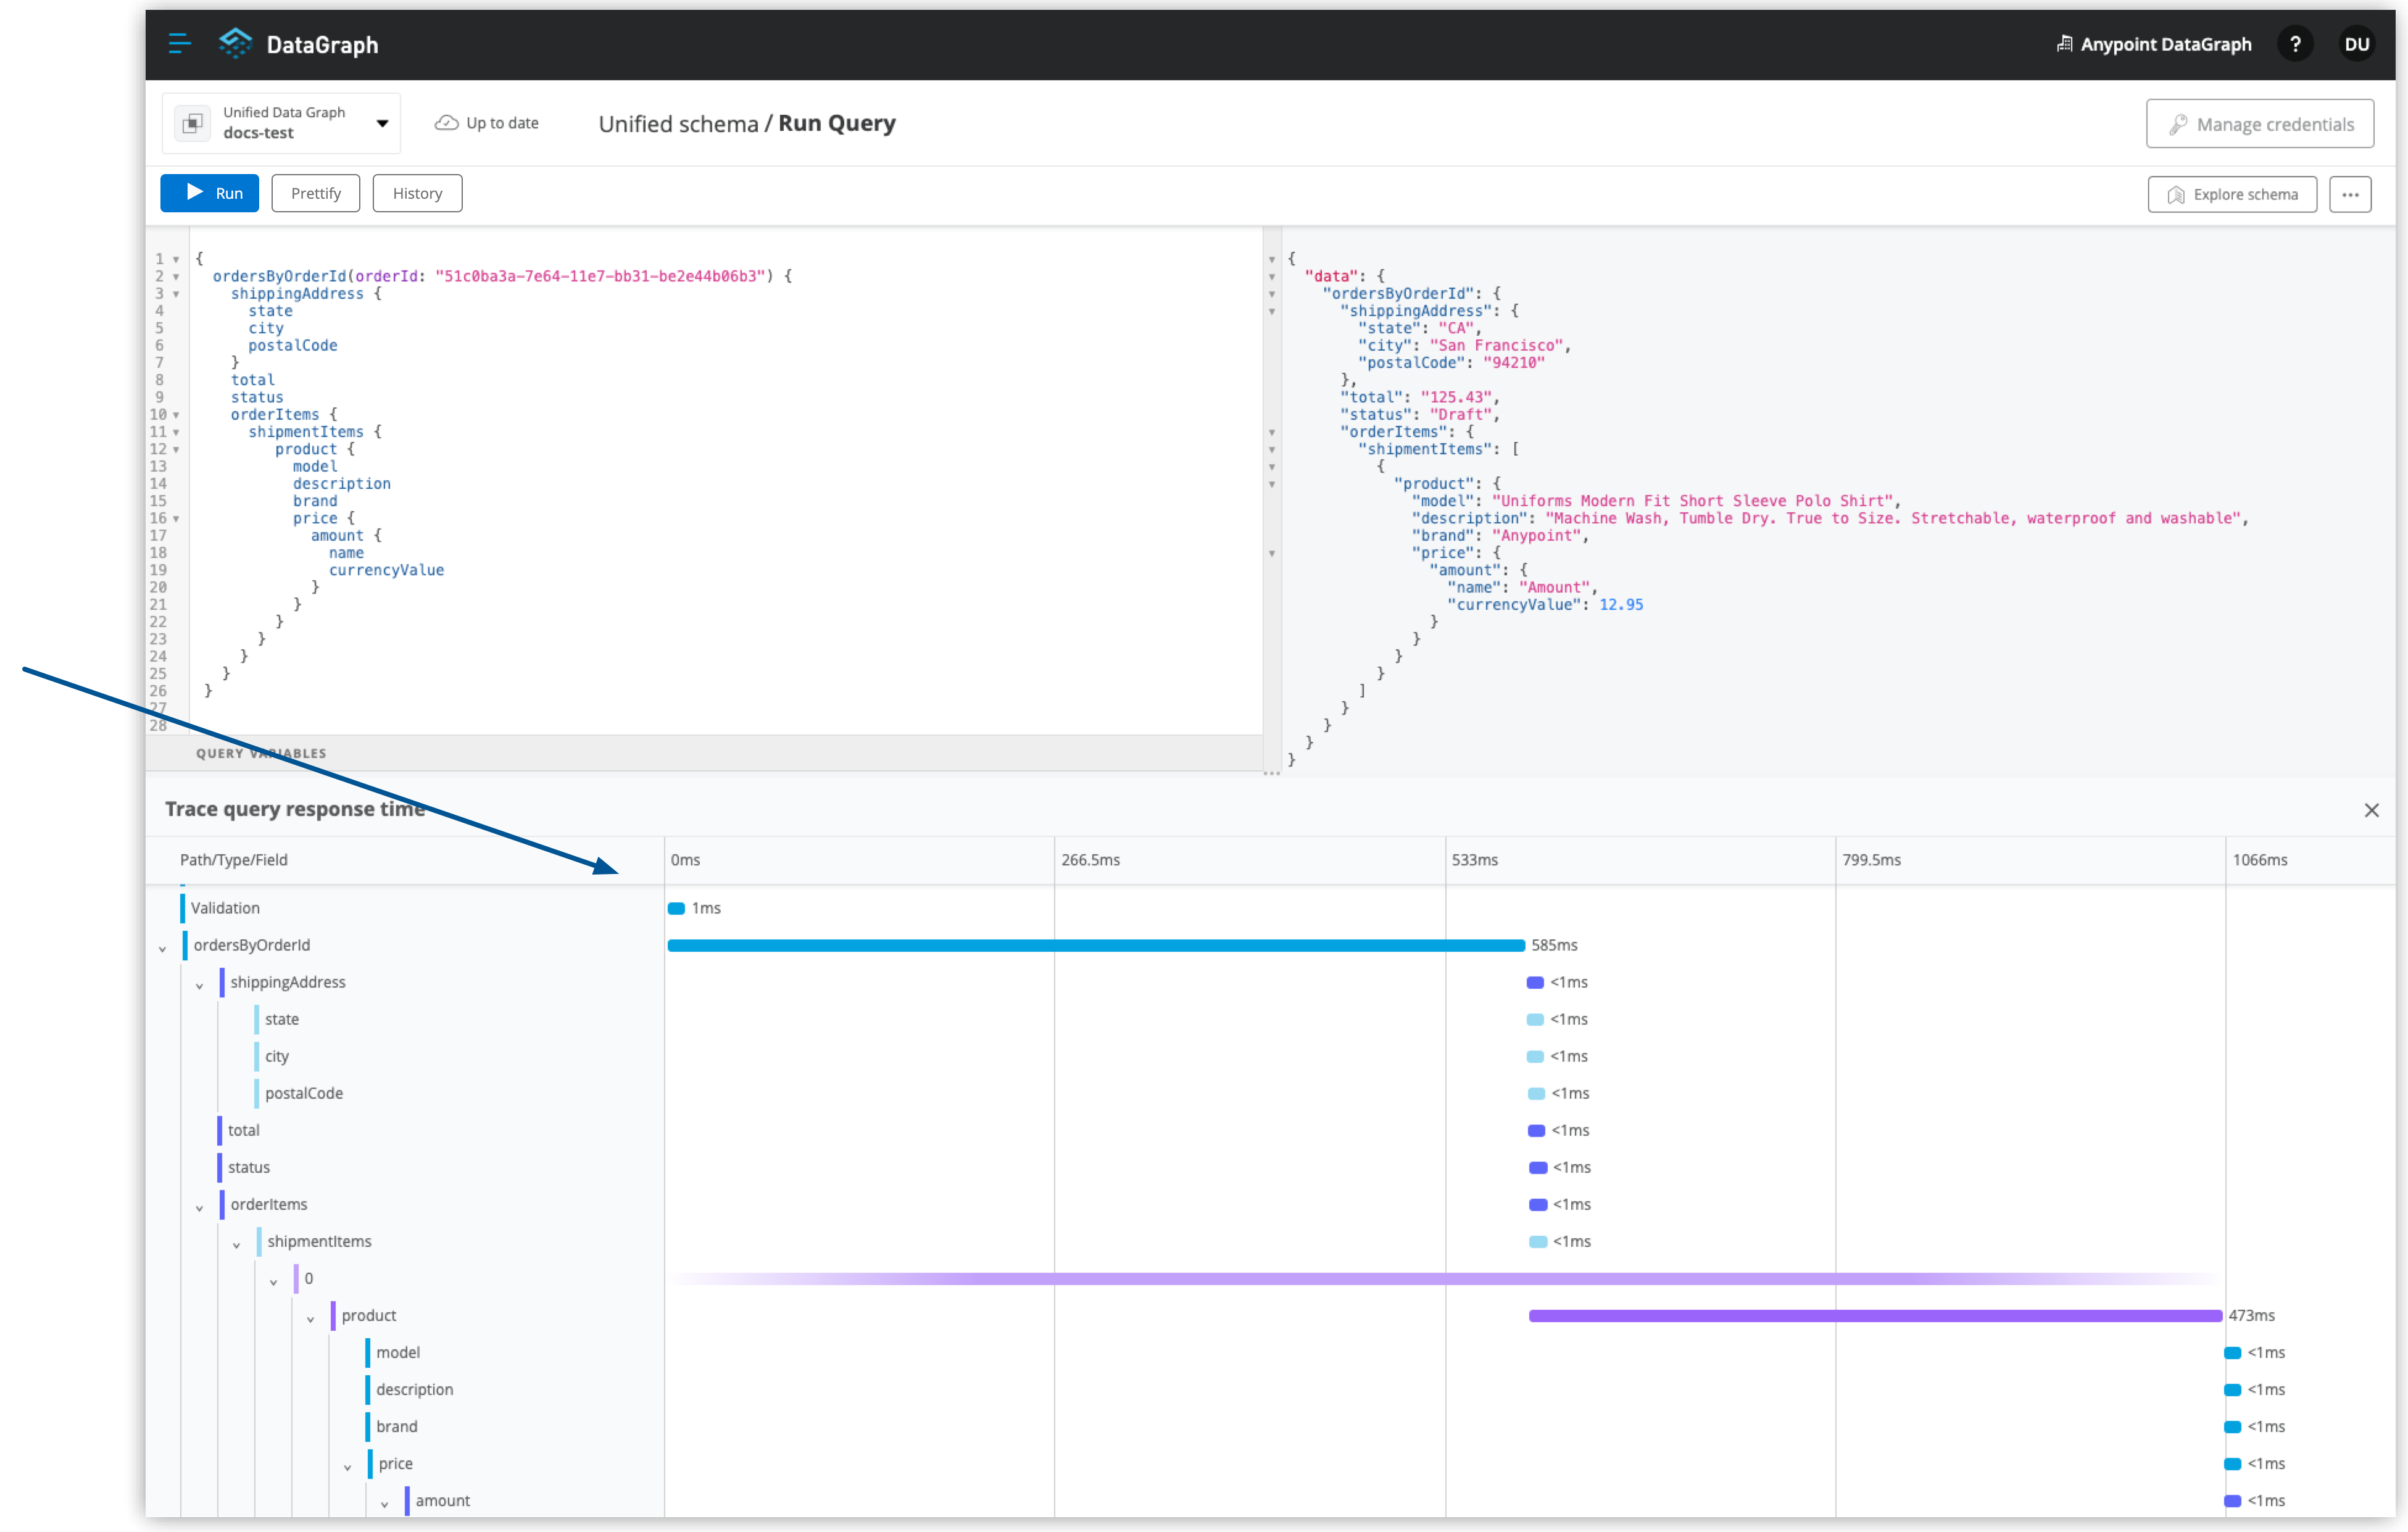
Trace results for Anypoint DataGraph provide the following information:
-
Time taken by Anypoint DataGraph to parse and validate the query
-
Total response time for the entire query
-
Duration of requests to each source API in the query
-
-
To see logs associated with the query, from the actions menu (…), click View Response Logs.

Log levels for Anypoint DataGraph include DEBUG, INFO, WARN, and ERROR.
You can view these same logs in Anypoint Monitoring (Anypoint Integration Advanced package or Titanium subscriptions only) , or use advanced search to find logs for a specific date, time, and priority.
-
Click View History to access this same query (or others) later.
-
To copy the query and the automatically generated endpoint, from the actions menu (…), click Copy & Share Endpoint.
Use the copy-to-clipboard icons to copy the query as a cURL snippet or as a GraphQL query. You can also copy any authentication values, request headers, or variables used in the query.