Search Pattern
The Search Pattern Action Step searches for one or more patterns within a defined Search Area on the screen.
Patterns can be taken directly from a screenshot or from the Workflow's Pattern Gallery. All patterns for a Workflow are saved in the Pattern Gallery.
The search algorithm is fast and stable. Search results can be reused in subsequent Action Steps, for example as a reference point for mouse clicks.
Various aspects of the search are configurable. You may choose to search for one of more patterns, decide whether an image may appear in the search area or not, and exclude patterns containing the pattern being searched for within them from the search. A tolerance for deviations between the pattern found and the pattern being searched for may also be set. It is possible to monitor that the position or existence of the image does not change within a defined period.
The search can be tested prior to executing the Workflow. An evaluation window shows possible matches and provides information about how search results could be improved.
Properties
-
Image Processing
-
Allow multiple matches of a found pattern
If this option is selected, the pattern may appear more than once in the Search Area. When this option is not selected, the Search Pattern Action Step returns an error if the pattern is found but occurs more than once. In the wizard this option is listed under Search Settings as Allow multiple matches of a found pattern.
If the coordinates of the pattern found are to be reused subsequently in a different Action Step (e.g. for mouse clicks relative to pattern), the coordinates used in the case of multiple identical patterns found will be the ones for the pattern furthest to the left within the Search Area. If multiple identical search images are located on top of each other in the same position on the left, the topmost image will be selected.
-
Hide mouse
Moves the cursor during the search to the upper left corner of the screen to the position with the coordinates x=0 and y=0. By this way unwanted mouse hover effects can be avoided. Independently of this setting the cursor is not included in the search. So also search patterns covered by the cursor symbol are found. After the search the cursor is set back to its original position.
-
Margin for automatic search area [pixel]
Number of pixels around a found pattern for defining the search area automatically. Valid values are between 0 and 999; the default-value is 100.
-
Neighborhood Pixel
Indicates the number of pixels by which the position of a pixel found may differ from the specified position. The default value for this setting is 1.
It is easier to search for similar images if the value is greater than 1, which means the images are not 100% identical based on pixels. The percentage score may vary by some percentage values depending on position though.
-
Original Desktop Size
Screen resolution at the time the image search was last tested. This size is required in order to scale the Search Area (but not the Search Pattern) if the Workflow is used on a device with a different screen resolution.
-
Pattern Steady check
Enables the option Wait For Pattern Steady Timeout and checks whether the coordinates of the pattern found change again within this time period. If not, the search is successful and ends; otherwise the search is repeated.
-
Reduce Score By [%]
When testing the Search Pattern settings, matches by this percentage below the Score are also shown. These are marked yellow in the test result window.
In the wizard, this setting shows under Search Settings and appears as a yellow zone on the Required matching precision (%) slider.
-
Score [%]
Indicates the accuracy in percent by which the pattern found must match the specified pattern in order to be considered found. In the wizard, this setting is labeled Required matching precision (%) under Search Settings and appears as a green zone on a slider.
-
Search Mode
-
Match all patterns
The search is successful if all of the specified patterns are found.
-
Match only one pattern The search is successful if exactly one of the specified patterns is found.
-
Match one or more patterns
The search is successful if at least one of the specified patterns is found.
-
-
Wait for Pattern Steady Timeout [ms]
If the option Pattern steady check is selected, a check for whether the pattern found is still in the same position, or whether it still does not appear in the Search Area, is performed according to the interval value entered here (or in the wizard under Search Settings > Check whether found match stays in same location every [time in ms] milliseconds). If this is the case, the search is successful and ends. Otherwise, the search is repeated either until it is successful or the Action Step times out. A value of 0 means that the position of the pattern found is not rechecked after having been found. The Action Step does not then wait beyond its runtime.
-
Inbound Variables
-
Find Coordinate
If there is at least one other Action Step that uses patterns before the Action Step Search Pattern, the outbound variable Find coordinate becomes the inbound variable for the subsequent Action Steps.
Outbound Variables
-
Find Coordinate
Topnleft corner of the pattern that has been found successfully. If a search is made for multiple patterns and they are found, the coordinates returned are of the image on the far left of the series of patterns being searched for as specified in the wizard. If multiple identical patterns are found in the same position on the far left of the Search Area, the topmost one is used for the coordinates.
-
Found Pattern Name
The name of the matched pattern as entered in the Pattern Gallery.
-
Found Matched Pattern Count
Number of found search patterns from the Regular category. The number of matches can consist of matches for different patterns. Matches of patterns of the category Ignore and Exclude are not counted.
The Found Matched Pattern Count is 0 if Search Pattern returns an error, even if matches for patterns of the Regular category are found.
Wizard
The Search Pattern Wizard enables you to select Search Patterns and the key search settings.
Pattern Strip is a UI module that consists of a list of Search Patterns, their associated options, and a menu bar. See The Pattern Strip Module for a description of the module’s functionality and all available pattern operations.
Click OK to confirm the configuration settings or Cancel as applicable. The Test button evaluates the search and displays the results in the Search Results window.
Regular Patterns
This section lists patterns that are to be found. The number of patterns that you can exclude is limited to 25.
There are three ways of searching for patterns:
-
Match only one pattern
The search is successful if exactly one of the selected patterns is found in the Search Area. An error is returned if none or a number of the selected patterns are found.
-
Match one or more patterns
The search is successful if at least one of the selected patterns is found in the Search Area. An error is returned if none of the selected patterns are found.
-
Match all patterns
The search is successful if all of the selected patterns are found in the Search Area. An error is returned if none or not all of the selected patterns are found.
If a pattern appears multiple times, a successful search will occur as above if Allow multiple matches of a found pattern is enabled in the Search Settings. The Action Step will otherwise return an error if the same pattern appears multiple times.
Chose a pattern from the Pattern Gallery or create a new one by using the Capture button.
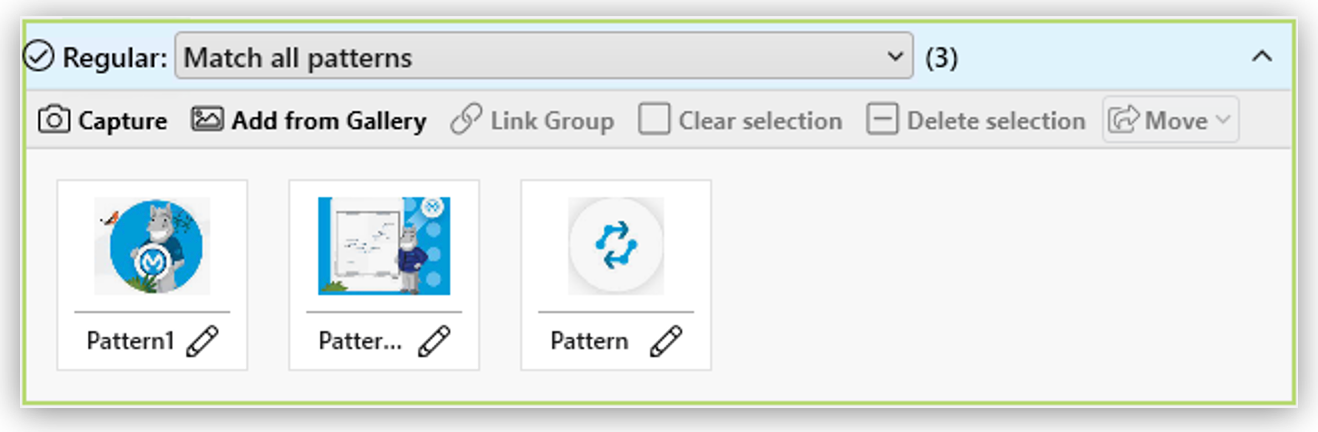
Click to select one or multiple patterns and delete or move them as a group. When a pattern is selected, a white tick will appear on a green background in the top right corner. To undo the selection, click the Clear Selection button. A vertical black line indicates where the pattern can be moved to using drag and drop. If Match one or more patterns is selected, the first pattern in the list will have a blue border. This image can be used as a reference point for other Action Steps as the Workflow progresses (see Other Uses of Matched Patterns).
Capture Pattern
One way of defining a pattern is to take a screenshot that shows it.
All patterns captured using the Search Pattern Action Step are transferred to the Workflow's Pattern Gallery.
For a complete description of the Capture Pattern functionality, see Adding a Pattern from Screen Capture.
Add Pattern from Gallery
If the Pattern Gallery for the Workflow already contains patterns, they can be added to the list of patterns for the Action Step using the Add from Gallery button.
The Add from Gallery window shows all the images that the Workflow's Pattern Gallery contains, categorized into the Available Groups. A white tick on a blue background in the top right corner indicates patterns which are already included in the Search Pattern Action Step. Patterns already included in another category of the same Action Step do not show.
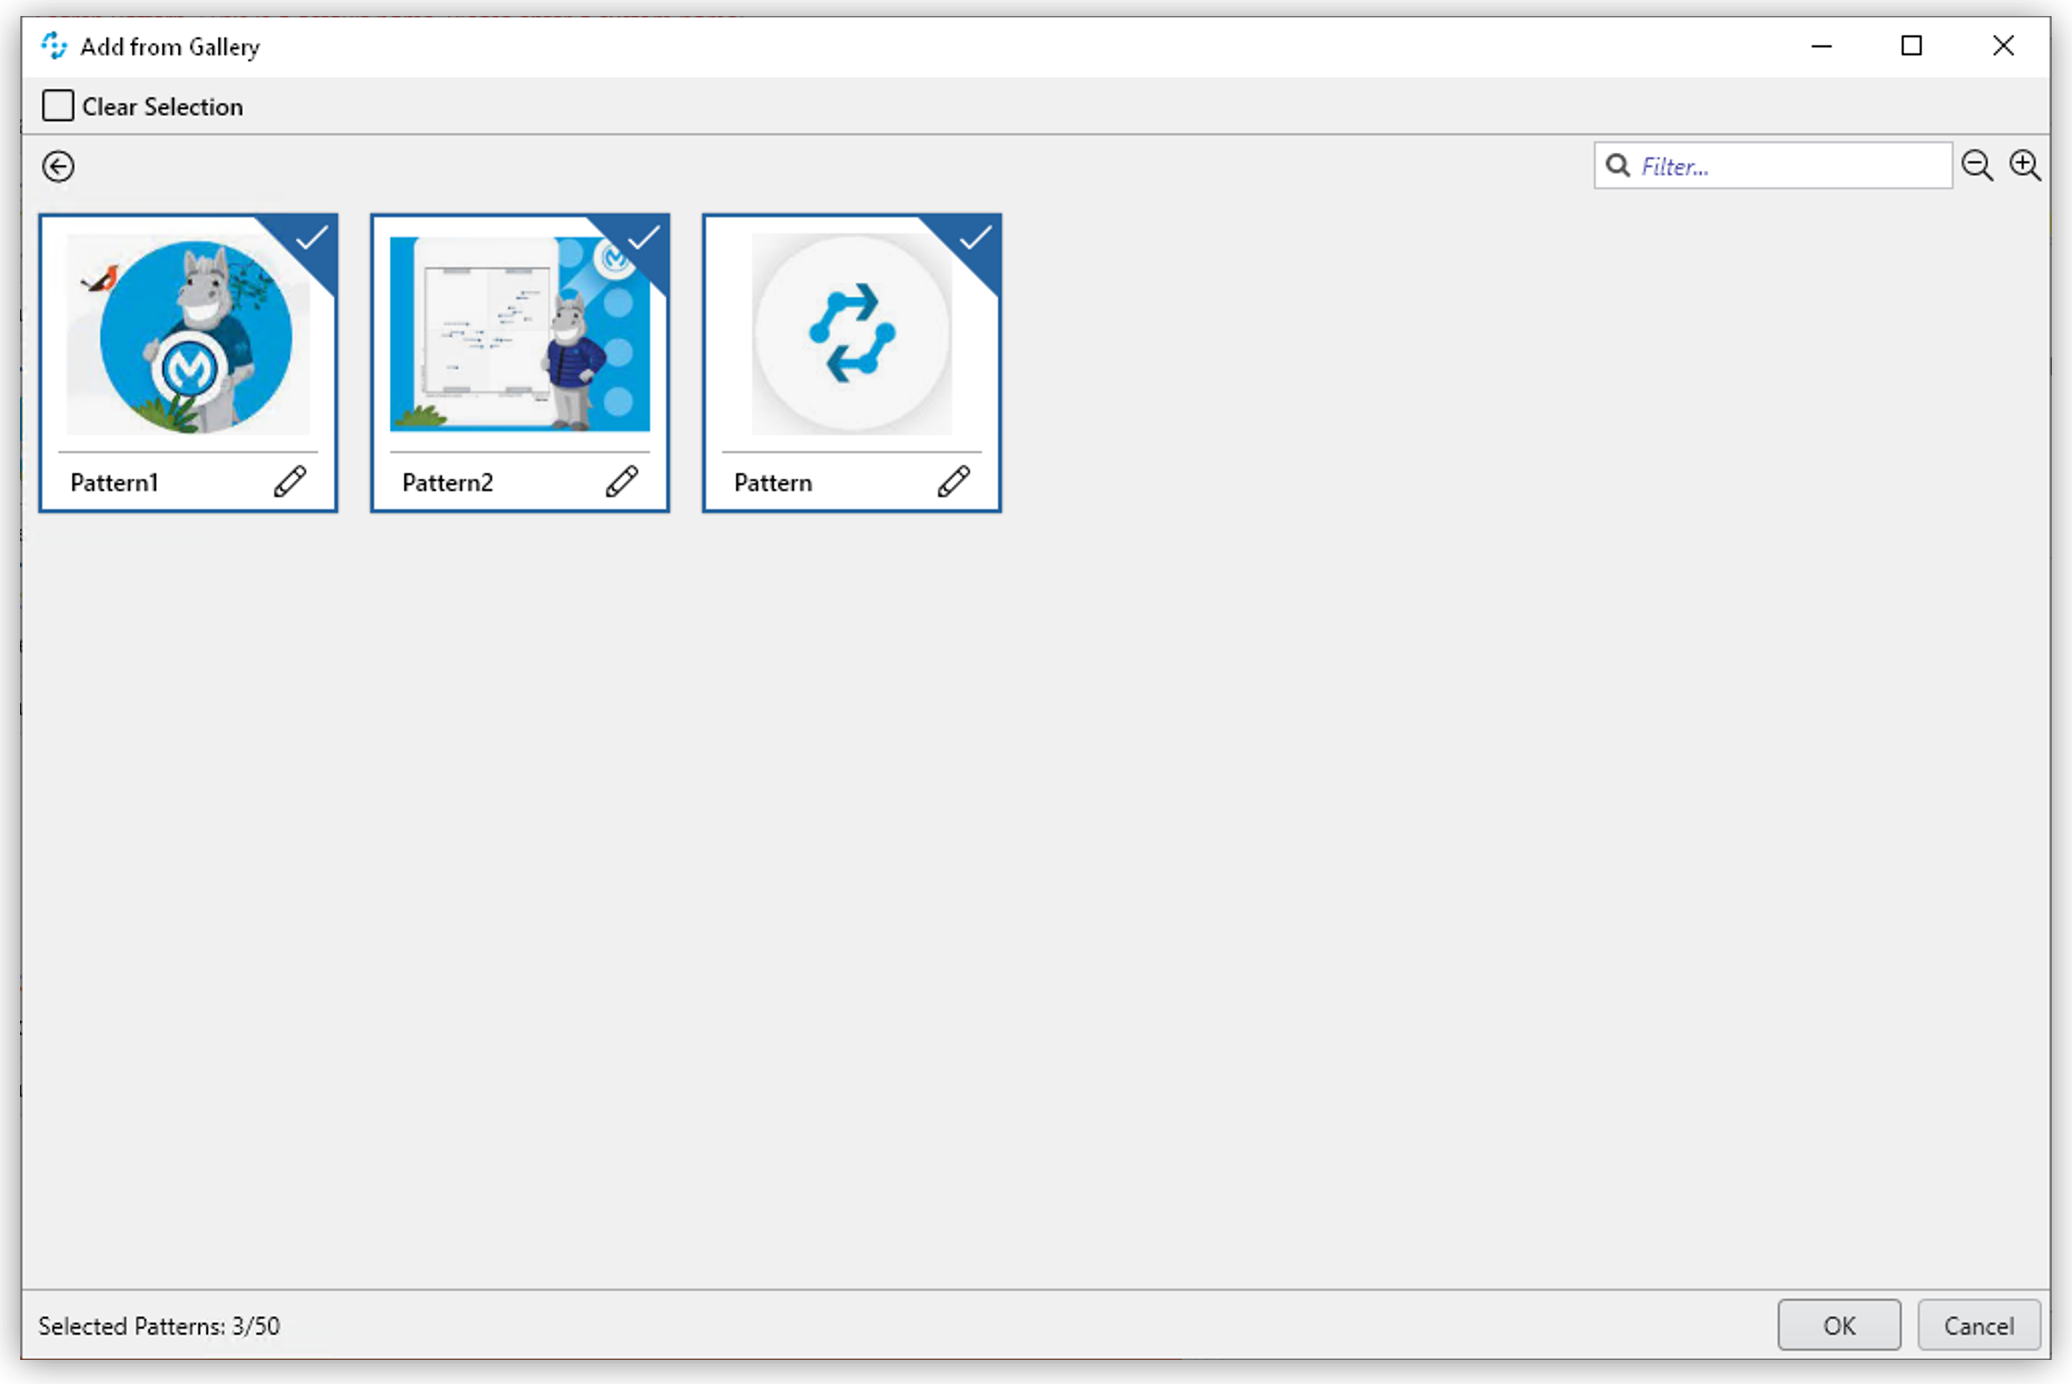
To add patterns to the search, simply use the mouse to click and select. Use the same method to deselect patterns which should no longer be included in the search.
Click OK to confirm the selection and add it to the pattern list for the Action Step.
Ignore All Matches within These Patterns

If you are checking for the single occurrence of a pattern that may be part of other patterns, exclude patterns containing the searched-for pattern within them from the search. The number of patterns that you can exclude is limited to 25.
You can add patterns to be excluded from the search by using the Capture or by selecting them from the Pattern Gallery.
Consider an example where you want to search for the word staff as a noun but only if it doesn’t form part of another term like staffing. In this case, include the staff pattern in the green Regular search patterns section among the patterns being searched for and add the patterns to ignore, like staffing or staffing, in the blue Ignored search patterns section.
Areas in a single color are not taken into account within the pattern. It is therefore not sufficient in the previous example to capture staff with free space at the right edge, because this free space will not form part of the pattern being searched for due to a lack of features.
Make Sure None of These Patterns Appear
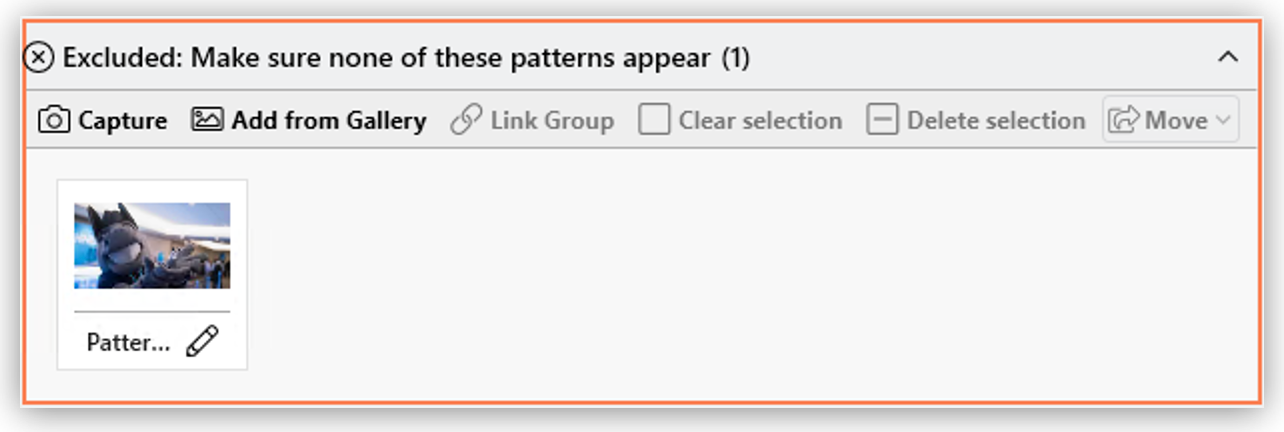
You can use the Search Pattern Action Step to check that a certain pattern does not appear.
When you are rechecking that a pattern does not appear, select Check whether found match stays in same location every [time in ms] milliseconds in the Search Settings and set the interval value (Wait for Image Steady Timeout [ms]) to other than 0.
As described before, patterns to be excluded from the search can be inserted here using a screenshot or from the Pattern Gallery. The number of patterns that you can exclude is limited to 25.
Changing the Category for a Search Pattern
Use the Move to… button in the menu bar to move the selected patterns between the categories Regular and Ignored.
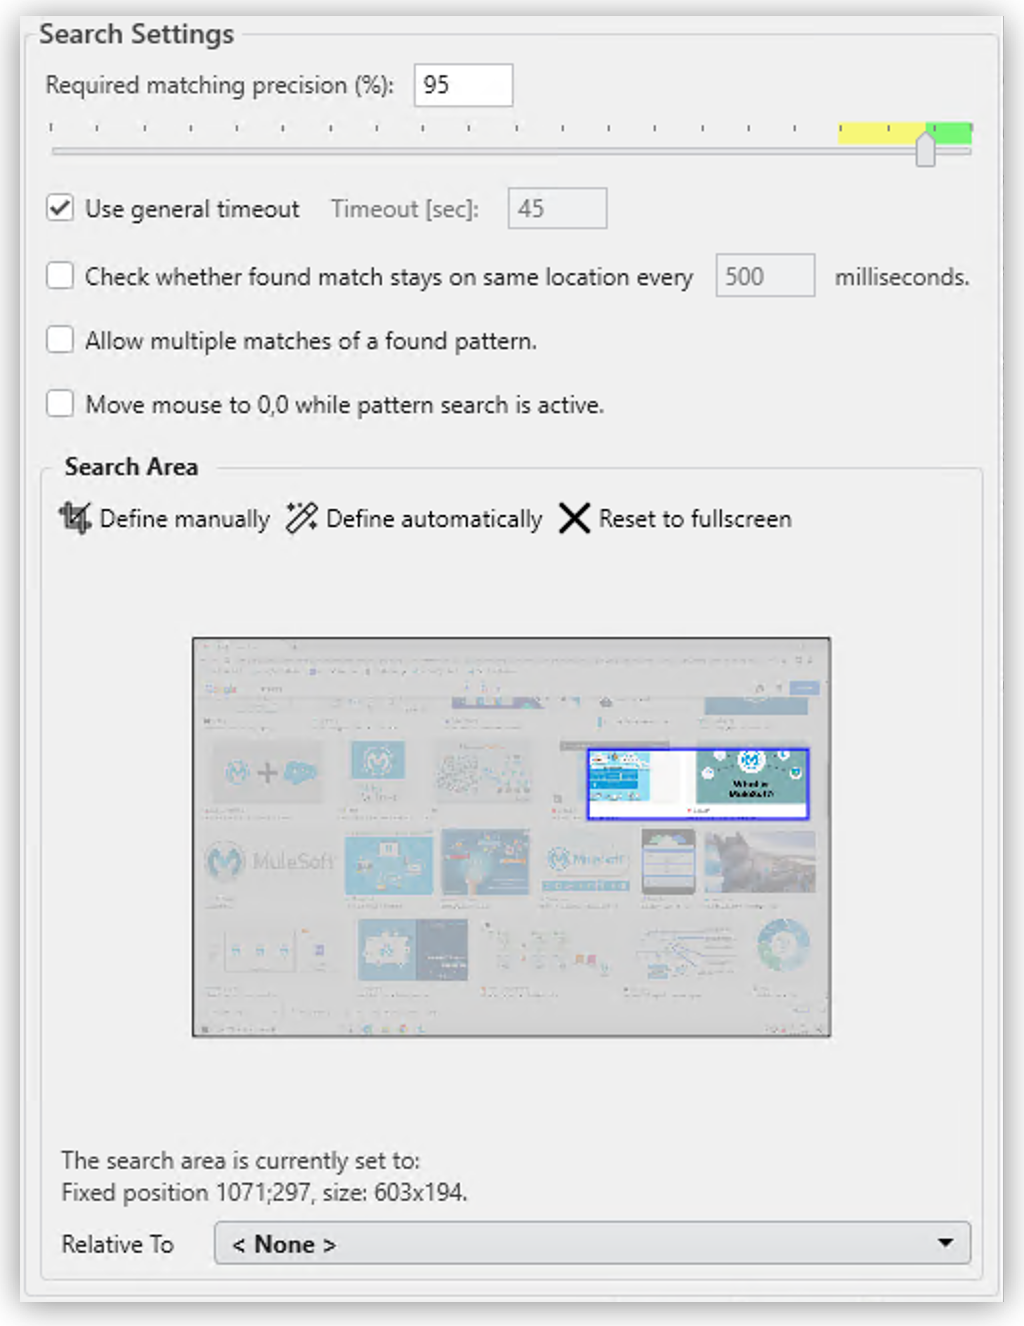
Search Settings
-
Required matching precision
The required matching precision percentage in percent shows as a green zone on a slider. A yellow zone to the left of the green indicates the range that was entered in the Properties under Reduce Score by [%] to monitor criteria during the test in an advanced search.
-
Use general timeout
Select this option to use the general Timeout or specify one in the Timeout [sec] box to use a custom value.
-
Check whether found match stays in same location every [time_in_ms] milliseconds
Select this option and specify a time value to check if the match stays in the same location after the set interval. This option takes the same value as Wait for Pattern Steady Timeout [ms] from the properties panel. When you select this option, ensure that you specify a proper Timeout depending on this value.
Because the repeated image search has to be completed in an interval defined here within the timeout, the recommended maximum interval value is ½*timeout.
If you are using the Excluded: Make sure none of these patterns appears search, enable this option and set the interval value to other than 0.
-
Allow multiple matches of a found of a pattern
Select this option to allow the pattern to occur in the Search Area more than once. When this option is not selected, the Search Pattern Action Step returns an error if the pattern is found more than once.
-
Move mouse to 0,0 while pattern search is active
Select this option to move the cursor during the search to the upper left corner of the screen to the position with the coordinates
x=0andy=0. This feature prevents unwanted mouse hover effects. Independently of this setting, the cursor is not included in the search, so patterns covered by the cursor symbol are found. After the search the cursor is set back to its original position. -
Search Area
The search area is displayed on the right side of the settings section.
-
Define manually
Enables you to define the search area by using drag&drop.
-
Define automatically
Automatically defines a search area containing all regular matches visible at the time of the definition of the search area.
-
Reset to fullscreen
Turns the search area back to full screen.
-
Relative To
The Search Area can be set to either a fixed or dynamic (relative) position. The Relative To dropdown menu lists all variables of type Coordinates that are available at this point. These include, for example, Outbound Variables from a previous Search Pattern Action Step in the same transaction. When you select a coordinate in the wizard as Relative To, an offset vector is immediately calculated. While the Workflow is being designed, this points from the selected coordinate to the top-left corner of the Search Area. At Workflow runtime, the calculated offset vector is applied to the real-time value of the Search Area that the coordinate relates to. This means that the Search Area at Workflow runtime is positioned at exactly the same distance from the “Relative To” coordinate as at the time of design.
-
Test
Pressing the Test button launches the search independently of Workflow execution and open the Search Results window where the search is evaluated. This can provide hints about possible improvements that could be made to the Search Settings.
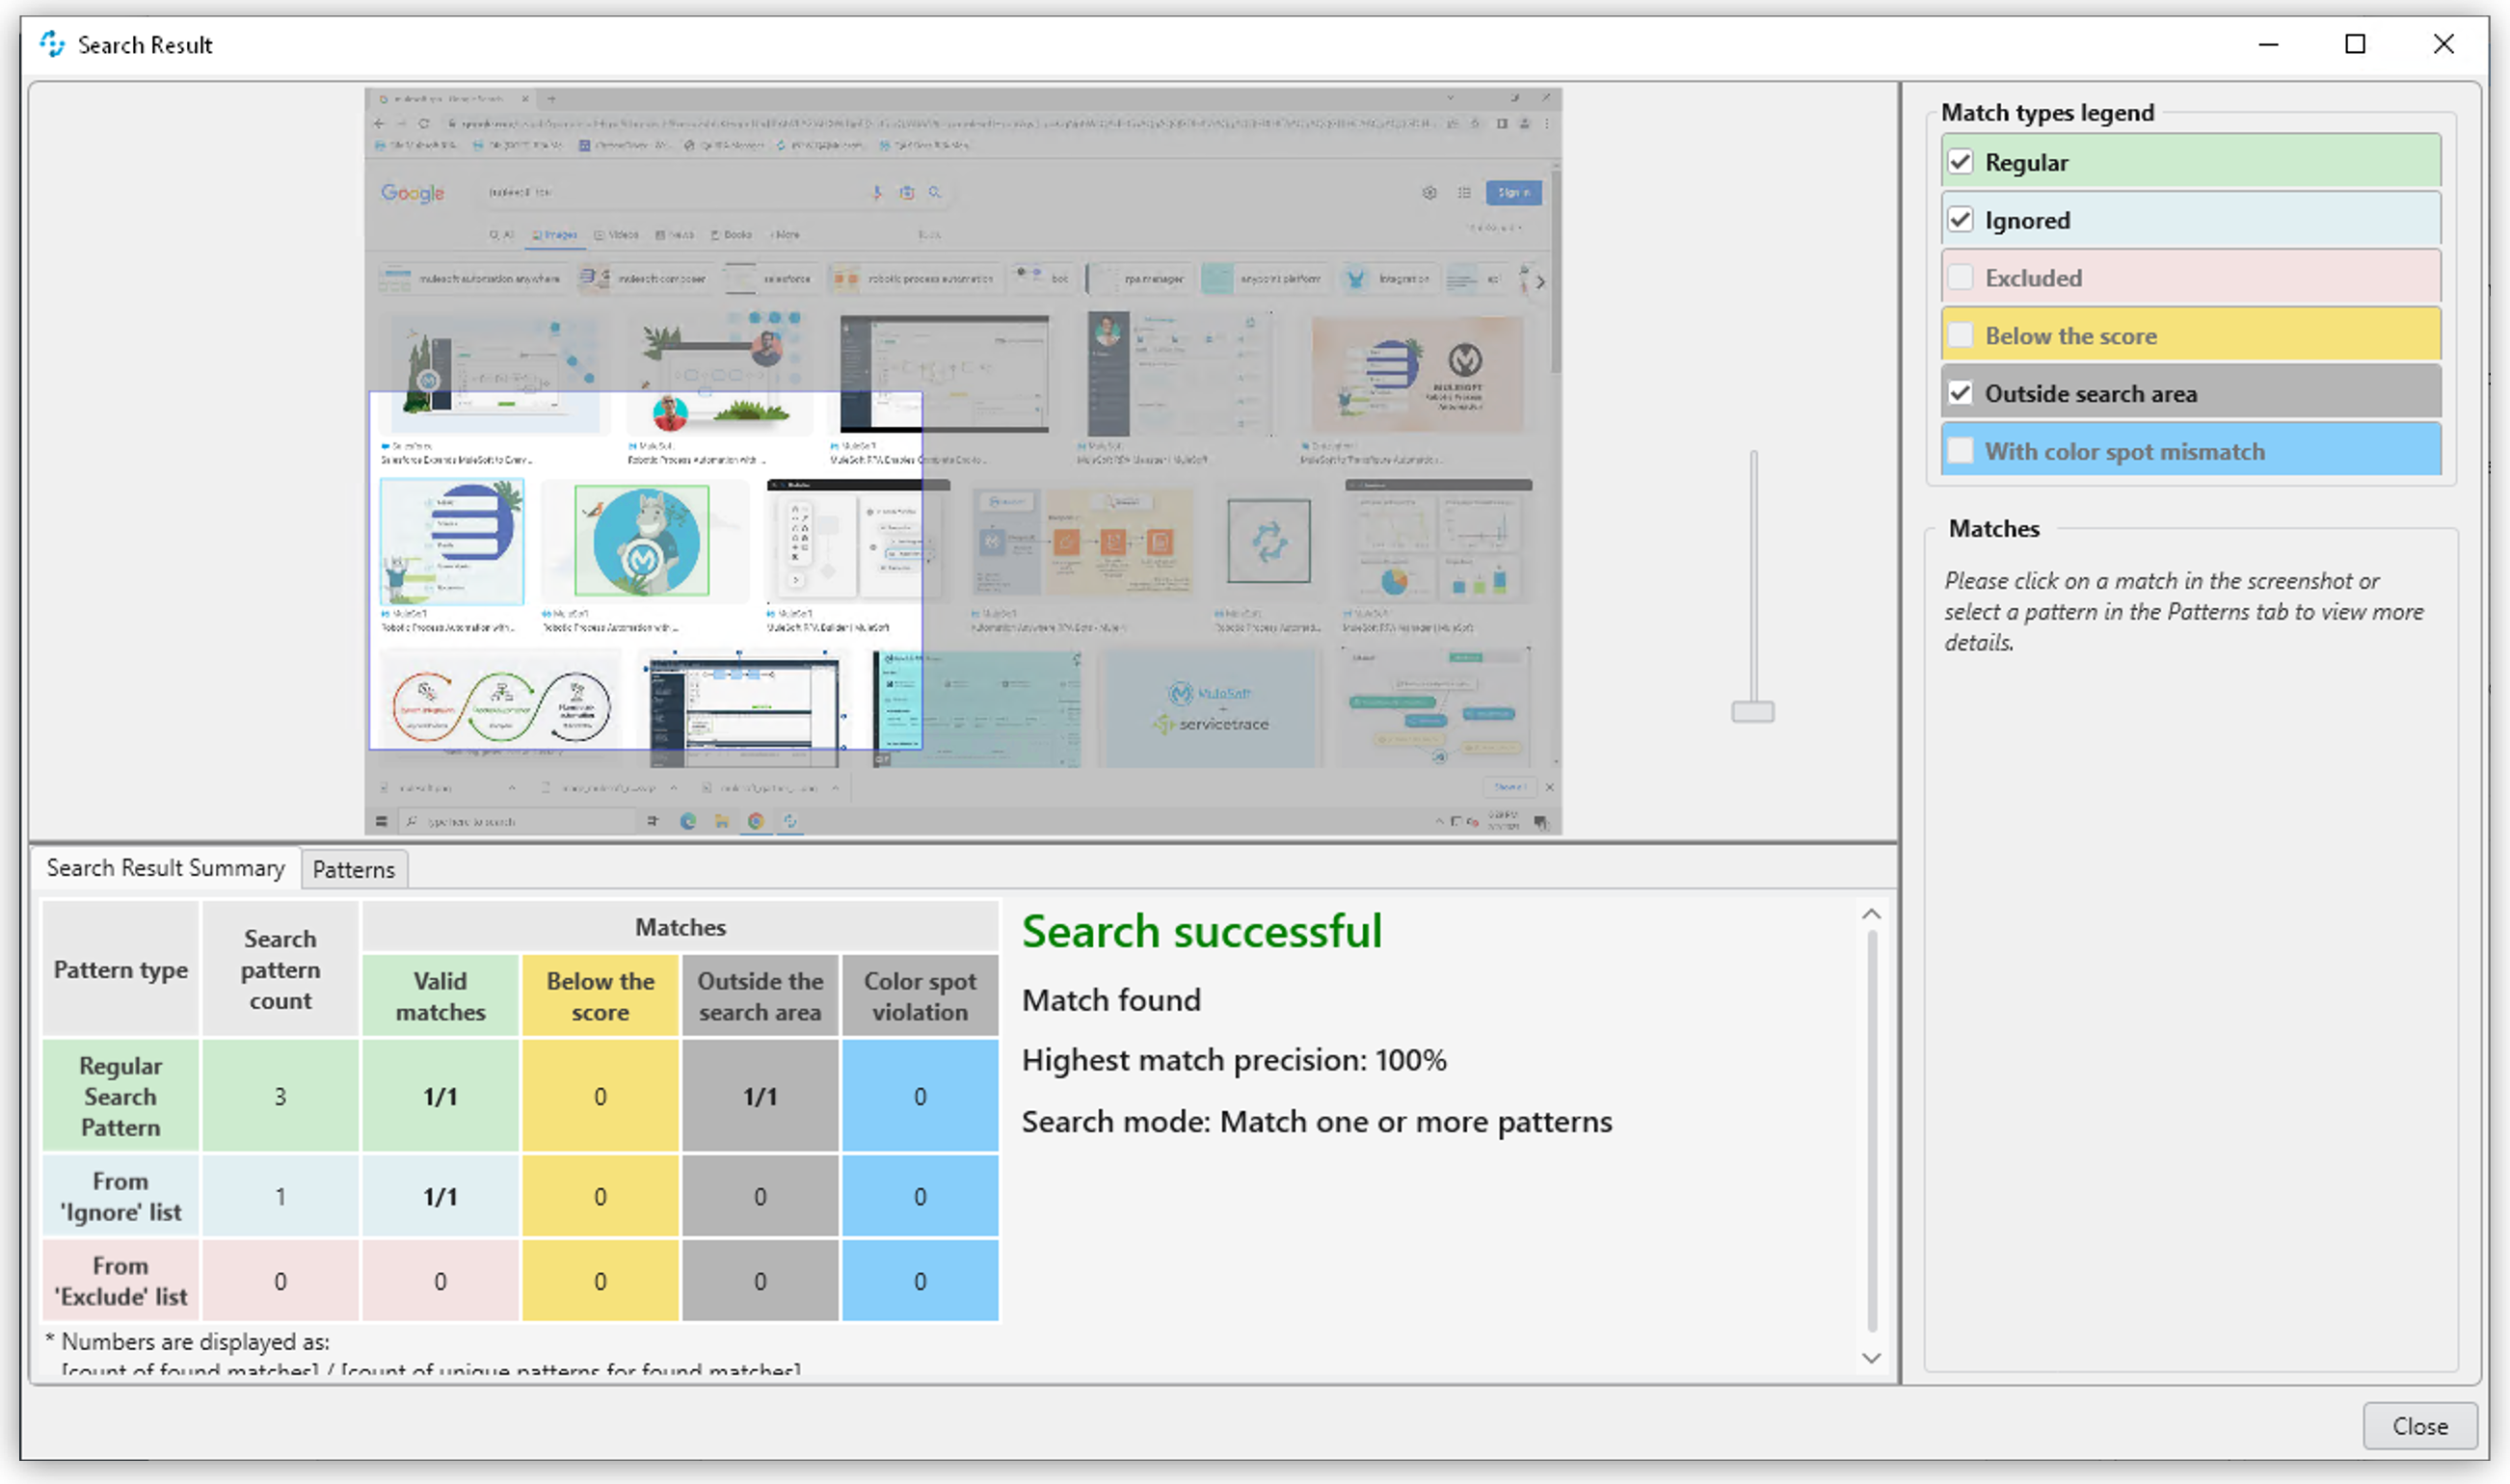
The screen content at the time the test was performed takes up the main part of the window Search Result.
A blue border surrounds the Search Area. The area outside the Search Area is shown grayed.
Matches are highlighted in color. The color legend at the right side of the window works simultaneously as a check box panel for switching the display of the different match types on and off. If there are no matches of a certain type, the according check box field is shown grayed.
Search Patterns of the list Match all / only one / one or more pattern(s) found within the defined precision are highlighted green. Matches from the list Ignore all matches within these patterns are highlighted light blue and matches from the list Make sure none of these patterns appear are highlighted red.
A yellow highlighting shows that the search pattern could have been found if the precision had been set lower. This reduced precision is calculated by deducting the Reduced Score from the Score. In each case, the precision of the match is stated.
Matches outside of the Search Area are marked in gray color irrespective of their type. Patterns with a Color Spot that are found but do not match the Color Spot color at a specific position are marked in blue. You can see the type of every match in the details pane on the right side of the window.
On opening the window, the size of the screenshot is adjusted so that the whole screenshot is visible. You can zoom in to or out of the image by dragging the slider at the right side of the screenshot. It is also possible to do this by mouse wheel. Double click on the slider shows the image in its original size. If the image is enlarged, scroll bars for adjusting the position of the view appear on the right side and on the lower border of the image.
Below the slider the current mouse position in relation to the screen shown in the screenshot is displayed dynamically.
Mouse hover over a match shows the name, a thumbnail and the matching precision as a tooltip.
Clicking on a found Pattern on the screenshot shows details to this Pattern on the right side of the window.
Clicking a pattern in the tab Pattern at the lower border of the window shows details to all matches to this pattern. Clicking a match in the screenshot only shows details for this single match. Details contain the name, type, size in pixels and a thumbnail of the pattern along with a color-marked listing of the found matches. For all matches, the coordinates of the upper left corner and the matching precision are displayed. The coloring is the same as described before.
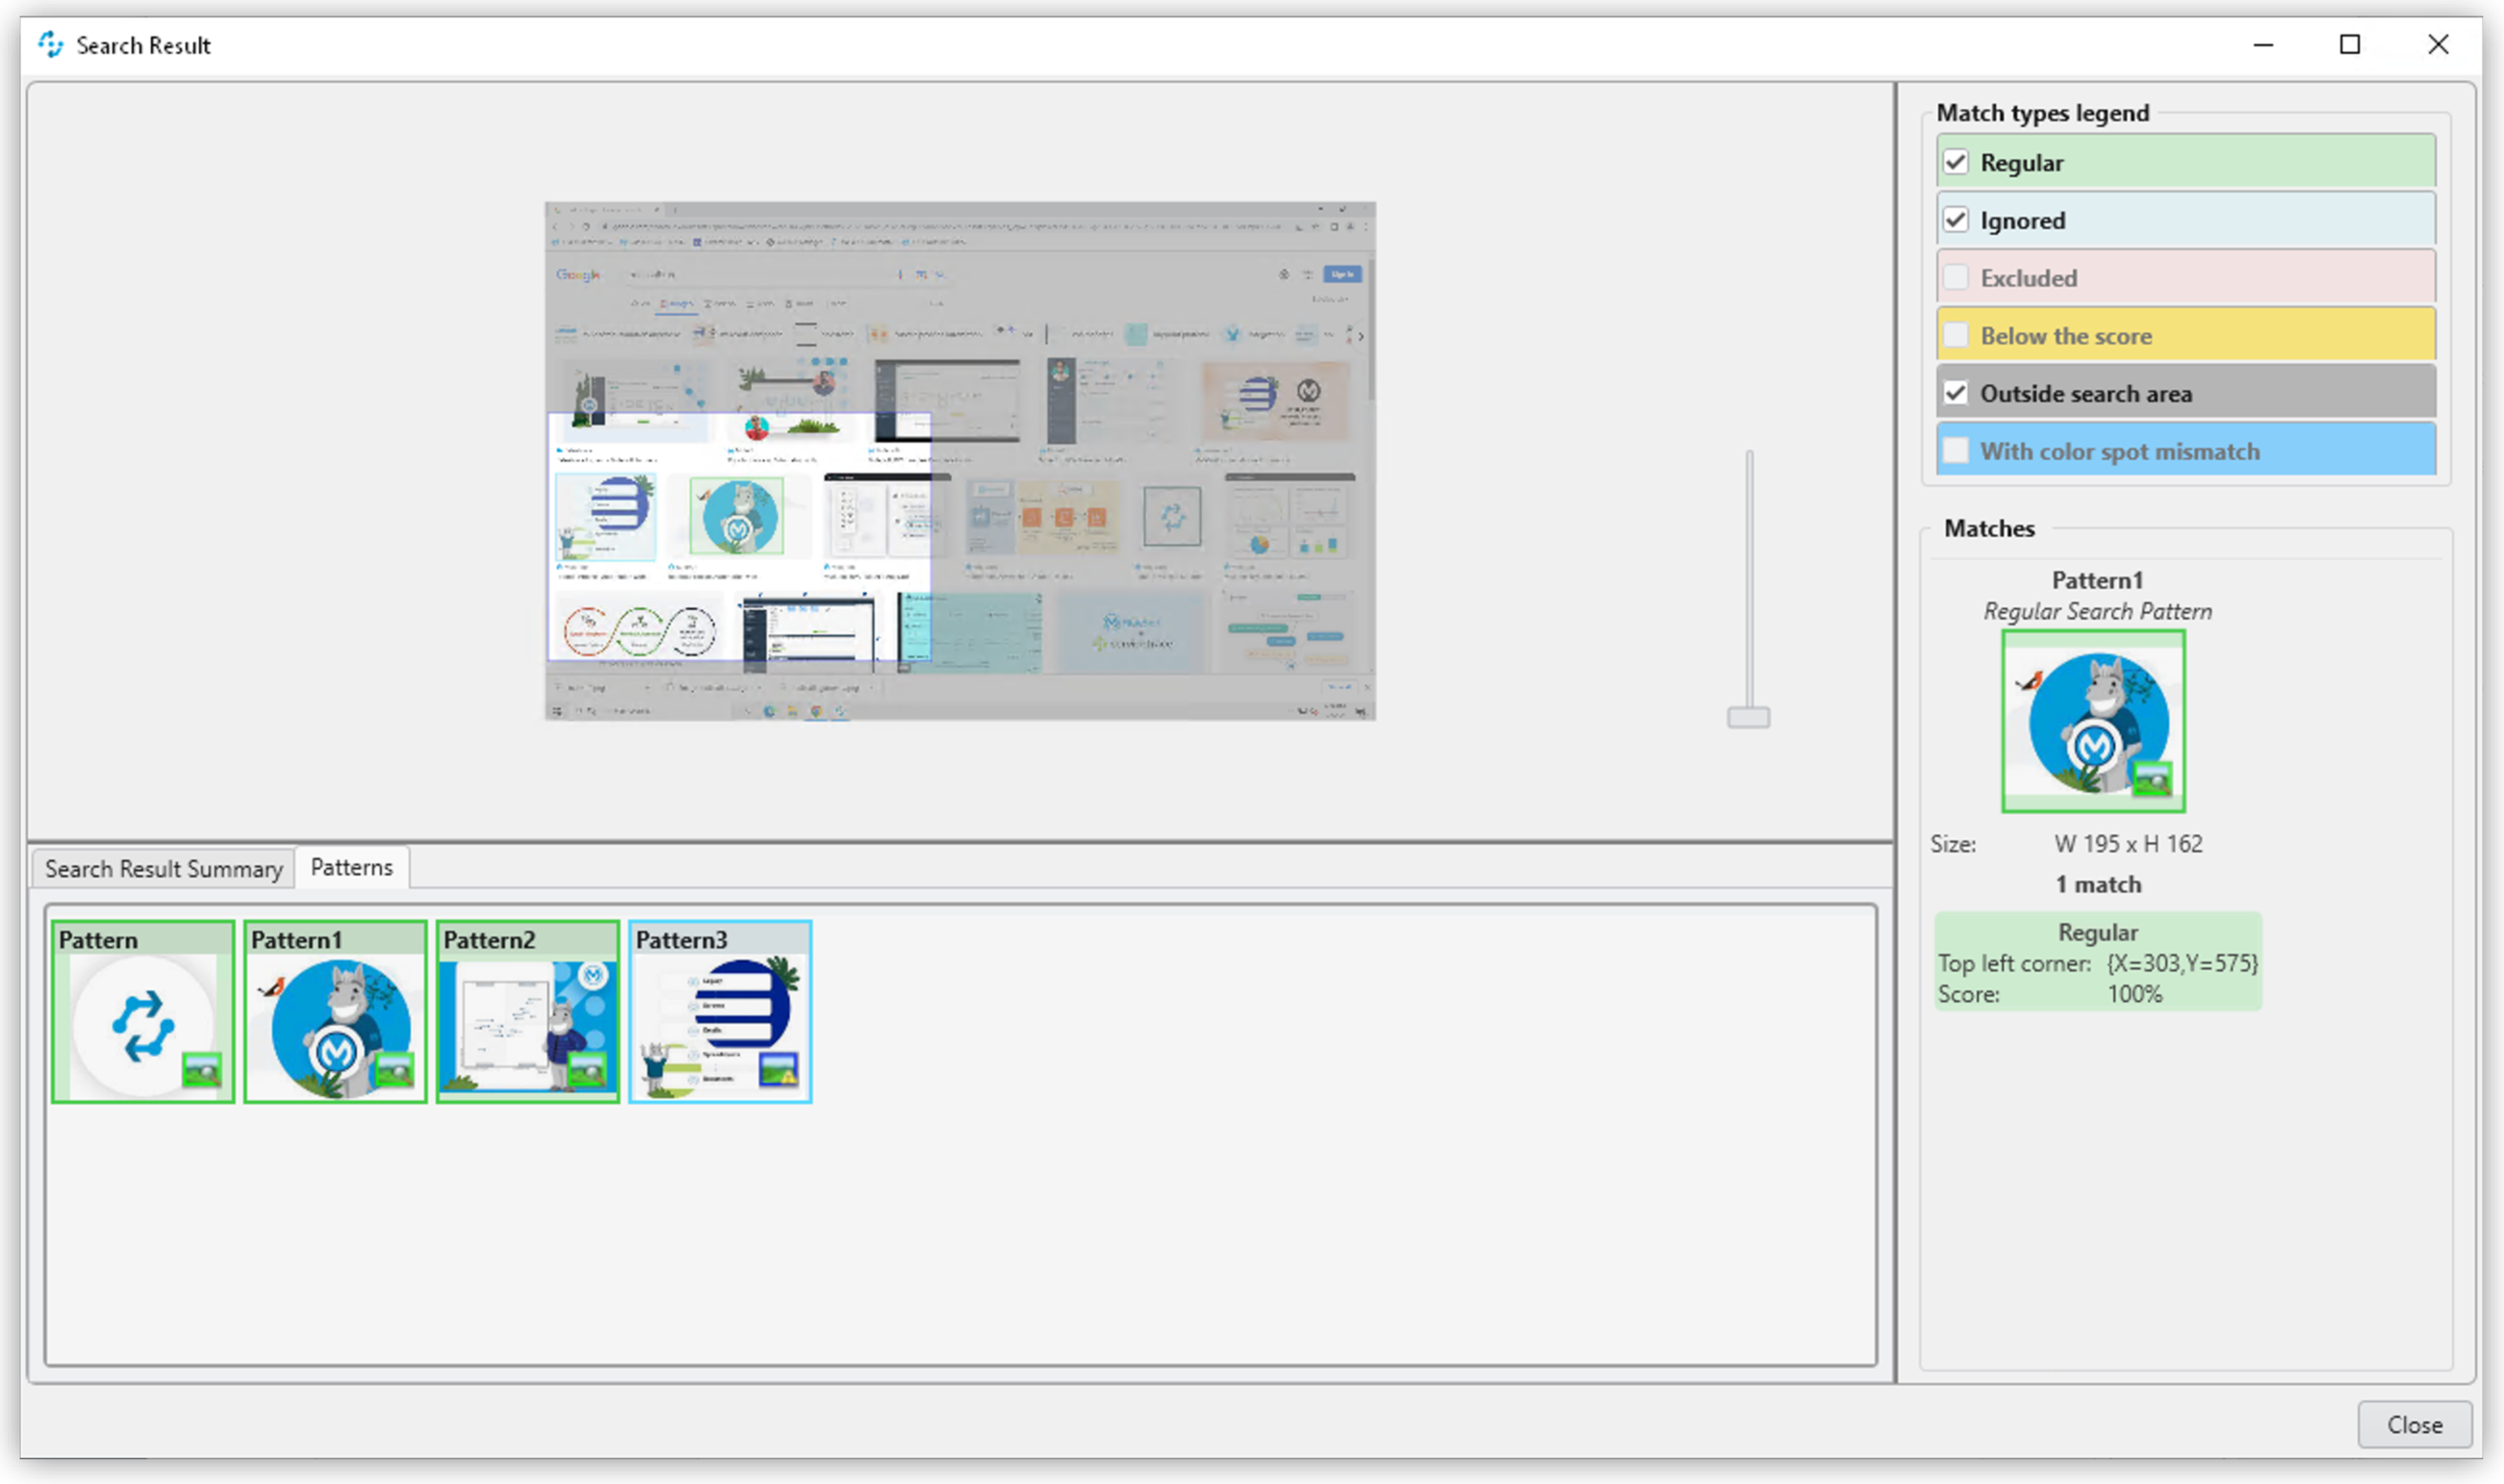
The tab Search Results Summary shows a textual overview over the search settings and the search result.
If the search failed because of one single pattern, this pattern is shown in tab Failure Reason.
Other Uses of Matched Patterns
If mouse clicks are to be performed relative to a matched image and, at the same time, the search is for more than one image, the image that the mouse clicks relate to must be at the top of the list.
If the first image on the list is not found, the mouse click will be inserted relative to the first image from the list that is found.
If the first image on the list that is found occurs multiple times, the image located on the far left of the screen will be used. If there are multiple images in the identical lateral position on the left, the topmost one will be used. If multiple identical images are found, the image on the far left or top far left will be used.