API Notebook Reference
| API Notebook reached its End of Life in August 2021. |
An API Notebook is a web-based tool for building interactive tutorials and examples in a JavaScript scripting workspace. Users do not need to install anything to explore the API from your Notebook. You present the Notebook on your API Portal to users of your API who can explore the API. API Notebook can generate an API client based on a RAML API definition, and through it perform authenticated live calls on a real server or on just an empty API interface. From the RAML definition, API Notebook obtains information about the API’s resources, methods, required arguments, and other things.
From your API Notebook, users can also create their own API Notebook for personalized testing of your API in their Github gist. Users can execute sequences of calls to an API for testing or other purposes.
First, you create an API client, based on a RAML API definition. Through the client, you perform authenticated live calls to an API, You can create multiple clients to call different APIs from the same Notebook.
Next, aided by code completion hints and prompting, you create code and documentation cells to test and explain the API. In code cells, you write JavaScript methods that expose the API resources and methods.
From a Notebook on your API Portal, users can save an API Notebook as a gist in a GitHub account and adapt it to their needs.
Anatomy of an API Notebook
Notebooks are composed of the following types of cells:
-
Text
These cells accept markdown. Use text cells to include documentation about Notebook functions.
-
Code
These cells accept JavaScript, including imported JavaScript libraries and functions from external libraries. Use code cells for executable blocks of JavaScript.
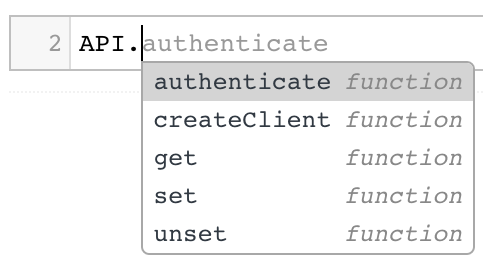
In a code type API. and pause to look at the code completion suggestions:

Type the following code:
API.createClient(alias, url, options? cb?)
As you type the createClient call, API Notebook offers the following suggestions. These are the attributes you can use in the createClient methods:
| Parameter | Description | Req/Opt |
|---|---|---|
|
The name with which you call this client from now on |
Required |
|
A URL that directs to the API’s RAML definition |
Required |
|
A specification of default headers, a fallback body, or other option. Type the method in the notebook and place the cursor on this argument for more details. |
Optional |
|
Pass in a custom callback to run when the client has loaded |
Optional |

The Notebook can call an existing API, as long as it’s published behind an HTTP endpoint. Through the MockingService you can call mocked APIs that are almost an empty shell to test out your API design.
The design of the API Notebook follows the literate programming paradigm: Code should be human readable as well as executable.
Creating a Notebook
There are two ways to create an API Notebook:
-
Edit an API portal. Create the Notebook within the portal using the left navigation of the portal to add a new API Notebook. A line of code that creates the necessary API client for your RAML-based API is generated when you add the API Notebook.
-
Use the following site to create a new Notebook:
https://api-notebook.anypoint.mulesoft.com-
Log in to your GitHub account.
-
Authorize your application to write to the gist.
-
Log into the
https://api-notebook.anypoint.mulesoft.comsite using your GitHub account credentials. -
Create the API Notebook.
-
Click the save icon.

The API Notebook is stored as a GitHub gist.
-
Sharing API Notebooks
To share an API Notebook that you create in an API portal, share the API portal itself. Either make the portal public or give other users permissions to view it from the API version details page.
To share or embed your Notebook, click the Share icon. You are offered two links, one for sharing the URL, the other for embedding the Notebook in a site.

To execute all code cells in your Notebook sequentially, click Play.


