To Create an API Notebook
| API Notebook reached its End of Life in August 2021. |
This procedure shows how to create interactive tutorials and examples in JavaScript that connect to a RAML-based API in API Manager. This procedure assumes you have a public API portal for the API and the level of permission or role required for creating a Notebook. After creating the API Notebook, it is published on the Developer portal.
-
Download the RAML code for this example, set up an API based on the code in API Manager, and create a public API portal for the API.
-
Go to the API Version details page of the example API, click Edit Portal, and on the Add drop-down, select API Notebook.
-
On the API Notebook, although a default client already exists for documentation purposes, create another one:
-
Hover over the greyed-out, circular widget above the code cell.

-
Click Insert API Client.
-
-
In Insert an API Client, enter the API name. For example, enter
T-Shirt Ordering Servicein the search box, scroll to the T-Shirt Ordering Service item in the list that bears the name of your organization, and click Add.The API Client code appears in the code cell prefaced by a comment that looks something like this:
// Read about the T-Shirt Ordering Service at https://anypoint.mulesoft.com/apiplatform/mulesoft-7/#/portals/organizations/2dfeffce-f770-4317-ad32-a2a9c01050f2/apis/4358/versions/4394 API.createClient('tShirtOrderingService', 'https://anypoint.mulesoft.com/apiplatform/repository/v2/organizations/2dfeffce-f770-4317-ad32-a2a9c01050f2/public/apis/4358/versions/4394/files/root'); -
Follow the prompt to create a new code cell:
-
Hover over the cell to display the menu icon, and select New Cell.
-
In the new code cell, type the name of the API. For example, type tShirtOrderingService in the cell.
-
-
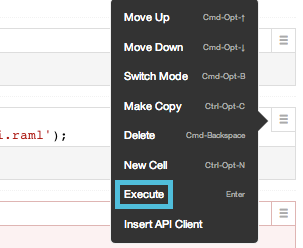
Execute the code cell:
-
Select the hamburger menu on the right of the cell.
-
Select Execute.
The following response containing the names of your resources appears:
function (a,b){var c=f(a||"",b||{}).replace(/^\/+/,"").split("/");return L(d.extend([],e,c),{},D)}
!client: Object
!config: Object
arguments: null
caller: null
length: 2
name: "g"
orders: Object
products: Object
prototype: g
You can expand
!configto see the URL of the API.
-
-
Add a code cell and enter the following function to post an order using the example order information in the RAML:
tShirtOrderingService.orders.post({"size": "M","email": "robin@mail.com","name": "Robin Pille","address1": "77 Geary St.","address2": "Apt 7","city": "San Francisco","stateOrProvince": "CA","country": "US","postalCode": "94131"}) -
Select Execute from the cell’s hamburger menu.
The response is:
Object {"body": Object, "status": 200, "headers": Object} body: Object headers: Object status: 200 -
Add a new code cell and type in the following code:
var shirts = tShirtOrderingService.orders.orderId('4321');
shirts;
You can use the autocomplete choices as you type. To add a line break within the cell, press Shift + Enter.