Adding an Omni Gateway API Instance
After you have created an API using Design Center or any other application, you can then manage that API in API Manager by adding an API instance. API instances remain under management until you delete them.
Use Omni Gateway for any APIs that need a flexible and performant API gateway that works with distributed and microservices environments and fits into your CI/CD environments.
There are three options for adding an API instance:
-
Add a new API: Select this option to add a completely new instance of an API.
-
Promote API from environment: Select this option if you have an API instance in a different environment, for instance the sandbox environment, and you want to promote it to the current or production environment.
-
Import API from zip file: Select this option if you have exported an API instance from a different Anypoint Platform instance.
When you are promoting or importing an API instance, you do not have options to alter the configuration. However, when you add a new API instance, you need to the downstream and the upstream configuration settings.
The following diagram shows the relationship of the upstream and downstream configurations settings to your upstream service and the downstream consumer application. In this configuration, the downstream service is the service making API requests that are completed by the upstream service. These terms represent the direction of dependency, not the direction of information. A downstream service could make a POST request where it provides information to the upstream service. However, the downstream service is still dependent on the upstream service to complete the request.

Add a New API
-
Navigate to Anypoint Platform > API Manager.
-
In API Administration, click Add and select Add new API.
-
Select Omni Gateway.
-
Select a connected Omni Gateway you have installed and registered from the list under Select a gateway.
If you don’t see an Omni Gateway listed, or you see an Omni Gateway but its status is Not Running, See Install Omni Gateway and Register and Run in Connected Mode for more information.
-
Click Next.
-
Select an API from the following options:
-
Click Select API from Exchange if you have an API shared with you through Exchange that you want to manage.
-
Click the API from the list under Select API. You can search for a specific API if needed.
-
Update the Asset type, API version, and Asset version if you are not using the latest version.
For more information about versions in Exchange, see Asset Versions.
-
If you chose a RAML/OAS asset type, view the Conformance Status of the API to ensure the API is conformant. If the Conformance Status is nonconformant, after deployment, view the Governance Report to find and fix the conformance issues. For more information about the Governance Report, see Governing API Instances.
-
-
Click Create new API:
-
Enter a Name for the new API asset.
-
Select the Asset type from the following options:
-
REST API: Select this option if you have a RAML or OAS API definition file you want to include for your asset.
Upload either a RAML or OAS file for your REST API. Versions 2.0.0 and later are the recommended versions for OAS or RAML specs, because these versions add native OAS support. If you upload an OAS API specification to an API proxy version 1.0 or earlier, your API specification is translated to RAML.
-
HTTP API: Select this option if you do not have an API definition file you want to include for your asset. For WebSocket APIs, select HTTP and then choose the WebSocket subtype when selecting the API from Exchange. WebSocket instances can use HTTP or AsyncAPI assets from Exchange.
-
SOAP API: Select this option if you have a WSDL API definition file or an external link to the file.
Upload a WSDL file for your SOAP API or add the link to the file.
-
GraphQL API: Select this option if you have a GraphQL schema definition file you want to include for your asset.
Upload the GraphQL schema definition for your GraphQL API.
-
-
Update the Asset type, API version, and Asset version if you are not using the latest version.
For more information about versions in Exchange, see Asset Versions.
-
If you chose a RAML/OAS asset type, view the Conformance Status of the API to ensure the API is conformant. If the Conformance Status is nonconformant, after deployment, view the Governance Report to find and fix the conformance issues. For more information about the Governance Report, see Governing API Instances.
-
-
-
Click Next.
-
Configure the downstream configuration settings:
Managed Omni Gateway
Field Name Description Required Notes Base path
Specifies the URL prefix for all API paths, relative to the host root. It must start with a leading slash
/.Yes
Client provider
Specifies a client provider for the API.
No
Anypoint Platform acts as the client provider by default. To configure an external client provider, see Client Providers.
Instance label
Specifies a label for the API.
No
If you have multiple managed instances of the same API, add a label to differentiate each instance from the others.
Advanced Options
Consumer endpoint
Specifies a proxy application’s address for consumers to use for sending requests.
No
Self-Managed Omni Gateway (Connected Mode)
Field Name Description Required Notes Protocol
Specifies whether to use HTTP or HTTPS.
Yes
If you select HTTPS, specify a TLS context for inbound traffic.
Inbound TLS
TLS Context used for the inbound traffic of HTTPS APIs
No
Configure a TLS Context for Omni Gateway before adding a TLS Context to your API. Only available on Omni 1.4.0+.
Port
Specifies the number to use if the displayed port is incorrect.
No
API instances can share the same port across the same target if the Base path is different for both instances. Only available on Omni 1.2.0+.
Base path
Specifies the URL prefix for all API paths, relative to the host root. It must start with a leading slash
/.Yes
Instance label
Specifies a label for the API.
No
If you have multiple managed instances of the same API, add a label to differentiate each instance from the others.
Advanced Options
Consumer endpoint
Specifies a proxy application’s address for consumers to use for sending requests.
No
Manual Approval
Enables manual approval for API Requests.
No
After submitting the instance, you must go to Contracts to approve or revoke the request.
-
Click Next.
-
Configure one of the following upstream configurations:
-
Single Upstream Service
For Omni Gateway versions 1.4.x or earlier or Omni Gateway version 1.5.x with a single upstream service, configure the following upstream configuration settings:Field Name Description Required Notes Upstream URL
URL to access for the proxy or API. This must end with a
/.Yes
For example, you can use the URL of your API asset in Exchange.
Outbound TLS
TLS Context used for the outbound traffic to the upstream service
No
Configure a TLS Context for Omni Gateway before adding a TLS Context to your API. Only available on Omni 1.4.0+.
-
Multiple Upstream Services
Omni Gateway version 1.5.x or later supports API instances that expose multiple upstream services through a single consumer endpoint.
To configure multiple upstream services, see Multiple Upstream Services for Omni Gateway Running in Connected Mode.
-
-
Click Next.
-
Review your selections and edit them if necessary.
-
If you are ready to deploy, click Save & Deploy. Otherwise, you can select Save, to save the instance and deploy it at a later time.
Multiple Upstream Services for Omni Gateway Running in Connected Mode
Omni Gateway version 1.5.x or later supports API instances that expose multiple upstream services through a single consumer endpoint.
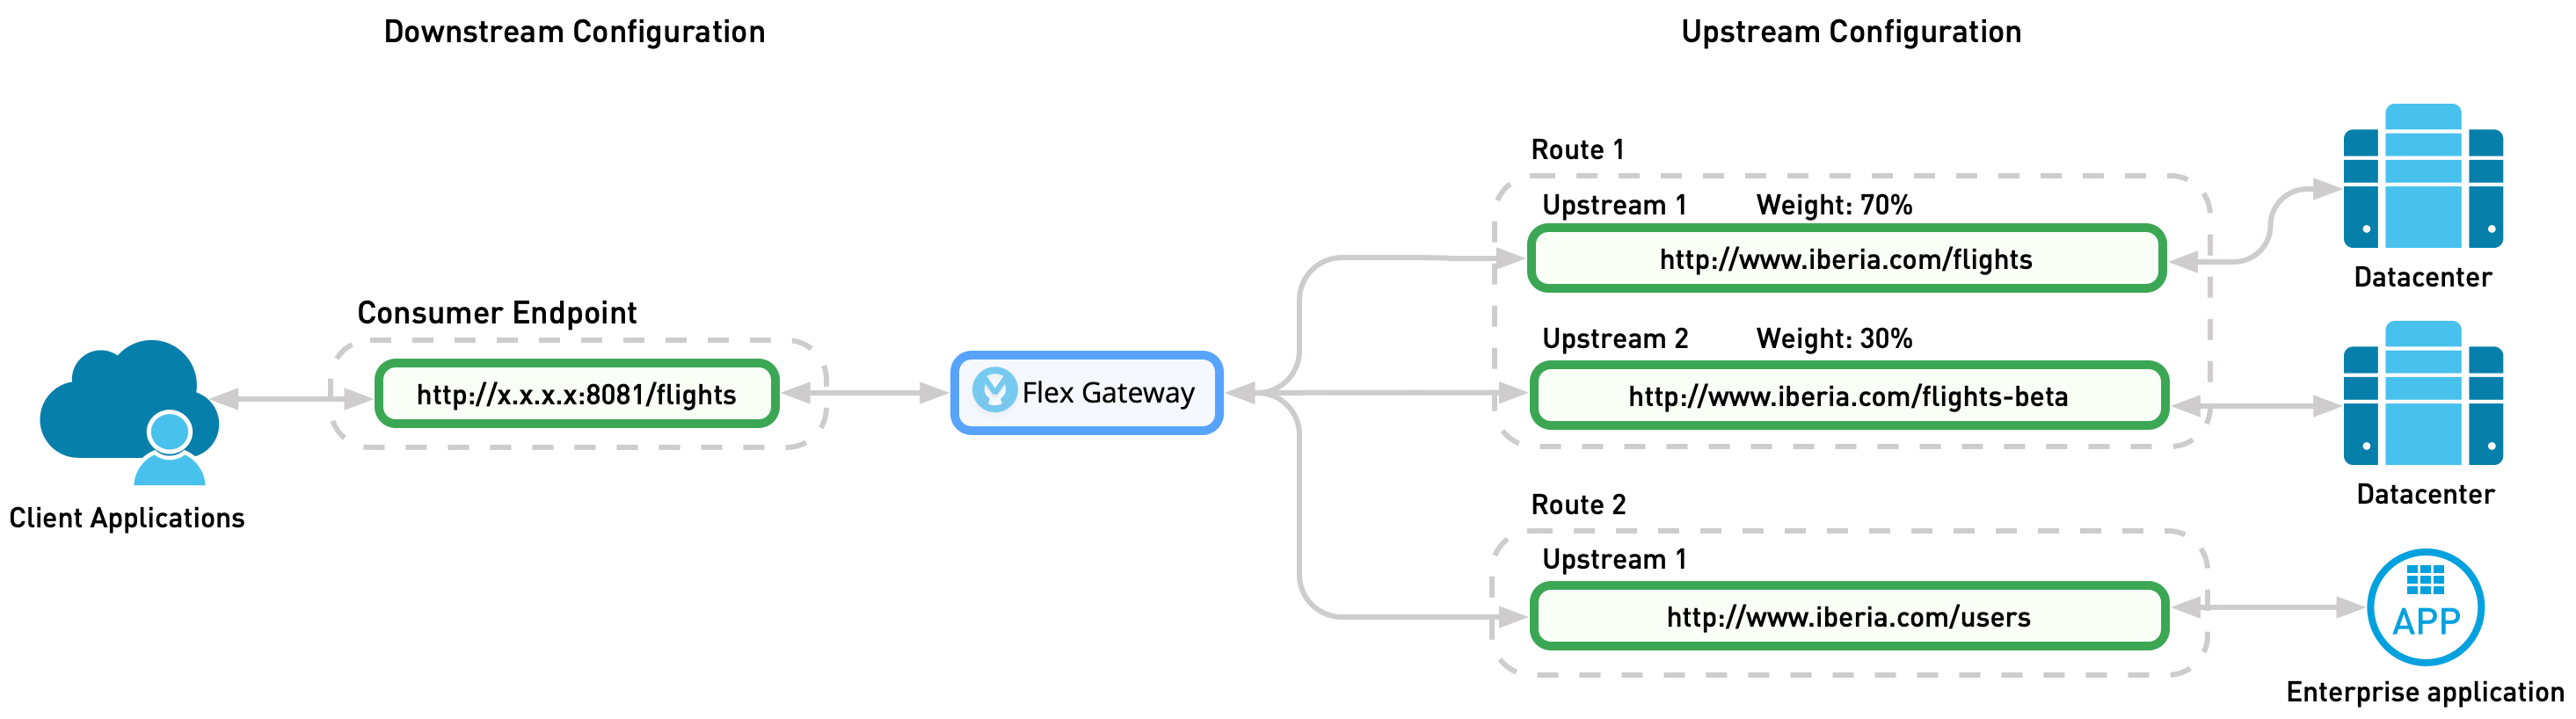
Omni Gateway manages request traffic by using different routes that can each direct traffic to multiple upstream services. Omni Gateway directs traffic to the routes by using the route order and the individual route’s rules. Additionally, you can add a weighted percentage to each upstream service within a route to manage the percentage of requests sent to the upstream service.
In the following diagram, different routes manage requests to flight information databases and to a customer service application. Route one has two upstream services defined, which direct 70% of requests to a stable database and 30% of requests to a beta database.
Limits
| Limit | Value | Notes |
|---|---|---|
Upstreams per API |
100 |
Each API supports 100 upstreams. The 100 upstreams can consist of a combination of different routes. |
Routes per API |
100 |
Each API supports 100 routes. |
Upstreams per route |
10 |
|
Headers per route rule |
10 |
Routes
Each API instance supports up to 100 routes and each route can support up to 10 upstream services. Configure what requests a route can receive by defining route rules and a route order. At least one route per API instance is required.
Before adding additional routes, enter an optional Route label for clarity.
You can add additional routes by clicking Add Route, and you can delete routes by clicking the Trash Can icon (![]() ). If only one route is defined, you cannot delete that route.
). If only one route is defined, you cannot delete that route.
Route Rules
You can direct requests to different routes by using route rules.
To view and edit route rules, click Route Rules.
All rules are optional. If a rule does not have a value, that rule is ignored. For example, not specifying a host means that the route can service any host if the request meets the other route rules. Not defining any rule means that the route can service every request.
Different routes can support the same upstream services. If you cannot capture all requests for a particular set of upstream services in a single route rule set, you can define multiple routes with different rules for full coverage.
Only requests that meet all of the rules defined in the ruleset are directed to that route. If a request does not meet the rules for any route, Omni Gateway returns a 404 error code.
Omni Gateway supports the following route rules:
- Method
-
Defines the types of request methods that the route can service.
You can select multiple methods for each route. Only requests that are one of the defined methods are directed to this route.
To select the supported methods:
-
Expand the Method drop down list.
-
Select all supported methods.
-
Collapse the drop down list.
-
- Path
-
Defines the request path that the route can service.
You can define only one “URI Template Regex" path for a route. Only requests with the defined path are sent to this route.
To define the Path rule:
-
Enter your path template in the Path configuration field.
-
- Host
-
Defines the request host that the route can service.
You can define only one host URL for each route. Only requests made from the defined host are sent to this route.
To define the Host rule:
-
Enter your host in the Host configuration field.
-
- Header
-
Defines what headers and regular expression value must be present for this route to service the request.
For this rule, you define the header name and a regular expression value. Only requests that meet all of the specified header requirements are sent to this route. Additional headers present in the request that are not specifically defined in the rules are ignored.
You can define up to 10 headers.
To define the Headers rule:
-
Click Add header, if this is not your first header.
-
Enter the header name in the first box.
-
Enter the header’s regular expresion value in the second box.
To delete a header, click the Trash Can icon (  ).
).
-
Route Order
In addition to using route rules, Omni Gateway directs requests to different routes by using the top to bottom order of how the routes appear on the page.
Omni Gateway directs requests to the first route if the request meets the route rules.
To define the route order, use the up and down arrows to arrange the routes.
Route ordering is very important when a request can meet the route rules of multiple routes. You should order the routes with more complex route rules first. If you do not define a route order, routes are ordered in the order they were created.
For example, in a configuration in which route one has the GET method defined as a rule and route two has no route rules defined, all GET requests are sent to route one and all other requests are sent to route two. If the route order was reversed and route one had no route rules, Omni Gateway would direct all requests to route one before any GET requests could reach route two.
Upstream Services
You can use multiple upstream services in a single route to direct requests to similar services. For example, to test the performance of a new beta upstream service without sending all traffic to the new service, you can direct half of the traffic to a stable upstream service and half to the new upstream service.
Each API instance route can support up to 100 upstream services, but at least one upstream service is required for each route.
What upstream service within the route each request is sent to is random and independent of any previous request. The upstream Weight defines the percentage chance of a request being sent to a particular upstream service.
Because any upstream service within a route can receive any request, all upstream services within the same route must adhere to the same API contract.
You can add an upstream service by clicking Add Upstream, and you can delete an upstream service by clicking the Trash Can icon (![]() ). If only one upstream service is defined, you cannot delete it.
). If only one upstream service is defined, you cannot delete it.
Configure the following fields for each upstream service:
| Field Name | Description | Required | Notes |
|---|---|---|---|
Upstream URL |
URL to access for the proxy or API. This must end with a |
Yes |
For example, you can use the URL of your API asset in Exchange. |
Upstream Label |
Label for the upstream service |
No |
If you have multiple upstream service instances, add a label to each one to differentiate it from the others. |
TLS |
TLS context used for the outbound traffic to the upstream service |
No |
Configure a TLS Context for Omni Gateway before adding a TLS context to your API. Add a TLS context by clicking Add TLS Context. |
Weight |
Percentage of requests to send to that upstream service |
Yes |
This value is configurable only if you have multiple upstream services. The sum of all upstream weights must equal |
Promote an API Instance from Another Environment
-
Navigate to Anypoint Platform > API Manager.
-
In API Administration, click Add API and select Promote API from environment.
-
Select the Source Environment.
-
Select the API by entering the name of the API into the search field.
-
Select the API Version.
-
Select the API instance label.
-
Optionally, uncheck any of the Include in Promotion options you want to exclude.
-
Click Promote.
-
Review and update the Runtime & Endpoint Configuration details as needed and click Save.
Import API from Zip File
-
Navigate to Anypoint Platform > API Manager.
-
From API Administration, click Add API and select Import API from zip file.
-
Click Choose file and select your API instance configuration zip file.
-
Click Next.
-
Review and update the API Configuration details as needed and click Save.