Create a Community
Creating and configuring a Salesforce Experience Cloud site for your API community includes setting branding, forums and moderation rules, Salesforce CMS, Salesforce CRM content, Chatter tracking for APIs, profiles and permissions, sharing, member registration and approval, and user impersonation.
You can create any number of sites. All sites are in the same Salesforce organization. The default Anypoint API Community Manager license covers up to 100 sites.
Installing, updating, or configuring API Community Manager must be done by a user account with the System Administrator profile in the API Community Manager Salesforce organization.
If you are not familiar with Experience Cloud, refer to the Experience Cloud Overview.
Create a New Community
-
Navigate to Setup.
-
In the Quick Find box, enter
Digital Experiencesand then click All Sites. -
Click New.
All site templates are listed.
-
If you want to get started from an example, choose any of the API Community Manager Templates or any of the other available templates.
-
If you want to design your site from scratch with full control of the structure and look and feel, choose Build your own.
-
Click Get Started.
-
Enter values for Name and optional URL suffix for your site.
-
Click Create.
The configuration process will take a few minutes.
-
When the configuration process finishes and you see your new site workspace, click Install AppExchange Package in the top banner and follow the installation wizard instructions to install the pre-defined metrics and dashboards.
Make sure to install this package in your production organization when prompted by the wizard.
-
Open Salesforce App Launcher and select API Community Manager to open the API Community Manager control panel.
If you don’t see API Community Manager in App Launcher, follow Enable API Community Manager Control Panel.
-
In the API Community Manager control panel, click Shortcuts to applications and select Site Administration.
-
Click Settings.
-
Click Activate.
To enable the admin panels, publish your community for the first time:
-
In the API Community Manager control panel, click Shortcuts to applications and select Site Builder.
-
Click Publish in the top right corner.
-
In the Publish Your Community dialog, click Publish.
In a few minutes, your community is published.
-
Look for an email notification including your community’s public URL.
-
You can also always find your community’s live URL by opening the API Community Manager control panel, clicking Shortcuts to applications, and selecting Open Site.
To use a custom domain name, also known as a vanity domain, refer to the Salesforce knowledge article Run your Salesforce Digital Experience under a custom domain.
To customize the look, feel, and branding of your community, refer to Brand and Customize Your API Community.
Configure Content
Your community’s content configuration controls the forums, moderation rules, Chatter tracking for APIs, Salesforce CMS, and Salesforce CRM content.
Configure Forums
-
In the API Community Manager control panel, click Shortcuts to applications and select Site Administration.
-
Click Preferences in the left panel.
-
Click Show all settings in Workspaces.
-
Click Save so this setting is reflected.
-
Click Allow discussion threads.
-
Click Save.
-
Return to the API Community Manager control panel, and click Manage CMS Content.
-
Click the Topics tab.
-
Click Navigational Topics.
-
Create as many topics as you need for your community forums and click Save.
By default, discussion forums are not moderated, so any member can create posts with any content and the posts become visible for other members immediately. If you want to define a basic "review/approve-all" moderation model, follow these steps:
-
In the API Community Manager control panel, click Manage Forums > Rules.
-
Click New and create a Content Rule.
-
Enter a Name and a Unique Name in the Details section and click Activate Rule.
-
In the Rule Conditions section, select Post and Comment, and in Moderation Action select Review.
-
In the Criteria section, move all items in Member Criteria from the Available Criteria box to the Selected Criteria box.
-
Click Save.
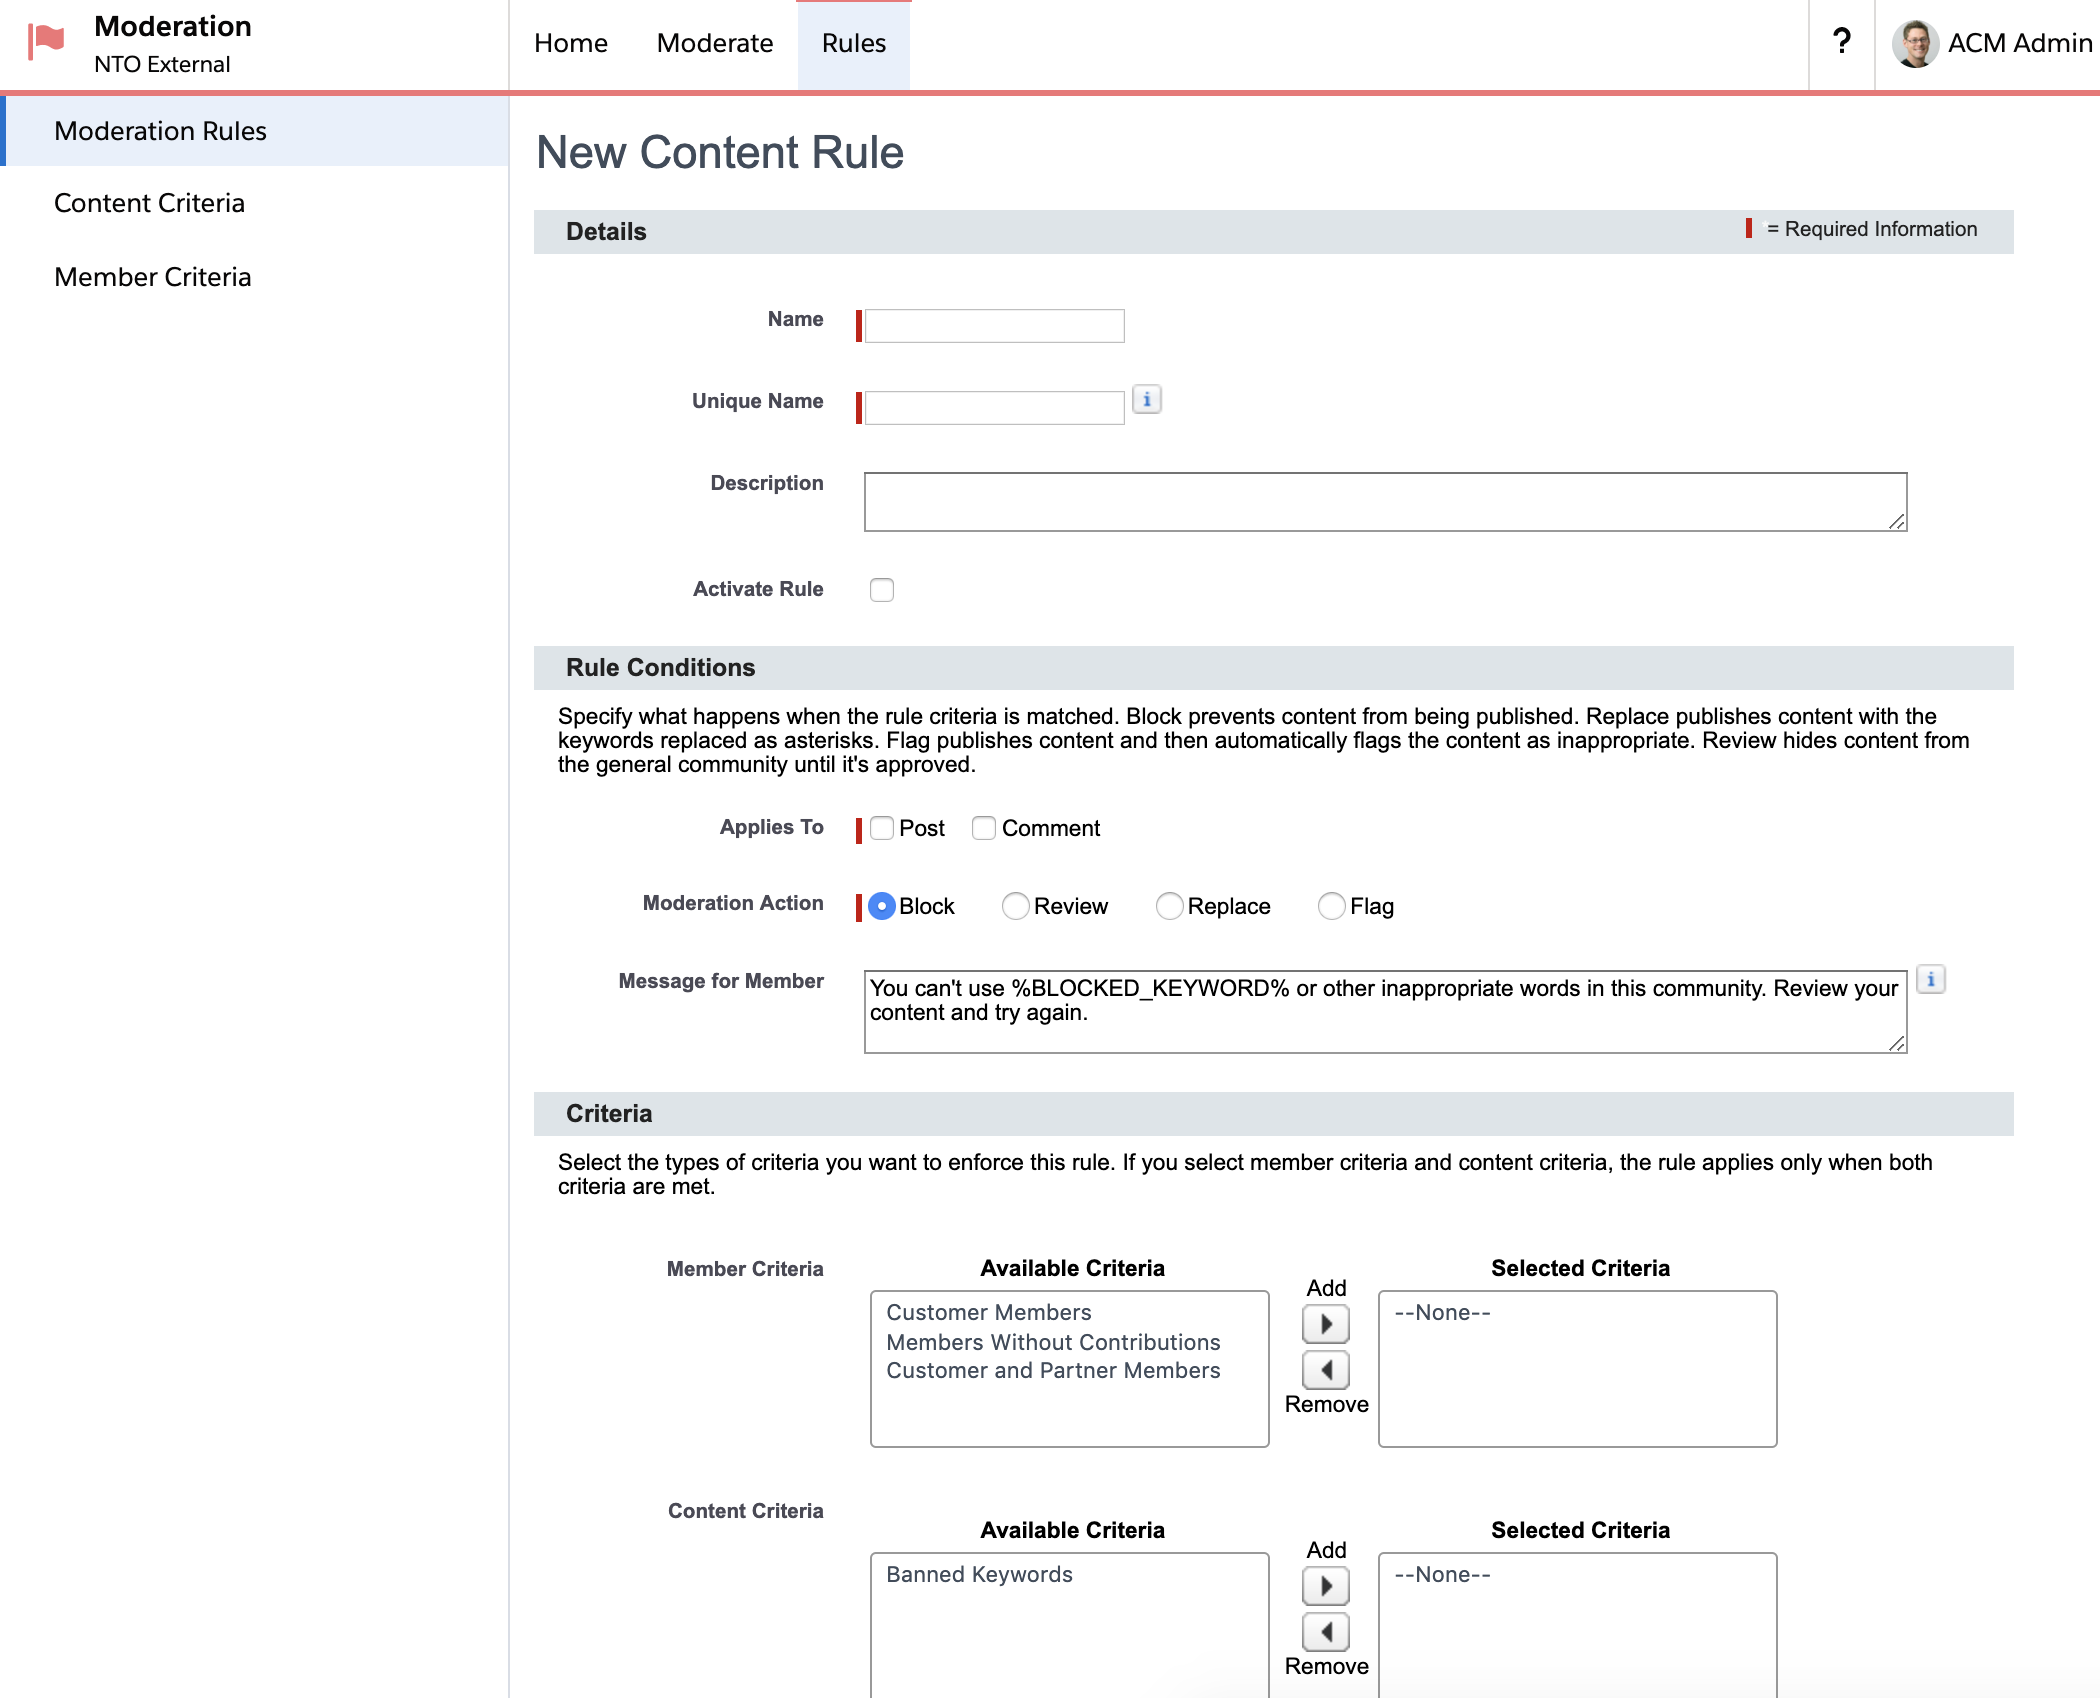
| Verify the Activate Rule check box is active when saving your changes. |
You can define much more advanced moderation and review rules. You can find more information in the Salesforce Experience Cloud documentation about forum moderation rules.
Chatter tracking enables your community to create discussions about specific objects such as APIs. To enable Chatter tracking:
-
In Setup, search for Chatter using the Quick Find box and click Feed Tracking.
-
Click CommunityAPI.
-
Without selecting any fields, click Enable feed tracking.
-
Click Save.
Organize CMS Content Using Topics
If you want to organize CMS content using Topics, follow these steps:
-
Go to the API Community Manager control panel, click Manage CMS Content, and click Topics.
-
Select the topics you want to enable to organize CMS content and click Enable for content in the top right.
Configure Profiles and Permissions
After you create a community, you must create different user profiles for your community members (signed in) and guests, so that you can control access to and visibility of APIs and content.
Configure the settings with one of these options:
-
Configure the member and guest user settings automatically using the default settings specified by the Fix buttons in the API Community Manager diagnostics user access tab.
-
Configure the member and guest user settings manually using custom settings applied in the following steps.
API Community Manager uses the following permission sets to define the visibility of external objects and Apex classes and access to these entities.
-
ACM Admin User
-
ACM Guest User
-
ACM Member User
For more information about using permission sets, see Permission Sets.
Configure Member User Permission Sets
The permission for the member user must be assigned to the ACM Member User permission set so your members can access APIs, create client applications, and manage their details.
As part of the API Community Manager package, the member user is assigned automatically. After the package is installed, a trigger searches for users with a Customer Community Profile and assigns the member users to the ACM Member User permission set.
To manually assign a new user to the permission set for access to the external objects and Apex classes:
-
Go to the member profile and search for the assigned user.
-
Assign the ACM Member User Permission Set to the User.
Configure Guest User Permission Sets
The permission for the guest user must be assigned to the ACM Guest User permission set so your guests can access API information.
You can use API Community Manager Diagnostics or manually set the guest user profile to the ACM Guest User permission set.
To manually assign the guest user to the permission set for access to the external objects and Apex classes:
-
Go to the guest profile and search for the assigned user.
-
Assign the ACM Guest User to the Community Guest User.
Configure Sharing Settings
Configure the settings with one of these options:
-
Configure sharing settings for members and guests automatically using the default settings specified by the Fix buttons in the API Community Manager diagnostics user access tab.
-
Configure sharing settings for members and guests manually using custom settings applied in the following steps.
Configure sharing settings for members:
-
In Setup, search for
Digital Experiencesusing the Quick Find box and click Settings. -
Scroll to Sharing Sets and click New.
-
In the Sharing Set Edit section, update Label with
Site Name Sharing Set. -
In the Select Profiles section, select Site Name Member User from Available Profiles and add it to Selected Profiles.
-
In the Select Objects section, select CommunityApi and CommunityAssetVersion from Available Objects and add them to Selected Objects.
-
In the Configure Access section, under the Action column, select Set Up next to CommunityApi.
-
In the Access Mapping for CommunityApi page enter these values.
-
Account in the User list.
-
acm_pkg__Account_c in the Target CommunityApi list.
-
Read Only in the Access Level list.
-
-
Click Update.
-
In the Configure Access section, under the Action column, select Set Up next to CommunityAssetVersion.
-
In the Access Mapping for CommunityAssetVersion page enter these values.
-
Account in the User list.
-
acm_pkg__Account_c in the Target CommunityAssetVersion list.
-
Read Only in the Access Level list.
-
-
Click Update.
-
Click Save.
Configure sharing settings for guests:
-
In Setup, search for Security using the Quick Find box and click Sharing Settings.
-
Scroll to the CommunityApi Sharing Rules section near the bottom of the page and click New.
-
In the Rule Name section, update Label with
Site Name Guest. -
In the Select your rule type section, select
Guest user access, based on criteria. -
In the Select which records to be shared section, add these criteria.
-
Field:
Community NameOperator:equalsValue:Site Name -
Field:
VisibilityOperator:equalsValue:Public
-
-
In Select the users to share with, select
Site Name Site Guest User. -
In Select the level of access for the users, select Read Only.
-
Save.
-
In Setup, search for Security using the Quick Find box and click Sharing Settings.
-
Scroll to the CommunityAssetVersions Sharing Rules section near the bottom of the page and click New.
-
In the Rule Name section, update Label with
Site Name Guest. -
In the Select your rule type section, select
Guest user access, based on criteria.-
Field:
Community NameOperator:equalsValue:Site Name -
Field:
VisibilityOperator:equalsValue:Public
-
-
In Select the users to share with, select
Site Name Site Guest User. -
In Select the level of access for the users, select Read Only.
-
Save.
| If you ever change the name of your site, be sure to update this setting. |
Enable Guest User Registration as Members
These steps enable guests to register as members in your API Community Manager portal.
Configure the settings with one of these options:
-
Configure user registration automatically using the default settings specified by the Fix buttons in the API Community Manager diagnostics user access tab.
-
Configure user registration manually using custom settings applied in the following steps.
Assign a profile for your community members:
-
In the API Community Manager control panel, click Shortcuts to applications and select Site Administration. Navigate to the Members section in the left panel.
-
In the Select Profiles section, in the Search list, click All.
-
Use the Add button to add Site Name Member User to the Selected Profiles box.
-
Click Save.
| Do not Remove the System Administrator profile from the Selected Profiles section. If you remove the System Administrator profile you will lose all access to your community. |
Create an account for your community members:
-
Navigate to App Launcher and click Accounts.
-
Click New to create a new account.
-
Select the record type Company and click Next.
-
Enter
ACM Registered Usersin Account Name. -
Click Save.
Configure a registration page for your community members. The self-registration Lightning component enables guest users to register themselves as members of your community. If you’re not using any of the templates supplied with API Community Manager, use these steps to add the self-registration Lightning component specific to API Community Manager:
-
In the API Community Manager control panel, click Shortcuts to applications and select Site Builder.
-
In the Pages list in the top left, navigate to the Register page.
-
Remove the standard Self Registration Lightning component by clicking the delete icon next to it.
-
Navigate to Components, search for Self Register and add the Lightning component to the page.
Configure a login page:
-
In the API Community Manager control panel, click Shortcuts to applications and select Site Administration. Navigate to the Login & Registration section in the left panel.
-
Scroll down to the Registration Page Configuration section near the bottom of the page.
-
Select Allow customers and partners to self-register.
-
Select Experience Builder Page for Registration Page Type and click Register.
-
Select Site Name Member User in Profile.
-
Select ACM Registered Users Account in Account.
-
-
Click Save.
| Refer to Brand and Customize Your API Community to understand how to configure the look and feel of your login and registration pages. |
Optionally Set Up an Admin Approval Process for Creating New Users
Use these steps to set an optional approval process for self-registered users. The system will then require administrator approval before creating member accounts. If the request is approved, the new user account is created, a welcome email is sent to the new user, and the user sets a password and logs in to the community.
If you don’t configure an approval process, self-registered users will become members automatically when they register.
Create the approval process:
-
In Setup, search for Approval Processes in the Quick Find box and click Approval Processes.
-
In the Manage Approval Processes For list, select Self Register User Request.
-
In the Create New Approval Process list, select Use Standard Setup Wizard.
-
In the wizard, enter this information.
-
In Step 1. Enter Name and Description, set Process Name to
Approve Registration. -
Click Next.
-
In Step 2. Specify Entry Criteria, enter this information.
-
Field:
SelfRegisterUserRequest: Approved -
Operator:
equals -
Value:
False
-
-
Click Next.
-
In Step 3. Specify Approver Field and Record Editability Properties, in the Record Editability Properties section, select Administrators ONLY can edit records during the approval process.
-
Click Next.
-
In Step 4. Select Notification Templates, in the Approval Assignment Email Template section, in the look-up dialog, under the ACM category, select Registration Request.
-
Click Next.
-
In Step 5. Select Fields to Display on Approval Page Layout:
-
Add Self Register User Request Name and Owner to Selected Fields.
-
Select the Display approval history information in addition to the fields selected above check box.
-
-
Click Next.
-
In Step 6. Specify Initial Submitters, add Self Register User Request Owner to the Allowed Submitters column.
-
Click Save and continue to the next section.
-
Create an approval step:
-
If you are prompted to add an approval step, click Yes, I’d like to create an approval step now and click Go!.
-
If you are not prompted to add an approval step:
-
In Setup, search for Approval Processes in the Quick Find box and click Approval Processes.
-
Click Approve Registration (the approval that you created in the previous section).
-
In the Approval Steps section, click New Approval Step.
-
-
In the Step 1. Enter Name and Description section, enter
Step 1in Name. -
Click Next.
-
In the Step 2. Specify Step Criteria section, click Next.
-
In the Step 3. Select Assigned Approver section, select Let the submitter choose the approver manually.
-
Click Save.
Create a final approval action:
-
If you are prompted to add an Approval Action, click Yes, I’d like to create an approval action for this step now, select Field Update in the list, and click Go!.
-
If you are not prompted to add an Approval Action:
-
In Setup, search for Approval Processes in the Quick Find box and click Approval Processes.
-
On the Self Register User Request: Approve Registration page, navigate to Final Approval Actions and click Add New.
-
Click Field Update.
-
-
In the Field Update Edit section, enter these values.
-
Name:
Create User -
Field to update:
Approved -
Re-evaluate Workflow Rules after Field Change: Select the check box.
-
Checkbox Options:
True.
-
-
Click Save.
Activate the approval process:
-
On the Approve Registration page, click Activate and confirm.
-
In the API Community Manager control panel, click Shortcuts to applications and select Site Builder. Click Settings > General.
-
In Site Builder, navigate to the Register page in the Pages list and select the API Community Manager Self Register Lightning component.
-
Ensure that Approved Registration is enabled.
Require Admin Approval for Guest Registration
To prevent the self-registration approval process from automatically approving new users, configure the guest registration to require an admin’s approval.
You must have API Community Manager package 2.24 or later installed to enable this approval process.
To require an admin’s approval for guest registration:
-
Configure the Builder:
-
Go to Salesforce > Setup.
-
In the Quick Find box enter
All Sitesand select All Sites. -
On the Digital Experience page, click Builder.
-
Click the Page Properties drop-down, enter
registerin the Pages search box, and select Register. -
Click the Self Register component and select the Registrations Require Approval checkbox.
-
-
Add the metadata in Salesforce:
-
Go to Salesforce.
-
In the Quick Find box, enter
custom metadata typesand select Custom Metadata Types. -
On the All Custom Metadata Types page, select ACM Community Configuration Metadata.
-
On the ACM Community Configuration Metadata page, click Manage ACM Configuration Metadata.
-
Select a metadata record from the list and click Edit.
-
Select the RegistrationRequireApproval checkbox and click Save.
-
If there’s no metadata record listed on the Manage ACM Configuration Metadata page:
-
Click New and enter these fields:
-
Label
-
ACM Community Configuration Metadata Name
-
-
To get the NetworkID:
-
Go to the Builder > Settings and select Developer and click </>Developer Console.
-
In the Query Editor, enter
Select Name, Id from Networkand click Execute. -
In Query Results, copy the number from the Id column and paste it into the NetworkId field on the ACM Community Configuration Metadata page.
-
-
Select the RegistrationRequireApproval checkbox and click Save.