Auto-Paging in Anypoint Connectors
When an Anypoint Connector in your flow produces output that is significantly large, processing the load may cause significant performance delays in your application. To prevent this from happening, split the connector’s output into several "pages" for more efficient processing. Within Mule this Anypoint Connector behavior is referred to as "auto-paging" because the connector automatically paginates its output to prevent memory issues. However, if memory use is not an issue, you can forgo any auto-paging configuration and simply treat the entire payload as a single unit.
Prerequisites
This document assumes that you are familiar with the Anypoint Studio Essentials, Anypoint Connectors and Global Elements. Review the Getting Started with Anypoint Studio chapter to learn more about developing with Mule’s graphical user interface.
Configuring Auto-Paging
The table below lists the Anypoint Connectors which support auto-paging functionality. Additionally, you can use auto-paging with any custom-built connector which supports auto-paging functionality.
Connectors with Auto-Paging
-
Box
-
Google Calendars
-
Google Drive
-
Google Contacts
-
Google Prediction
-
Google Spreadsheets
-
Google Tasks
-
Marketo
-
Microsoft Dynamics CRM (On Demand)
-
Microsoft Dynamics CRM (On Premise)
-
NetSuite
-
QuickBooks
-
Salesforce (bundled with Studio)
To Install this Connector
-
In Anypoint Studio, click the Exchange icon in the Studio taskbar.
-
Click Login in Anypoint Exchange.
-
Search for the connector and click Install.
-
Follow the prompts to install the connector.
When Studio has an update, a message displays in the lower right corner, which you can click to install the update.
To Configure Using Studio Visual Editor
-
To make the Paging section visible in a connector, you must first select an Operation which outputs a collection, for example
Get calendar list. Otherwise, Studio does not display the Paging section in the properties editor. -
Enter an integer in the Fetch Size field to indicate the batch size of objects in a "page". For example, set the Fetch Size to
50to return information in batches of 50 objects.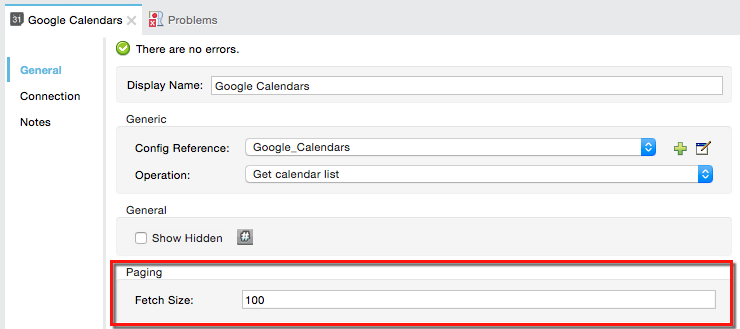
Attribute Default Value Description Fetch Size
100
Specify the number of objects that Mule returns in each page.
To Configure Using the XML Editor
-
To the connector in your flow, add a
fetchSizeattribute. -
Set the value of the attribute to an integer to indicate the batch size of objects in a "page". For example, set
fetchSizeto50to return information in batches of 50 objects.<flow name="for-screenshotsFlow"> <google-calendars:get-calendar-list config-ref="Google_Calendars" doc:name="Google Calendars Paging Example" fetchSize="50"/> </flow>xmlProperty Default Value Description fetchSize100
Specify the number of objects that Mule returns in each page.
Handling Auto-Paged Output
When you use a connector that employs paging, Mule creates an iterator object that splits the payload into manageable pages. Regardless of the page-size, the iterator pushes out objects one at a time, then fetches the next pages on demand. To process the paginated output, you must use elements in your flow that can handle collections, such as a Foreach scope, a collection splitter, a Transform Message component, etc. Because Mule processes the set of pages one page at a time, it prevents memory usage from exceeding its limits.
Example Using Studio Visual Editor
-
Drag an HTTP endpoint onto the canvas.
-
Set its Path to
authenticate. -
Create a Connector Configuration element for the HTTP endpoint. Set its Host to
localhostand its Port to 8081 -
Add a Google Calendars connector to the flow, then set its Operation to
Authorize. -
Create a Google Calendars Global Element, then configure its Consumer Key and Consumer secret.
-
Create a new flow dragging in a new HTTP endpoint.
-
Set its Path to
get_events. -
Add a new Google Calendars connector to the new flow.
-
Set its Operation to
Get Eventsand its Fetch Size to50. -
Add a Foreach scope after the Google Contacts connector, and a Logger inside the Foreach scope.
When a message reaches the Google Calendar connector, the Logger outputs a separate message for each object. If there are more than 50 objects, Mule paginates the output.
Example Using XML
-
Create a google-contacts Global Element, then define its Consumer Key and Consumer secret.
<google-contacts:config-with-oauth name="Google_Contacts" consumerKey="" consumerSecret="" doc:name="Google Contacts" applicationName="Mule-GoogleContactsConnector"> <google-contacts:oauth-callback-config domain="localhost" path="auth" remotePort="8081"/> </google-contacts:config-with-oauth>xml -
Create an HTTP connector and set the value of its Path to
authenticate.<http:listener config-ref="HTTP_Listener_Configuration" path="authenticate" doc:name="HTTP"/>xml -
Outside the flow, create a configuration element that matches the name referenced by the connector. Set the host to localhost and the port to 8081.
<http:listener-config name="HTTP_Listener_Configuration" host="localhost" port="8081" doc:name="HTTP Listener Configuration"/>xml -
Add a Google Calendars connector setting its operation to
authorize.<google-contacts:authorize config-ref="Google_Contacts" doc:name="Google Contacts"/>xml -
Create a new flow with a new HTTP endpoint. Set the value of its Path to
get_events, and reference the same configuration element as the other connector.<http:listener config-ref="HTTP_Listener_Configuration" path="get_events" doc:name="HTTP Connector"/>xml -
Add a new Google Contacts connector in the new flow setting its operation to
get-eventsand fetchSize to50.<google-calendars:get-events config-ref="Google_Calendars1" doc:name="Google Calendars Paging Example" fetchSize="50" calendarId="myCal"/>xml -
After the Google Calendars connector, add a Foreach to the flow, then add a Logger as a child element inside Foreach element.
<foreach doc:name="For Each"> <logger message="#[message.payload.getEmailAddresses()]" level="INFO" doc:name="Logger"/> </foreach>xml
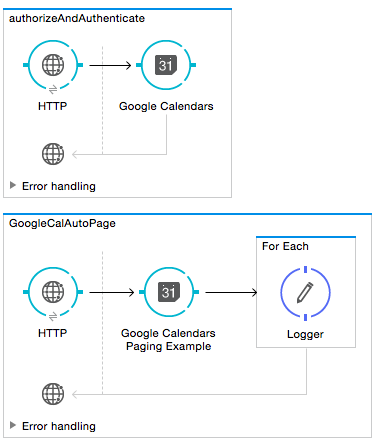
Example Final Flows
<flow name="authorizeAndAuthenticate">
<http:listener config-ref="HTTP_Listener_Configuration" path="authenticate" doc:name="HTTP"/>
<google-calendars:authorize config-ref="Google_Calendars" doc:name="Google Calendars"/>
</flow>
<flow name="GoogleCalAutoPage">
<http:listener config-ref="HTTP_Listener_Configuration" path="get_events" doc:name="HTTP"/>
<google-calendars:get-events config-ref="Google_Calendars" doc:name="Google Calendars Paging Example" fetchSize="50" calendarId="myCal"/>
<foreach doc:name="For Each">
<logger level="INFO" doc:name="Logger"/>
</foreach>
</flow>xmlWhen a message reaches the Google Contacts connector, the Logger outputs a separate message for each object. If there are more than 50 objects, Mule paginates the output. See below for a complete example.
Additional MEL Expressions
When working with paginated output in a flow, you can use MEL expressions to call two functions.
| Function | Syntax | Description |
|---|---|---|
size |
|
Returns the total amount of available objects. |
close |
|
Abort iteration. |
Another Paging Example
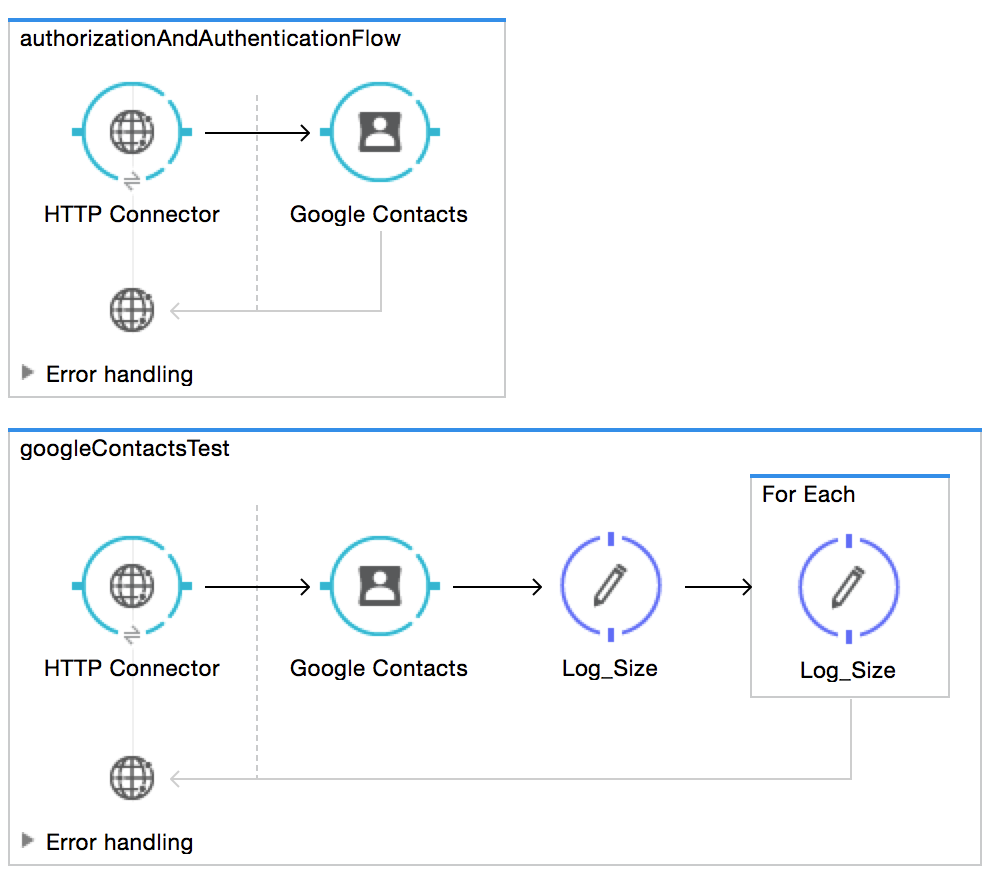
You can call both the size() and the close() functions in any expression that supports MEL. The simple example below illustrates how to call size() in a logger so that it records the total amount of objects that the connector is outputting.
The following example utilizes the Google Contacts connector.
<?xml version="1.0" encoding="UTF-8"?>
<mule xmlns:http="http://www.mulesoft.org/schema/mule/http" xmlns:tracking="http://www.mulesoft.org/schema/mule/ee/tracking" xmlns:google-contacts="http://www.mulesoft.org/schema/mule/google-contacts" xmlns="http://www.mulesoft.org/schema/mule/core" xmlns:doc="http://www.mulesoft.org/schema/mule/documentation" xmlns:spring="http://www.springframework.org/schema/beans" xmlns:xsi="http://www.w3.org/2001/XMLSchema-instance" xsi:schemaLocation="http://www.springframework.org/schema/beans http://www.springframework.org/schema/beans/spring-beans-current.xsd
http://www.mulesoft.org/schema/mule/core http://www.mulesoft.org/schema/mule/core/current/mule.xsd
http://www.mulesoft.org/schema/mule/google-contacts http://www.mulesoft.org/schema/mule/google-contacts/1.7.4/mule-google-contacts.xsd
http://www.mulesoft.org/schema/mule/http http://www.mulesoft.org/schema/mule/http/current/mule-http.xsd
http://www.mulesoft.org/schema/mule/ee/tracking http://www.mulesoft.org/schema/mule/ee/tracking/current/mule-tracking-ee.xsd">
<google-contacts:config-with-oauth name="Google_Contacts" consumerKey="" consumerSecret="" doc:name="Google Contacts" applicationName="Mule-GoogleContactsConnector">
<google-contacts:oauth-callback-config domain="localhost" path="auth" remotePort="8081"/>
</google-contacts:config-with-oauth>
<http:listener-config name="listener-config" host="localhost" port="8081" doc:name="HTTP Listener Configuration"/>
<flow name="authorizationAndAuthenticationFlow">
<http:listener config-ref="listener-config" path="authenticate" doc:name="HTTP Connector"/>
<google-contacts:authorize config-ref="Google_Contacts" doc:name="Google Contacts"/>
</flow>
<flow name="googleContactsTest" >
<http:listener config-ref="listener-config" path="get_events" doc:name="HTTP Connector"/>
<google-contacts:get-contacts config-ref="Google_Contacts" doc:name="Google Contacts" fetchSize="50"/>
<logger message="#[payload.size()]" level="INFO" doc:name="Log_Size"/>
<foreach doc:name="For Each">
<logger message="#[payload.getEmailAddresses()]" level="INFO" doc:name="Log_Size"/>
</foreach>
</flow>
</mule>xmlSee Also
-
Learn more about Scopes.
-
Learn more about the Foreach scope.
-
Need to handle really large payloads? Learn about Mule High Availability HA Clusters.