Build an Application from an API Specification
During your app development lifecycle, you can build Mule REST or SOAP APIs from an API specification using APIkit. You develop APIs based on the following modeling languages:
-
RAML (RESTful API Modeling Language)
-
WSDL (Web Service Description Language)
-
OData (OData-Enabled APIs using APIkit OData Extension)
-
OAS (Open API Specification)
By using APIkit in Anypoint Studio, you can simplify the design and implementation of APIs by automating Mule flow creation based on importing either a RAML or a WSDL specification file. After generating the API, you can perform calls to test the API and then finalize its implementation.
Additionally, APIkit helps you build applications using Apache Maven, and also provides a CLI tool to generate flows for an already existing application. However, before you perform any of these tasks, you must learn the basic APIkit anatomy and understand the scaffolding technique that generates Mule flows when you start APIkit projects.
APIkit Anatomy
A REST or SOAP Studio project that uses APIkit has the following parts:
-
A REST or SOAP interface
-
A main flow
-
Backend flows
REST Interface
The relationship between REST resources and actions is called resource-action pairing. The interface exposes internal data assets requested by the REST service. Also, the interface defines the API, designating resources that contain or access data and specify actions, such as GET and PUT, on the example data.
SOAP Interface
The interface defined by a WSDL file exposes a number of services. Each service has a set of operations. The underlying type of data is XML defined by schemas within the WSDL file or by an imported XSD file.
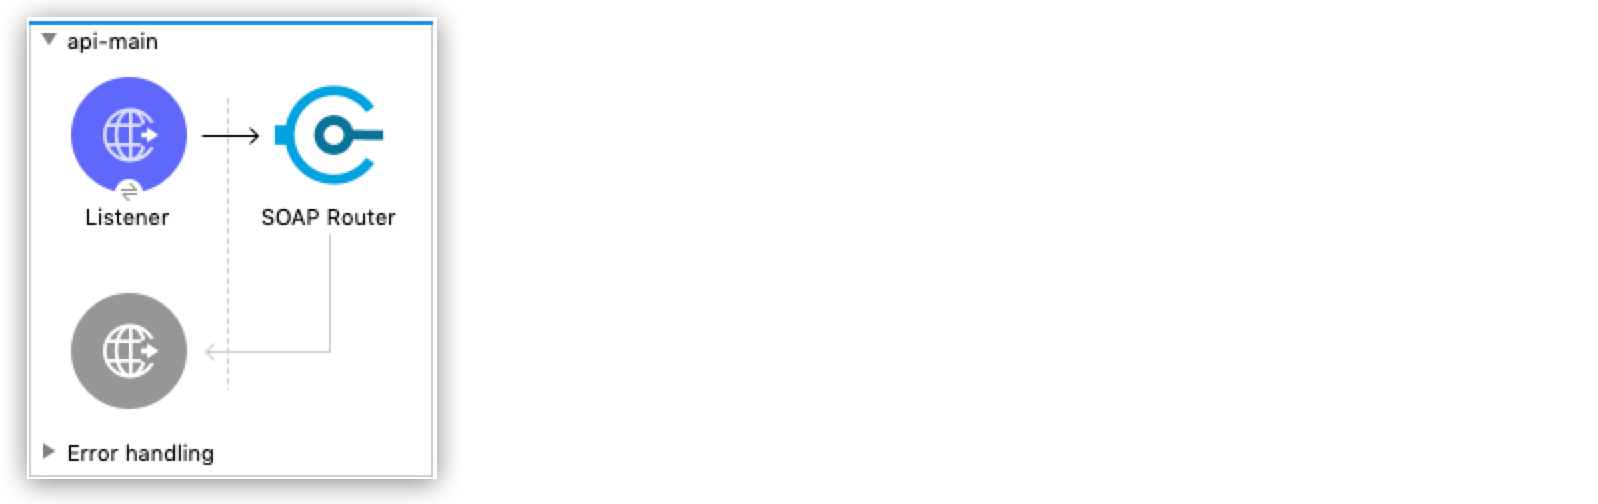
Main Flow
The main flow for the API manages these functions:
-
Exposes the API using Anypoint Connector for HTTP (HTTP Connector).
-
Routes requests between the interface and the backend flows based on the HTTP request.
-
Accepts requests, sends responses, and facilitates communication between the interface and API processes.
The main flow consists of HTTP Listener and APIkit (REST or SOAP) Router components. The APIkit Router is a key message processor that validates requests against the provided definition, enriches messages (for example by adding default values to the messages) and routes requests to a particular flow. Also, the Router raises errors messages if errors occurs while routing, validating or processing the user request.

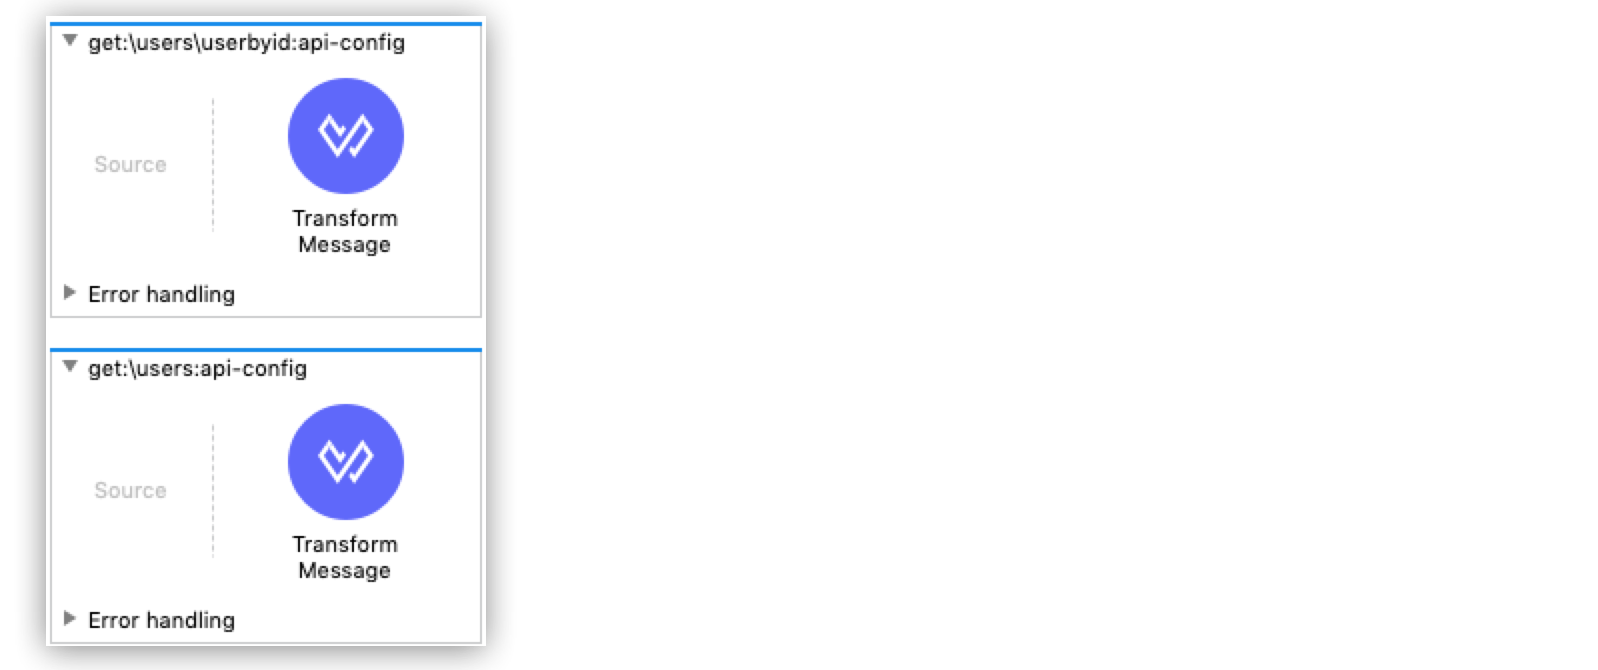
Backend Flows
APIkit for REST generates a backend flow for each resource-action pairing in a RAML file.
APIkit for SOAP generates a backend flow for each operation in a WSDL.
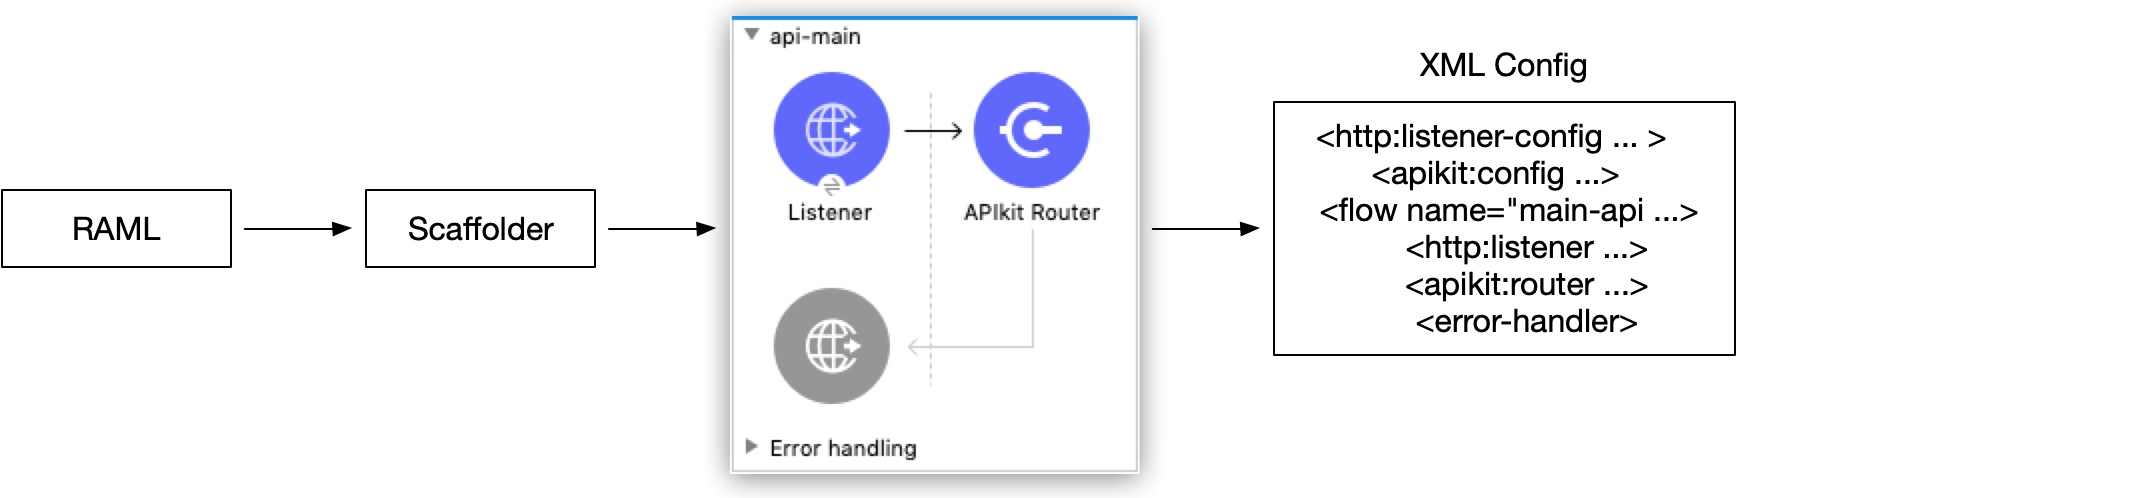
In the following example, the RAML interface receives the GET request users. The backend flow accesses a database to look up users by ID.
Start APIkit Project and Generate Mule Flows
When you start a new APIkit project in Studio, you have the option to import an API definition file. When you import the file, the APIkit scaffolding mechanism generates different flows for the API. There are three ways to start an APIkit project in Anypoint Studio:
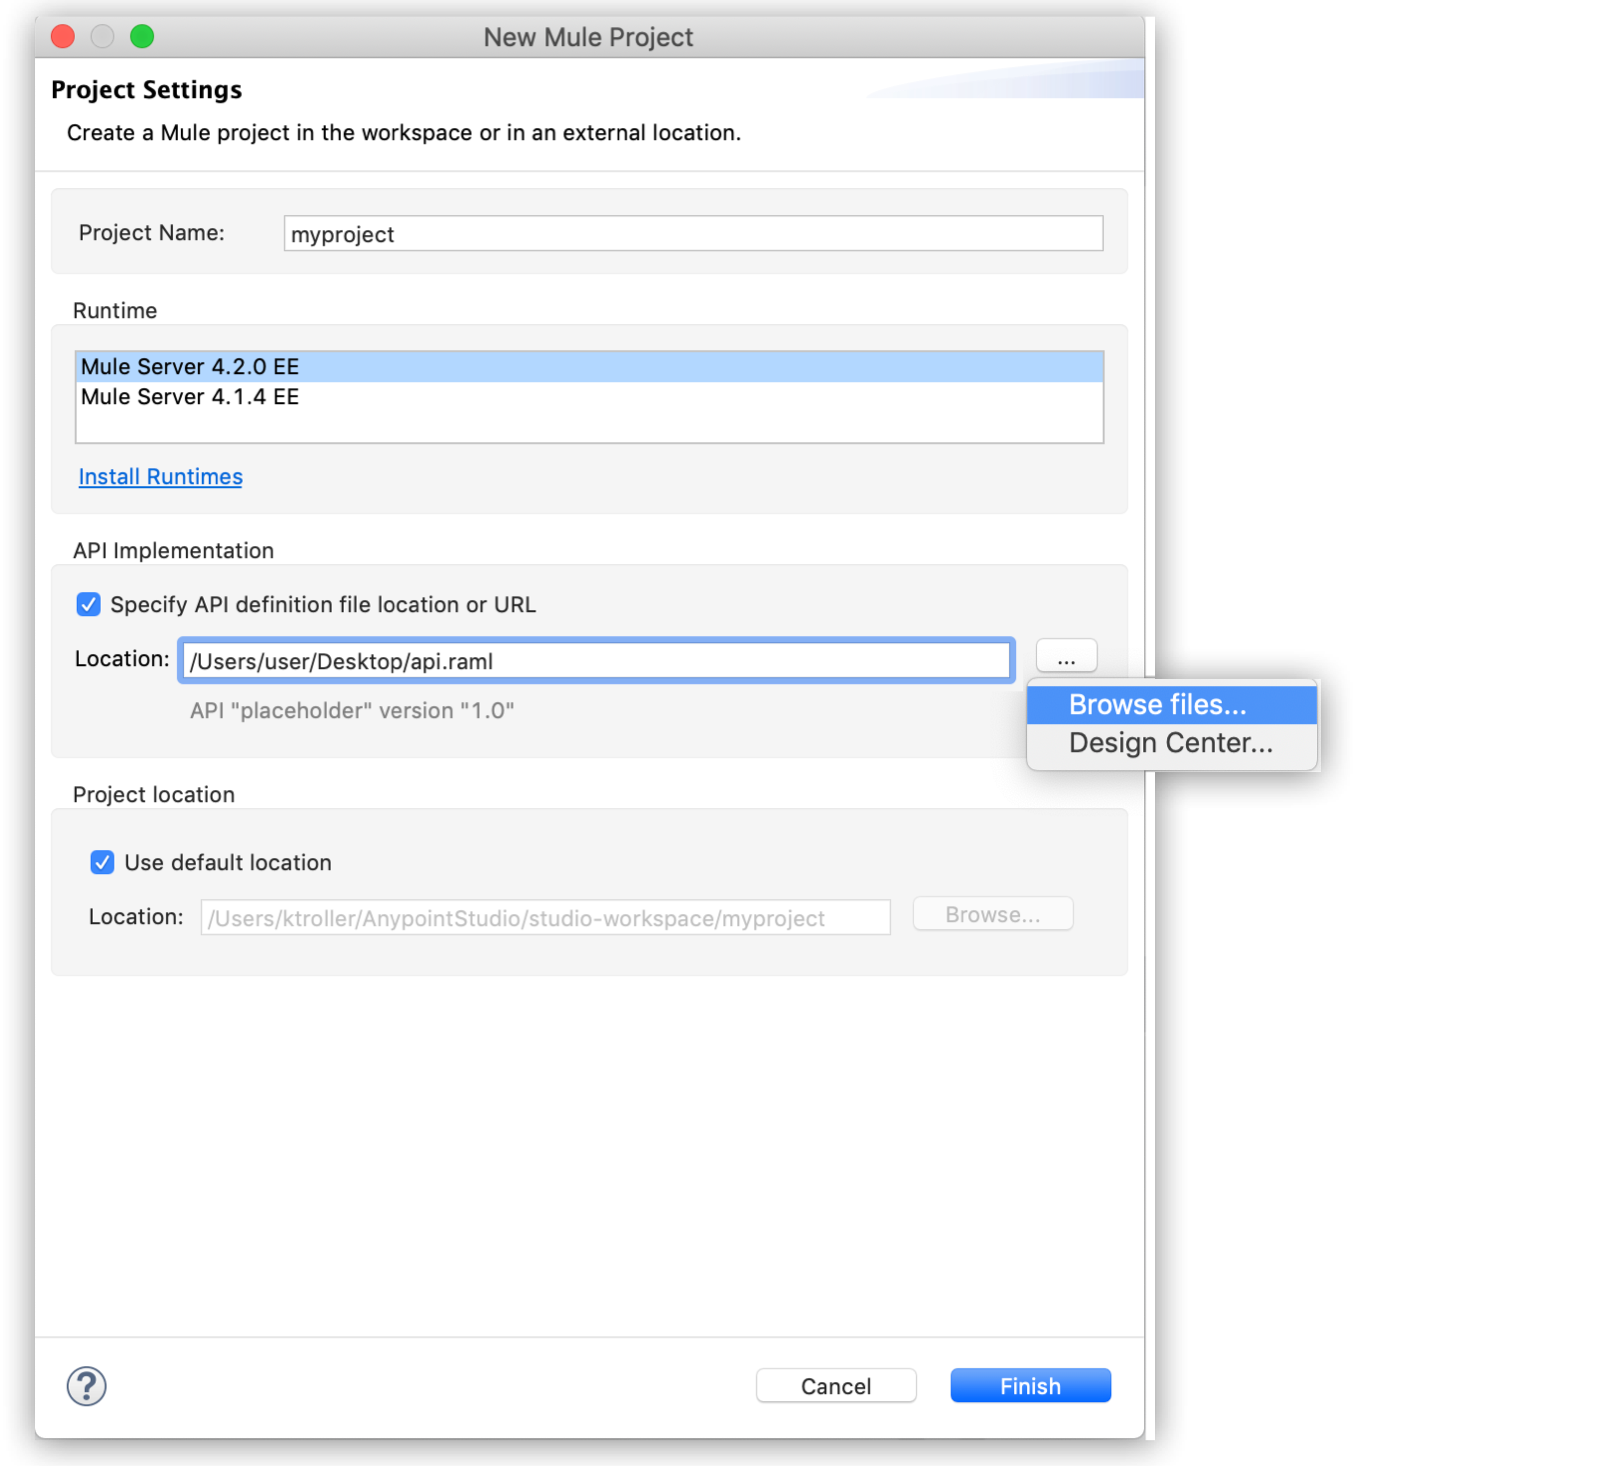
Start a New APIkit Project Using an API Definition File
Use this method if you want to start a project by either importing an existing RAML or WSDL file or by referencing the file URL:
-
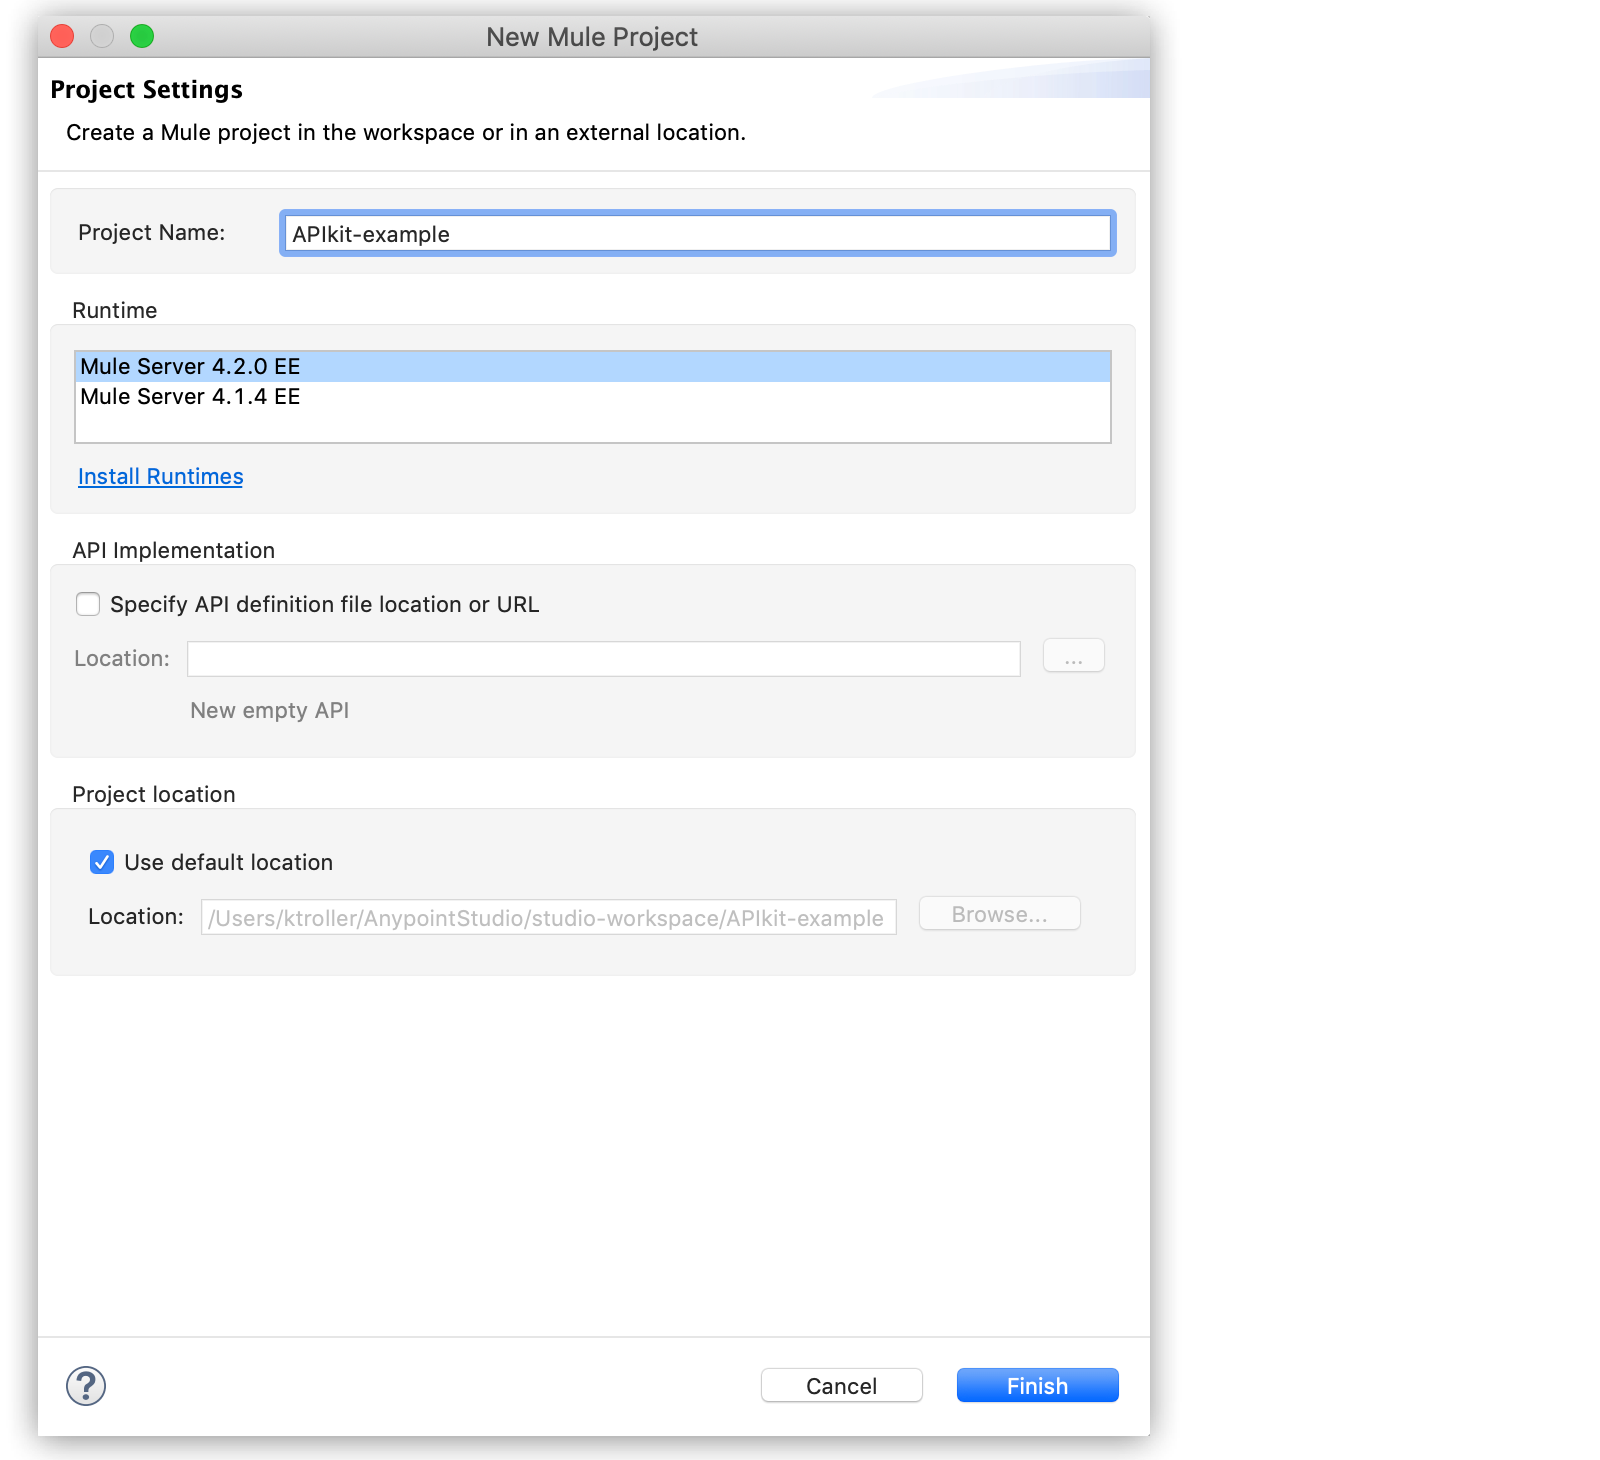
Select File > New > Mule Project.
-
In Project Name, enter a name for the project, for example myproject.
-
Select or accept the default EE Runtime, for example Mule Server 4.2.0 EE.
-
In API Implementation, select Specify API Definition File Location or URL.
-
In Location, do one of the following:
-
If you created an
api.ramlfile in Design Center, select Design Center . Login to Anypoint Platform if necessary, and selectapi.raml. -
If you didn’t create a RAML file in Design Center, select Browse Files and select the RAML or WSDL file that you created in a text editor. For a WSDL file, select a service and port from the drop-down menus or accept the defaults.
-
-
Accept the Location default options, and click Finish.
Using this method the APIkit scaffolding technique generates:
-
An archetype that contains basic configuration files plus a Mule XML configuration file
-
An implementation of the API
For RAML-based APIs, the RAML file appears under the src/main/resources/api folder. The implementation of the API contains:
-
A main flow with an HTTP Listener
-
APIkit Router component
-
Error handlers
-
RAML dependencies (push or pull changes from one location, such as Studio, to the other, such as Design Center)
-
Backend flows containing REST resource-action mappings
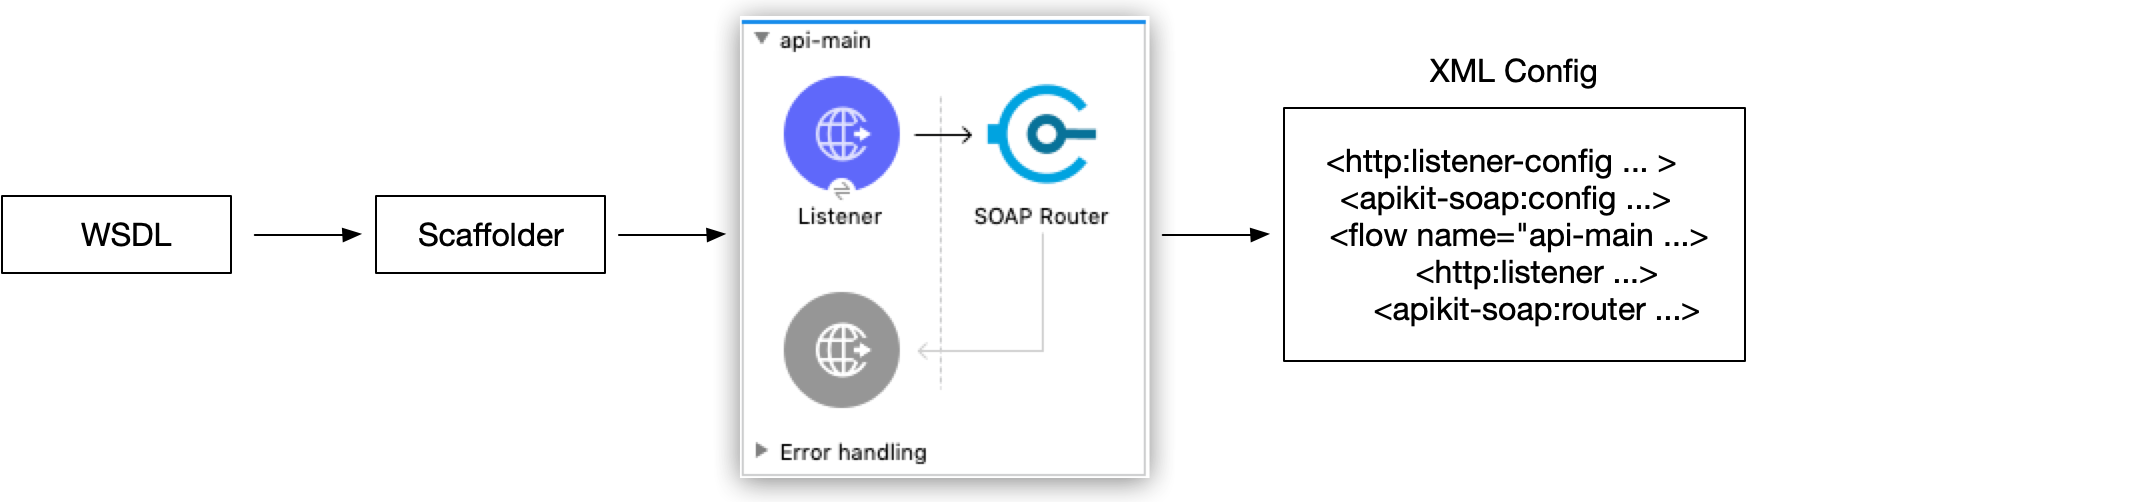
For WSDL-based APIs, the WSDL file appears under the src/main/resources/api folder. The implementation of the API contains:
-
A SOAP Router
-
A SOAP fault response template
-
Backend flows containing SOAP message templates
The following graphics illustrate the APIkit scaffolding:
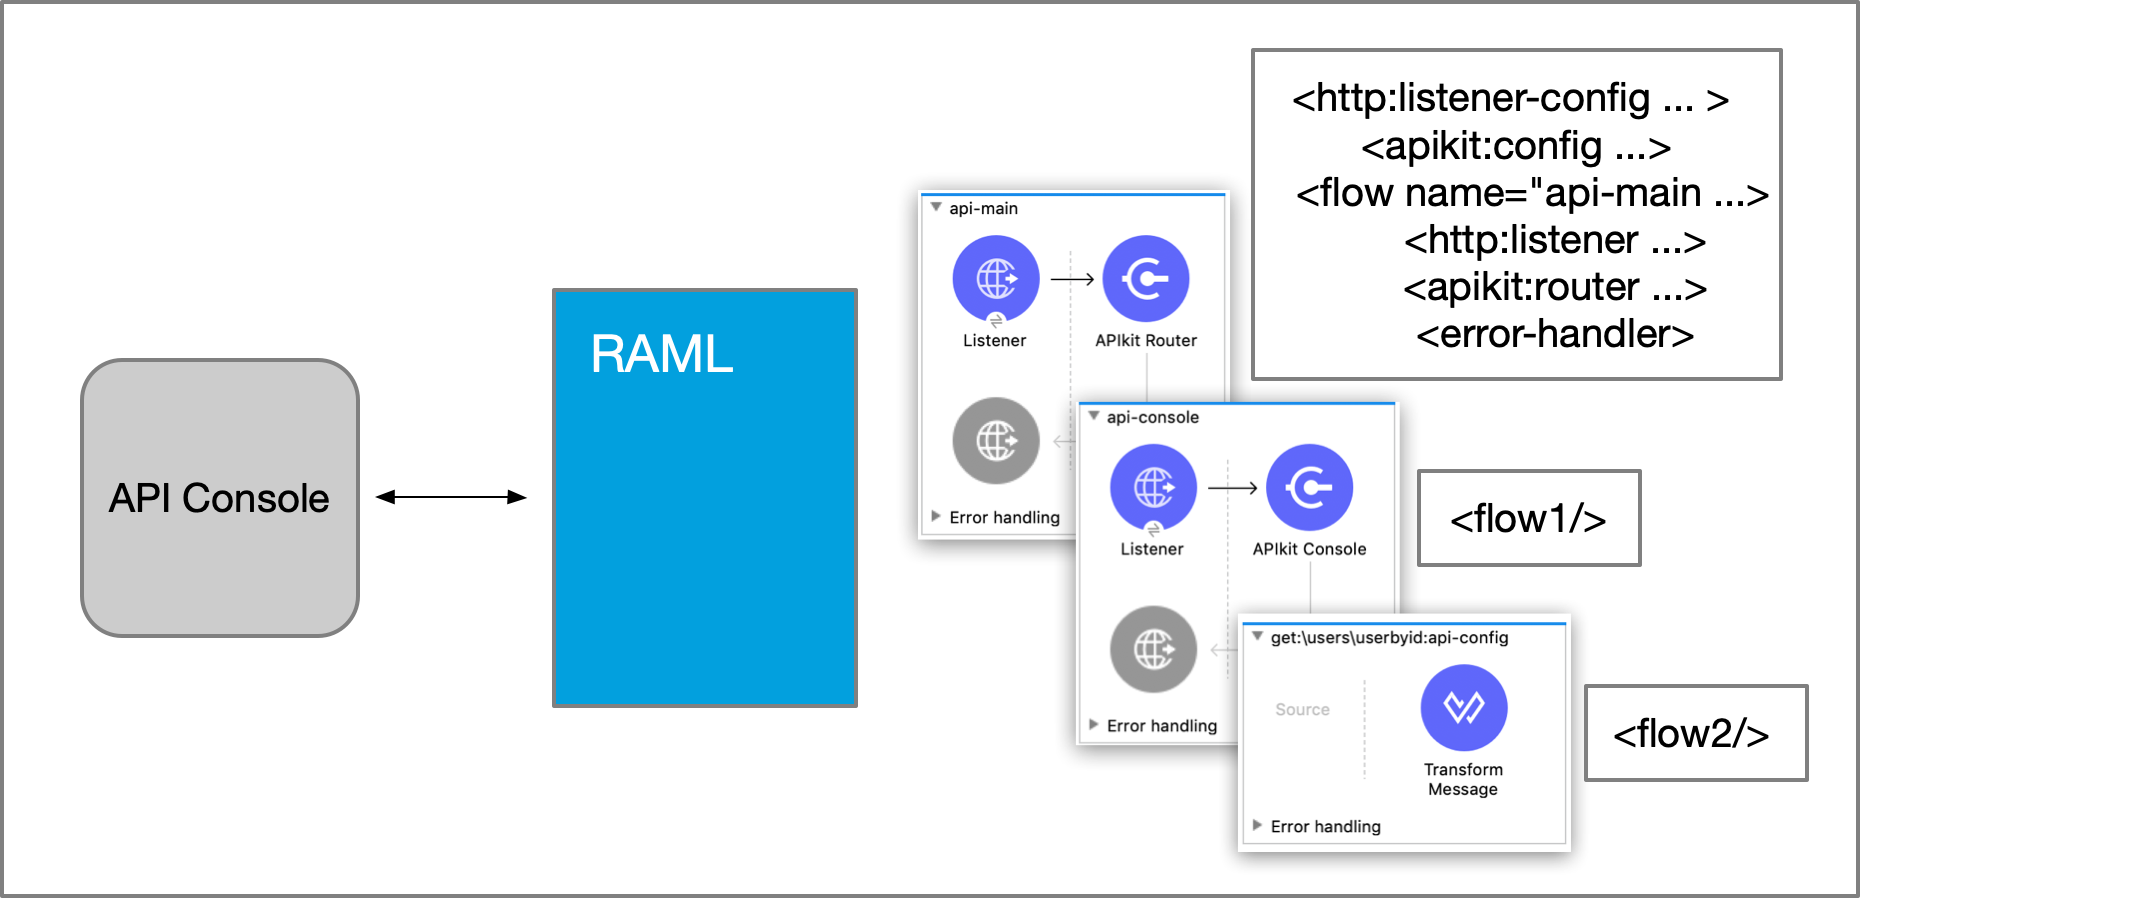
In Studio, the REST API APIkit project looks like this:
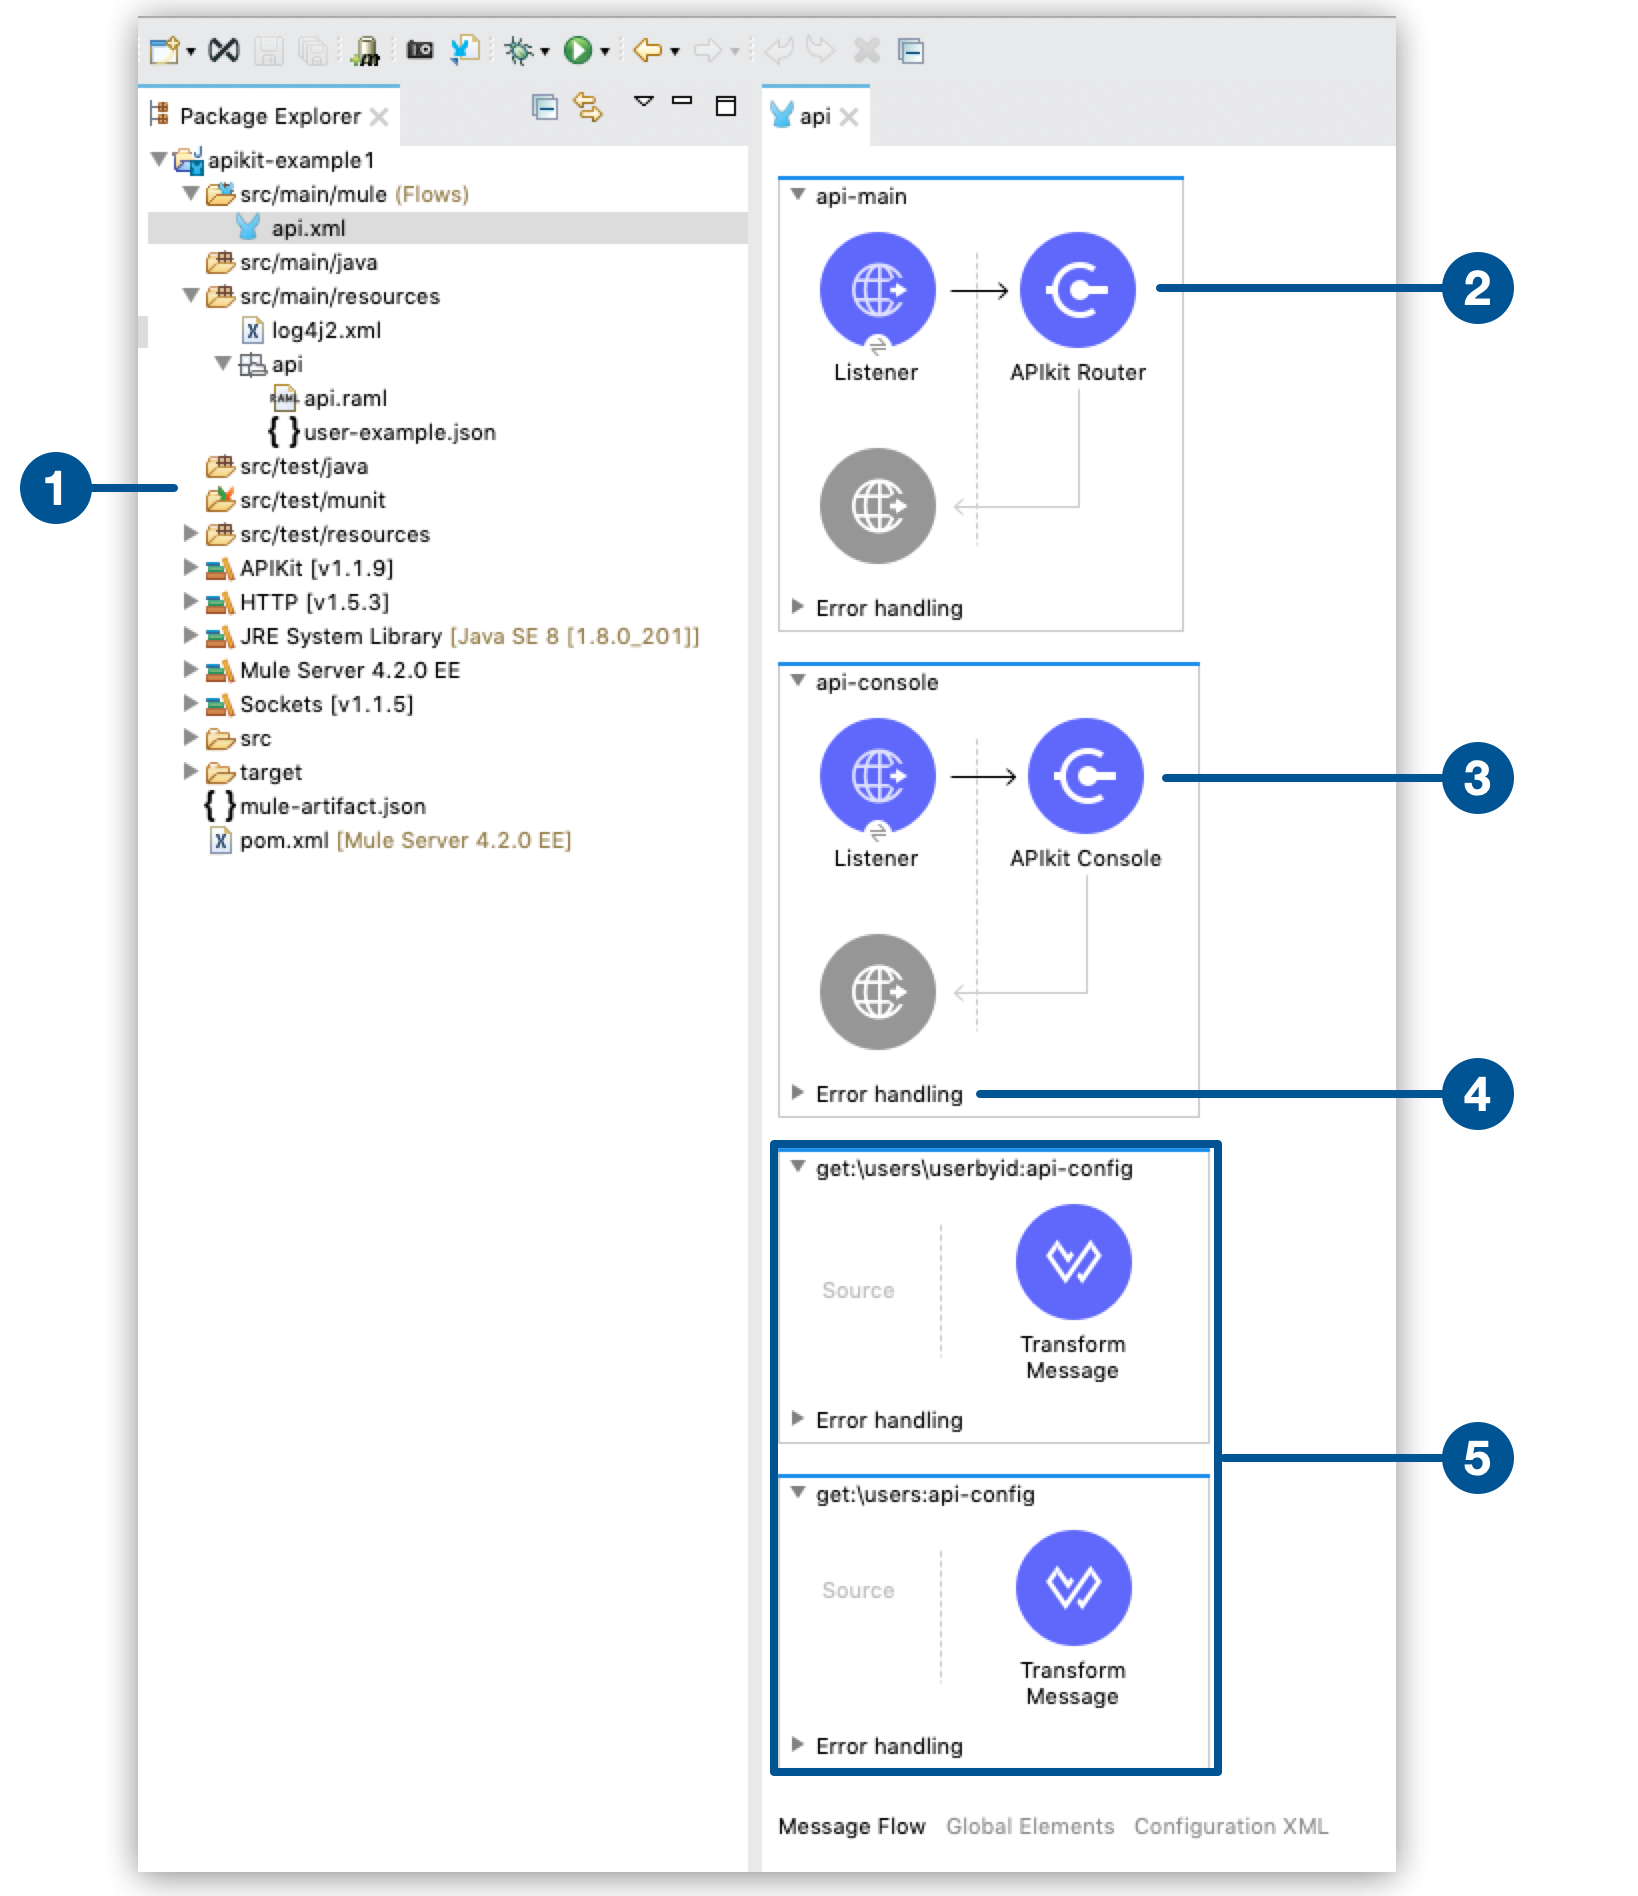
The five items illustrated here show:
-
The project files in the Package Explorer of Studio with the
api.ramlfile undersrc/main/resources/apifolder. -
The main flow, with the APIkit Router.
-
APIkit Console
-
Error Handling
-
Generated flows for each resource method.
The generated minimal flows meets the communication operations required by a REST contract.
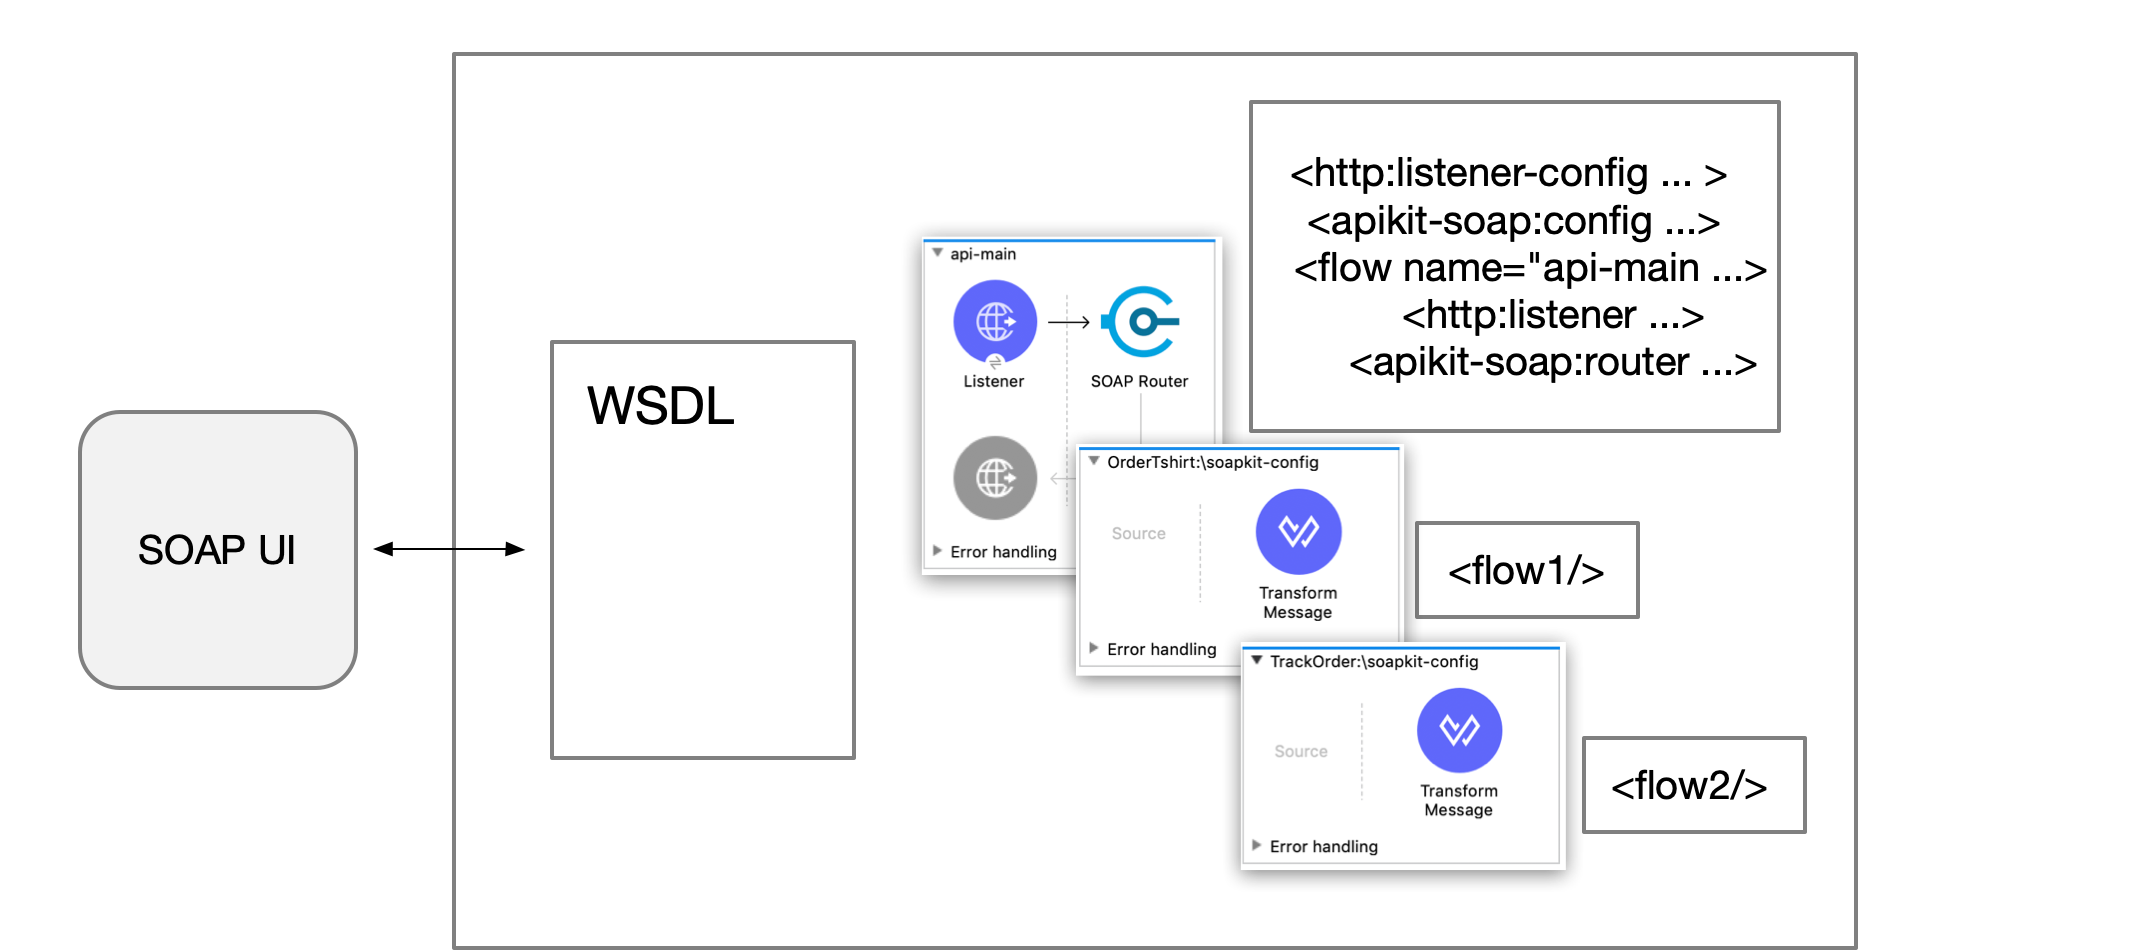
In Studio, the SOAP API APIkit project looks like this:
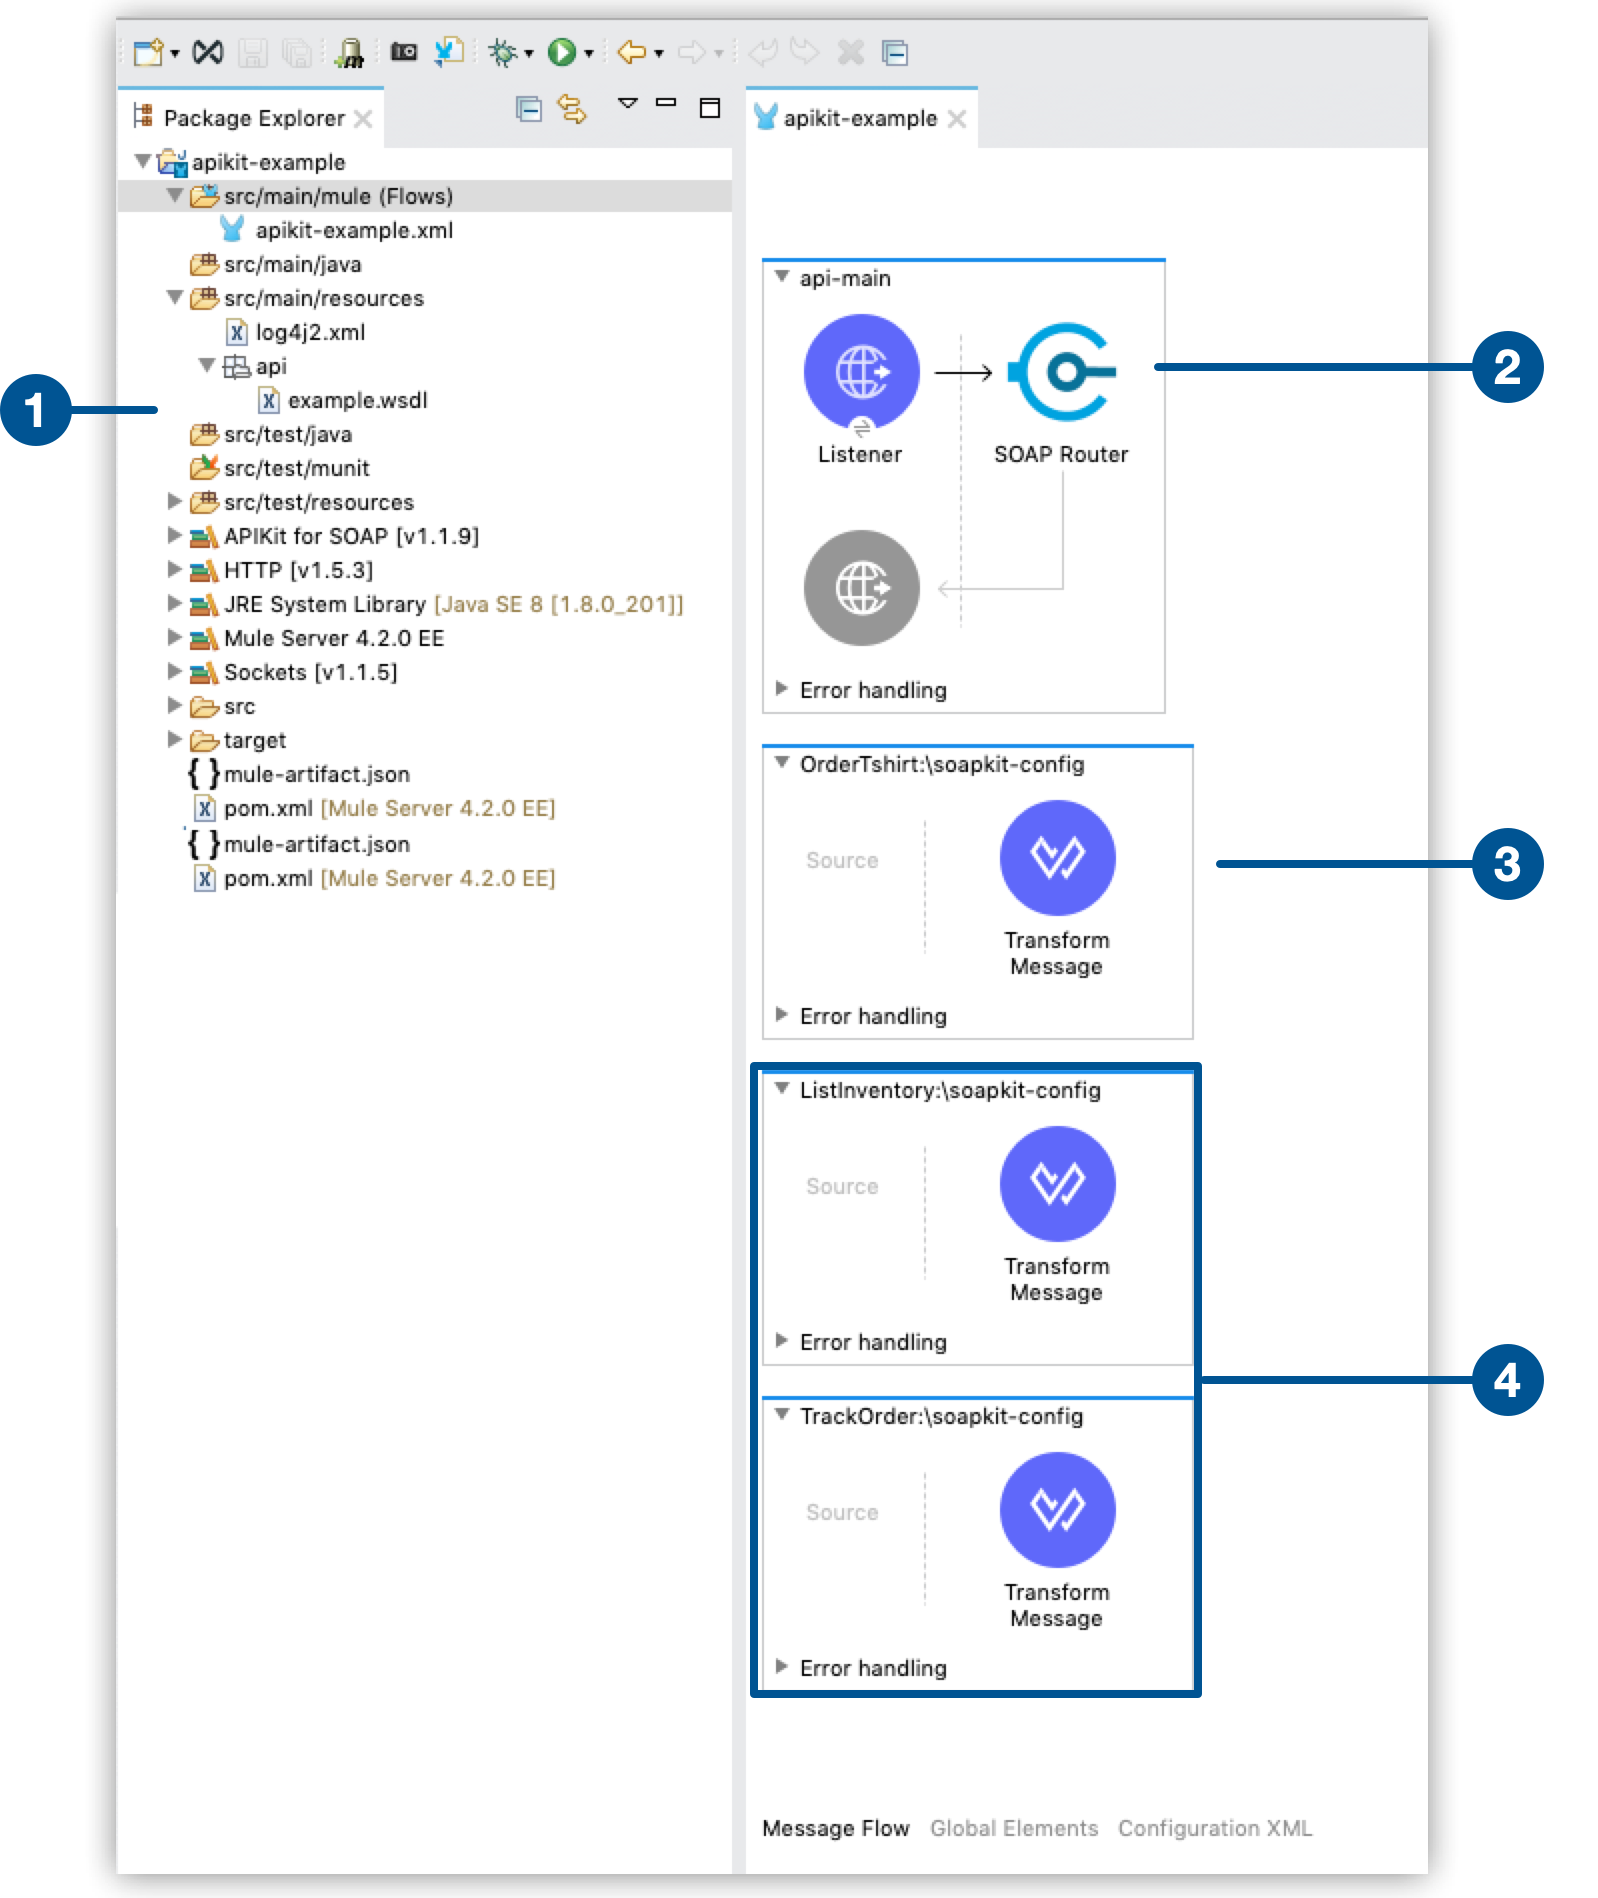
The four items illustrated here show:
-
The project files in the Package Explorer of Studio with the
example.wsdlfile undersrc/main/resources/apifolder. -
The main flow, with the SOAP Router.
-
SOAP fault response template
-
Generated backend flows containing SOAP message templates.
After you create your APIkit project, you can continue building the application by performing calls to test the API and finalize its implementation. See Build Applications Workflows for details.
Start a New APIkit Project
Use this method if you start an APIkit project without an API specification file and you can later add it into the project. APIkit generates a skeletal RAML file and XML configuration file.
-
Select File > New > Mule Project.
-
In Project Name, enter a name for the project, for example myproject.
-
Select or accept the default EE . Runtime, for example Mule Server 4.2.0 EE.
-
In API Implementation, do not select Specify API Definition File Location or URL.
This creates the backend-first APIkit design. -
Accept the other default options, and click Finish.
Using this method the APIkit scaffolding generates a skeletal RAML file and XML configuration file that includes the following components:
-
A main flow
<flow name="main-api"></flow> -
HTTP Listener configuration in the main flow
-
APIkit Router component
-
Error handlers
You can later add an API specification to the backend-first APIkit design and generate backend flows to continue building the application. See Build Applications Workflows for details.
Start a New APIkit Project by Generating Backend Flows
To perform this task, you must have met the following prerequisites:
-
Created a RAML file in Studio (RAML editor)
-
Created a main flow with an HTTP Listener and APIkit Router components
When you create a RAML file in Studio, generating backend flows is optional. Error handling is generated automatically for a RAML-based API. To start the APIkit project, you need to generate the backend flows from the main flow. Follow the next steps:
-
In Package Explorer, right-click the project name.
-
Select Mule > Generate Flows From REST API.
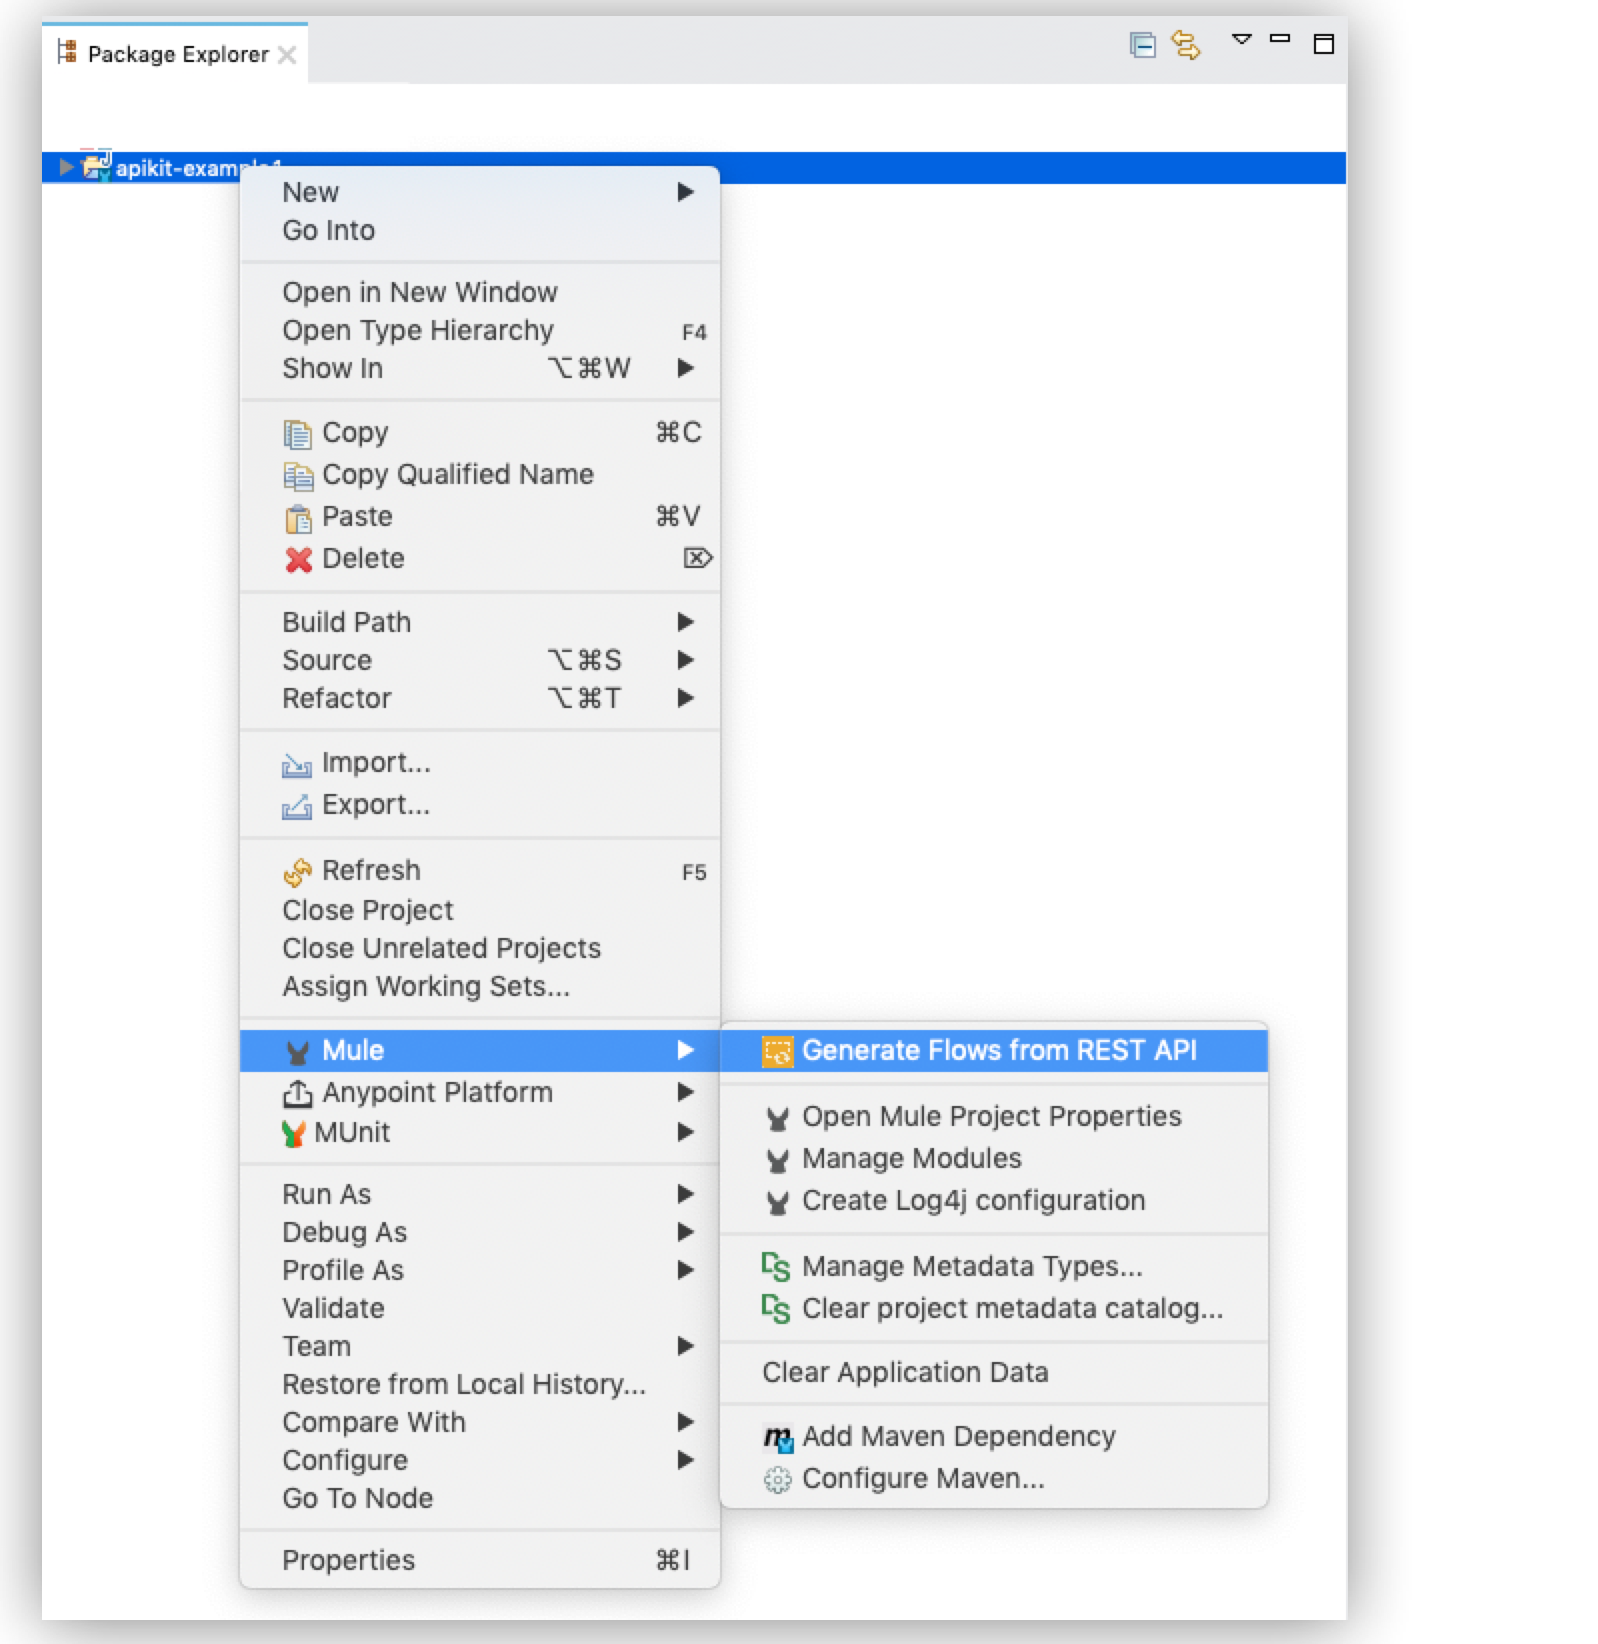
The APIkit scaffolding technique generates the backend flows following the main flow. You can then continue building the application by performing calls to test the API and finalize its implementation. See Build Applications Workflows for details.
Build Applications Workflows
After you are familiar with the basic APIkit anatomy and the scaffolding technique, examine the following workflows to help you build your desired application by creating the APIkit project, generating Mule flows, performing calls to the API, and finalizing its implementation:
Additionally, you can:
-
Convert an Existing Mule Project to an APIkit Project
Add an API specification to an existing APIkit backend-first design, define API definition files, create main flow, generate backend REST API flows, map RAML resources to actions. -
Perform APIkit 4.x Tasks
Change APIkit project, customize API console, configure headers, retrieve RAML files, execute nonfunctional requirements, configure load balancers. -
Create an Enable O-Data API using the APIkit OData Extension
Generate Mule flows to handle OData requests. -
Create an APIkit project with Maven
Add APIkit components to an existing Apache Maven project.
Consume Data from an API
After you build your application, you can start consuming data from the API. Review the Consume Data from an API documentation for guidelines.