Flow and Subflow Scopes
Flow and Subflow scopes are components for grouping together a sequence of other Core components and operations (provided by connectors and modules) to help automate integration processes. The Flow component is fundamental to a Mule app. Because all Mule apps must contain at least one flow, Anypoint Studio automatically provides the first Flow component in your Mule app.
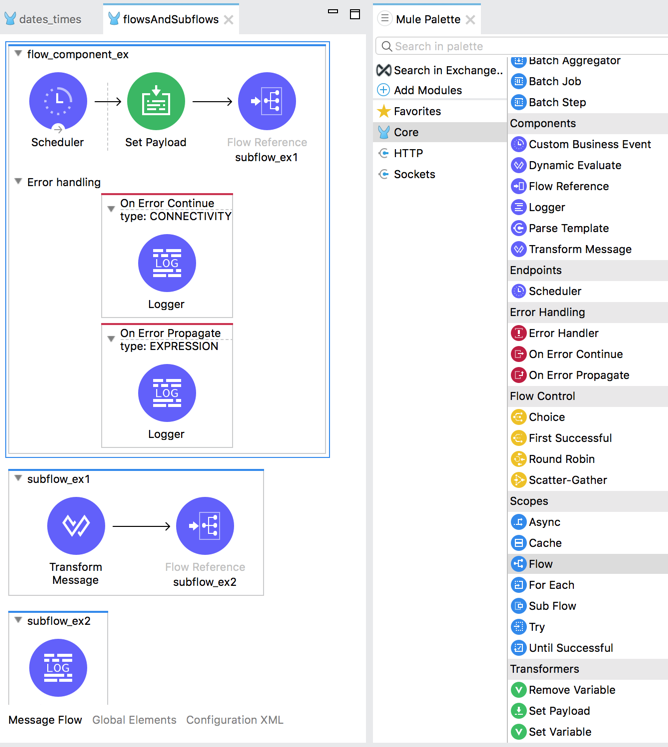
A Mule app can contain additional flows and subflows, as this example shows:
For a more in-depth discussion of uses, capabilities, and limits of flows and subflows, see Flows and Subflows.
Note that flows always function synchronously. If you need to achieve
asynchronous patterns, such as Fire-and-Forget, you can use the
Async Scope (<async/>).
Flow Configuration
Flows are configurable. For example, you can set them to start or remained stopped when the Mule app starts, place limits on the allowed concurrency, or set up business events. You can also set up error handling for a component (see Error Handling).
| Field | Description |
|---|---|
Name ( |
Name for the flow. Flows automatically receive an editable name that matches (or partially matches) the project name. |
Initial State ( |
Values: Started, Stopped. These are Mule runtime settings for the flow. The default, Started ( If you set the initial state to Stopped ( |
Max Concurrency ( |
Optional. Sets the maximum number of concurrent messages that a flow can process. If not set, the container thread pool determines the maximum number of threads the flow can use to optimize the performance when processing messages. While the flow is processing the maximum number of concurrent messages, it cannot receive additional requests. Set See Back-pressure for details about Mule’s behavior after the the maximum concurrency value is reached. |
Business Events |
Optional: Defaults to |
Metadata |
As with many other components, you can set metadata for this component. For more on this topic, see the Studio document Metadata Editor. |
Subflow Configuration
Subflow scopes provide a way to edit the name of the subflow and to add metadata. Unlike flows, subflows lack a built-in mechanism for setting up error handling, though you can use error handling provided by the Try Scope within a subflow if you need to perform error handling.
| Field | Description |
|---|---|
Name ( |
Name for the subflow. Subflows automatically receive an editable name that matches (or partially matches) the project name. |
Metadata |
As with many other components, you can set up metadata for this component. For more on this topic, see the Studio document Metadata Editor. |
XML for Flows and Subflows
This example shows the XML for a simple flow (<flow/>) that uses a Scheduler as a source to trigger execution of
the flow every 10 seconds, and it connects to a subflow (<sub-flow/>) through a Flow Ref (<flow-ref/>) component. That
subflow then connects to another subflow, also using a Flow Ref component. Note
that when you configure components through the Studio UI, Studio automatically adds the XML to the Configuration XML for your Mule app.
<flow name="flow_component_ex">
  <scheduler doc:name="Scheduler" >
    <scheduling-strategy >
      <fixed-frequency frequency="10" timeUnit="SECONDS"/>
    </scheduling-strategy>
  </scheduler>
  <ee:transform doc:name="Transform Message">
    <ee:message >
      <ee:set-payload ><![CDATA[
 %dw 2.0
 var myXml =  read('<prices>
    <basic>9.99</basic>
    <premium>53</premium>
    <vip>398.99</vip>
  </prices>', 'application/xml')
 output application/xml
 ---
 myXml
]]></ee:set-payload>
    </ee:message>
  </ee:transform>
  <flow-ref name="subflow_ex1"/>
</flow>
<sub-flow name="subflow_ex1">
  <ee:transform doc:name="Transform Message">
    <ee:message>
      <ee:set-payload><![CDATA[%dw 2.0
import * from dw::util::Timer
output application/json
var conversionRate=13
---
priceList: payload.prices mapObject(value, key, index) -> {
  (key) : {
       dollars: value,
       localCurrency: value * conversionRate,
       index_plus_1: index + 1,
       timer : currentMilliseconds()
   }
}]]>
      </ee:set-payload>
   </ee:message>
 </ee:transform>
 <flow-ref name="subflow_ex2"/>
</sub-flow>
<sub-flow name="subflow_ex2">
  <logger level="INFO" doc:name="Logger" message="#[payload]" />
</sub-flow>
The example produces the following output:
{
  "priceList": {
    "basic": {
      "dollars": "9.99",
      "localCurrency": 129.87,
      "index_plus_1": 1,
      "timer": 1533024312658
    },
    "premium": {
      "dollars": "53",
      "localCurrency": 689,
      "index_plus_1": 2,
      "timer": 1533024312659
    },
    "vip": {
      "dollars": "398.99",
      "localCurrency": 5186.87,
      "index_plus_1": 3,
      "timer": 1533024312659
    }
  }
}
Error Handling
You can add error handlers to the Flow components (but not to subflows).
In Studio, you can simply expand the Error Handling area at the bottom of the Flow component and drag the error components into the flow. Note that this process automatically places the component into the Error Handler component, so there is no need to add the Error Handler component first.
Near the end of this XML example, the flow shows an On Error Continue configuration (<on-error-continue/>):
<flow name="flow_subflowFlow" >
  <scheduler doc:name="Scheduler" >
    <scheduling-strategy >
      <fixed-frequency frequency="10" timeUnit="SECONDS"/>
    </scheduling-strategy>
  </scheduler>
  <ee:transform doc:name="Transform Message" >
    <ee:message >
      <ee:set-payload ><![CDATA[
 %dw 2.0
 var myXml =  read('<prices></prices>', 'application/xml')
 output application/xml
 ---
 myXml
]]></ee:set-payload>
    </ee:message>
  </ee:transform>
  <logger level="INFO" doc:name="Logger" message='#[payload.prices]'/>
  <error-handler >
    <on-error-continue enableNotifications="true" logException="true" doc:name="On Error Continue" type="EXPRESSION" when="#[isEmpty(payload.prices)]">
      <logger level="ERROR" doc:name="Logger" message='"An Error Occurred"'/>
    </on-error-continue>
  </error-handler>
</flow>
The preceding example produces an error. Notice the following:
-
The variable
var myXmlin<set-payload/>configures an empty<prices></prices>tag as the payload. -
The Logger beside the
<set-payload/>component returnsnullbecause it is set to log the value of the empty tag. -
The
<on-error-continue/>component returns an error because the DataWeave conditionisEmpty(payload.prices)returnstrue. -
The Logger (
<logger/>) within<on-error-continue/>configures an error message to print to the console when an error occurs. The resulting error message looks something like this:
ERROR 2018-07-30 23:58:45,293 [[MuleRuntime].cpuLight.06:
 [flow_subflow].flow_subflowFlow.CPU_LITE @1b1529b2]
 [event: 0-2aba3280-948f-11e8-82d0-f45c898f2549]
 org.mule.runtime.core.internal.processor.LoggerMessageProcessor:
 "An Error Occurred"
For details about these components, see On-Error error handlers.