Workbench Toolbar Overview
Next to the Workbench tab bar is the Workbench toolbar, which enables you to perform different actions related to the Workflow and its elements.

Some of these actions apply to the selected objects in the Workflow. The unavailable functions are grayed out depending on which Workflow object is selected.
The Workbench Toolbar contains the following buttons:
-
(
 ) Redo action
 -
(
 ) Run Workflow
 -
(
 ) Print
 -
(
 ) Tools
 -
(
 ) Record
In addition to the Workbench Toolbar, you can find the Search bar at the end of the Workbench:

Copy and Paste Workflow Objects
Clicking Copy (![]() ) copies the selected Workflow objects and their underlying elements to the clipboard. Select the target object and click Paste (
) copies the selected Workflow objects and their underlying elements to the clipboard. Select the target object and click Paste (![]() ) to paste it. You can also use Ctrl + C for copying and Ctrl + V for pasting.
) to paste it. You can also use Ctrl + C for copying and Ctrl + V for pasting.
Undo and Redo Previous Action
The Undo button (![]() ) enables you to undo any previous action you carried out in RPA Builder. If you accidentally went back too far, use the Redo button (
) enables you to undo any previous action you carried out in RPA Builder. If you accidentally went back too far, use the Redo button (![]() ) to get back to the desired action.
Using Ctrl + Z for undo and Ctrl + Y for redo also works.
) to get back to the desired action.
Using Ctrl + Z for undo and Ctrl + Y for redo also works.
Change the Order of Workflow Objects
To change the order of objects, select the object and move it up or down in the Workflow by clicking Move up (![]() ) or Move down (
) or Move down (![]() ) until the object reaches the desired position. You can also drag and drop elements to rearrange them.
Action steps cannot be moved outside of their Transaction. If you want to move an action step to another Transaction, use copy and paste instead, and then delete the old one. You can also use Ctrl + X or the Cut option from the context menu to remove the action step from the Workflow and put it into the clipboard in one step.
) until the object reaches the desired position. You can also drag and drop elements to rearrange them.
Action steps cannot be moved outside of their Transaction. If you want to move an action step to another Transaction, use copy and paste instead, and then delete the old one. You can also use Ctrl + X or the Cut option from the context menu to remove the action step from the Workflow and put it into the clipboard in one step.
Delete Workflow Objects
To delete an object, select it and click Delete (![]() ). Pressing the Del key has the same effect.
). Pressing the Del key has the same effect.
Starting the Configuration Wizard of a Workflow Object
To configure a Workflow object with the wizard, select it and then click Wizard (![]() ). This process works for single action steps as well as for complete Transactions. You can also double-click a Workflow object to start its wizard.
). This process works for single action steps as well as for complete Transactions. You can also double-click a Workflow object to start its wizard.
Start Quick Creation Mode
Use this function to speed up the initial Workflow creation. When you start a new Workflow project from scratch, click Start Quick Creation Mode (![]() ) to open the Quick Creation Mode interface.
) to open the Quick Creation Mode interface.
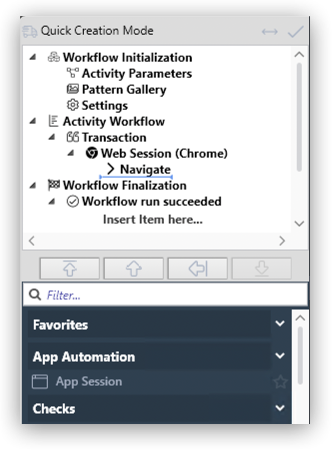
Depending on the state and position your Workflow project is in, Quick Creation Mode provides the Workflow objects that you can use. For every object you insert, the wizard automatically starts so you can configure the different steps without ever losing focus on the actual application you want to automate. You can also insert any possible object at any position later on.
If, for example, you want to add a Window wait action step in front of an Image search in a Transaction you have already created, place the blue position indicator where you want to add the action step and then click Window wait. You can position the objects with the blue arrow buttons or by clicking on the desired position directly.
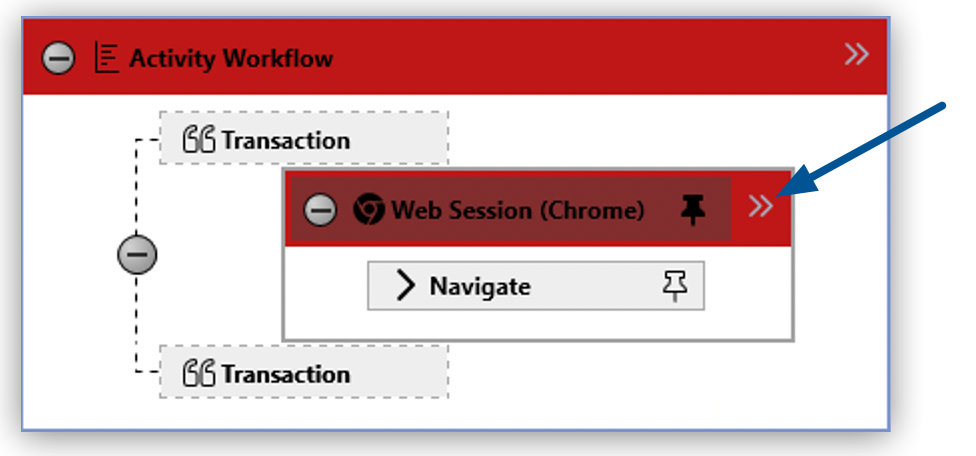
The blue arrow buttons also enable you to collapse or expand the selected Workflows, Transactions, or Control Blocks to optimize the graphical representation of your Workflow.
If the Quick Creation Mode interface is blocking parts of the application you need to use in the Workflow, click Switch Monitor Side (![]() ) and the interface switches from the right to the left side of the screen and vice versa. After you finish creating the Workflow, close Quick Creation Mode by clicking Exit Quick Creation Mode (
) and the interface switches from the right to the left side of the screen and vice versa. After you finish creating the Workflow, close Quick Creation Mode by clicking Exit Quick Creation Mode ( ). After you exit Quick Creation Mode, the standard RPA Builder GUI shows again, including the Workflow you just created.
Validate Workflow
To check if a Workflow is ready for script generation, press Validation (![]() ). If the project contains Workflow objects that are not configured, are wrongly configured, or have errors, RPA Builder shows warnings or general messages as a list in the Validation result window. Double-click an entry in this list to navigate to the corresponding Workflow object.
). If the project contains Workflow objects that are not configured, are wrongly configured, or have errors, RPA Builder shows warnings or general messages as a list in the Validation result window. Double-click an entry in this list to navigate to the corresponding Workflow object.
Run Workflow
To test the created Workflow, click Run Workflow (![]() ) to generate or update the script file from the currently active project. The script executes automatically after its creation.
) to generate or update the script file from the currently active project. The script executes automatically after its creation.
When you start a Workflow from within RPA Builder, the workflow runs in design mode so you can already test whether the Workflow behaves as expected or still needs modifications before the production phase.
Note that the STC Guard module does not execute and does not close any windows if an error occurs, and the Clear screen action step does not execute in design mode.
Debug Workflow
With the Debug Workflow (![]() ) button, you can start a debug run of the active Workflow project. The Workflow Debugger automatically starts if you have set break points in your Workflow or if any error occurs during the debug run. Here you can make changes to Workflow elements and retry certain action steps or complete Transactions until they work properly. Then, you can continue to execute the Workflow from the current position without having to start the debug run at the beginning.
) button, you can start a debug run of the active Workflow project. The Workflow Debugger automatically starts if you have set break points in your Workflow or if any error occurs during the debug run. Here you can make changes to Workflow elements and retry certain action steps or complete Transactions until they work properly. Then, you can continue to execute the Workflow from the current position without having to start the debug run at the beginning.
You can document a Workflow project by clicking Print Workflow (![]() ), which opens the printing function and displays a Print Preview:
), which opens the printing function and displays a Print Preview:
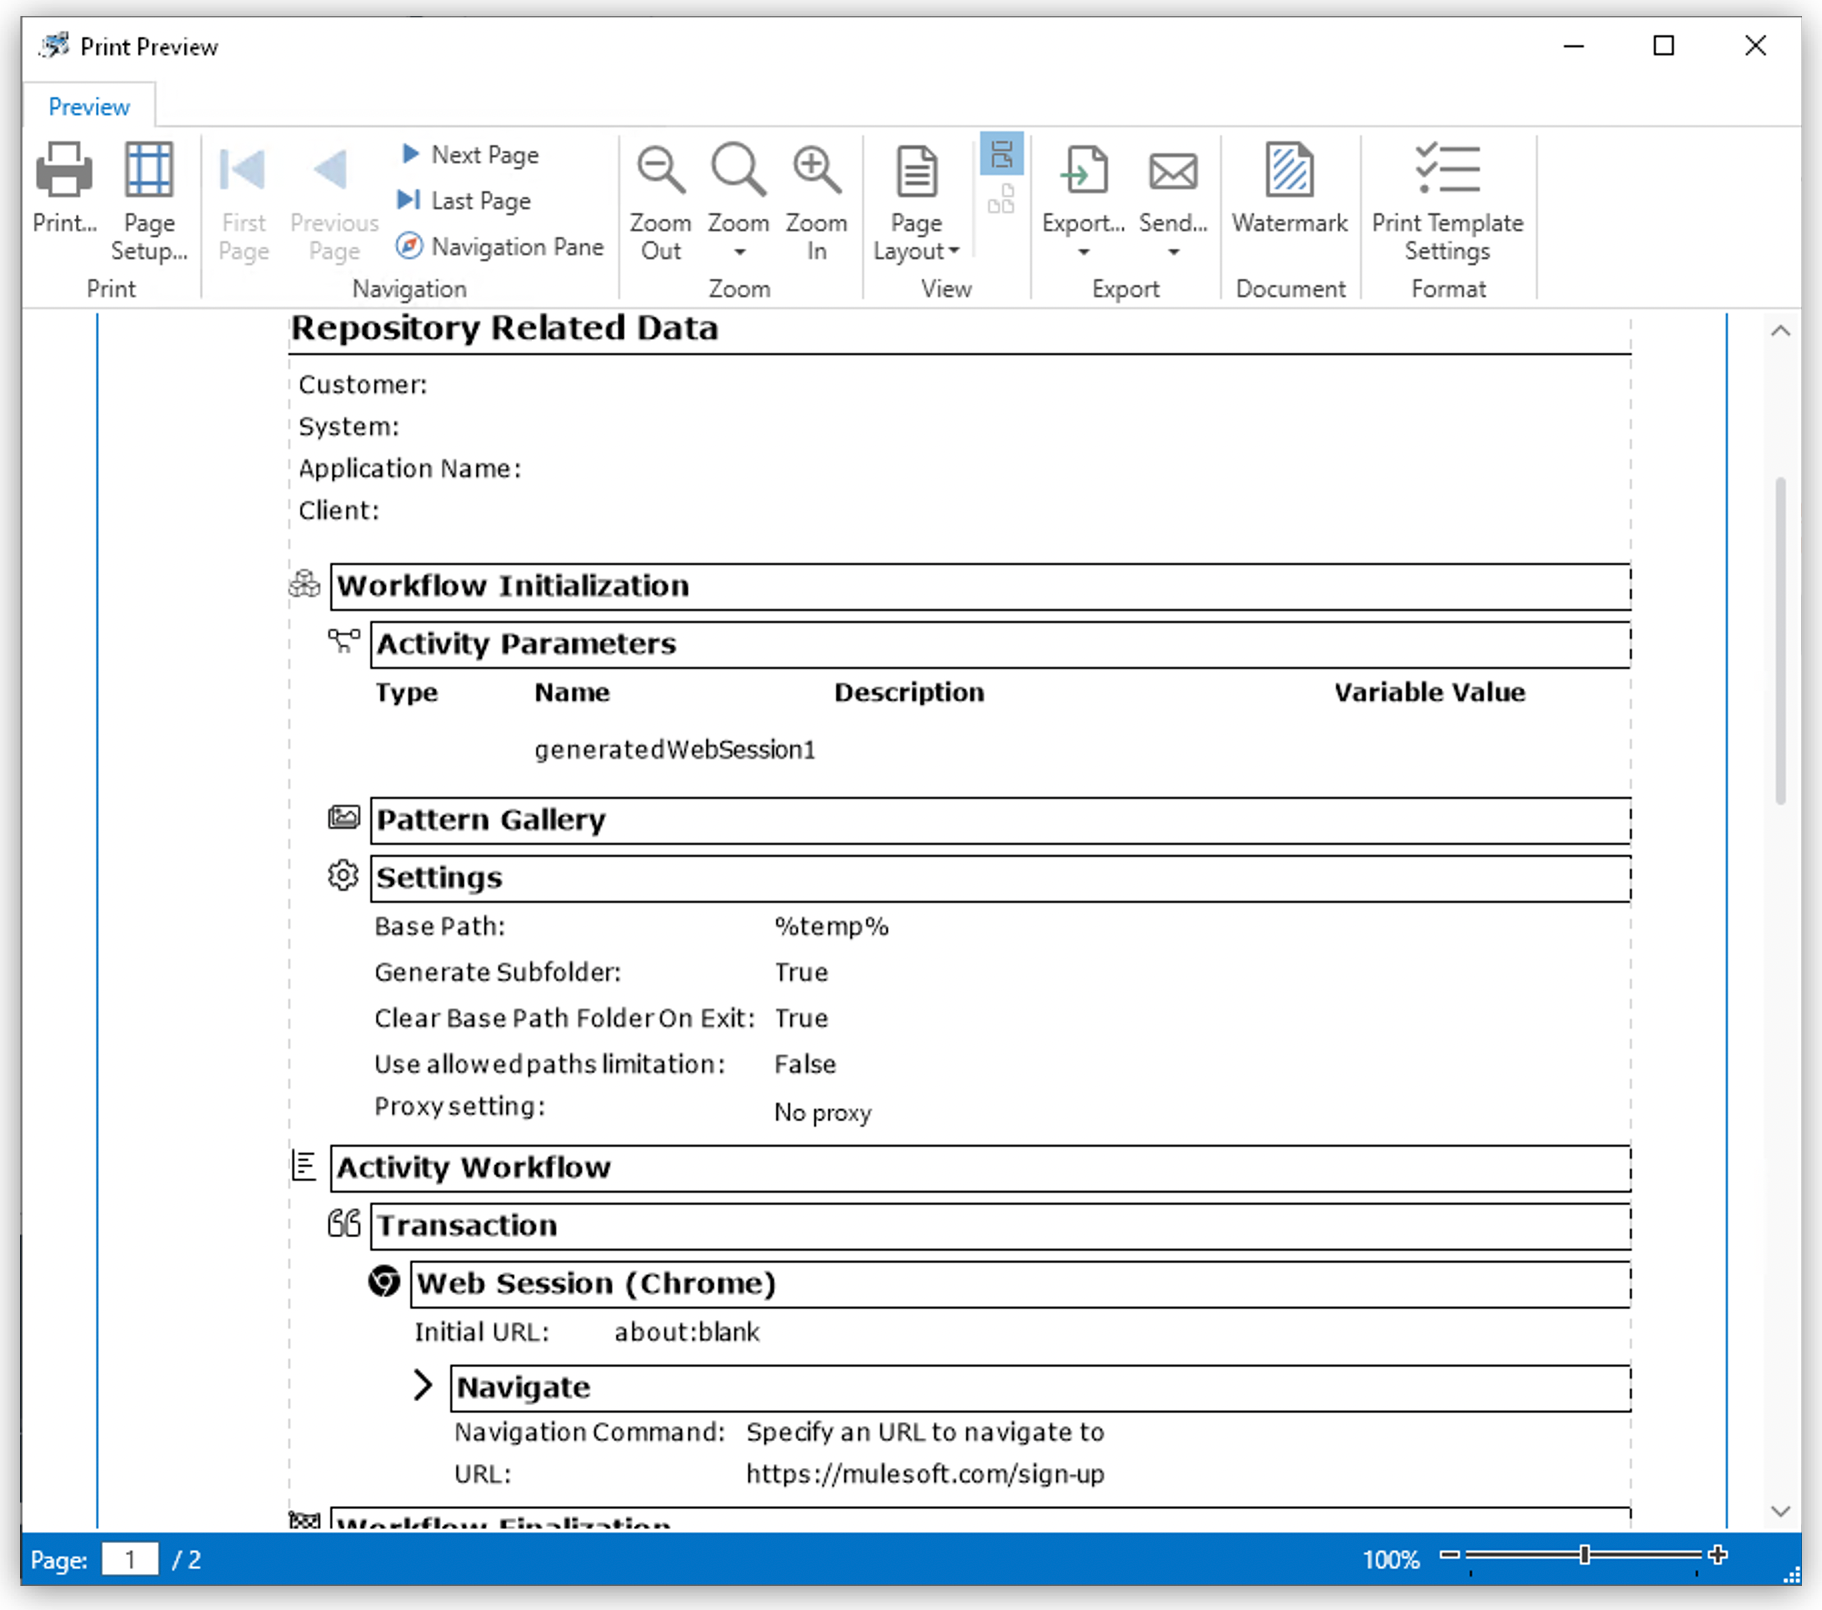
The resulting document shows the steps the Workflow executes during a run, together with the most important settings. At the beginning of the window Print Preview, there is a menu for further processing the Workflow Print.

-
Print…
Opens a window for starting the print of the Workflow.
-
Page Setup…
Opens a window for setting the page format and margins for the print or export of the Workflow.
RPA Builder saves the changes in the Page Setup… settings according to your configuration for all users in common or for every user separately. It then uses these settings for the Print of a Workflow.
-
First Page
Shows the first page.
-
Previous Page
Shows the previous page.
-
Next Page
Shows the next page.
-
Last Page
Shows the last page.
-
Zoom Out
Reduces the size of the view by 25%, so that more of the page is visible on screen.
-
Zoom
Sets the size of the view to a certain percentage of the original size, to the whole width of the screen, or so that a whole page fits on the screen.
-
Zoom In
Increases the size of the view by 25% at a time.
-
Export…
Opens a window for choosing the file format, choosing the folder to save to, and configuring additional settings for the print export. Allowed formats are PDF, HTML, and RTF.
-
Send…
Opens a window for choosing whether to export the print in PDF or RTF format. The file is attached to an Email automatically after saving.
For the option Send…, an Outlook Email profile configured on the computer is required.
-
Watermark
Opens a window in which you can specify a text or an image to use as a watermark on the print.
-
Print Template Settings
Opens a window for choosing a logo for the print, the format of the page numbering, and the scaling of text and images.
RPA Builder saves the changes in Print Template Settings according to your configuration for all users in common or for every user separately. It then uses these settings for the Print of a Workflow.
The current page number is referenced by
{0}and the total number of pages is referenced by{1}. If the formatting has errors, RPA Builder sets the footer back to the default configuration{0}/{1}.
Tools
The Tools (![]() ) button enables you to access additional functions:
) button enables you to access additional functions:
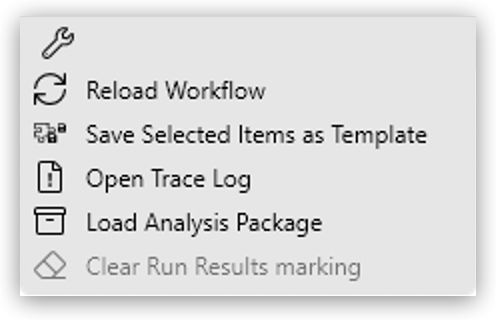
Reload Workflow
(![]() ): Reverts back to the last saved state of your project.
): Reverts back to the last saved state of your project.
| After reloading a Workflow, you cannot use the undo function. Therefore, all unsaved changes in the Workflow are lost. |
Save Selected Items as Template
(![]() ): To create a template, select the Workflow object you want to save as a template and click Save as template in the context menu. See Managing User Templates for additional details about creating, importing, and exporting User Templates.
): To create a template, select the Workflow object you want to save as a template and click Save as template in the context menu. See Managing User Templates for additional details about creating, importing, and exporting User Templates.
Open Trace Log
( ): Shows the content of the log file created during the last test run of this Workflow. Use this option to obtain additional information for failure analysis.
Load Analysis Package
( ): RPA Manager provides analysis packages for Workflow runs that don’t execute successfully. RPA Builder can display errors that occur within a Workflow run, whether from a run started by RPA Builder or by reading the analysis package of a run executed in RPA Manager.
To load an analysis package:
-
Get the analysis package you want to use from RPA Manager and save it to the local disk.
-
Open the File Explorer by clicking File > Load Analysis Package.
-
Browse to the analysis package you downloaded and then press Open.
Alternatively, you can drag the package from Windows Explorer and drop it into RPA Builder.
You can also select an Analysis Package directly in the Activity Workflow. Click the Tools button on the Workbench toolbar and select the Load Analysis Package entry.
The analysis information includes the trace file and Workflow Run Results. After loading and analysis package, RPA Builder displays the error screenshots and replaces the current log file with the log file in the analysis package.
Opening an analysis package
When you import an analysis package into RPA Builder, the corresponding process and the relevant Activity Workflow open automatically. To make searching for the error easier, Run Result Marking immediately displays the action step in which the error occurred.
If the process to open is not in the local cache, RPA Builder downloads it automatically from RPA Manager. In this case, the process must be in the Build phase.
Clear Run Results Markings
(![]() ): Use this menu item to clear the markings of warnings and errors in the Workbench view of the selected project. These markings are shown after a failed local Workflow run or after the import of an analysis package.
Errors and warnings are still displayed in the pane Workflow Run Results.
): Use this menu item to clear the markings of warnings and errors in the Workbench view of the selected project. These markings are shown after a failed local Workflow run or after the import of an analysis package.
Errors and warnings are still displayed in the pane Workflow Run Results.
Record
Starts RPA Recorder to record an activity. After you finish the recording, RPA Builder appends a new transaction containing the recorded actions at the end of the workflow.
Search
At the end of the Workbench is the Search… (![]() ) function. If you gave your Workflow elements descriptive names and want to detect them in a Workflow, type the name (or part of it) into the search field and press Enter. The first element with a matching name shows on the Workbench. If there are additional matching occurrences, you can access them by pressing F3.
) function. If you gave your Workflow elements descriptive names and want to detect them in a Workflow, type the name (or part of it) into the search field and press Enter. The first element with a matching name shows on the Workbench. If there are additional matching occurrences, you can access them by pressing F3.
If there are multiple results, you can switch between the results with the arrow buttons.