REST Connect Connector ジェネレーター
Exchange バックエンドは REST Connect を使用して、REST API 仕様を Mule 3 または Mule 4 Connector に透過的に変換します。Anypoint Studio でこのコネクタを他のコネクタと同様に使用できます。
生成されたコネクタへのアクセス
Exchange の [Download (ダウンロード)] メニューから、生成されたコネクタをダウンロードます。
| Exchange に REST アセットをデプロイしたら、画面を更新してすべてのダウンロードオプションが使用可能であることを確認してください。 |
Mule 3 Connector は ZIP ファイルとしてダウンロードされ、Mule 4 Connector は JAR ファイルとしてダウンロードされます。
API 仕様形式のサポート
REST Connect では、次の API 仕様形式がサポートされています。
-
OAS 3 - JSON
-
OAS 3 - YAML
-
OAS 2 - JSON
-
OAS 2 - YAML
-
RAML 1.0
セキュリティスキームのサポート
REST Connect では、次のセキュリティスキームがサポートされています。
-
基本認証
-
OAuth 2.0 クライアントログイン情報
-
OAuth 2.0 認証コード
-
パススルー
-
ダイジェスト認証
サポートされていない認証種別を使用して API 仕様をパブリッシュすると、アラートメールを受け取ります。これが発生した場合、サポートされているセキュリティスキームのいずれかを使用するように API 仕様を更新します。
API 仕様で定義されている操作で複数のセキュリティスキームがサポートされている場合、サポートされているスキームのリストの最初のスキームが使用されます。
基本認証の例
#%RAML 1.0
title: Dropbox API
version: 1
baseUri: https://api.dropbox.com/{version}
securitySchemes:
  basic:
    description: |
      This API supports Basic Authentication.
    type: Basic Authentication
OAuth 2.0 クライアントログイン情報の例
#%RAML 1.0
version: v1
title: Deadlines API
baseUri: http://localhost/deadlines
securitySchemes:
    oauth_2_0:
        description: Deadlines API supports OAuth 2.0 for authenticating all API requests.
        type: OAuth 2.0
        describedBy:
            headers:
                Authorization:
                    description: Sends a valid OAuth 2 access token.
                    type: string
            responses:
                401:
                    description: Bad or expired token.
                403:
                    description: Bad OAuth request.
        settings:
            accessTokenUri: https://api.example.com/1/oauth2/token
            authorizationGrants: [ client_credentials ]

/deadlines:
    get:
        securedBy: [oauth_2_0]
        displayName: Get deadlines.
        description: Get a list of all registered deadlines.
        responses:
            200:
                body:
                    application/json:
                        example: '[ { "rest-connect": "2017-03-13" } ]'
OAuth 2.0 認証コードの例
#%RAML 1.0
version: v1
title: Github API
baseUri: https://api.github.com

securitySchemes:
  oauth_2_0:
    description: |
      OAuth2 is a protocol that lets external apps request authorization to private details
      in a user's GitHub account without getting their password. This is preferred over
      Basic Authentication because tokens can be limited to specific types of data,
      and can be revoked by users at any time.
    type: OAuth 2.0
    describedBy:
      headers:
        Authorization:
          description: |
            Used to send a valid OAuth 2 access token.

      responses:
        404:
          description: Unauthorized
    settings:
      authorizationUri: https://github.com/login/oauth/authorize
      accessTokenUri: https://github.com/login/oauth/access_token
      authorizationGrants: [ authorization_code ]
      scopes:
        - "user"
        - "user:email"
        - "user:follow"
        - "public_repo"
        - "repo"
        - "repo_deployment"
        - "repo:status"
        - "delete_repo"
        - "notifications"
        - "gist"
        - "read:repo_hook"
        - "write:repo_hook"
        - "admin:repo_hook"
        - "admin:org_hook"
        - "read:org"
        - "write:org"
        - "admin:org"
        - "read:public_key"
        - "write:public_key"
- "admin:public_key"自動生成されたコネクタの名前の変更
REST Connect は、operationName、displayName、endpoint 属性に基づいてこの順序で操作名を生成します。
生成されたコネクタ名を変更するには、displayName のテキストを変更します。次に例を示します。
#%RAML 1.0
title: Sample API
baseUri: https://jsonplaceholder.typicode.com
version: 0.1
mediaType: application/json

  ...
  /{postId}:
    uriParameters:
      postId: integer

    get:
      displayName: Get a post by ID.
      responses:
        200:
          body:
            type: Post
また、REST Connect ライブラリを参照し、GET、POST、DELETE などのメソッドから operationName アノテーションを使用して、生成されたコネクタ名を変更することもできます。次に例を示します。
#%RAML 1.0
title: Sample API
baseUri: https://jsonplaceholder.typicode.com
version: 0.1
mediaType: application/json

uses:
  rest-connect: exchange_modules/org.mule.connectivity/rest-connect-library/1.0.0/rest-connect-library.raml

  ...
  /{postId}:
    uriParameters:
      postId: integer

    get:
      (rest-connect.operationName): Retrieve a post by id
      displayName: Get a post by ID.
      responses:
        200:
          body:
            type: Post
メタデータの制限
REST Connect は、要求内のスキーマ定義および RAML 内の各メソッドの応答に基づいて各操作のメタデータを生成します。REST Connect は RAML の例に基づいてメタデータを生成することはできません。
REST Connect では、1 つの入力/出力種別のみがサポートされ、API 仕様で宣言された最初の種別が使用されます。この動作は、REST Connect ライブラリの default プロパティを使用して変更できます。
次の例では REST Connect ライブラリを使用します。
#%RAML 1.0
title: Sample API
baseUri: https://jsonplaceholder.typicode.com
version: 0.1
mediaType: application/json

uses:
  rest-connect: exchange_modules/org.mule.connectivity/rest-connect-library/1.0.0/rest-connect-library.raml

  ...
  /{postId}:
    uriParameters:
      postId: integer

    get:
      displayName: Get a post by ID.
      responses:
        200:
          body:
            application/json:
             type: string
            application/xml:
             (rest-connect.default): //this sets application/xml response by default
             type: string
予約済みのキーワード
REST Connect の有効な識別子には、予約済みの Java または Mule キーワードを使用できません。
REST Connect の有効な識別子に名前を付ける際に避けるべき予約済みの Java キーワードは次のとおりです。
-
abstract -
assert -
boolean -
break -
byte -
case -
catch -
char -
class -
const -
continue -
default -
do -
double -
else -
extends -
false -
final -
finally -
float -
for -
goto -
if -
implements -
import -
instanceof -
int -
interface -
long -
native -
new -
null -
package -
private -
protected -
public -
return -
short -
static -
strictfp -
super -
switch -
synchronized -
this -
throw -
throws -
transient -
true -
try -
void -
volatile -
while
REST Connect の有効な識別子に名前を付ける際に避けるべき予約済みの Mule キーワードは次のとおりです。
-
friendlyName -
name -
operationName -
target -
targetValue
TLS サポートのあるコネクタの生成
Mule 4 (SmartConnector) Connector では、Transport Layer Security (TLS) がサポートされています。
TLS サポートを有効にして、コネクタを生成すると、次のようになります。
-
コネクタは Mule Runtime 4.6 で動作するようにアップグレードされます。
-
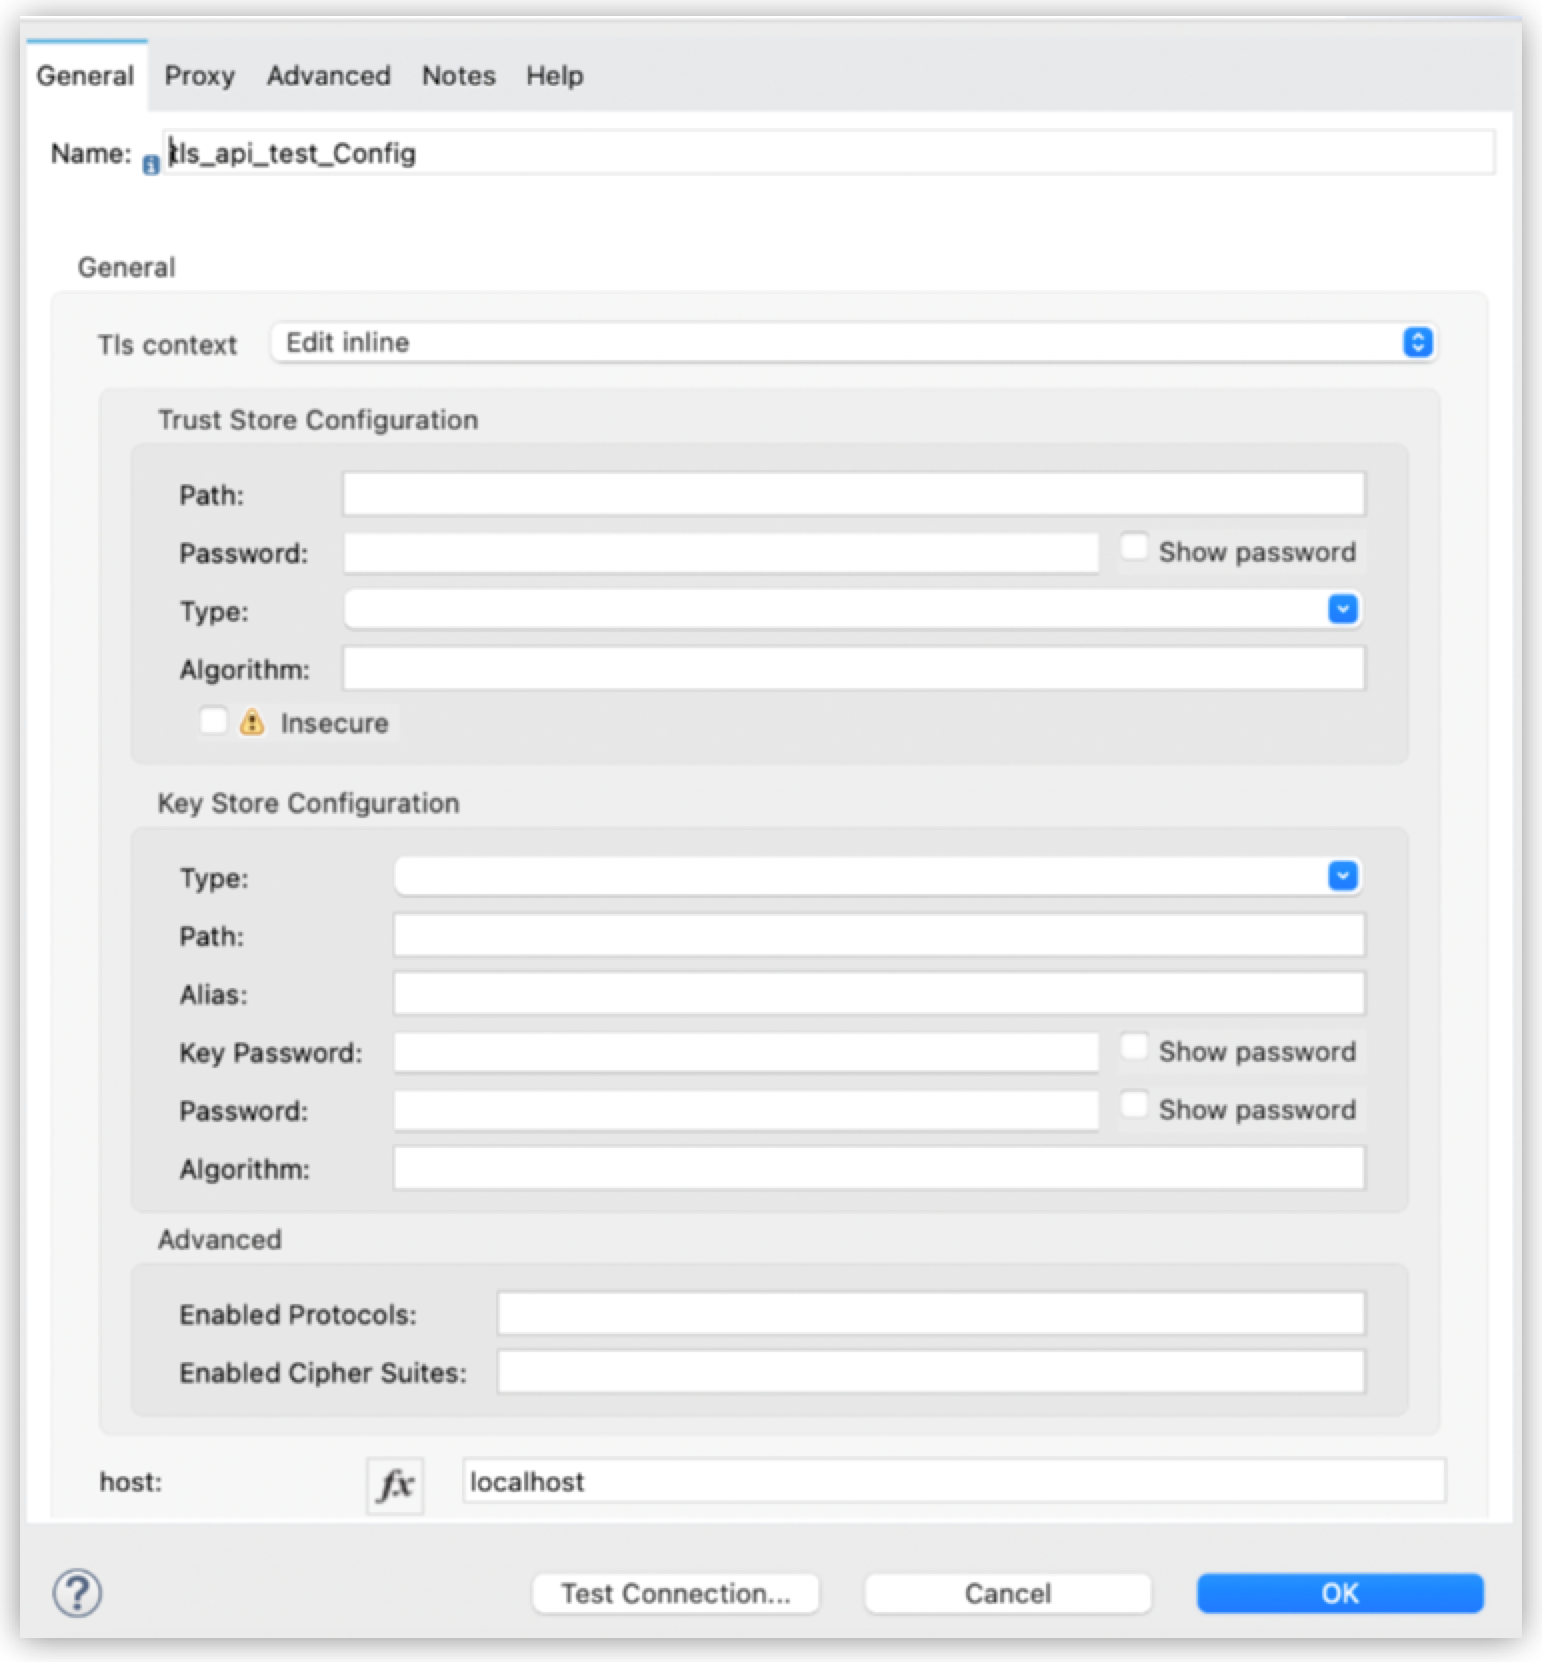
TLS が有効になります。これにより、Anypoint Studio には、コネクタの必須の TLS 接続設定情報を収集するフォームが表示されます。接続設定プロパティを表示するには、[Tls context (TLS コンテキスト)] 項目から [Edit inline (インライン編集)] または [Global reference (グローバル参照)] を選択します。
TLS を有効にするには、アプリケーションの Design Center API プロジェクトのルートディレクトリに properties.json ファイルを追加します。
-
Design Center で、[Files + (ファイル +)] > [New file (新規ファイル)] を選択します。
-
[Add new file (新規ファイルを追加)] ウィンドウで、[API format (API 形式)] > [other (その他)] を選択し、ファイルに
properties.json という名前を付けて、[Create (作成)] をクリックします。 -
新しいファイルに
"tlsEnabled": true を追加します。TLS サポートを有効にするか、TLS サポートを明示的にオプトアウトする場合のみ、 properties.json ファイルを追加します。properties.json ファイルを API プロジェクトに追加しない場合、REST Connect サービスにより、TLS サポートのない標準コネクタアーティファクトが生成されます。
properties.json ファイルを追加して TLS を有効にしたら、Anypoint Studio にコネクタの TLS 設定フォームが表示されます。
properties.json ファイルをプロジェクトに追加する場合、tlsEnabled プロパティが有効なブール値 (TLS を有効にするには true、TLS を明示的に無効にするには false) で正しく設定されていることを確認します。properties.json ファイルが無効か、プロパティが正しく設定されていない場合、コネクタの生成は中止されます。
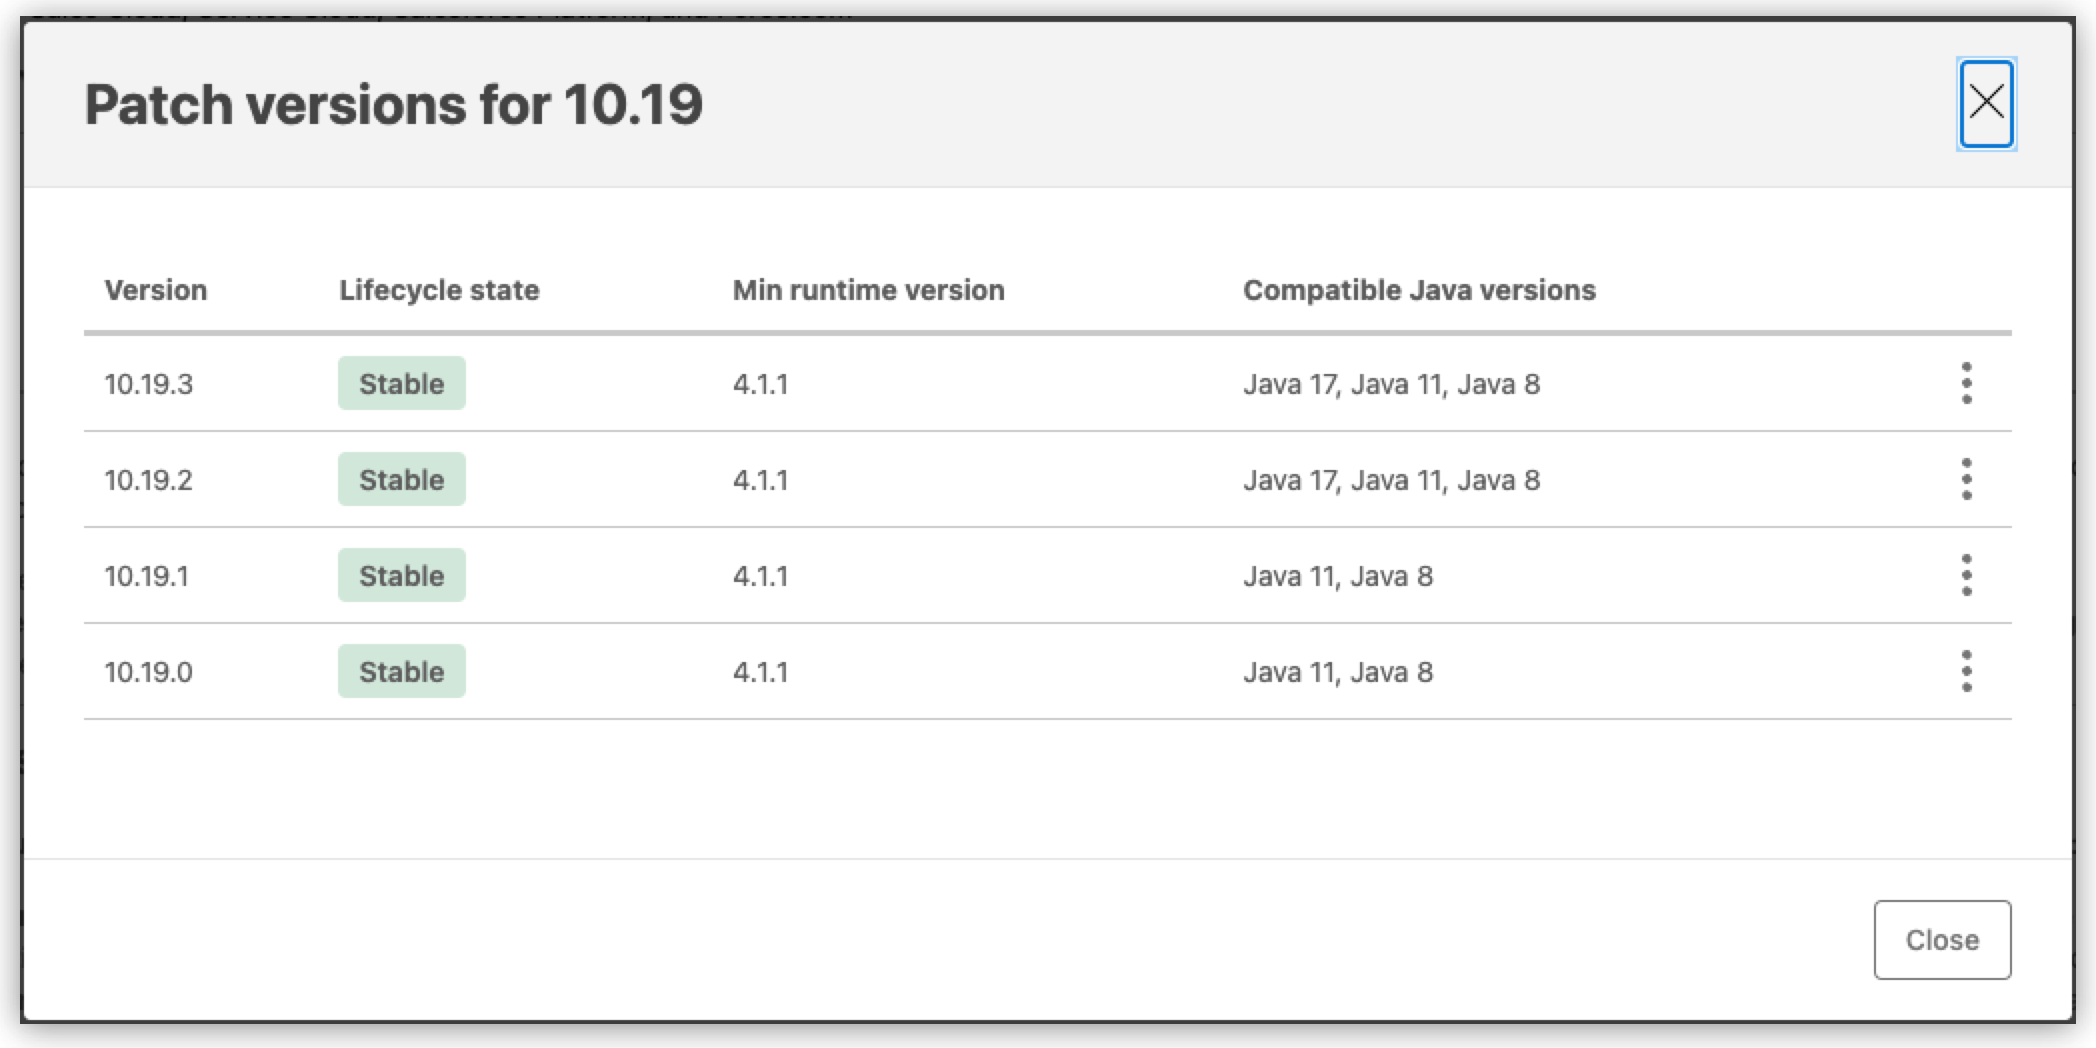
Mule Runtime バージョンおよび互換性のある Java バージョンの表示
コネクタのパッチバージョンに対応する最小 Mule Runtime バージョンまたは互換性のある Java バージョンを表示する手順は、次のとおりです。
-
Exchange でコネクタを選択します。
-
アセットの詳細ページで、[View versions (バージョンを表示)] をクリックします。
REST Connect で生成されたコネクタのアップグレード
Mule Runtime の最新バージョンを使用し、Java 17 との互換性を確保するように、REST Connect で生成されたコネクタを更新する手順は、次のとおりです。
-
Design Center で API プロジェクトを開きます。
-
[Publish (パブリッシュ)] をクリックします。
コネクタが再生成されます。
TLS サポートをアプリケーションに追加する必要がある場合は、コネクタを再生成する前に追加します。これにより、アプリケーションのテストが 1 回のみで済みます。