Introduction to Mule 4: Studio 7
Before learning about what’s new in Mule 4, you should install and familiarize yourself with Studio 7. It is the development environment for Mule 4 applications. Beyond support for Mule 4, it includes many new productivity improvements. Note that Studio 7 does not support opening Mule 3 applications.
New Mule Palette
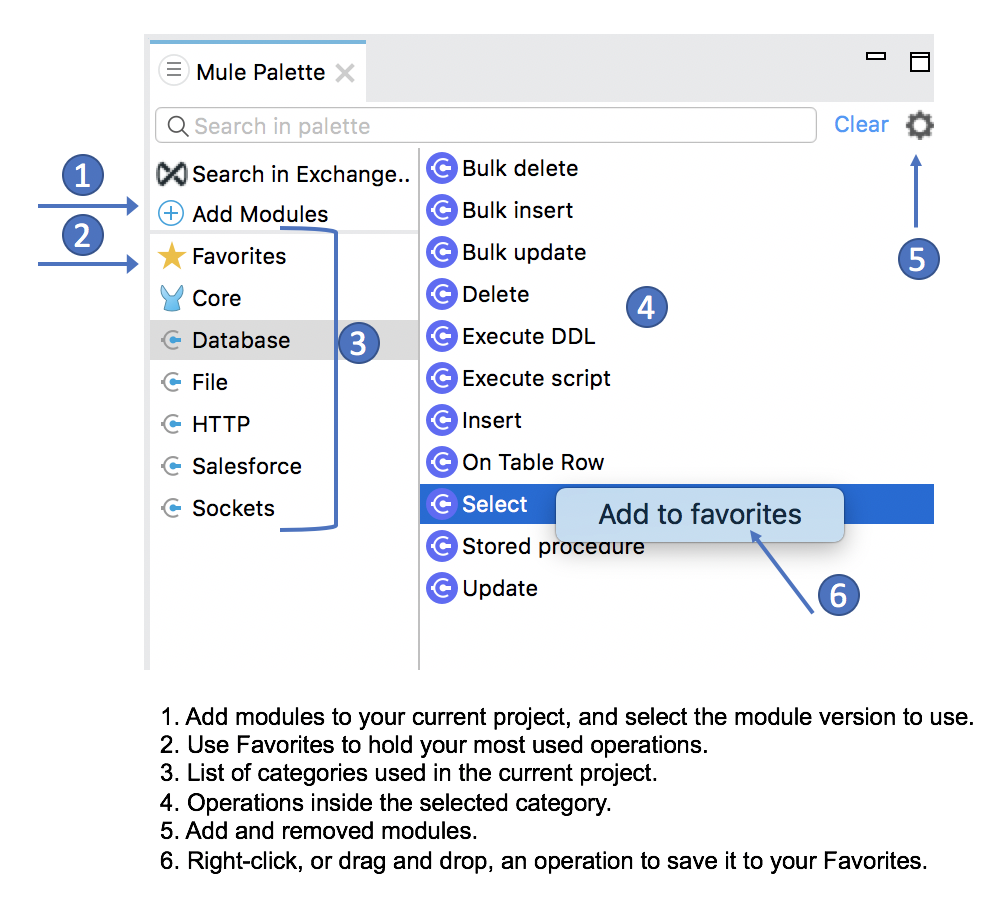
When using the Studio 6 palette, finding the right operation was a multi-step process: you had to find the connector, drag it onto the canvas, then search for an operation. To speed this process, Studio 7 provides a two-level palette that improves access time, discoverability, and categorization. You can search directly for a connector operation and easily add commonly used operations to your Favorites.
Managing your connectors and modules has also improved. In Studio 7, you can explicitly add versions of connectors to your project, which makes the palette specific to your project. As a result, you no longer have to see connectors or modules you are not using.

Managing Dependencies, Automatic Maven Integration
In previous versions of Studio, every Mule module was an Eclipse plugin that required installation through an "update site" mechanism. Now, every module is simply a project dependency, managed by Maven. This means that you no longer have to deal with huge “update sites,” plugin installations, or plugin versions. Studio will automatically add Maven dependencies to the ‘pom.xml’ file and keep track of them for you.
If you don’t know Maven, don’t worry, Studio will manage Maven for you automatically by creating a default pom.xml file for every project.
Navigating to XML View
You can now navigate quickly to the XML from the visual view:
-
Simply right-click on any component, and select Go to XML.
Anypoint Platform Account Management
In every operation related to the Platform, you’ll see a quick-change toolbar that allows you to change accounts and if applicable, the business group. You can also add accounts from the toolbar.
For example, when creating a new Mule project (File > New > Mule Project), if you select an API implementation from Design Center, the toolbar displays at the top of the selection dialog:

Similarly, if you select Search in Exchange from the Mule Palette, the toolbar displays in a slightly different form:

Metadata Storage
Mule 4 applications contain an application-types.xml file, which is where metadata around your data types is stored. For example, if you create a new CSV type, that metadata will be added to this file. This new file is easy to share, commit, and merge when conflicts arise, which enables you to do more metadata-driven development.
Other Improvements
-
A new set of graphic icons for better usability.
-
A watermark text that will always display the operation name (such as, Select or Delete) when you change the default Display Name of the operation. This change provides you with better visibility.
-
Collapsible flows with interactive preview.


