AsyncAPI 仕様の実装
Anypoint Code Builder では、Mule Runtime バージョン 4.6 以降で実行されるプロジェクトでの AsyncAPI 2.6 および 2.0 仕様の実装がサポートされます。プロジェクトを作成して実装すると、Anypoint Code Builder は、Anypoint Exchange でホストされている AsyncAPI 仕様をインポートして、ビジネスニーズに応じてさらに開発可能な実装プロジェクトにスキャフォールディングします。
非同期 API はメッセージブローカーに依存して、異なるサービスまたはコンポーネント間で分離された方法でメッセージを送受信します。このサービスは、受信者または送信者の特定の詳細を知らなくてもメッセージを送受信できるため、非同期の通信が可能になります。受信者および送信者と通信するために、メッセージブローカーは特定のプロトコルを使用します。APIkit for AsyncAPI Module リファレンスの「サポートされるメッセージブローカー」を参照してください。
始める前に
-
まだ Anypoint Code Builder へのアクセス権がない場合は、Anypoint Code Builder 入門の手順を実行します。
-
AsyncAPI 仕様のスキャフォールディングプロセスについての需要な情報は、スキャフォールディングの基礎を参照してください。
-
Anypoint Exchange でホストされているサポート対象 AsyncAPI 仕様へのアクセス権が必要です。
AsyncAPI 仕様が Exchange にパブリッシュされていない場合は、AsyncAPI 仕様の作成およびインポートを参照してください。
スキャフォールディングの基礎
Anypoint Code Builder で AsyncAPI 仕様を実装する前にスキャフォールディングプロセスの概要を理解することが重要です。
AsyncAPI 仕様を Mule プロジェクト (実装またはインテグレーション) にスキャフォールディングすると、Anypoint Code Builder で次の操作が実行されます。
-
AsyncAPI 仕様を調べる
-
一度に 1 つの仕様を検討する
-
インポートされた仕様を既存の仕様の変更として扱い、再スキャフォールディングのために評価する
-
仕様内の publish 操作ごとに個別のフローを使用して新しい Mule プロジェクトを作成する
例: スキャフォールディング済みフローを参照してください。
-
AsyncAPI 仕様に publish 操作が含まれない場合は、Mule プロジェクトの名前を持つ空の XML ファイルを生成する
-
Mule プロジェクトの
src/main/resources ディレクトリに設定プロパティファイル dev-properties.properties を生成する例: 設定プロパティファイルを参照してください。
-
APIkit for AsyncAPI モジュール (AsyncAPI モジュール) をプロジェクトで使用できるようにする
このモジュールでは次の操作が提供されます。
-
Subscribe (
<apikit-asyncapi:publish/>): 仕様内の AsyncAPI subscribe 操作は AsyncAPI Publish 操作として設定で使用できます。「例: スキャフォールディング済みフロー」の実装例を参照してください。 -
Message Listener (
<apikit-asyncapi:message-listener/>): 仕様内の AsyncAPI publish 操作は設定可能な Message Listener 操作です。システムはメッセージをチャネルにパブリッシュし、Mule アプリケーションはこれらのメッセージをリスンします。例: スキャフォールディング済みフローの例を参照してください。スキャフォルダーは、各 publish 操作を Message Listener 操作に変換し、Mule アプリケーションが指定されたチャネルから読み取り、パブリッシュされたメッセージを処理できるようにします。
-
-
AsyncAPI モジュールの Message Listener および Publish 操作の接続設定と、そのモジュールの基盤となっているコネクタの接続設定が含まれる
global-configs.xml ファイルを生成します。例: 接続設定を参照してください。
スキャフォールディングプロセス中、次の場合にエラーが発生する可能性があります。
-
仕様でチャネルが定義されていない
-
サポートされないメッセージブローカープロトコルの場合
サポートされるプロトコルについては、APIkit for AsyncAPI Module リファレンスの「サポートされるメッセージブローカー」を参照してください。
Anypoint Code Builder では、API 仕様から参照される場合、次のスキーマフラグメントファイルのスキャフォールディングがサポートされています。
| Avro | JSON | RAML | |
|---|---|---|---|
AsyncAPI |
はい |
はい |
いいえ |
GraphQL |
いいえ |
いいえ |
はい |
OData |
いいえ |
いいえ |
はい |
REST |
いいえ |
いいえ |
はい |
SOAP |
いいえ |
いいえ |
はい |
サポートされていないフラグメントを追加した場合、スキャフォールダーは Exchange から仕様をインポートするときに、これらのフラグメントをプロジェクトの連動関係として追加しません。ただし、仕様内でインラインで指定されたスキーマをスキャフォールディングすることはできます。
Mule プロジェクトに AsyncAPI 仕様をスキャフォールディングする
新しいまたは既存の Mule プロジェクトに AsyncAPI 仕様をスキャフォールディングすることができます。
-
新しい実装プロジェクトに AsyncAPI 仕様をスキャフォールディングするには、新しいプロジェクトへの AsyncAPI 仕様のスキャフォールディングの手順を実行します。
-
既存の Mule プロジェクト (実装またはインテグレーション) に AsyncAPI 仕様をスキャフォールディングまたは再スキャフォールディングするには、既存のプロジェクトに AsyncAPI 仕様をスキャフォールディングまたは再スキャフォールディングするを参照してください。再スキャフォールディングは、仕様バージョンを更新して新しい操作やサーバーを導入する場合に役立つ可能性があります。仕様に新しいサーバーが含まれる場合、スキャフォルダーはその新しい設定を Mule プロジェクトに追加します。
再スキャフォールディングする場合、スキャフォルダーは仕様内のチャネル、サーバー、および publish 操作と subscribe 操作のグルーピングの新しい組み合わせに対してアクションを実行しますが、新しくない組み合わせを再スキャフォールディングすることはありません。
新しいプロジェクトへの AsyncAPI 仕様のスキャフォールディング
Anypoint Exchange でホストされている AsyncAPI 仕様から実装プロジェクトを作成します。プロジェクトを作成すると、Anypoint Code Builder は、仕様を、Mule アプリケーションとして実装できるインターフェースにスキャフォールディングします。
-
始める前にの前提条件を満たします。
-
IDE のアクティビティバーで、
 (Anypoint Code Builder) アイコンをクリックします。
![アクティビティバー内で強調表示されている [Anypoint Code Builder] アイコン](_images/anypoint-code-builder-view.png)
-
[Quick Actions (クイックアクション)] から [Implement an API (API を実装)] をクリックします。
![*[Getting Started (使用開始)]* セクション内の強調表示された *[Implement an API (API を実装)]*リンク](_images/implement-api-option-mat.png)
-
[Implement an API Specification (API 仕様を実装)] フォームに入力します。
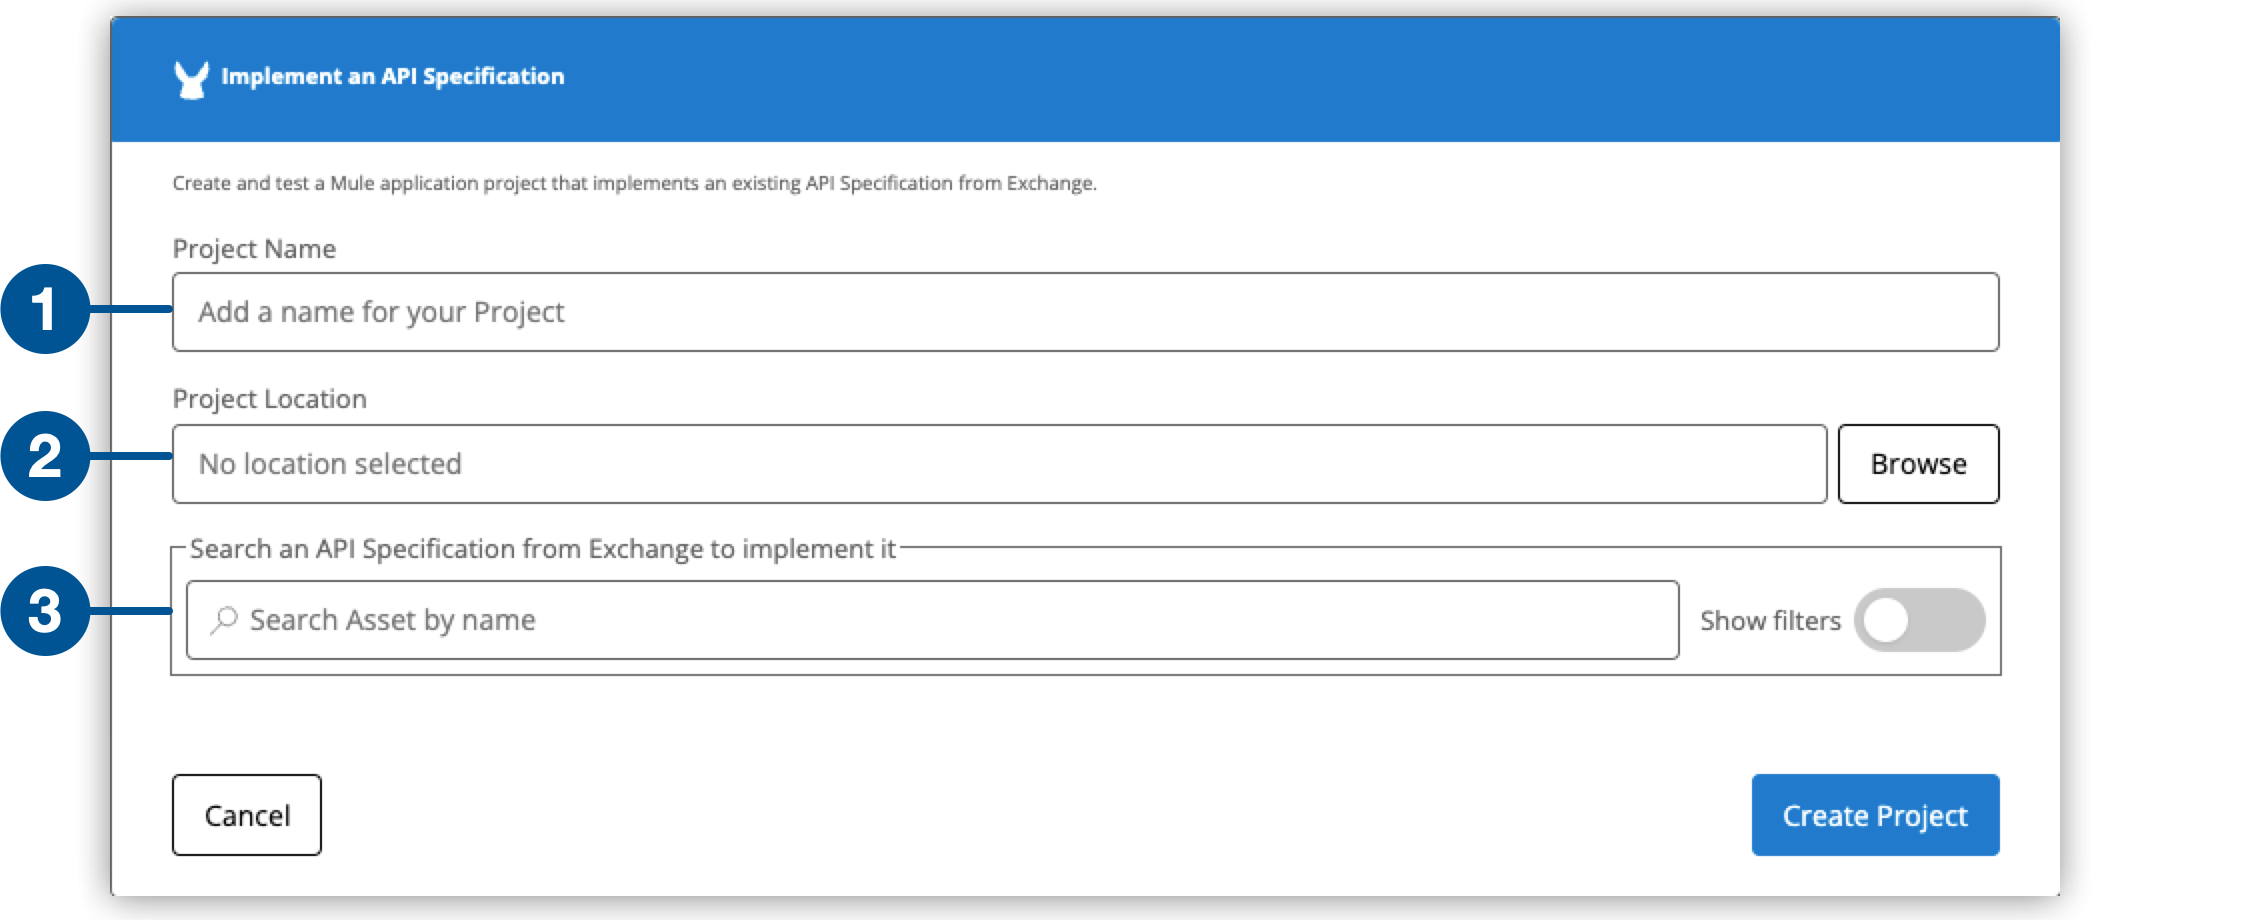
項目名 項目値 Project Name (プロジェクト名)
プロジェクトの一意の名前。
この名前はタイトルおよびプロジェクトファイルの名前として使用されます。 たとえば、プロジェクト名が「My Project (私のプロジェクト)」の場合、プロジェクトファイル名は
my-project になります。Project Location (プロジェクトの場所)
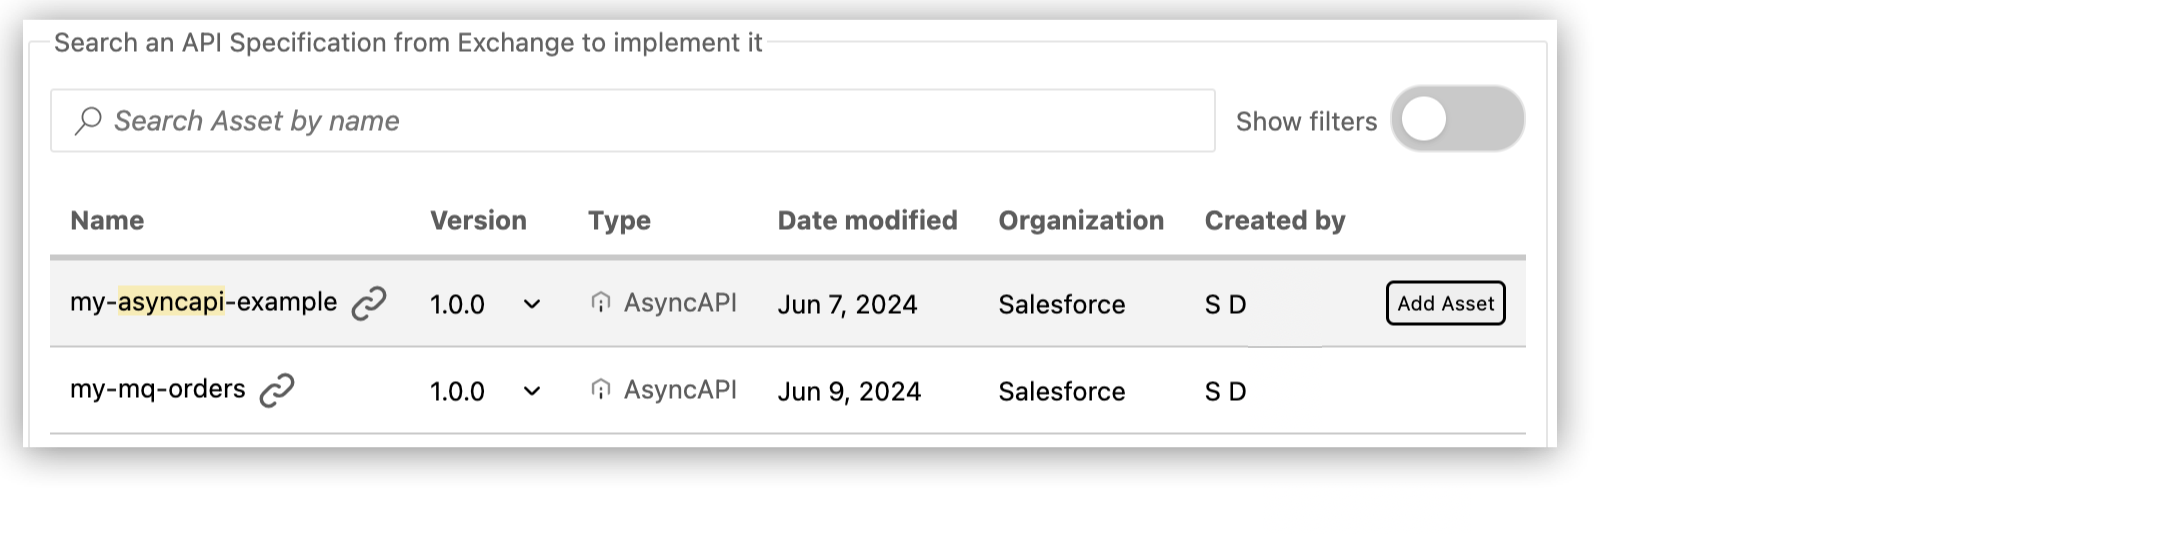
Search an API Specification from Exchange (Exchange から API 仕様を検索)
Exchange の仕様の名前。[Show filters (検索条件を表示)] をアクティブ化して、検索結果を絞り込みます。詳細は、検索結果の絞り込みを参照してください。
Mule Runtime
プロジェクトに使用する Mule Runtime バージョン。
Java Version (Java バージョン)
Mule に使用する Java バージョン。
サポートされている Mule Runtime と Java バージョンのいずれかを選択できます。IDE は、バージョン設定をプロジェクトの
mule-artifact.json ファイルに保存します。 -
Exchange で API 仕様を検索します。
-
API 仕様の名前の入力を開始します。
-
Enter キーを押して、検索結果のリストを表示します。
-
[Add Asset (アセットを追加)] をクリックして、選択した API 仕様を追加します。
Exchange でサポートされるバージョンの AsyncAPI 仕様のみがスキャフォールディングに使用できます。サポートされないバージョンは検索結果に表示されません。
-
-
[Create Project (プロジェクトを作成)] をクリックします。
プロジェクトを作成すると、Anypoint Code Builder で次の操作が実行されます。
-
API 仕様を新しい Mule プロジェクトにスキャフォールディングします。この Mule プロジェクトが開き、スキャフォールディング済みフローを含む設定 XML ファイル (
flows.xml) が表示されます。次に例を示します。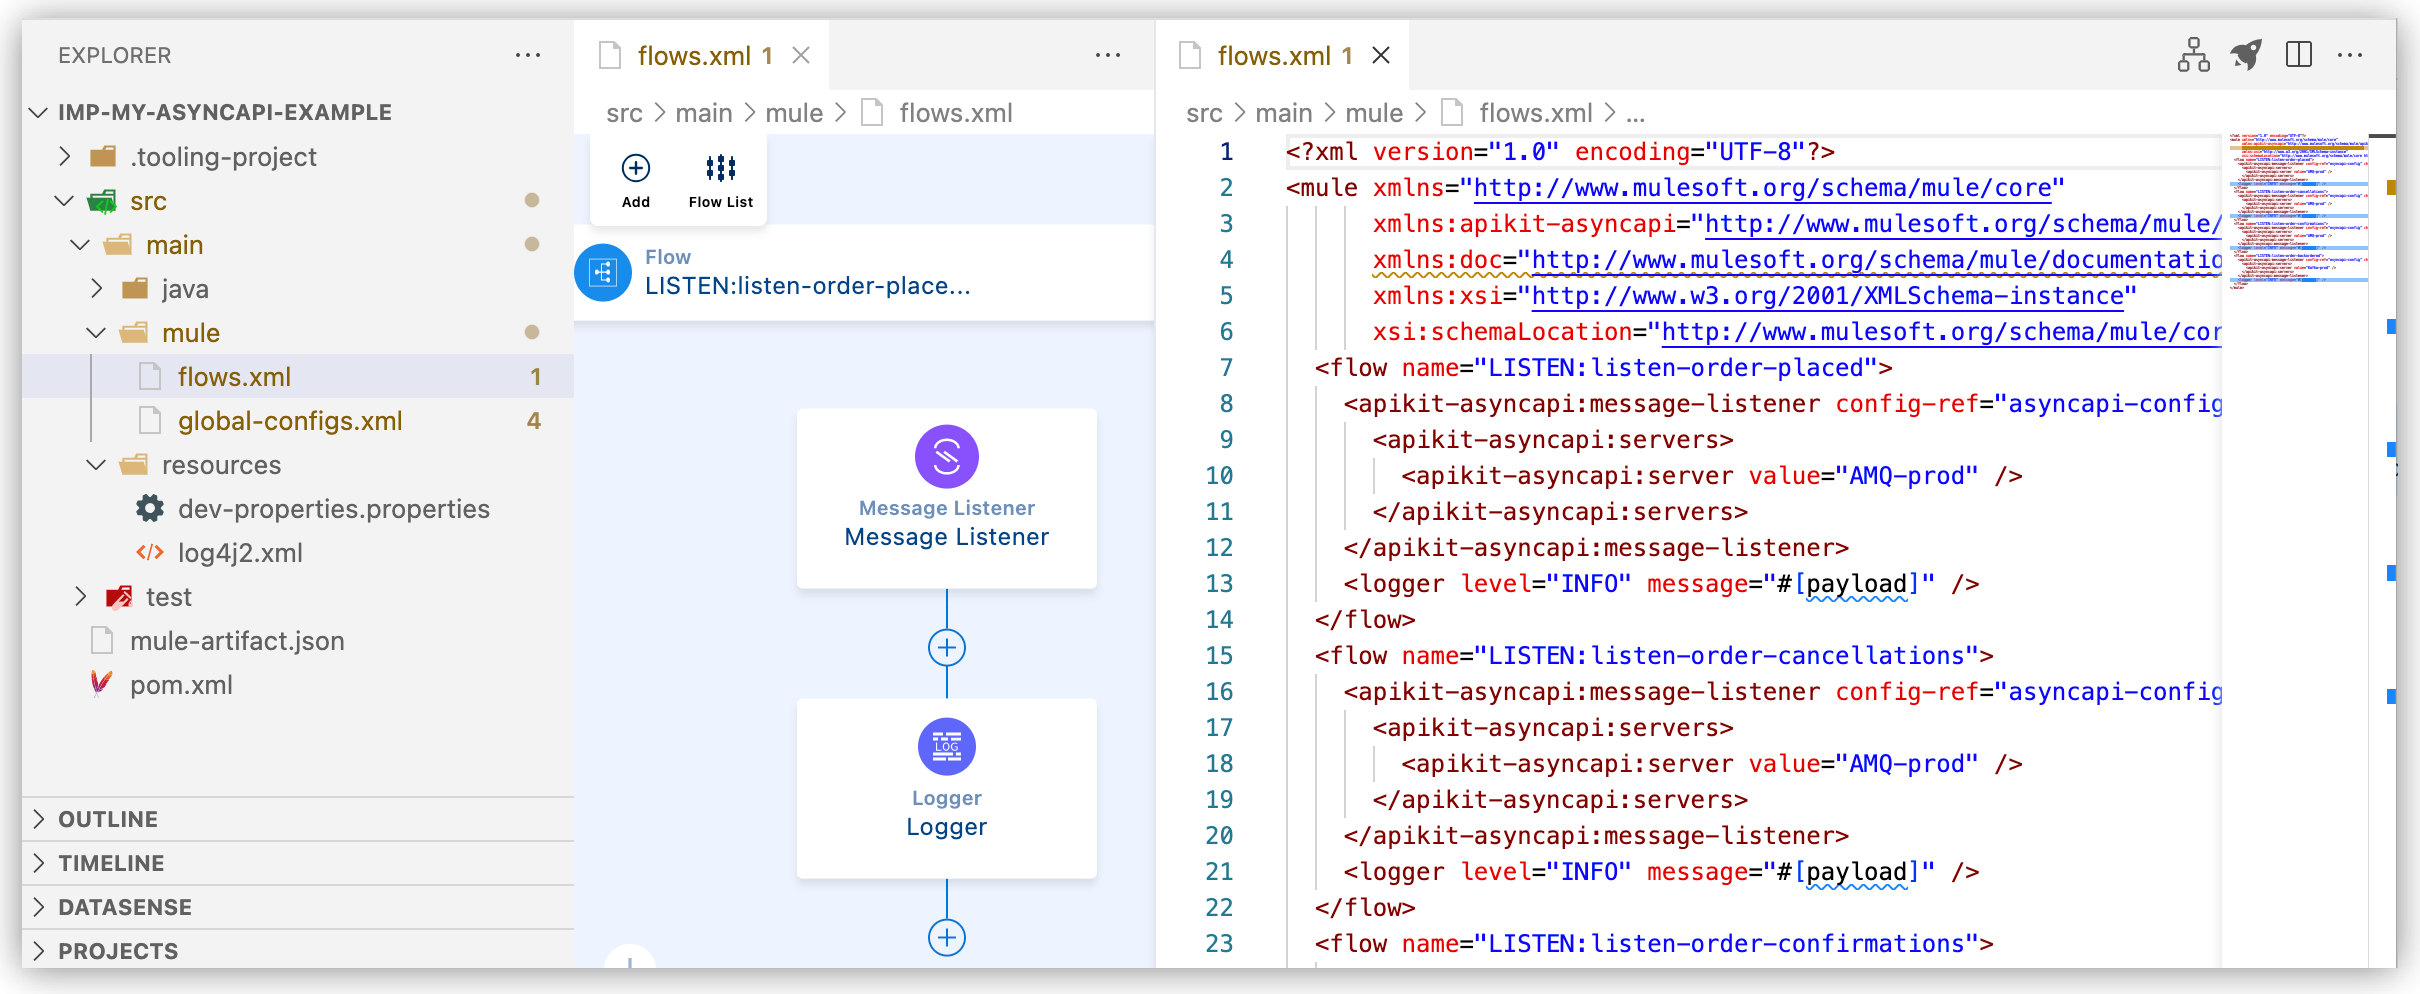
設定 XML ファイルには、実装プロジェクトのインターフェースが含まれ、フローには仕様内の各
publish 操作の Message Listener (<apikit-asyncapi:message-listener/>) 設定が含まれます。 -
プロジェクトの
pom.xml ファイルに API 仕様を連動関係として追加します。次に例を示します。<dependency> <groupId>e21dd38b-8231-45bf-aaa7-abde2072d538</groupId> <artifactId>my-asyncapi-example</artifactId> <version>1.0.0</version> <classifier>evented-api</classifier> <type>zip</type> </dependency> -
Mule と Java のバージョンをプロジェクトの
mule-artifact.json ファイルに追加します。次に例を示します。{ "minMuleVersion": "4.7.0", "javaSpecificationVersions": [ "17" ] }
-
-
Mule アプリケーション内でこのインターフェースを実装するためのビジネスロジックを指定します。
ユースケースのニーズに応じて、コネクタ操作と処理コンポーネントを設定することでビジネスロジックを定義します。設定プロパティ値を
dev-properties.properties ファイルに提供します。必要に応じて、処理要件の追加のフローまたはサブフローを作成および設定します。コンポーネントの設定、デバッグ、アプリケーションの単体テストの実行、およびその他のタスクに関する指針については、インテグレーションの開発. For information about connectors and processors for configuring your business logic, see 参照を参照してください。
Mule アプリケーション内で一部の注文を処理するための AsyncAPI 仕様、スキャフォールディング済みインターフェース、ビジネスロジックの例については、例を参照してください。
既存のプロジェクトに AsyncAPI 仕様をスキャフォールディングまたは再スキャフォールディングする
AsyncAPI 仕様を Exchange から Anypoint Code Builder の既存のプロジェクトにスキャフォールディングまたは再スキャフォールディングします。再スキャフォールディングする前に、どの新しい設定がプロジェクトにスキャフォールディングされるかに関する重要なメモを確認してください。
-
始める前にの前提条件を満たします。
IDE で AsyncAPI 機能を使用するには、Anypoint Platform 組織のシステム管理者による有効化が必要です。
-
Anypoint Code Builder でプロジェクトを開きます。
-
コマンドパレットを開きます。
手順を表示
-
キーボードショートカットを使用する。
-
Mac: Cmd+Shift+p
-
Windows: Ctrl+Shift+p
-
-
デスクトップ IDE で、[View (表示)] > [Command Palette (コマンドパレット)] を選択する。
-
クラウド IDE で、
 (メニュー) アイコンをクリックし、[View (表示)] > [Command Palette (コマンドパレット)] を選択する。
-
-
次のコマンドを入力します。
MuleSoft: Import Asset from Exchange -
アセットのリストから [AsyncAPI] を選択します。
-
Anypoint Platform にログインするように促されたら、ログインし、拡張機能で外部 Web サイトにサインインして開くことおよび Visual Studio Code を開くことを許可します。
-
仕様の完全な名前または部分的に一致する名前を入力します。次に例を示します。
My AsyncAPI Spec
-
名前に一致するアセットのリストが IDE に読み込まれるまで待機した後、対象の AsyncAPI 仕様を選択します。
Exchange でサポートされるバージョンの AsyncAPI 仕様のみがスキャフォールディングに使用できます。サポートされないバージョンは検索結果に表示されません。
-
バージョンを要求されたら、インポートする API のバージョン (
1.0.0 または 2.0.0 など) を選択します。 -
API 連動関係をスキャフォールディングするように促されたら、[Yes (はい)] を選択します。
スキャフォールディングプロセスが完了したら、IDE が開き、スキャフォールディング済みフローを含む設定 XML ファイル (
flows.xml) が表示されます。仕様を再スキャフォールディングした場合は、どの新しい設定がプロジェクトにスキャフォールディングされるかについての重要なメモを確認してください。 -
Mule アプリケーション内でこのインターフェースを実装するためのビジネスロジックを指定します。
ユースケースのニーズに応じて、コネクタ操作と処理コンポーネントを設定することでビジネスロジックを定義します。設定プロパティ値を
dev-properties.properties ファイルに提供します。必要に応じて、処理要件の追加のフローまたはサブフローを作成および設定します。コンポーネントの設定、デバッグ、アプリケーションの単体テストの実行、およびその他のタスクに関する指針については、インテグレーションの開発. For information about connectors and processors for configuring your business logic, see 参照を参照してください。
Mule アプリケーション内で一部の注文を処理するための AsyncAPI 仕様、スキャフォールディング済みインターフェース、ビジネスロジックの例については、例を参照してください。
実装のデプロイ
実装を CloudHub および CloudHub 2.0 または別のホストにデプロイします。CloudHub または CloudHub 2.0 には Anypoint Code Builder からデプロイすることができます。他のデプロイメントオプションについては、デプロイメントオプションを参照してください。
例
この例では、注文を処理し、注文状況の通知をメールと Slack で送信するための API 仕様と実装について説明します。
-
AsyncAPI 仕様では、Anypoint MQ と Kafka プロトコルを使用する注文処理 API を定義します。
-
スキャフォルダーは、AsyncAPI 仕様内の各 publish 操作のフローが含まれる
flow.xml ファイルを生成します (再スキャフォールディングについては、Mule プロジェクトに AsyncAPI 仕様をスキャフォールディングするを参照)。この例では、生成されたフローについて説明し、注文処理ロジックをいくつかのフローに提供するコンポーネントを設定します。 -
スキャフォルダーは、フロー内の Message Listener および Publish 操作の接続設定と、Apache Kafka 用 Anypoint Connector (Apache Kafka Connector) や Anypoint MQ 用 Anypoint Connector (Anypoint MQ Connector) などのコネクタの接続設定を含む
global-configs.xml ファイルを生成します。この例では、ファイルのコンテンツについて説明し、Email Connector および Slack Connector 操作の接続設定を追加します。 -
スキャフォルダーは Mule プロジェクトの
src/main/resources ディレクトリに dev-properties.properties ファイルを生成します。この例では、生成されたファイルについて説明し、メール通知と Slack 通知で使用する設定プロパティをファイルに追加します。 -
notifications.xml のサブフロー (<sub-flow/>) では、メール用 Anypoint Connector (Email Connector) と Slack 用 Anypoint Connector (Slack Connector) を使用して、メールと Slack で注文確認メッセージを送信するビジネスロジックを実装します。
例: AsyncAPI 2.6 仕様
次の例では、Anypoint MQ と Kafka プロトコルを使用する API 仕様を定義します。この仕様では、Anypoint MQ を使用する注文 (新規、確認済み、およびキャンセル済み注文) 用の チャネルと、取り寄せ注文 (在庫にない品目) 用に Kafka を使用するチャネルを定義します。各チャネルに publish および subscribe 操作が含まれます。仕様の サーバー設定では、AsyncAPI モジュールの操作を介してイベントをパブリッシュまたはサブスクライブするときに (間接的に) 使用するコネクタを決定するメッセージブローカーを定義します。
asyncapi: '2.6.0'
info:
  title: Async-AMQ-Kafka-Orders
  version: '1.0.0'
  description: Orders API
  license:
    name: Anypoint MQ
    url: https://license.com
  contact:
    name: Max Muley
    email: max@salesforce.com
    url: http://www.salesforce.com
defaultContentType: application/json
tags:
  - name: Orders API
    description: API for orders
servers:
  AMQ-prod: (1)
    url: https:://your_MQ_server_URL_here
    protocol: anypointmq
    protocolVersion: v1
    description: Anypoint MQ broker
  Kafka-prod: (2)
    url: localhost:9092
    protocol: kafka
    description: kafka broker
channels:
  order-placed:  (3)
    description: new orders channel
    servers:
      - AMQ-prod
    publish:
      operationId: listen-order-placed
      description: listen for new order events
      summary: Order Placed Event
      message:
        $ref: '#/components/messages/OrderPlaced'
    subscribe:
      operationId: publish-order-placed
      description: publish new order events
      summary: Order Placed Event
      message:
        $ref: '#/components/messages/OrderPlaced'
  order-cancelled:
    description: orders cancelled channel
    servers:
      - AMQ-prod
    publish:
      operationId: listen-order-cancellations
      description: listen for order cancellation events
      summary: Order Cancelled Event
      message:
        $ref: '#/components/messages/OrderCancelled'
    subscribe:
      operationId: publish-order-cancellations
      description: publish order cancellation events
      summary: Order Cancelled Event
      message:
        $ref: '#/components/messages/OrderCancelled'
  order-confirmed:
    description: orders confirmed channel
    servers:
      - AMQ-prod
    publish:
      operationId: listen-order-confirmations
      description: listen for order confirmation events
      summary: Order Confirmed Event
      message:
        $ref: '#/components/messages/OrderConfirmed'
    subscribe:
      operationId: publish-order-confirmations
      description: publish order confirmation events
      summary: Order Confirmed Event
      message:
        $ref: '#/components/messages/OrderConfirmed'
  order-backordered: (4)
    servers:
      - Kafka-prod
    description: orders backordered channel
    publish:
      operationId: listen-order-backordered
      description: listen for backorder events
      summary: Backorder Event
      message:
        $ref: '#/components/messages/BackOrder'
    subscribe:
      operationId: publish-order-backordered
      description: publish backorder events
      summary: Backorder Event
      message:
        $ref: '#/components/messages/BackOrder'
components:  (5)
  messages:
    OrderPlaced:
      payload:
        type: object
        properties:
          orderId:
            type: string
          customerName:
            type: string
          email:
            type: string
          items:
            type: array
            items:
              type: object
              properties:
                productId:
                  type: string
                productName:
                  type: string
                quantity:
                  type: integer
                price:
                  type: number
    OrderConfirmed:
      payload:
        type: object
        properties:
          orderId:
            type: string
          email:
            type: string
    OrderCancelled:
      payload:
        type: object
        properties:
          orderId:
            type: string
          email:
            type: string
          reason:
            type: string
    BackOrder:
      payload:
        type: object
        properties:
          orderId:
            type: string
          email:
type: string| 1 | AMQ-prod では、Anypoint MQ ブローカーを設定します。
MQ ブローカーの URL は、キューを作成するときに選択したリージョンで見つけることができます。キューを作成するのコピーボタンと、クライアントアプリケーションの設定を参照してください。 |
| 2 | Kafka-prod では、ローカルでホストされた Kafka ブローカーを設定します。 |
| 3 | order-placed では、注文をパブリッシュ (リスン) およびサブスクライブ (パブリッシュ) するための Anypoint MQ チャネルを設定します。order-cancelled チャネルと order-confirmed チャネルは同様に設定されます。 |
| 4 | order-backordered では、取り寄せ注文をパブリッシュ (リスン) およびサブスクライブ (パブリッシュ) するための Kafka チャネルを設定します。 |
| 5 | components では、OrderPlaced、OrderCancelled、OrderConfirmed、BackOrder を含むさまざまな注文種別のメッセージの構造を定義します。 |
例: スキャフォールディング済みフロー
仕様を実装プロジェクトにスキャフォールディングすると、Anypoint Code Builder は各 publish 操作のフロー (<flow/>) を作成し、publish 操作を APIkit の AsyncAPI モジュールの Message Listener ソース (<apikit-asyncapi:message-listener/>) に変換します。各フローには Logger コンポーネントも含まれます。このモジュールについての詳細は、APIkit for AsyncAPI モジュールリファレンスを参照してください。
スキャフォルダーは仕様から flow.xml ファイルを生成します。キャフォルダーは AsyncAPI 仕様例から次の XML を生成します。
<?xml version="1.0" encoding="UTF-8"?>
<mule xmlns="http://www.mulesoft.org/schema/mule/core"
      xmlns:apikit-asyncapi="http://www.mulesoft.org/schema/mule/apikit-asyncapi"
      xmlns:doc="http://www.mulesoft.org/schema/mule/documentation"
      xmlns:xsi="http://www.w3.org/2001/XMLSchema-instance"
      xsi:schemaLocation="http://www.mulesoft.org/schema/mule/core http://www.mulesoft.org/schema/mule/core/current/mule.xsd http://www.mulesoft.org/schema/mule/apikit-asyncapi http://www.mulesoft.org/schema/mule/apikit-asyncapi/current/mule-apikit-asyncapi.xsd http://www.mulesoft.org/schema/mule/kafka http://www.mulesoft.org/schema/mule/kafka/current/mule-kafka.xsd http://www.mulesoft.org/schema/mule/anypoint-mq http://www.mulesoft.org/schema/mule/anypoint-mq/current/mule-anypoint-mq.xsd">
  <flow name="LISTEN:listen-order-placed">
    <apikit-asyncapi:message-listener config-ref="asyncapi-config" channelName="order-placed">
      <apikit-asyncapi:servers>
        <apikit-asyncapi:server value="AMQ-prod" />(1)
      </apikit-asyncapi:servers>
    </apikit-asyncapi:message-listener>
    <logger level="INFO" message="#[payload]" />
  </flow>
  <flow name="LISTEN:listen-order-cancellations">
    <apikit-asyncapi:message-listener config-ref="asyncapi-config" channelName="order-cancelled">
      <apikit-asyncapi:servers>
        <apikit-asyncapi:server value="AMQ-prod" />
      </apikit-asyncapi:servers>
    </apikit-asyncapi:message-listener>
    <logger level="INFO" message="#[payload]" />
  </flow>
  <flow name="LISTEN:listen-order-confirmations">
    <apikit-asyncapi:message-listener config-ref="asyncapi-config" channelName="order-confirmed">
      <apikit-asyncapi:servers>
        <apikit-asyncapi:server value="AMQ-prod" />
      </apikit-asyncapi:servers>
    </apikit-asyncapi:message-listener>
    <logger level="INFO" message="#[payload]" />
  </flow>
  <flow name="LISTEN:listen-order-backordered">
    <apikit-asyncapi:message-listener config-ref="asyncapi-config" channelName="order-backordered">
      <apikit-asyncapi:servers>
        <apikit-asyncapi:server value="Kafka-prod" />(2)
      </apikit-asyncapi:servers>
    </apikit-asyncapi:message-listener>
    <logger level="INFO" message="#[payload]" />
  </flow>
</mule>次の例では、ビジネスロジックをスキャフォールディング済みフローに追加します。
-
LISTEN:listen-order-placed は注文をリスンします。トリガーされると、DataWeave 式を使用して十分な在庫があるかどうかを確認します。在庫に十分な品目が存在する場合、フローで注文データを order-confirmed チャネルにパブリッシュする Publish 操作が設定され、LISTEN:listen-order-confirmations フローがトリガーされます。存在しない場合、フローで注文データを order-backordered チャネルにパブリッシュする Publish 操作が追加され、LISTEN:listen-order-backordered フローがトリガーされます。 -
LISTEN:listen-order-confirmations は注文確認をリスンします。トリガーされると、注文情報を notification-flow サブフローに送信し、このサブフローで Slack とメールを介して確認通知が送信されます (例: 通知サブフローを参照)。
<mule xmlns="http://www.mulesoft.org/schema/mule/core"
xmlns:apikit-asyncapi="http://www.mulesoft.org/schema/mule/apikit-asyncapi" xmlns:doc="http://www.mulesoft.org/schema/mule/documentation"
xmlns:ee="http://www.mulesoft.org/schema/mule/ee/core"
xmlns:http="http://www.mulesoft.org/schema/mule/http"
xmlns:xsi="http://www.w3.org/2001/XMLSchema-instance"
xsi:schemaLocation="http://www.mulesoft.org/schema/mule/core http://www.mulesoft.org/schema/mule/core/current/mule.xsd http://www.mulesoft.org/schema/mule/apikit-asyncapi http://www.mulesoft.org/schema/mule/apikit-asyncapi/current/mule-apikit-asyncapi.xsd http://www.mulesoft.org/schema/mule/kafka http://www.mulesoft.org/schema/mule/kafka/current/mule-kafka.xsd http://www.mulesoft.org/schema/mule/anypoint-mq http://www.mulesoft.org/schema/mule/anypoint-mq/current/mule-anypoint-mq.xsd  http://www.mulesoft.org/schema/mule/http http://www.mulesoft.org/schema/mule/http/current/mule-http.xsd  http://www.mulesoft.org/schema/mule/ee/core http://www.mulesoft.org/schema/mule/ee/core/current/mule-ee.xsd">
  <flow name="LISTEN:listen-order-placed">(1)
    <apikit-asyncapi:message-listener channelName="order-placed" config-ref="asyncapi-config" doc:name="Listen for new orders">
      <apikit-asyncapi:servers>
        <apikit-asyncapi:server value="AMQ-prod"></apikit-asyncapi:server>
      </apikit-asyncapi:servers>
    </apikit-asyncapi:message-listener>
    <logger level="INFO" message="#[payload]"></logger>
    <http:request config-ref="HTTP_Request_config" doc:id="nscwew"
    doc:name="check inventory" target="inventory" url="https://anypoint.mulesoft.com/mocking/api/v1/links/3a7158be-3edb-40d9-a776-71614fe490e9/inventory?ProductID=12345"></http:request>
    <choice doc:id="e61a19-cfc986" doc:name="If in stock">(2)
      <when doc:id="43efa6-eb5afe" doc:name="in stock" expression="#[vars.inventory.stockDetails.availableStock > payload.items.quantity[0]]">
        <http:request config-ref="HTTP_Request_config" doc:id="aa26a8-7a1ec5" doc:name="CreateOrder" target="status" url="https://anypoint.mulesoft.com/mocking/api/v1/links/d0d179d9-8a69-4227-ade1-626f1754404d/order"></http:request>
        <ee:transform doc:id="9c714a-117d59" doc:name="Prepare confirmation message">
          <ee:message>
            <ee:set-payload doc:id="166d40-4bf0b6" doc:name="Set payload">
              <![CDATA[%dw 2.0
                output application/json
                ---
                {
                  orderId : payload.orderId,
                  email : payload.email,
                }]]>
            </ee:set-payload>
          </ee:message>
        </ee:transform>
        <apikit-asyncapi:publish channelName="order-confirmed" config-ref="asyncapi-config" doc:id="oigqfw" doc:name="Order confirmation notification" serverName="AMQ-prod">
        </apikit-asyncapi:publish>
      </when>
      <otherwise doc:name="out of stock">
        <ee:transform doc:id="90dd99-c160de" doc:name="Prepare notification message">
          <ee:message>
            <ee:set-payload doc:id="f5aced-23fcf9" doc:name="Set payload">
              <![CDATA[%dw 2.0
            output application/json
            ---
            {
              orderId : payload.orderId,
              email : payload.email,
            }]]>
            </ee:set-payload>
          </ee:message>
        </ee:transform>
        <apikit-asyncapi:publish channelName="order-backordered" config-ref="asyncapi-config" doc:id="lsmcyo" doc:name="Out of stock notification" serverName="Kafka-prod"></apikit-asyncapi:publish>
      </otherwise>
    </choice>
  </flow>
  <flow name="LISTEN:listen-order-confirmations">(3)
    <apikit-asyncapi:message-listener channelName="order-confirmed" config-ref="asyncapi-config" doc:name="listen for order confirmation">
      <apikit-asyncapi:servers>
        <apikit-asyncapi:server value="AMQ-prod"></apikit-asyncapi:server>
      </apikit-asyncapi:servers>
    </apikit-asyncapi:message-listener>
    <logger level="INFO" message="#[payload]"></logger>
    <set-payload doc:id="28ace0-983314" doc:name="Set Payload"
                  value="#[
                    { 'orderId': payload.orderId,
                      'email': payload.email,
                      'subject': 'Order: ' ++ payload.orderId as String ++ ' is confirmed',
                      'emailmessage': 'We are pleased to let you know that your order: ' ++ payload.orderId as String ++ ' is confirmed. \nThank you for shopping with us.\n\nThrone of Games Corporation',
                      'slackmessage': ':mega: Please note that the order with OrderId ' ++ payload.orderId as String ++ ' has been confirmed.'
                    }
                  ]">
    </set-payload>
    <flow-ref name="notification-flow"></flow-ref>
  </flow>
  <flow name="LISTEN:listen-order-cancellations">
    <apikit-asyncapi:message-listener channelName="order-cancelled" config-ref="asyncapi-config">
      <apikit-asyncapi:servers>
        <apikit-asyncapi:server value="AMQ-prod"></apikit-asyncapi:server>
      </apikit-asyncapi:servers>
    </apikit-asyncapi:message-listener>
    <logger level="INFO" message="#[payload]"></logger>
  </flow>
  <flow name="LISTEN:listen-order-backordered">(4)
    <apikit-asyncapi:message-listener channelName="order-backordered" config-ref="asyncapi-config">
      <apikit-asyncapi:servers>
        <apikit-asyncapi:server value="Kafka-prod"></apikit-asyncapi:server>
      </apikit-asyncapi:servers>
    </apikit-asyncapi:message-listener>
    <logger level="INFO" message="#[payload]"></logger>
  </flow>
  <flow name="new-orders">
        <http:listener path="neworder" config-ref="HTTP_Listener_config" doc:name="listen for new orders" doc:id="nghrkl" allowedMethods="POST"/>
        <logger doc:name="Logger" doc:id="adydcs" />
  </flow>
</mule>| 1 | 注文によりフロー LISTEN:listen-order-placed 内の Message Listener がトリガーされると、HTTP 要求操作 (<http:request/>) で在庫データが要求されて対象変数 inventory に保存されます。 |
| 2 | Choice コンポーネント (<choice/>) では、対象変数 (vars.inventory.stockDetails.availableStock) の availableStock 値を注文ペイロード (payload.items.quantity[0]) の quantity 値と照合します。quantity 値は、フローをトリガーする OrderPlaced メッセージから取得されます。
十分な在庫がある場合、Set Payload コンポーネント ( |
| 3 | フロー LISTEN:listen-order-confirmations の Message Listener は Anypoint MQ チャネル order-confirmed のアクティビティをリスンします。トリガーされると、フローでその <set-payload/> コンポーネントが設定されて注文確認メッセージが作成されます。Flow Reference (<flow-ref/>) でこのメッセージが notification-flow サブフローでの処理のために送信されます。 |
| 4 | 在庫が十分でない場合、LISTEN:listen-order-placed によってフロー LISTEN:listen-order-backordered がトリガーされます。 |
例: 接続設定
スキャフォールディングプロセスでは、仕様で定義されたサーバー接続設定用の global-configs.xml を生成します。
<apikit-asyncapi:config/> 内の AsyncAPI モジュールの接続設定は Kafka Cnnector および Anypoint MQ Cnnector の接続設定を参照します。スキャフォールディングプロセスでは、AsyncAPI 仕様内の server および channel 設定に基づいてコネクタをプロジェクトに追加します。
-
指定されたチャネルとサーバーの組み合わせにパブリッシュする場合、フローの Publish 操作 (
<apikit-asyncapi:publish/>) で接続設定が使用されます。フローで Kafka-prod または AMQ-prod サーバーの Kafka および Anypoint MQ チャネルにパブリッシュします。 -
フローの Message Listener 操作 (
<apikit-asyncapi:message-listener/>) は、サーバーの value 設定 (Kafka-prod または AMQ-prod) に基づいて指定されたチャネルをリスンするように自動的に設定されます。この値は、AsyncAPI 接続設定 (<apikit-asyncapi:config/>) の serverKey 設定のいずれかに一致します。
<?xml version="1.0" encoding="UTF-8"?>
<mule xmlns="http://www.mulesoft.org/schema/mule/core"
      xmlns:anypoint-mq="http://www.mulesoft.org/schema/mule/anypoint-mq"
      xmlns:apikit-asyncapi="http://www.mulesoft.org/schema/mule/apikit-asyncapi"
      xmlns:doc="http://www.mulesoft.org/schema/mule/documentation"
      xmlns:kafka="http://www.mulesoft.org/schema/mule/kafka"
      xmlns:xsi="http://www.w3.org/2001/XMLSchema-instance"
      xsi:schemaLocation="http://www.mulesoft.org/schema/mule/core http://www.mulesoft.org/schema/mule/core/current/mule.xsd http://www.mulesoft.org/schema/mule/apikit-asyncapi http://www.mulesoft.org/schema/mule/apikit-asyncapi/current/mule-apikit-asyncapi.xsd http://www.mulesoft.org/schema/mule/kafka http://www.mulesoft.org/schema/mule/kafka/current/mule-kafka.xsd http://www.mulesoft.org/schema/mule/anypoint-mq http://www.mulesoft.org/schema/mule/anypoint-mq/current/mule-anypoint-mq.xsd">
  <kafka:producer-config name="Apache_Kafka_Producer_configuration_Kafka-prod">
    <kafka:producer-plaintext-connection>
      <kafka:bootstrap-servers>
        <kafka:bootstrap-server value="localhost:9092" />
      </kafka:bootstrap-servers>
    </kafka:producer-plaintext-connection>
  </kafka:producer-config>
  <kafka:consumer-config name="Apache_Kafka_Consumer_configuration_Kafka-prod">
    <kafka:consumer-plaintext-connection>
      <kafka:bootstrap-servers>
        <kafka:bootstrap-server value="localhost:9092" />
      </kafka:bootstrap-servers>
      <kafka:topic-patterns>
        <kafka:topic-pattern value="order-backordered" />
      </kafka:topic-patterns>
    </kafka:consumer-plaintext-connection>
  </kafka:consumer-config>
  <anypoint-mq:config name="Anypoint_MQ_configuration_AMQ-prod">
    <anypoint-mq:connection clientId="${anypointmq.server.AMQ-prod.clientAppId}" clientSecret="${anypointmq.server.AMQ-prod.clientSecret}" url="https://mq-us-east-1.stgx.anypoint.mulesoft.com/api/v1/organizations/8dbc2756-83d6-4a1c-91c4-6eafbe7d7ae0/environments/49cbf562-fed4-4b42-bce9-98fe8f7bcf60" />
  </anypoint-mq:config>
  <configuration-properties file="${env}-properties.properties" />
  <global-property name="env" value="dev" />
  <apikit-asyncapi:config name="asyncapi-config" apiDefinition="${api.path}">
    <apikit-asyncapi:kafka-configs>
      <apikit-asyncapi:kafka-config serverKey="Kafka-prod" producerConfigRef="Apache_Kafka_Producer_configuration_Kafka-prod" consumerConfigRef="Apache_Kafka_Consumer_configuration_Kafka-prod" />
    </apikit-asyncapi:kafka-configs>
    <apikit-asyncapi:anypoint-mq-configs>
      <apikit-asyncapi:anypoint-mq-config serverKey="AMQ-prod" configRef="Anypoint_MQ_configuration_AMQ-prod" />
    </apikit-asyncapi:anypoint-mq-configs>
  </apikit-asyncapi:config>
</mule>
ビジネスロジックをスキャフォールディング済みプロジェクトに追加する場合、アプリケーション内のフローまたはサブフローに追加するコネクタ操作など、他の接続設定を global-configs.xml に追加できます。次の例では、HTTP、Email、Slack Connector 操作の接続設定を追加します。これらの設定プロパティ (${email.password} など) はプロパティファイルで定義できます。
<!-- additional connection configuration examples -->
  <http:request-config name="HTTP_Request_config" basePath="path" > (1)
    <http:request-connection protocol="HTTP" host="example.com" />
  </http:request-config>

  <http:listener-config name="HTTP_Listener_config" > (2)
    <http:listener-connection host="0.0.0.0" port="8081" />
  </http:listener-config>

  <email:smtp-config name="Email_SMTP"> (3)
    <email:smtps-connection host="smtp.gmail.com" password="${email.password}" user="${email.username}">
      <tls:context>
        <tls:trust-store insecure="true"></tls:trust-store>
      </tls:context>
    </email:smtps-connection>
  </email:smtp-config>

  <slack:config name="Slack_Config"> (4)
    <slack:token-connection token="${slack.token}" />
</slack:config>| 1 | HTTP 要求接続設定例 |
| 2 | HTTP リスナー接続設定例 |
| 3 | メール SMTP 接続設定例 |
| 4 | Slack 接続設定例 |
例: 設定プロパティファイル
Anypoint Code Builder は実装プロジェクトの src/main/resources ディレクトリに dev-properties.properties ファイルを生成します。
仕様例では、Anypoint MQ ブローカーのサーバー設定を定義します。Anypoint MQ キューをリスンし、Anypoint MQ キューにメッセージをパブリッシュするには、MQ クライアントアプリケーションの clientAppId と clientSecret を指定する必要があります。スキャフォールディングプロセス中に、関連付けられた api-path 設定が自動的に生成されます。
#Fri Jun 07 09:32:50 PDT 2024
anypointmq.server.AMQ-prod.clientAppId=
anypointmq.server.AMQ-prod.clientSecret=
api.path=resource\:\:e21dd38b-8231-45bf-aaa7-abde2072d538\:my-asyncapi-example\:1.0.0\:evented-api\:zip\:anypointmq-kafka-orders-demo-final.yamlこのファイルに他のプロパティを追加できます。email と slack の例は、通知サブフローの Email Connector および Slack Connector 操作用です。
#Fri Jun 07 17:05:33 PDT 2024
anypointmq.server.AMQ-prod.clientAppId=my_client_app_id_here
anypointmq.server.AMQ-prod.clientSecret=my_client_app_secret_here
slack.token=my_slack_token_here
email.host=smtp.gmail.com
email.username=me@gmail.com
email.password=my_gmail_password_here
api.path=resource\:\:8dbc2756-83d6-4a1c-91c4-6eafbe7d7ae0\:async-amq-kafka-orders\:1.0.2\:evented-api\:zip\:anypointmq-kafka-orders-demo-compliant.yamlパスワードや他の機密データのセキュアプロパティを含む設定プロパティについての詳細は、Mule アプリケーションのプロパティの定義および保護を参照してください。
例: 通知サブフロー
notifications.xml のサブフロー (<sub-flow/>) では、メールおよび Slack で注文確認メッセージを送信するためのビジネスロジックを実装します。このファイルはスキャフォルダーでは生成されません。
LISTEN:listen-order-confirmations フローの Flow Reference コンポーネント (<flow-ref/>) によってトリガーされた場合、通知サブフローで注文確認メッセージが送信されます。
<?xml version="1.0" encoding="UTF-8"?>
<mule xmlns="http://www.mulesoft.org/schema/mule/core" xmlns:doc="http://www.mulesoft.org/schema/mule/documentation"
  xmlns:xsi="http://www.w3.org/2001/XMLSchema-instance"
	xmlns:slack="http://www.mulesoft.org/schema/mule/slack"
	xmlns:email="http://www.mulesoft.org/schema/mule/email"
	xmlns:ee="http://www.mulesoft.org/schema/mule/ee/core"
  xsi:schemaLocation="http://www.mulesoft.org/schema/mule/core http://www.mulesoft.org/schema/mule/core/current/mule.xsd
	http://www.mulesoft.org/schema/mule/slack http://www.mulesoft.org/schema/mule/slack/current/mule-slack.xsd
	http://www.mulesoft.org/schema/mule/email http://www.mulesoft.org/schema/mule/email/current/mule-email.xsd
	http://www.mulesoft.org/schema/mule/ee/core http://www.mulesoft.org/schema/mule/ee/core/current/mule-ee.xsd">
  <sub-flow name="notification-flow">
        <logger doc:name="Logger" doc:id="pdclup" />
        <ee:transform doc:name="extract variables" doc:id="14b208-1ae908">(1)
          <ee:variables>
            <ee:set-variable variableName="emailmsg">
                <![CDATA[%dw 2.0 output application/java --- payload.emailmessage]]>
            </ee:set-variable>
            <ee:set-variable variableName="slackmsg">
                <![CDATA[%dw 2.0 output application/java --- payload.slackmessage]]>
            </ee:set-variable>
            <ee:set-variable variableName="email">
                <![CDATA[%dw 2.0 output application/java --- payload.email]]>
            </ee:set-variable>
            <ee:set-variable variableName="subject">
                <![CDATA[%dw 2.0 output application/java --- payload.subject]]>
            </ee:set-variable>
            </ee:variables>
        </ee:transform>
      <slack:post-message channel="order-status" config-ref="Slack_Config" doc:id="305e92-9dc173" doc:name="Send order notification to slack">(2)
        <slack:message>
          <![CDATA[#[vars.slackmsg]]]>
        </slack:message>
      </slack:post-message>
      <email:send config-ref="Email_SMTP" doc:id="7dd748-b67d3d" doc:name="Send notification email" fromAddress="#[vars.email]" subject="#[vars.subject]">(3)
        <email:to-addresses>
          <email:to-address value="#[vars.email]"></email:to-address>
        </email:to-addresses>
        <email:body contentType="text/plain">
          <email:content>
            <![CDATA[#[vars.emailmsg]]]>
          </email:content>
        </email:body>
      </email:send>
      <logger doc:id="hyxybs" doc:name="Logger"></logger>
    </sub-flow>
</mule>
| 1 | LISTEN:listen-order-confirmations フローから出力されたペイロードを、確認メッセージデータを取得する Mule 変数に変換します。 |
| 2 | Slack Connector から <slack:post-message/>`* 操作を使用して Slack 確認メッセージを投稿します。 |
| 3 | Email Connector から <email:send/> 操作を使用して確認メッセージをメール送信します。 |