App Automation
App Automation lets you address elements directly through their XPaths. The appearance and coordinates are not relevant, in contrast to the Mouse Action and Pattern Search Action Steps. The advantage of this approach is that App Automation works even if the position or design of the target application changes on the desktop.
In addition, App Automation makes it easier to create workflows, by recording clicks and keyboard inputs to generate Action Steps automatically.
Generating Action Steps
There are two ways to generate Action Steps automatically.
-
RPA Manager
During the design phase on RPA Manager, you can record a process with a sequence of clicks and keyboard inputs by using RPA Recorder, which is available for download in the RPA Manager UI (for more information, see RPA Manager Overview).
After you finish the recording, you can upload it to RPA Manager, together with the generated process, and move the process to the Build phase. You can then download and open the process in RPA Builder. All the recorded information for generating the Action Steps automatically is now available.
-
RPA Builder
If the App Session does not contain any elements yet, you can use the wizard to start a local recording, which you can then use to generate App Automation Action Steps automatically. After you select Start Capturing in the wizard of the App Session and completed the recording, you can then click OK & generate. RPA Builder then generates the Action Steps automatically.
Example
The following example calls Microsoft Excel, opens a new Excel workbook, and inserts text in the first row. The example shows the corresponding clicks and keyboard inputs, together with an example of a filled wizard for a Click App Element Action Step:
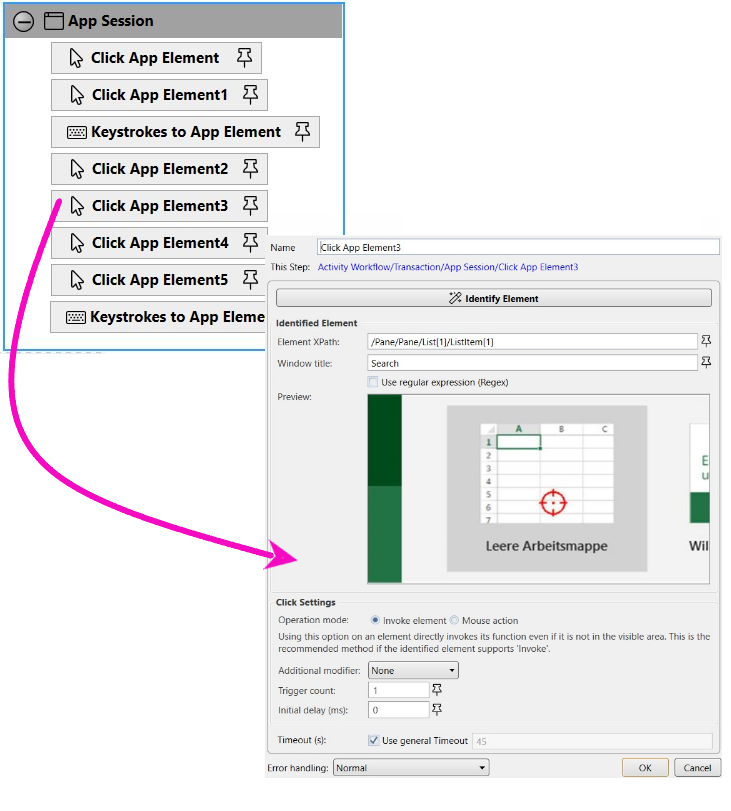
You can now edit the generated workflow, for example, adding additional Action Steps or renaming existing ones.
The red highlighting in the wizard preview immediately shows you where the click was executed.
Supported Applications
The following types of applications are supported:
-
Win32
-
Windows Forms
-
WPF
-
UWP
Common Properties (App Automation)
The App Automation Action Steps also contain the common properties of the other Action Steps. See Common Properties for a description.
The following are properties common to all App Automation Action Steps:
-
Identify Element
The wizard contains the Identify Element button in all Action Steps of the App Automation. This button sets the wizard to a Capture Mode, which lets you hover the mouse over a certain element and capture it by pressing F2.
When you hover the mouse over an element and press F2, the following happens:
-
A frame is drawn around the element.
-
The Element XPath and Window Title are filled with the values of the selected element.
-
The preview shows a screen shot with the selected element. The element is marked with red crosshairs.
-
If the selected element does not match the Action Step, a warning is displayed below the preview. This is the case, for example, if an element that does not support text entry is selected in a Set Text to App Element Action Step. In this case, the frame is displayed in red instead of green.
-
-
Element XPath
XPath is short for XML path language and is used to identify and address elements. Use the Identify Element to read the XPath or specify it manually.
-
Window Title
The name of the window to use.
-
Use Regular Expression (Regex)
When you select this option, the Window Title is interpreted as a Regex expression.
-
Preview
You see a preview of the selected element here. It only appears if the element was selected using Identify Element or the if Action Step was generated automatically.