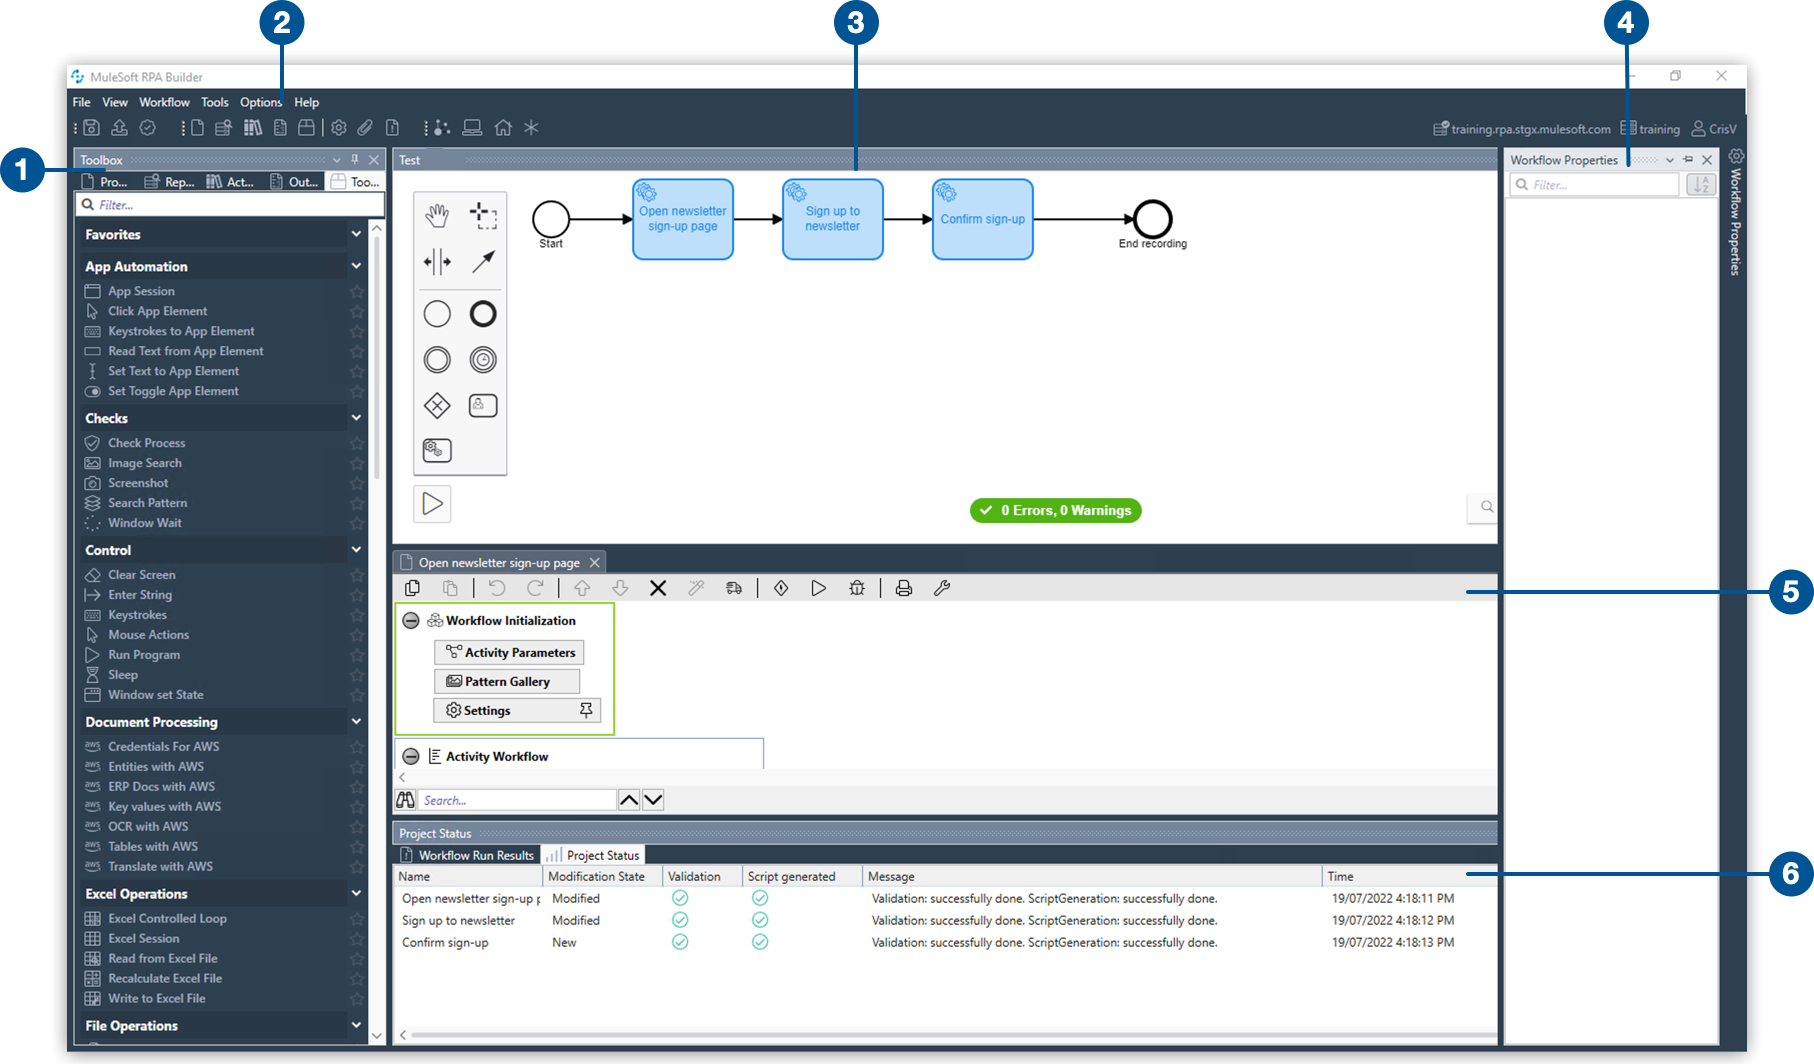
RPA Builder UI Overview
The RPA Builder user interface has the following main areas:
-
Explorer pane
-
Menu bar
-
BPMN editor
-
Workflow Properties pane
-
Workbench
-
Workflow Run Results
In addition to the Workflow Run Result, you can also find the Process Status in this area.
Most visual elements in RPA Builder have tooltips. If you ever want to know what a button or setting does, hover your mouse pointer over it for a few seconds.
Menu Bar
The menu bar contains icons for saving, uploading, and validating projects. The other icons are shortcuts to various views in RPA Builder.
Tools
Open MuleSoft RPA Builder Log This menu item opens the RPA Builder log file in your default text editor. The log is a text file containing a chronological list of all relevant events since RPA Builder was last launched. It also contains information about the executing system.
Open Regex Tester Use this dialog to create and test regular expressions. You can also access the Regex Tester directly from various Action Steps. The section on Using Regular Expressions includes a more detailed description of this dialog and of regular expressions in general.
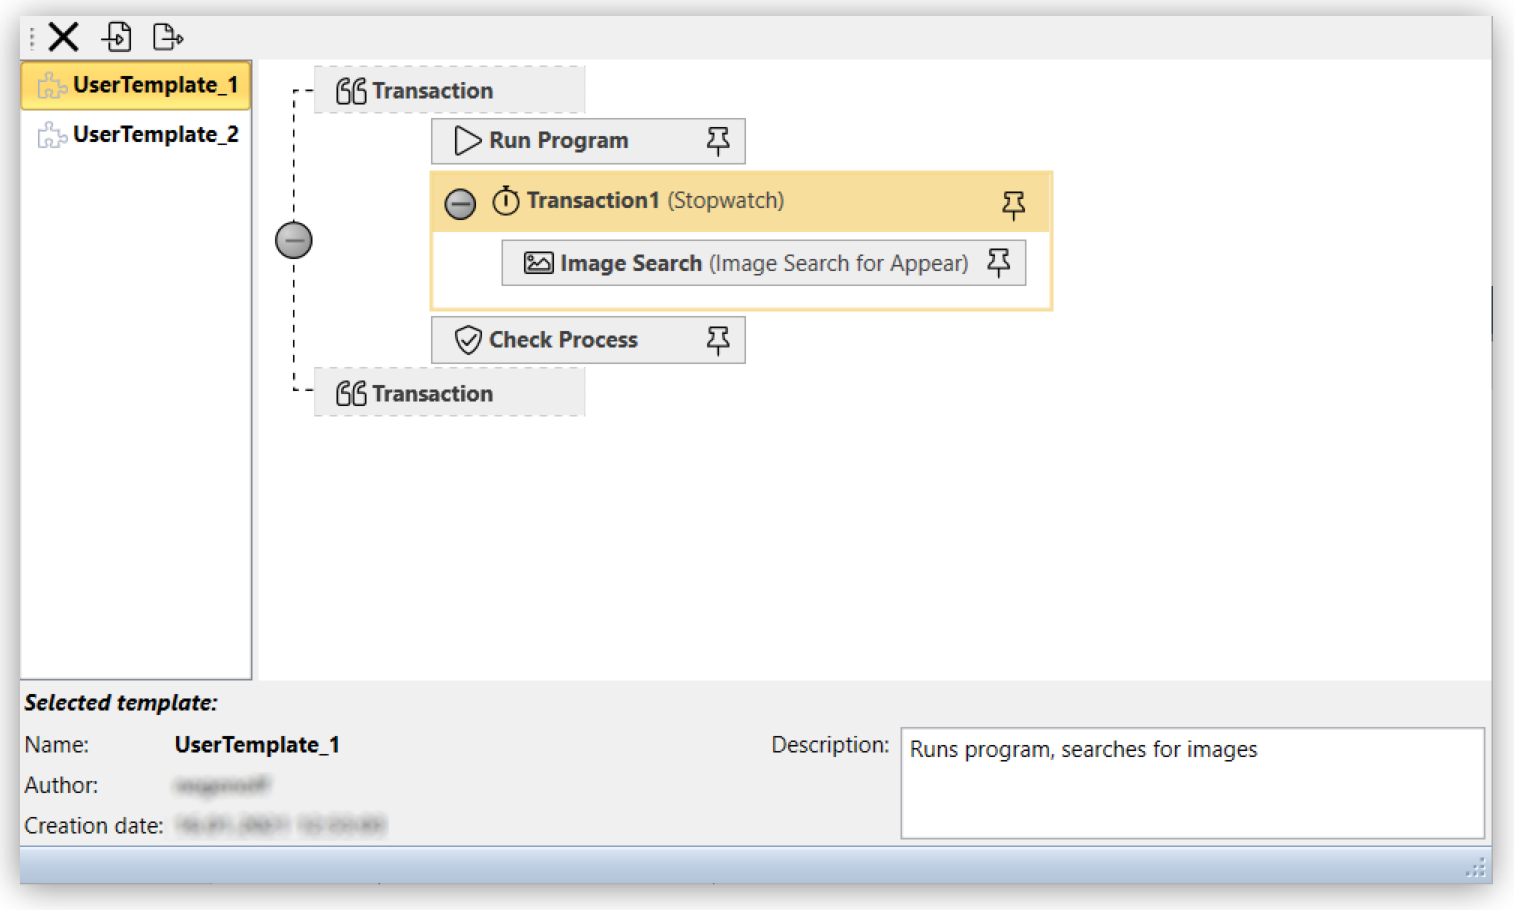
Templates Manager This menu item opens the Templates Manager. This provides an overview of all the templates which have been created in RPA Builder already. Clicking the template name on the left-hand side of the window opens a preview of that template’s content. Use the Delete button to delete individual templates. You can find out how to create and edit templates in the section entitled Save selected Workflow Objects as template.
Options
The menu Options contains four sub-menus: General, Autosave, Repository and Visibility. If you click on one of the menu items, the wizard automatically opens with the selected tab.
General timeout default for new projects
If you want to use the same timeout for every Action Step containing this property, you can enter the value here.
A timeout is the time span an Action Step waits before reporting an error in case of failure.
This value is only used for initialization when creating a new project and can be replaced within each Action Step by a value that is valid only for that Action Step.
If you want to change the default timeout value for a whole Workflow which has already been created, please use the Default Timeout [sec] setting in the Workflow Properties.
Use All Users as project home location
If this option is set, RPA Builder saves all projects, the most common
options, Page Setup…, and Print Template Settings
for the Printing of a Workflow into the folder
C:\Users\Public\Documents\MuleSoft\RPA. Otherwise, it saves the settings to the folder
C:\Users\[UserName.Domain]\Documents\MuleSoft\RPA of the respective
user.
Open last project on start Selecting this option means that the last project that you opened is reloaded and displayed when you launch RPA Builder.
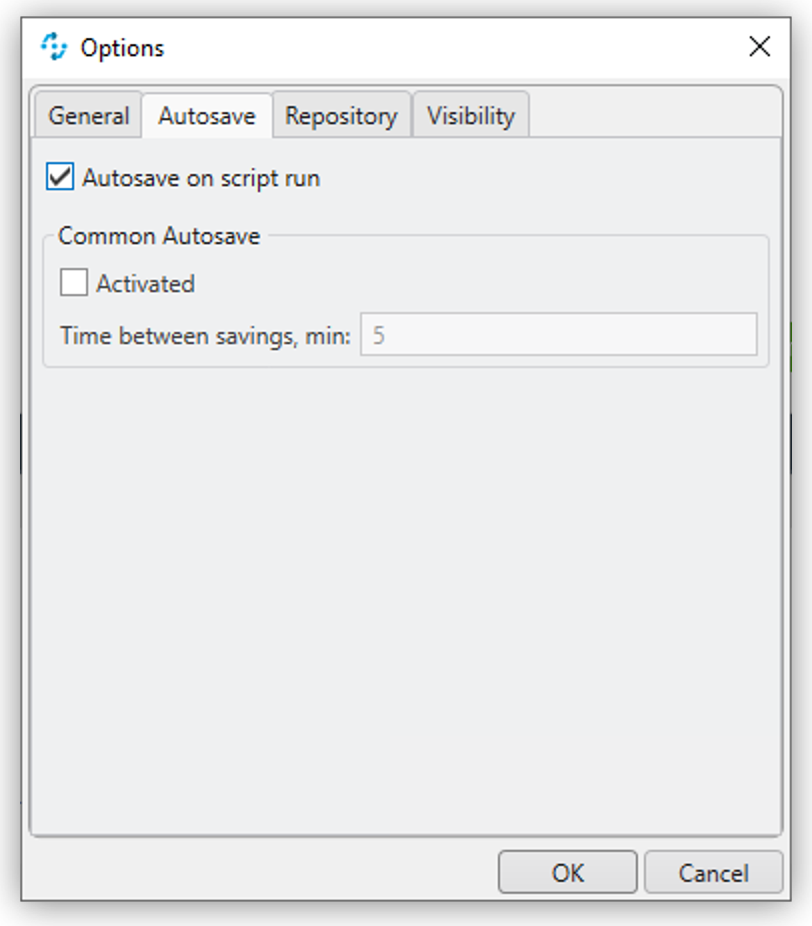
Autosave on script run
If this option is selected, the Workflow is saved automatically before each local run.
Common Autosave
If this option is activated, projects are saved automatically at intervals of a few minutes.
RPA Builder always saves the entire Business Process, including all Workflows.
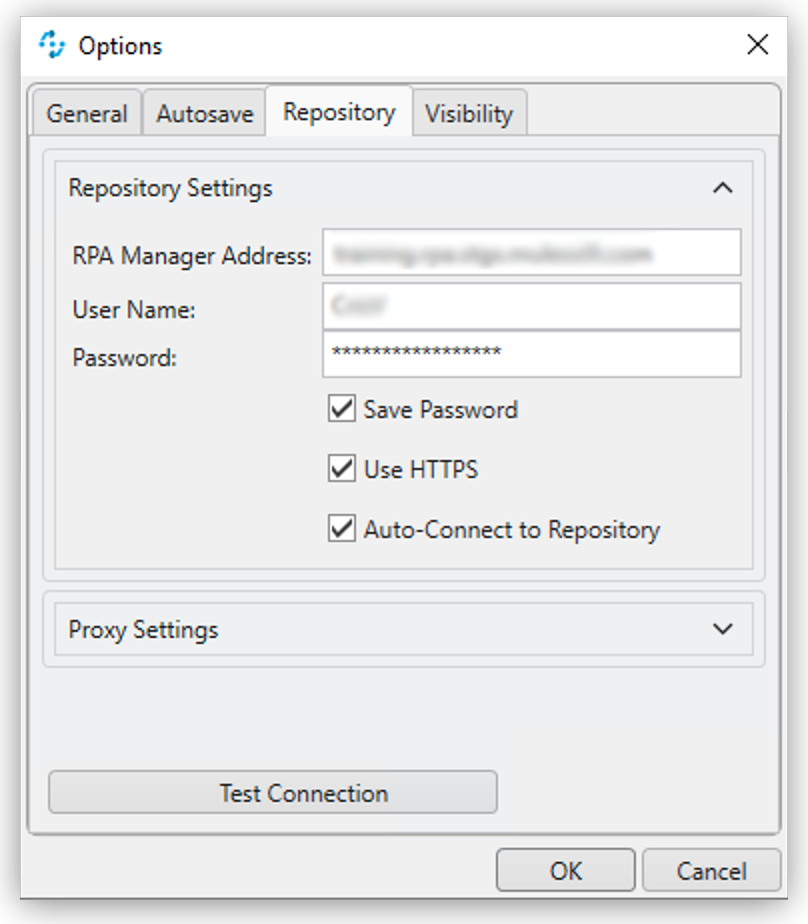
You can find a detailed description of the Repository Settings in Connect RPA Builder with RPA Manager.
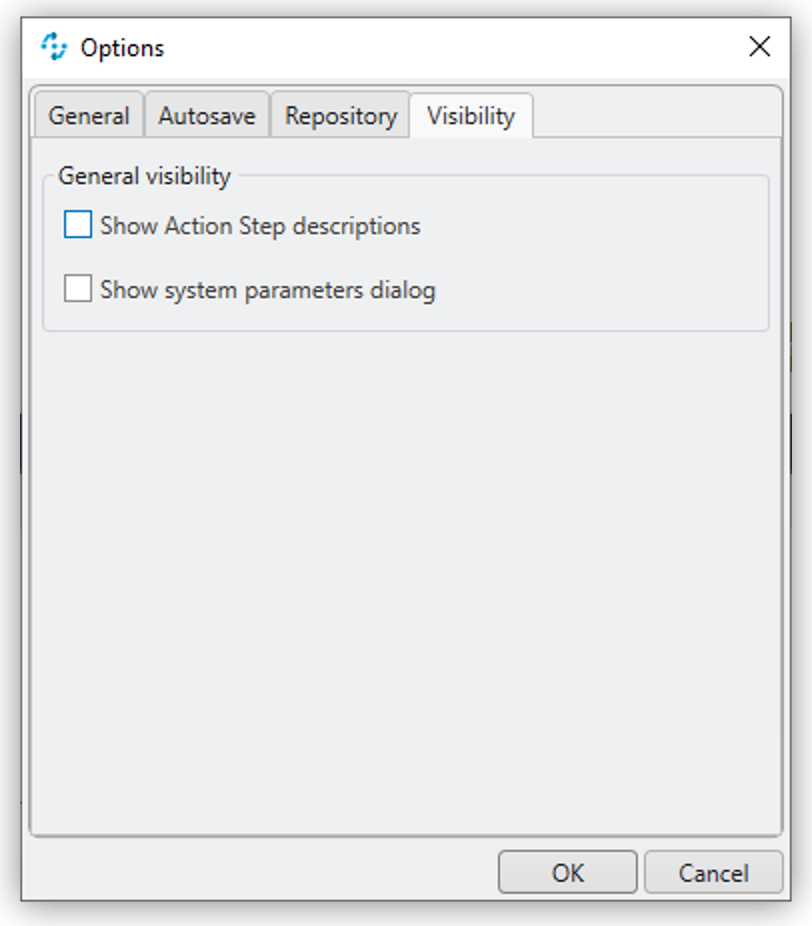
Show Action Step descriptions (default: off) This option allows you to show and hide the descriptions of individual Workflow elements on the Workbench in RPA Builder. This does not affect the visibility of the individual element descriptions for the Properties and tool tips, which are always visible. This option can also be modified via the Show Action Step descriptions button or the CTRL+D shortcut. It is saved on an individual user basis.
Show system parameters dialog
If this option is set, the system parameters are shown whenever a new Activity Workflow is created. These can also be shown via the menu View → Show System Parameters.
Explorer Pane
In the window pane on the left-hand side, you will find five tabs containing the views Toolbox, Project, Activity Library, Repository and Outline.
If any of these views are not visible, you can always show them again by using the View menu from the menu bar.
The Toolbox contains a list of all elements, such as Action Steps and Control Blocks, which can be inserted in a Workflow.
Elements are organized in categories, so that you can find fitting ones easily. By clicking on the star symbol next to an element, you can add it to the category Favorites.
Elements can be inserted into the Workflow using Drag&Drop.
You can find a detailed description for each element in the Toolbox section.
If you input text in the field Filter the content of the Toolbox is reduced successively to elements, the names of which contain this text.
The filter is case-insensitive.
The Project tab contains a list of all loaded Workflows of a project. If you click on one of the Workflows, it is also displayed in the Workbench. This way you can easily switch back and forth between Workflows
Right-clicking a Workflow opens the context menu providing additional functions:
-
Edit Workflow Properties Opens the Properties pane of the selected Workflow
-
Clear Run Results marking Clears the markings of warnings and errors in the Workbench view of the selected project. These markings are shown after a failed local Workflow run or after the import of an analysis package.
-
Open Workflow Location Opens the folder containing the selected Workflow.
If you are using the Repository for storing your Business Process, the tab Repository Explorer shows a list of all available Business Process. These can be downloaded for editing.
If you use the Activity Library, you can view and delete all available Activity Templates here.
The Workflow Outline is a shortened view of the open Workflow.
You can double-click an element to mark it in the Workbench pane.
Right-clicking an element opens a context menu:
-
Run Wizard Opens the Wizard of the selected element
-
Delete Deletes the selected element
-
Expand all Expands the view to show all elements, in the Document Outline as well as on the Workbench
-
Collapse all Collapses the view to show only higher-level elements, in the Document Outline as well as on the Workbench
Workflow Run Results
The Workflow Run Results section shows detailed information on the last Activity Workflow that was run.
Project Status
The Project Status section provides detailed information about the validation and script generation of the project.
Workflow Properties Grid
The Workflow Properties grid is located on the right-hand side of the screen. In the initial view it is set to auto-hide, but it will expand as soon as you have opened or created a Workflow. It displays all properties of the current selection within the Workbench.
If you click on an element, a description shows in the bottom of the pane.
If you enter text in the field Filter, the displayed properties are successively reduced to those containing the entered text.