Create Custom Modules and Mappings
In addition to using the built-in DataWeave function modules (such as dw::Core and dw::Crypto), you can also create and use custom modules and mapping files. The examples demonstrate common data extraction and transformation approaches.
You write modules and mapping files in a DataWeave Language (.dwl) file and import into your Mule app through DataWeave scripts in Mule components. Both modules and mapping files are useful when you need to reuse the same functionality or feature over and over again.
-
Custom modules can define functions, variables, types, and namespaces. You can import these modules into a DataWeave script to use the features.
-
Custom mapping files are a type of module that contains a complete DataWeave script that you can import and use in another DataWeave script or reference in a Mule component.
Fields in many Mule connectors and components accept DataWeave expressions and scripts.
Note that if you want to import and use a built-in DataWeave function module, and not a custom one, see DataWeave Function Reference.
Creating and Using DataWeave Mapping Files
You can store a DataWeave transformation in a .dwl mapping file (mapping module), then import the file into another DataWeave script. Mapping files can be executed through the Transform Message component, or you can import them into another mapping and execute them through the main function.
-
In your Studio project, set up a subfolder and file for your mapping module:
-
You can create a subfolder in
src/main/resourcesby navigating to New → Folder → [your_project] →src/main/resources, then adding a folder namedmodules. -
You can create a new file for your module in that folder by navigating to New → File → [your_project] →
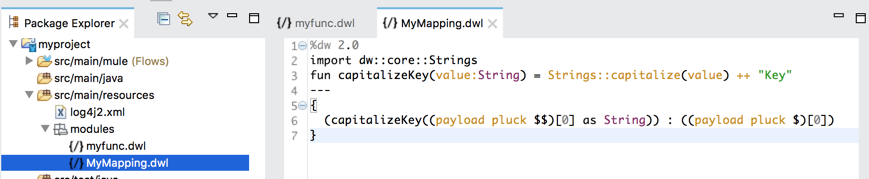
src/main/resources/modules, then adding a DWL (DataWeave language) file such asMyMapping.dwl.Saving the module within
src/main/resourcesmakes it accessible for use in any DataWeave script within the Mule app in that project.
-
-
Create your function in your mapping file, for example:
Example: Mapping File Content%dw 2.0 import dw::core::Strings fun capitalizeKey(value:String) = Strings::capitalize(value) ++ "Key" --- payload mapObject ((value, key) -> { (capitalizeKey(key as String)) : value } ) -
Save your DWL function module file.
Using a Mapping File in a DataWeave Script
To use a mapping file, you need to import it into a DataWeave script and use the main function to access the body of the script in the mapping file.
Assume that you have created the MyMapping.dwl file in /src/main/resources/modules that contains this script.
To import and use the body expression from the MyMapping.dwl file (above) in DataWeave Mapping file, you need to do this:
-
Specify the
importdirective in the header. -
Invoke the
MyMapping::mainfunction. The function expects an input that follows the structure of the input that the mapping file uses. For example, the body ofMyMapping.dwlexpects an object of the form{"key" : "value"}.
%dw 2.0
import modules::MyMapping
output application/json
---
MyMapping::main(payload: { "user" : "bar" })
Here is the result:
{
  "UserKey": "bar"
}
Even though the capitalizeKey function is private, it is still used through the main function call, and the DataWeave mapping file is also able to import and reuse the dw::core::Strings module.
Creating and Using a Custom Module
The steps for creating a custom DataWeave module are almost identical to the steps for creating a custom mapping file. The only difference is the contents of the .dwl file. Unlike a typical DataWeave script or mapping file, a custom DataWeave
module cannot contain an output directive, body expression, or the separator (---) between header and body sections. (For
guidance with mappings, see Creating and Using DataWeave Mapping Files.)
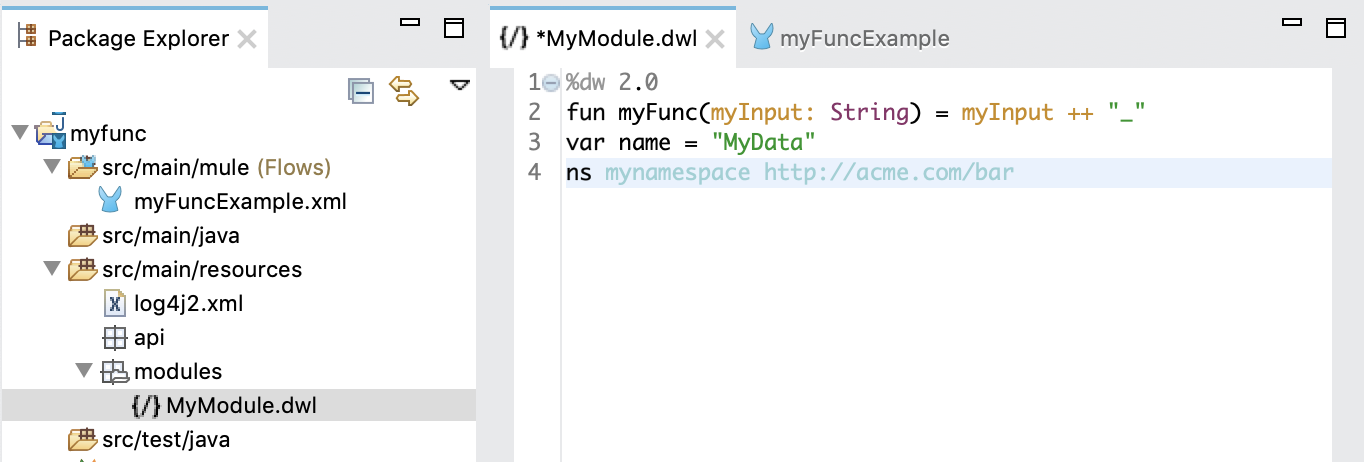
A custom module file can only contain var, fun, type, and ns declarations, for example:
%dw 2.0
var name = "MyData"
fun myFunc(myInput: String) = myInput ++ "_"
type User = {
    name: String,
    lastname: String
}
ns mynamespace http://acme.com/bar
When you import a custom module into another DataWeave script, any functions, variables, types, and namespaces defined in the module become available for use in the DataWeave body. In the next example, a DataWeave script:
-
Imports the module
MyModulethrough theimportdirective in the header. In this case, the imported module is stored in a Studio project pathsrc/main/resources/modules/MyModule.dwl -
Calls a function in
MyModuleby usingMyModule::myFunc("dataweave").
%dw 2.0
import modules::MyModule
output application/json
---
MyModule::myFunc("dataweave") ++ "name"
There are several ways to import a module or elements in it:
-
Import the module, for example:
import modules::MyModule. In this case, you must include the name of the module when you call the element (here, a function) in it, for example:MyModule::myFunc. -
Import all elements from the module, for example:
import * from modules::MyModule. In this case, you do not need to include the name of the module when you call the element. For example:myFunc("dataweave") ++ "name"works. -
Import specific elements from a module, for example:
import myFunc from modules::MyModule. In this case, you do not need to include the name of the module when you call the element. For example:myFunc("dataweave") ++ "name"works. You can import multiple elements from the module like this, for example:import myFunc someOtherFunction from modules::MyModule(assuming bothmyFuncandsomeOtherFunctionare defined in the module).
"dataweave_name"Assigning a Local Alias for an Imported Element
To avoid name clashes, you can use as to assign an alias for a custom module or its elements when you import the module into a DataWeave script.
Assume that you define a custom module like this one in the file MyModule.dwl:
%dw 2.0
fun myFunc(name:String) = name ++ "_"
var myVar = "Test"
When you import the custom module into a DataWeave script, you can create aliases to elements in the custom module, for example:
%dw 2.0
import myFunc as appendDash, myVar as weaveName from modules::MyModule
var myVar = "Mapping"
output application/json
---
appendDash("dataweave") ++ weaveName ++ "_" ++ myVar
The script returns "dataweave_Test_Mapping".
You can create an alias to the imported module, for example:
%dw 2.0
import modules::MyModule as WeaveMod
output application/json
---
WeaveMod::myFunc("dataweave")
Referencing a DWL File
You can use DWL files directly in Mule connectors and components.
See dwl File for details.
Writing Documentation for Custom DataWeave Modules
DataWeave supports use of the AsciiDoc text format for documenting your functions, types, annotations, and the modules that contain them.
Documenting Your DataWeave Functions
DataWeave defines a multi-section template for documenting function code. The template provides sections for the following:
-
A description of the function.
-
Parameter descriptions in an AsciiDoc table format.
-
Example code that includes sections for any input, the DataWeave script, and the resulting output.
To define parameter and example sections below the function description, the template uses AsciiDoc heading grammar:
-
=== Parameters -
=== Example-
==== Source -
==== Input -
==== Output
-
The following function template provides guidance on documenting the function. As the template notes, some sections are optional.
/**
* %Replace with your function description%
*
*
* %Add additional information to your function description% (optional section)
*
* === Parameters (optional section)
*
* [%header, cols="1,1,3"]
* |===
* | Name | Type | Description
* | %`The parameter name`% | %`The parameter type`% | %The parameter description%  (one row per param)
* |===
*
* === Example (optional section)
*
* %The example description% (optional)
*
* ==== Source (optional section)
*
* [source,%The language%,linenums] (optional)
* ----
* YOUR CODE
* ----
*
* ==== Input (optional section)
*
* The input description (optional)
*
* [source,%The language%,linenums] (optional)
* ----
* YOUR CODE
* ----
*
* ==== Output (optional section)
*
* %The output description% (optional)
*
* [source,%The language%,linenums] (optional)
* ----
* YOUR CODE
* ----
*/
Description Section
This section provides a description of the function. The section starts at the top of the comments and extends to the line before the first section heading. If there is no section header, the description extends to the end of the comments for the function.
A description consists of the following parts:
-
Short description: The first paragraph, which provides the primary description of the function.
-
Long description: Any additional information about the function. This optional description begins two line breaks below the short description.
See the example that includes a description with sections for the parameters and examples.
Each part is useful for auto-generated documentation.
Parameters Section
The optional === Parameters section describes parameters of the function.
The template uses AsciiDoc table format to document each parameter in a table row.
[%header, cols="1,1,3"]
|===
| Name | Type | Description
| yourParameter1 | The parameter type | Your description here.
| yourParameter2 | The parameter type | Your description here.
|===
Example Section
You can use zero or more === Example sections to provide any examples needed to illustrate how your function works.
This section contains the following optional subsections:
-
==== Inputfor input to the DataWeave script. -
==== Sourcefor the DataWeave script. -
==== Outputfor output generated by the script.
All subsections follow the same template, which includes an optional description and an optional code section:
Your section description

[source,%The language%,linenums]
----
YOUR CODE
----
The following example shows the log function documentation.
/**
* Without changing the value of the input, `log` returns the input as a system
* log. So this makes it very simple to debug your code, because any expression or subexpression can be wrapped
* with *log* and the result will be printed out without modifying the result of the expression.
* The output is going to be printed in application/dw format.
* (1)
*
* The prefix parameter is optional and allows to easily find the log output.
*
*
* Use this function to help with debugging DataWeave scripts. A Mule app
* outputs the results through the `DefaultLoggingService`, which you can see
* in the Studio console.
*
* === Parameters
*
* [%header, cols="1,13"]
* |===
* | Name | Type | Description
* | `prefix` | `String` | An optional string that typically describes the log.
* | `value` | `T` | The value to log.
* |===
*
* === Example
*
* This example logs the specified message. Note that the `DefaultLoggingService`
* in a Mule app that is running in Studio returns the message
* `WARNING - "Houston, we have a problem,"` adding the dash `-` between the
* prefix and value. The Logger component's `LoggerMessageProcessor` returns
* the input string `"Houston, we have a problem."`, without the `WARNING` prefix.
*
* ==== Source
*
* [source,DataWeave,linenums]
* ----
* %dw 2.0
* output application/json
* ---
* log("WARNING", "Houston, we have a problem")
* ----
*
* ==== Output
*
* `Console Output`
*
* [source,XML,linenums]
* ----
* "WARNING - Houston, we have a problem"
* ----
*
* `Expression Output`
*
* [source,XML,linenums]
* ----
* "Houston, we have a problem"
* ----
*
* === Example
*
* This example shows how to log the result of expression `myUser.user` without modifying the
* original expression `myUser.user.friend.name`.
*
* ==== Source
*
* [source,DataWeave,linenums]
* ----
* %dw 2.0
* output application/json
*
* var myUser = {user: {friend: {name: "Shoki"}, id: 1, name: "Tomo"}, accountId: "leansh" }
* ---
* log("User", myUser.user).friend.name
* ----
*
* ==== Output
*
* `Console output`
*
* [source,console,linenums]
* ----
* User - {
*   friend: {
*     name: "Shoki"
*   },
*   id: 1,
*   name: "Tomo"
* }
* ----
*
* `Expression Output`
*
* [source,DataWeave,linenums]
* ----
* "Shoki"
* ----
*/
Documenting Your DataWeave Modules
The DataWeave module description does not follow a structured template.
The only requirement is to place the documentation above the DataWeave version tag.
The following example documents the dw::Core module:
/**
 * This module contains core DataWeave functions for data transformations.
 * It is automatically imported into any DataWeave script.
 */
%dw 2.0
Documenting Your Annotation and Types
Annotation and Types documentation do not follow a structured template.
The only requirement is to write the descriptions above the Annotation or Type definition.
The following example documents the @StreamCapable annotation.
/**
* Annotation that marks a parameter as stream capable, which means that this
* field will consume an array of objects in a forward-only manner.
*/
@AnnotationTarget(targets = ["Parameter", "Variable"])
annotation StreamCapable()
The following example documents the EncodingSettings type found in the dw::extension::DataFormat module.
/**
 * Represents encoding settings.
 */
@Since(version = "2.2.0")
type EncodingSettings = {
    /**
    * Encoding that the writer uses for output. Defaults to "UTF-8".
    */
    encoding?: String {defaultValue: "UTF-8"}
}