Installing and Using the DataWeave Extension
Install and use DataWeave extension in Visual Studio Code (DataWeave extension) to develop, preview, test, and deploy custom mappings and modules into libraries in a DataWeave project. The extension also enables you to preview transformations similar to those you perform in the DataWeave Playground.
Before You Begin
Before installing the DataWeave extension to Visual Studio Code, you must:
-
Install AdoptOpenJDK
-
Install Apache Maven (3.6.3 minimum)
-
Install Microsoft Visual Studio Code for your specific operating system
| If you have any other prior extensions for DataWeave, whether experimental or from a third party, uninstall them. |
Install the DataWeave Extension
To install the extension:
-
Open Visual Studio Code.
-
In the EXTENSIONS tab, type
dataweaveto search the extension in the marketplace. -
Select Anypoint Code Builder - DataWeave Extension from the search results.
-
Click Install.

-
After the installation finishes, restart Visual Studio Code.
Developing DataWeave Libraries
A DataWeave library is a reusable package of DataWeave module and mapping files, and resource files, such as JSON, XML, and CSV. To develop DataWeave libraries, first create a new DataWeave project in Visual Studio Code where you then create, preview, and test custom mappings and modules.
If you want to try out your mapping without creating a DataWeave project, you can either open your .dwl mapping file directly in Visual Studio Code or create a new one and use sample data and scenarios.
Understanding the DataWeave Project Structure
DataWeave projects use Apache Maven to build and declare project dependencies. The following diagram shows the DataWeave project structure:
├── src
│   ├── main
│   │   ├── dw // Put your DataWeave mappings and module files here
│   │   │   ├── MyMapping.dwl
|   |   |   └── MyModule.dwl
│   │   └── resources
│   └── test
│       ├── dw
│       │   └── MyModuleTest.dwl  //Unit tests for the functions in your module
│       │   └── MyMappingTest.dwl //Integration test for your mapping using the saved scenarios
│       ├── resources
│       │       └── MyMapping //Contains the different scenarios for your mapping
│       │           ├── default
│       │           │   └── inputs
│       │           │       └── payload.json //[Sample data](#sample-data) for your mappings
│       │           └── SavedTestScenario //Scenario used for the integration test
├── pom.xml
Create a DataWeave Project
To create a new project:
-
Open Visual Studio Code.
-
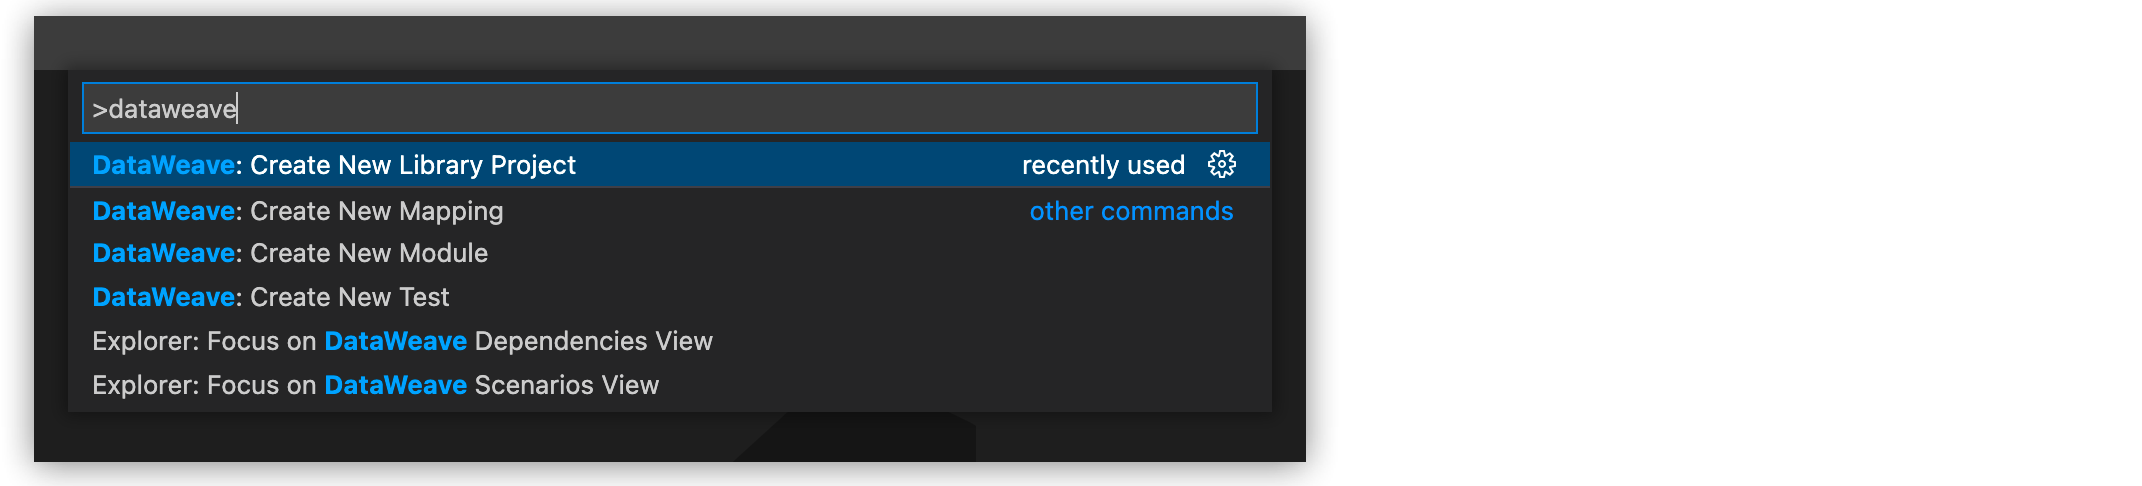
Click View > Command Palette.
-
In the search bar, type
dataweave. -
Select DataWeave: Create New Library Project.
-
Follow prompts to complete an initial configuration for your project:
-
Organization ID (Group ID)
-
Artifact ID
-
Version
-
Project name
-
-
Choose a directory folder for your new project.
-
Select OK.
-
When prompted, select Yes or No whether you want to open the project in a new Visual Studio Code window.
The following image shows a new DataWeave project in Visual Studio Code:
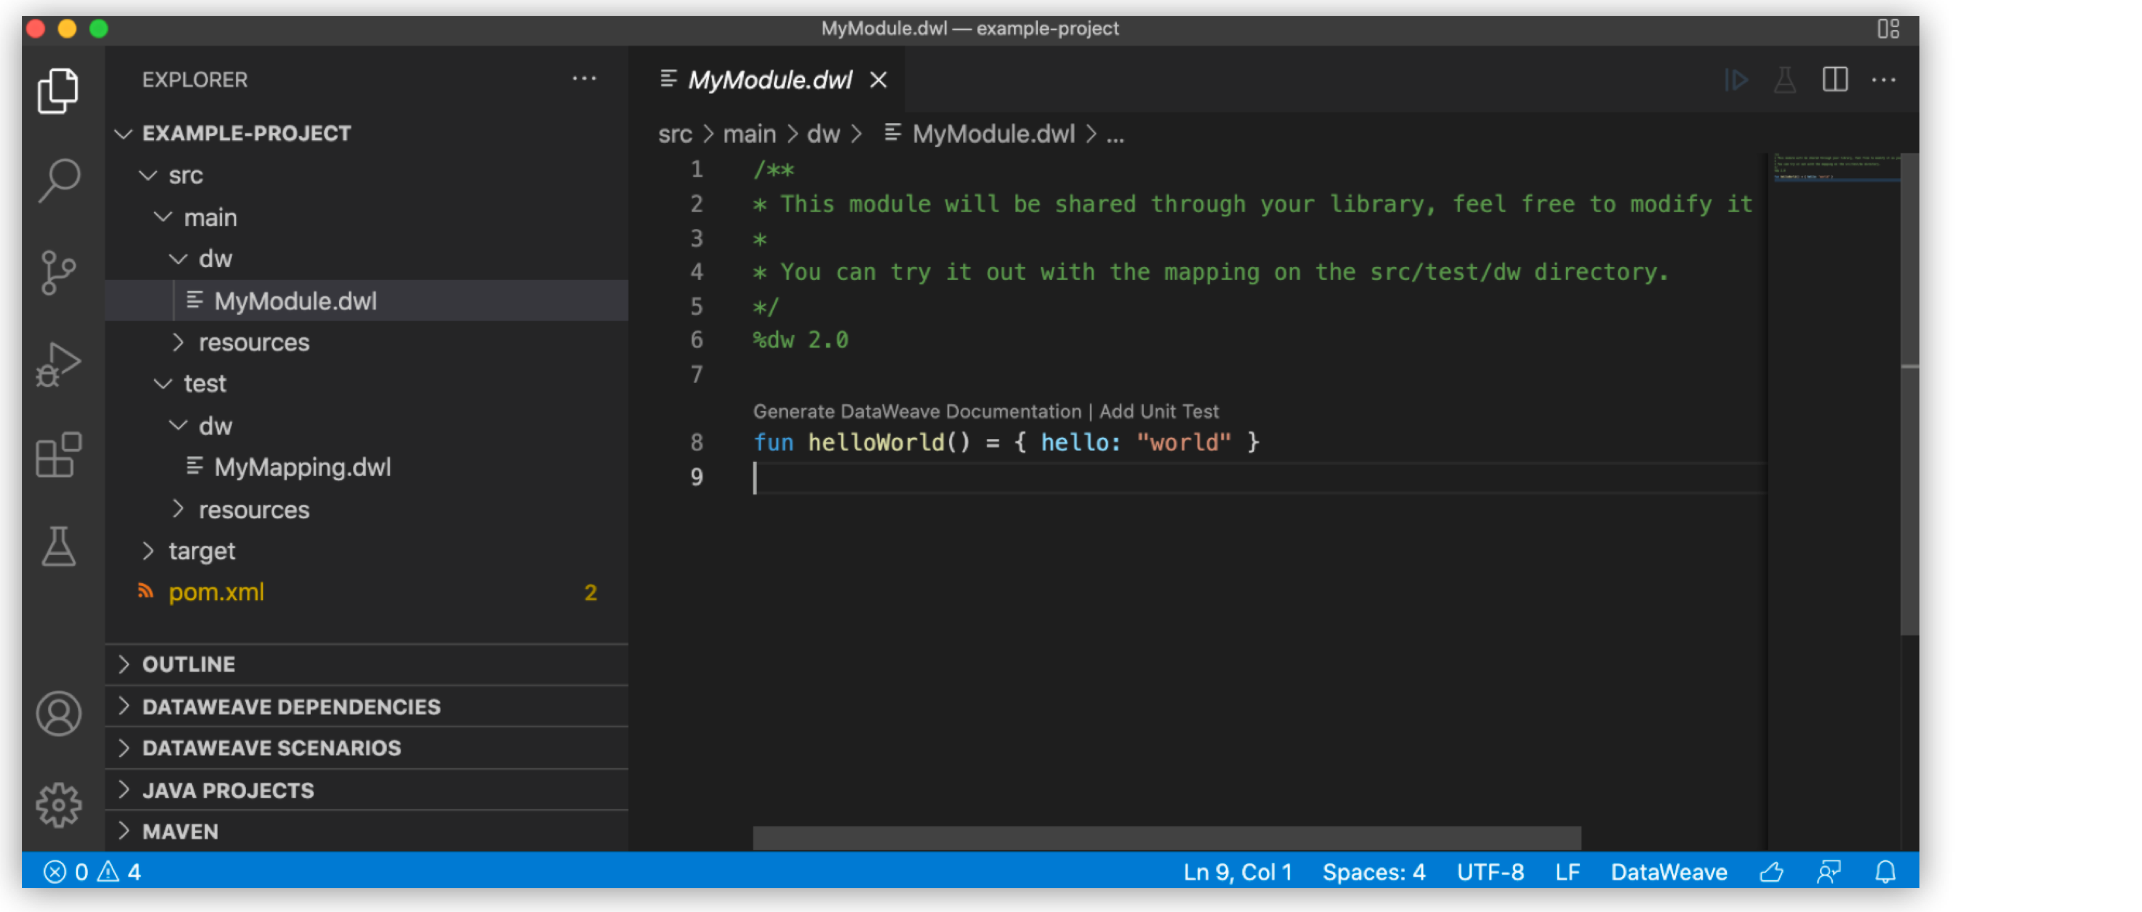
When creating a DataWeave project, the DataWeave extension requires all dependencies to be loaded and indexed before it can search the libraries and make them available in your project. Visual Studio Code provides a notification bar at the bottom of the screen editor that shows when the dependencies are loading and when the indexing is complete.

Create a DataWeave Module
DataWeave modules are .dwl files that define functions, variables, types, and namespaces. These files cannot contain output directives, body expressions, or --- separators between header and body sections. A DataWeave module enables you to share all the content defined in the .dwl file for reuse.
To create a new DataWeave module:
-
In Visual Studio Code, click View > Command Palette.
-
In the search bar, type
dataweave. -
Select DataWeave: Create New Module.

-
Add a name for the new module
dwlfile and press enter.
This creates a new module.dwlfile under thesrc/main/dwfolder.
Preview a DataWeave Module
For a better development experience, you can use the preview view to develop your module’s functions. The preview view lets you get instant feedback on how a mapping file is working by previewing its output. Use this view to develop the module’s functions by creating a DataWeave mapping inside the src/test/dw folder that imports your functions and calls them to check how they’re currently working.
To preview the module functionality, follow these steps:
-
In Visual Studio Code, open your DataWeave project.
-
Navigate to the
src/main/dwfolder. -
Select your module
.dwlfile. -
Click the Create Integration Mapping button located at the top of your module
.dwlfile.
This create a mapping file under thesrc/test/dwfolder to test your module, which isn’t meant to be shared or reused.

-
Either preview the module function by one of these options:
-
Click the DataWeave: Run Preview button (arrow icon) at the top right corner of your module
.dwlfile.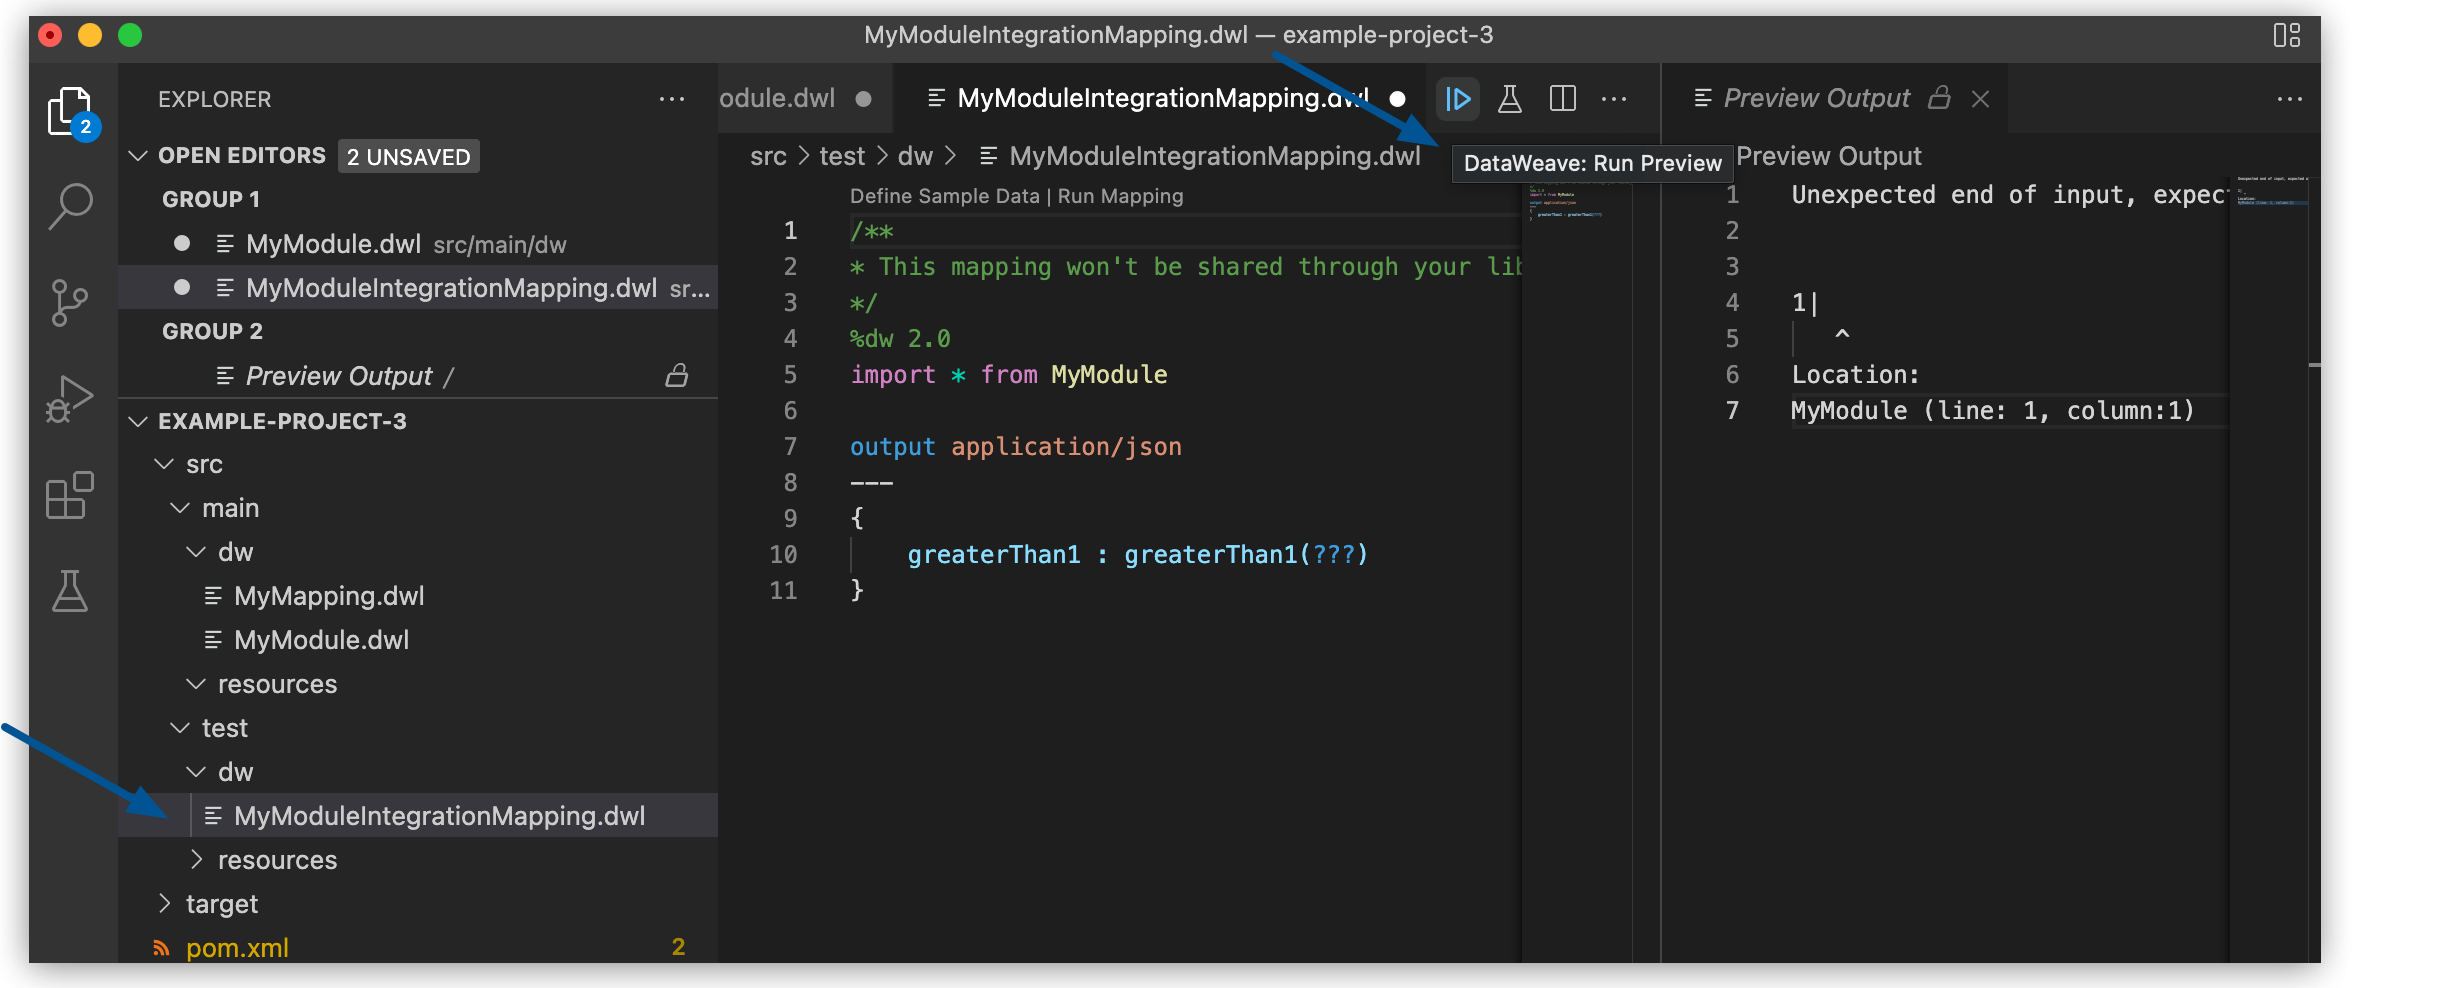
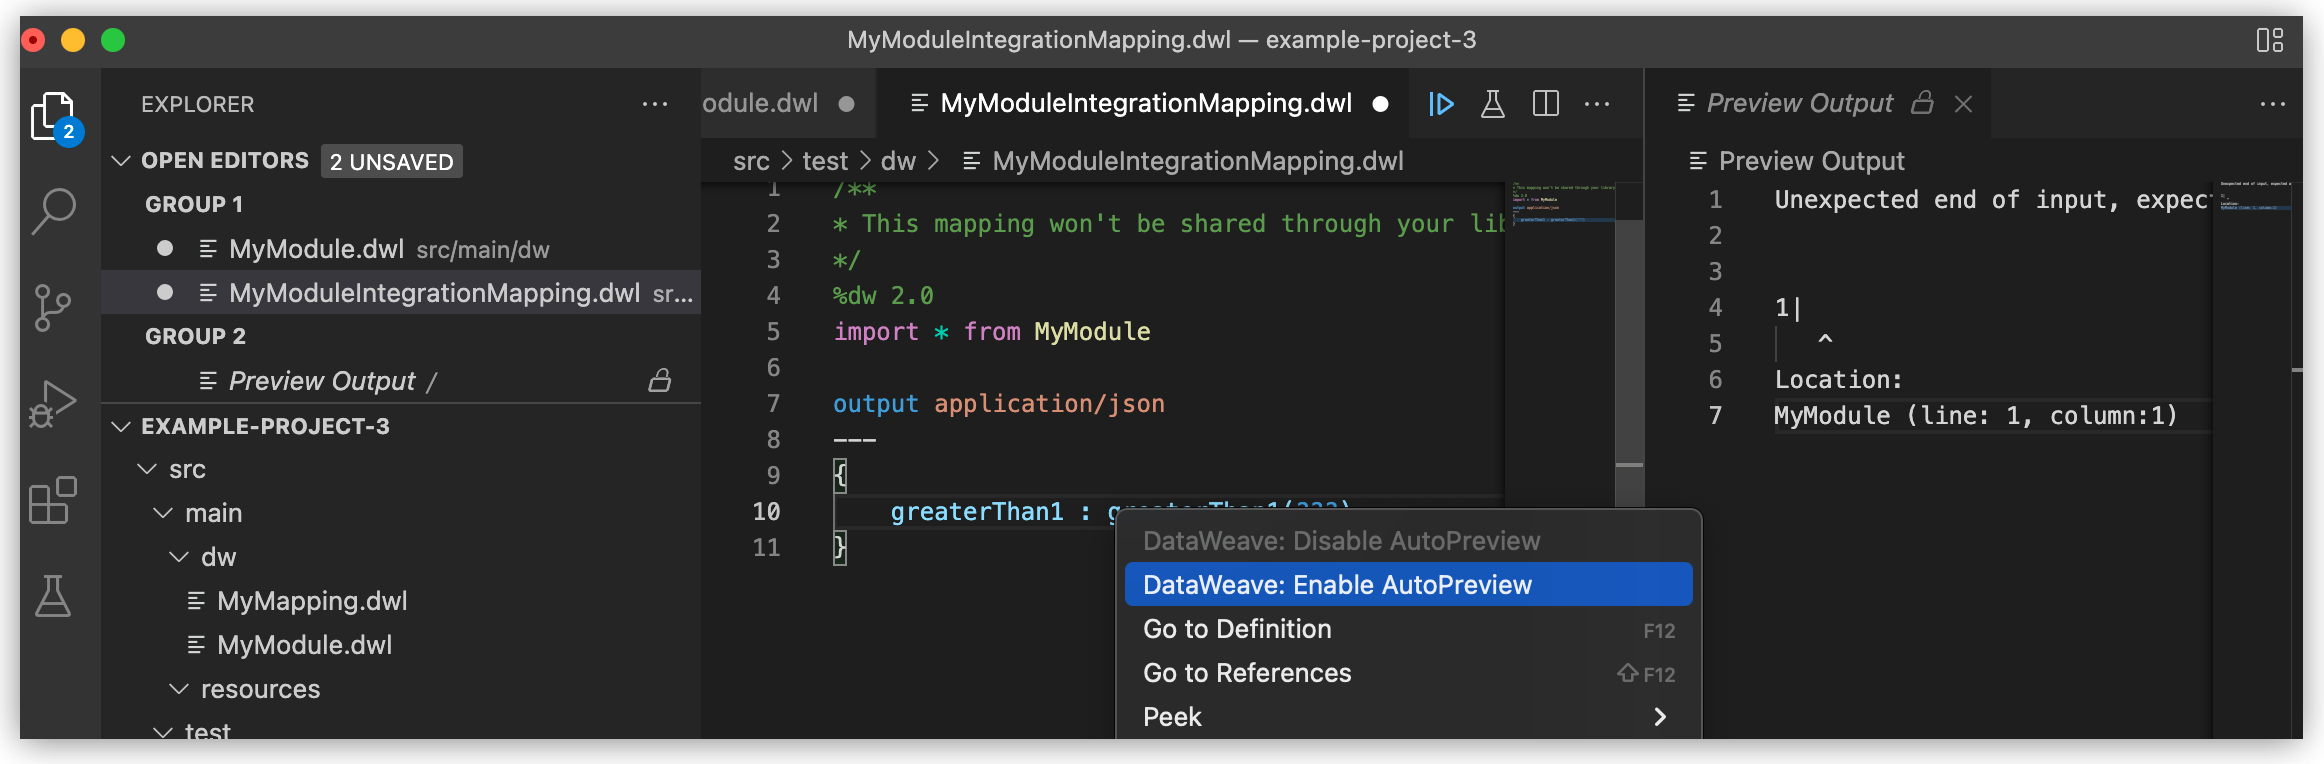
-
Right-click the editor and select DataWeave: Enable AutoPreview to run it on every file change.
-
Test a DataWeave Module
There’re two ways to test your module:
-
By running a unit test
-
By creating a test mapping located in your
src/test/dwfolder to avoid exposing the test to consumers of your module
The tests use functions of the modules dw::test::Tests and dw::test::Asserts provided by the artifact org.mule.weave:data-weave-testing-framework of the DataWeave Testing Framework.
To generate a unit test for a DataWeave module, follow these steps:
-
In Visual Studio Code, open your DataWeave project.
-
Navigate to the
src/main/dwfolder. -
Select your module
.dwlfile. -
In your module
.dwlfile, click the Add Unit Test button located above your function.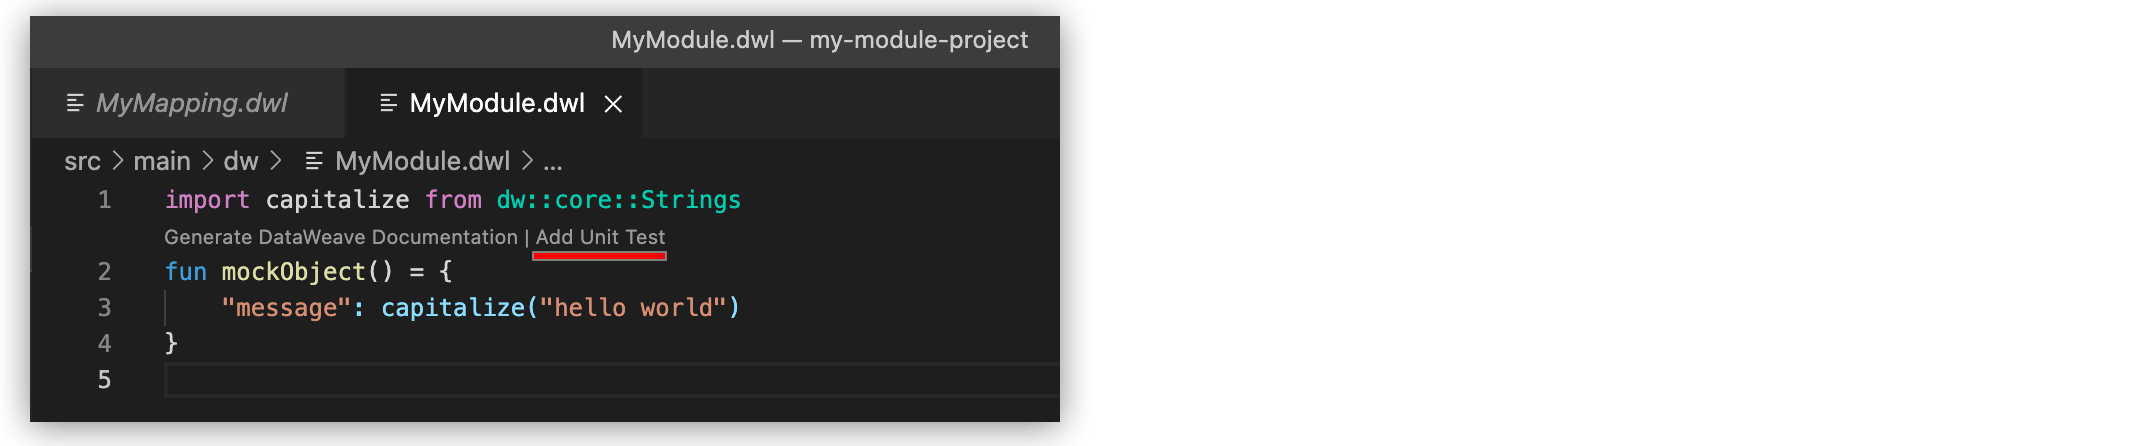
This behavior generates:
-
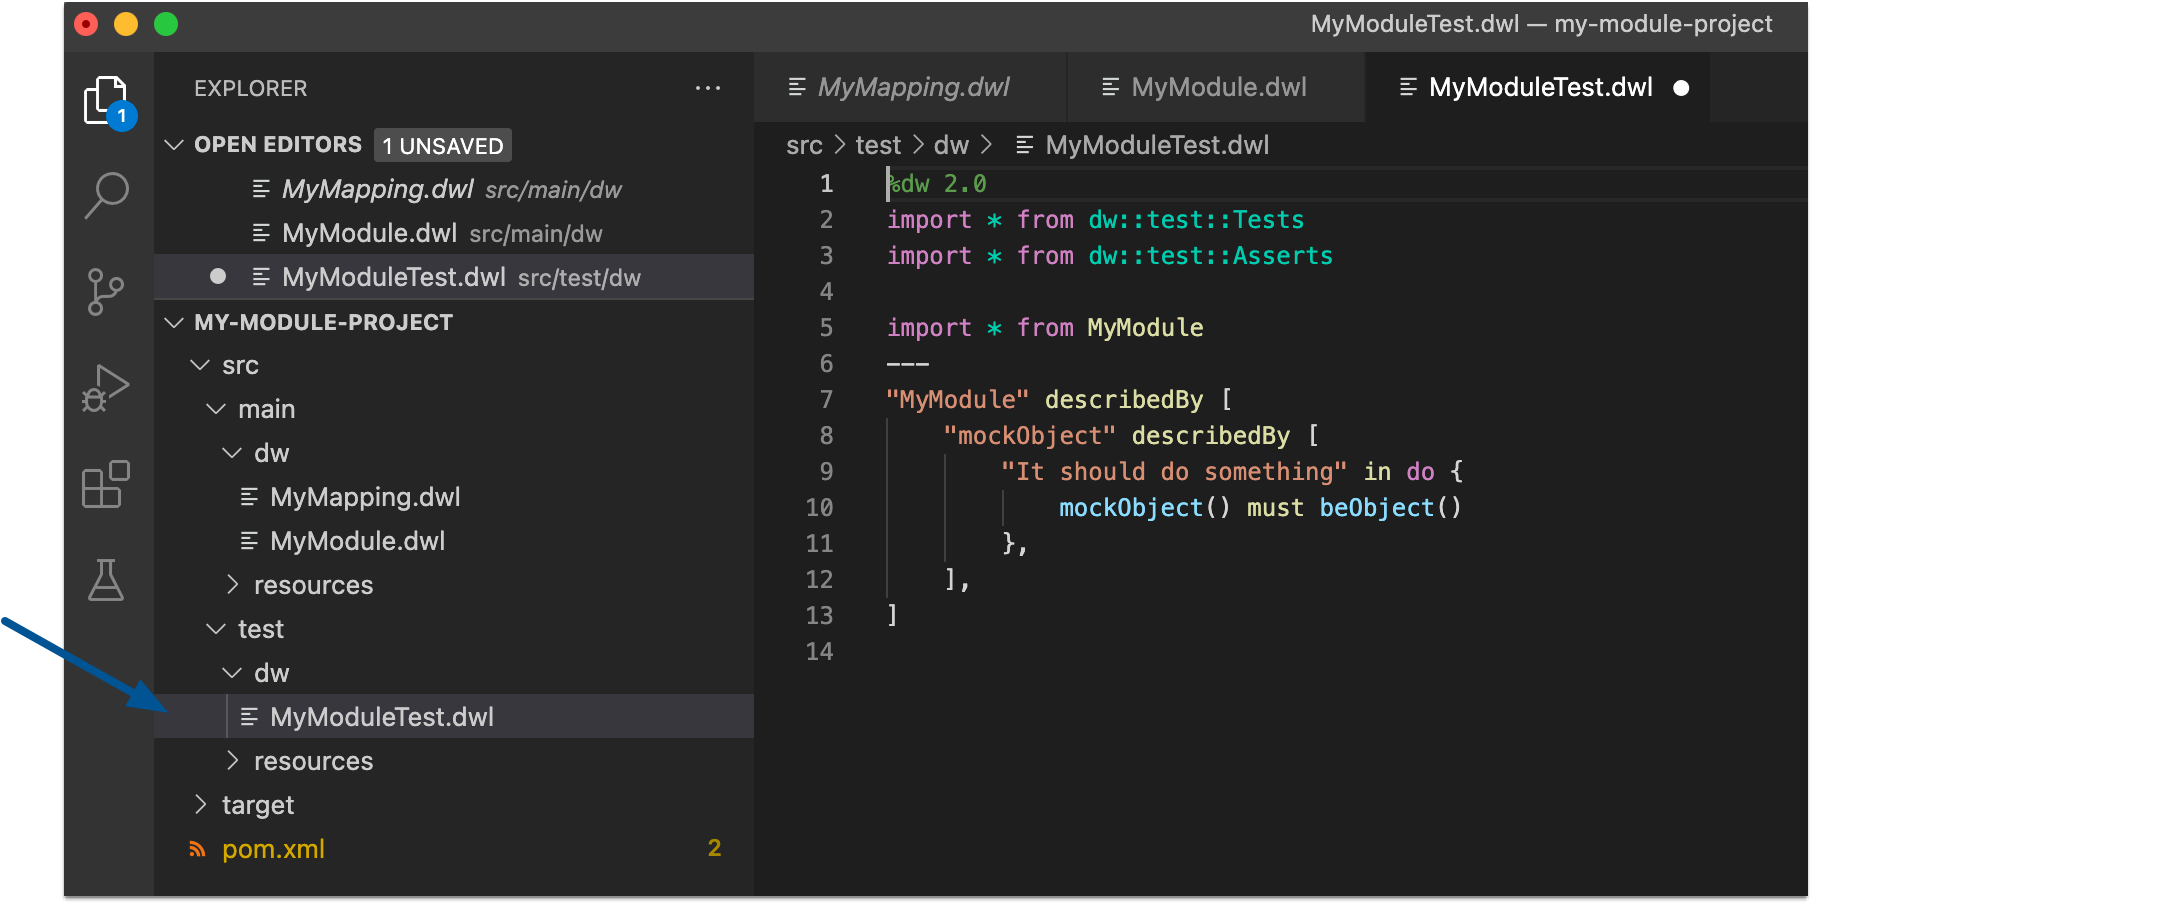
A new
.dwltest file insrc/test/dwthat describes test cases and tests suites for the module.-
A test case is a single test with the evaluation and assertion of the result.
-
A test suite groups tests with a name that better describes the intention of some related cases.
The test file defines a test case for the function that you call with specific arguments and use to make assertions over the output.
-
-
A new test case within a test suite for the function. If not present, the test suite is also created.
To run the test:
-
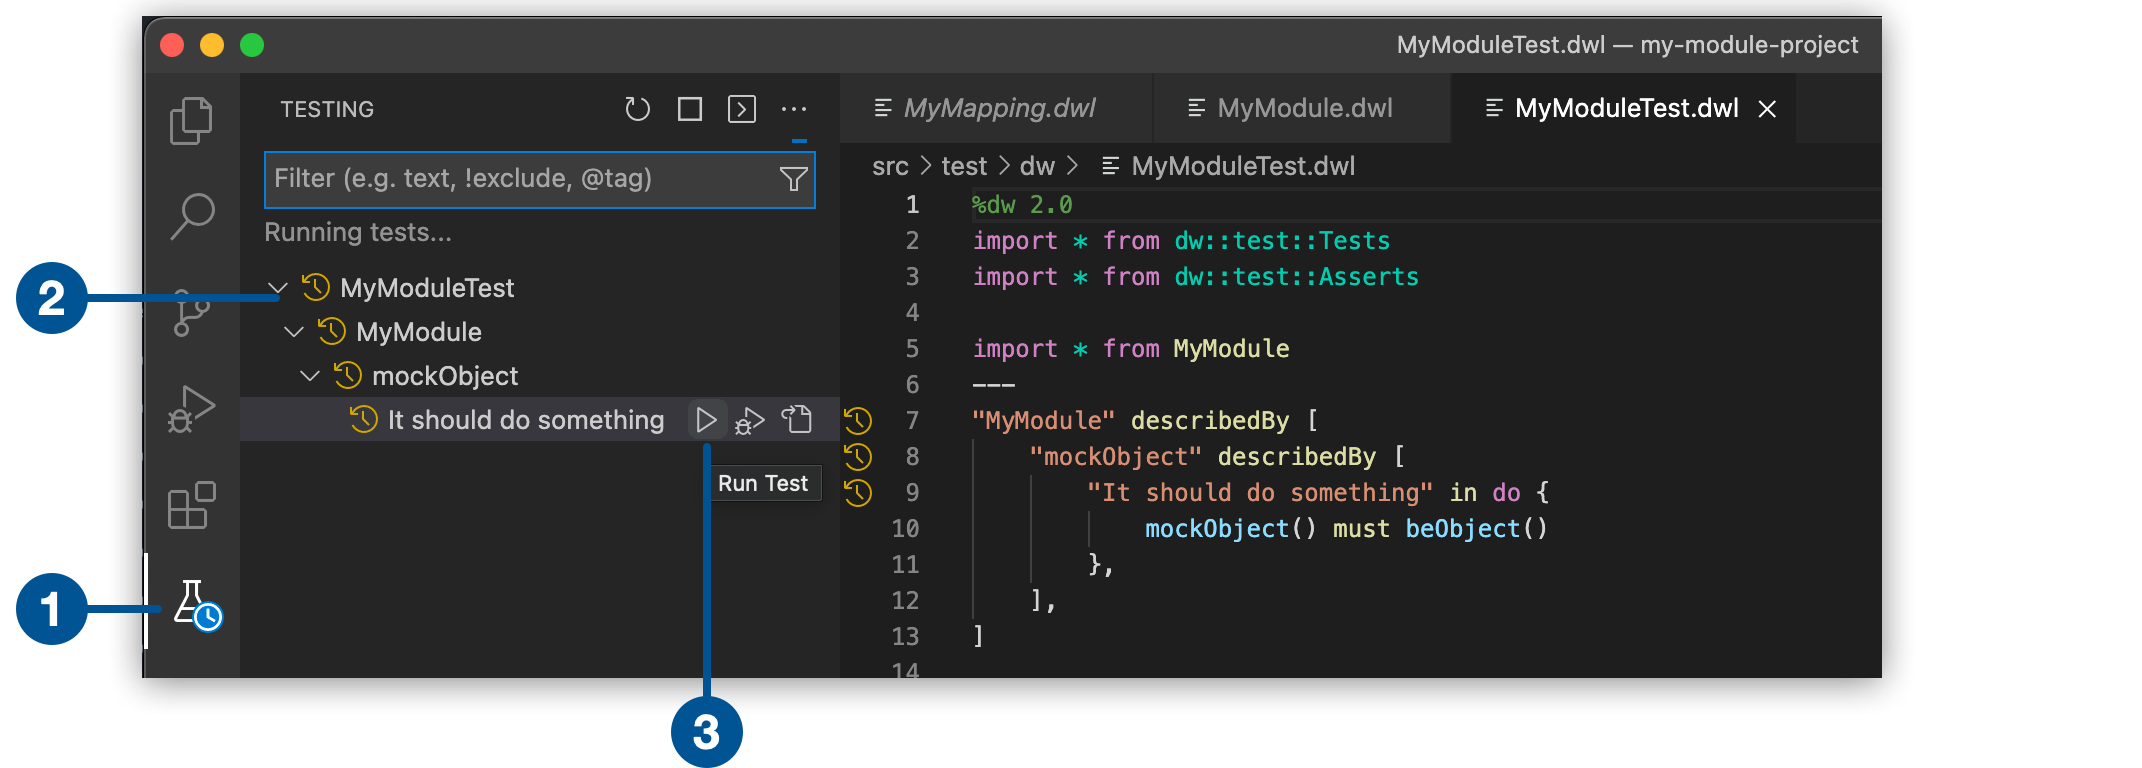
In Visual Studio Code, go to the TESTING view.
-
Select the dropdown arrows of your module test file.
-
Click the Run Test arrow button.
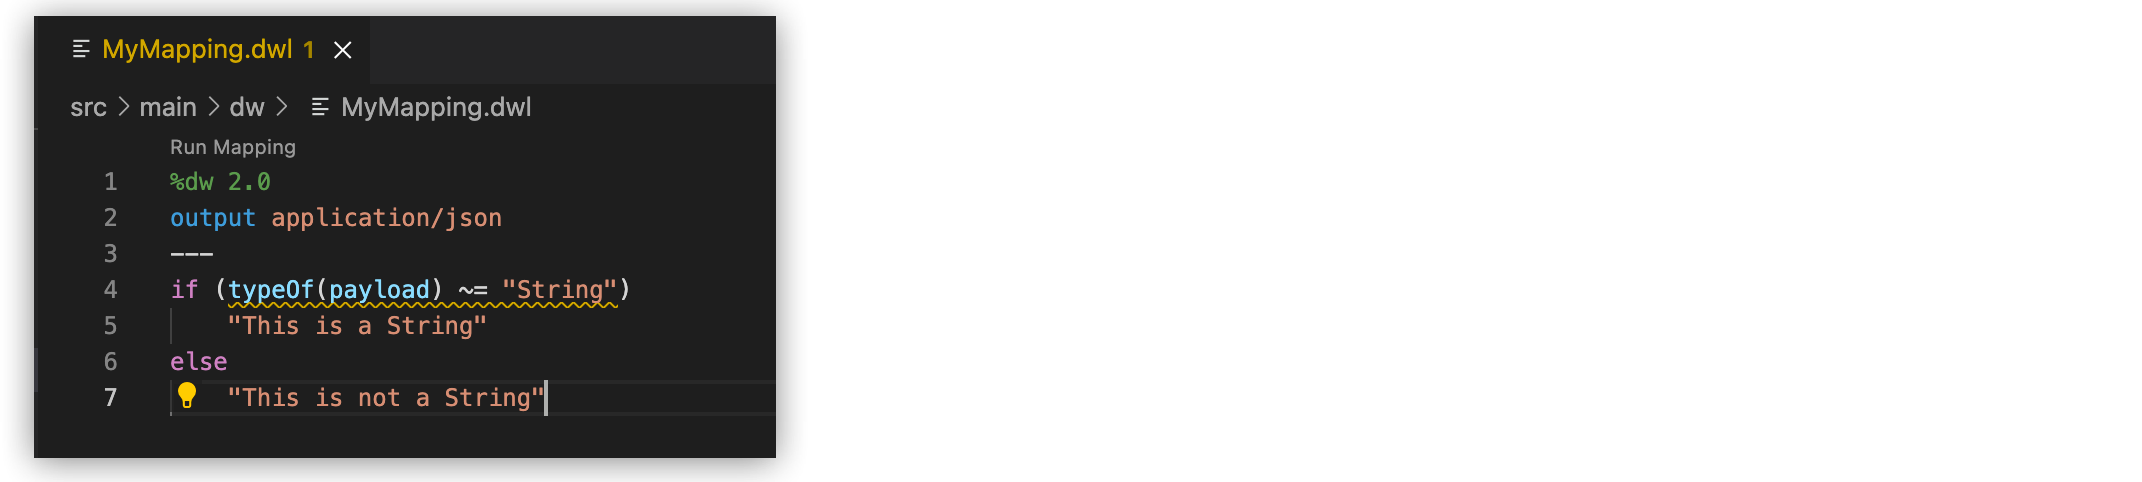
Create a DataWeave Mapping
A DataWeave mapping is a .dwl file that enables you to map and connect to anything, regardless of data type or structure. As when using a DataWeave module, you can use a mapping to define functions, variables, types, and namespaces, but you can additionally specify a body section after the separator ---.
Unlike a DataWeave module file, a DataWeave mapping file is an executable unit that enables you to transform zero or more inputs into a single output. Using the DataWeave extension, you can develop these files to create reusable assets that you can deploy and share with others.
To create a new DataWeave mapping, follow these steps:
-
In Visual Studio Code, click View > Command Palette.
-
In the search bar, type
dataweave. -
Select DataWeave: Create New Mapping.

-
Add a name for the new mapping
dwlfile and press enter.
This creates a new mapping.dwlfile under thesrc/main/dwfolder.
Define Sample Data for DataWeave Mappings
Generate multiple sample data inputs for your mapping by clicking the Define Sample Data button at the top of your mapping .dwl file. Sample data is a key part of DataWeave project development to run your mappings.
To define sample data, follow these steps:
-
In Visual Studio Code, open your DataWeave project.
-
Navigate to the
src/main/dwfolder. -
Select your mapping
.dwlfile. -
Click the Define Sample Data button located above your mapping
.dwlfile.
-
Specify the name for the sample data file and press enter.
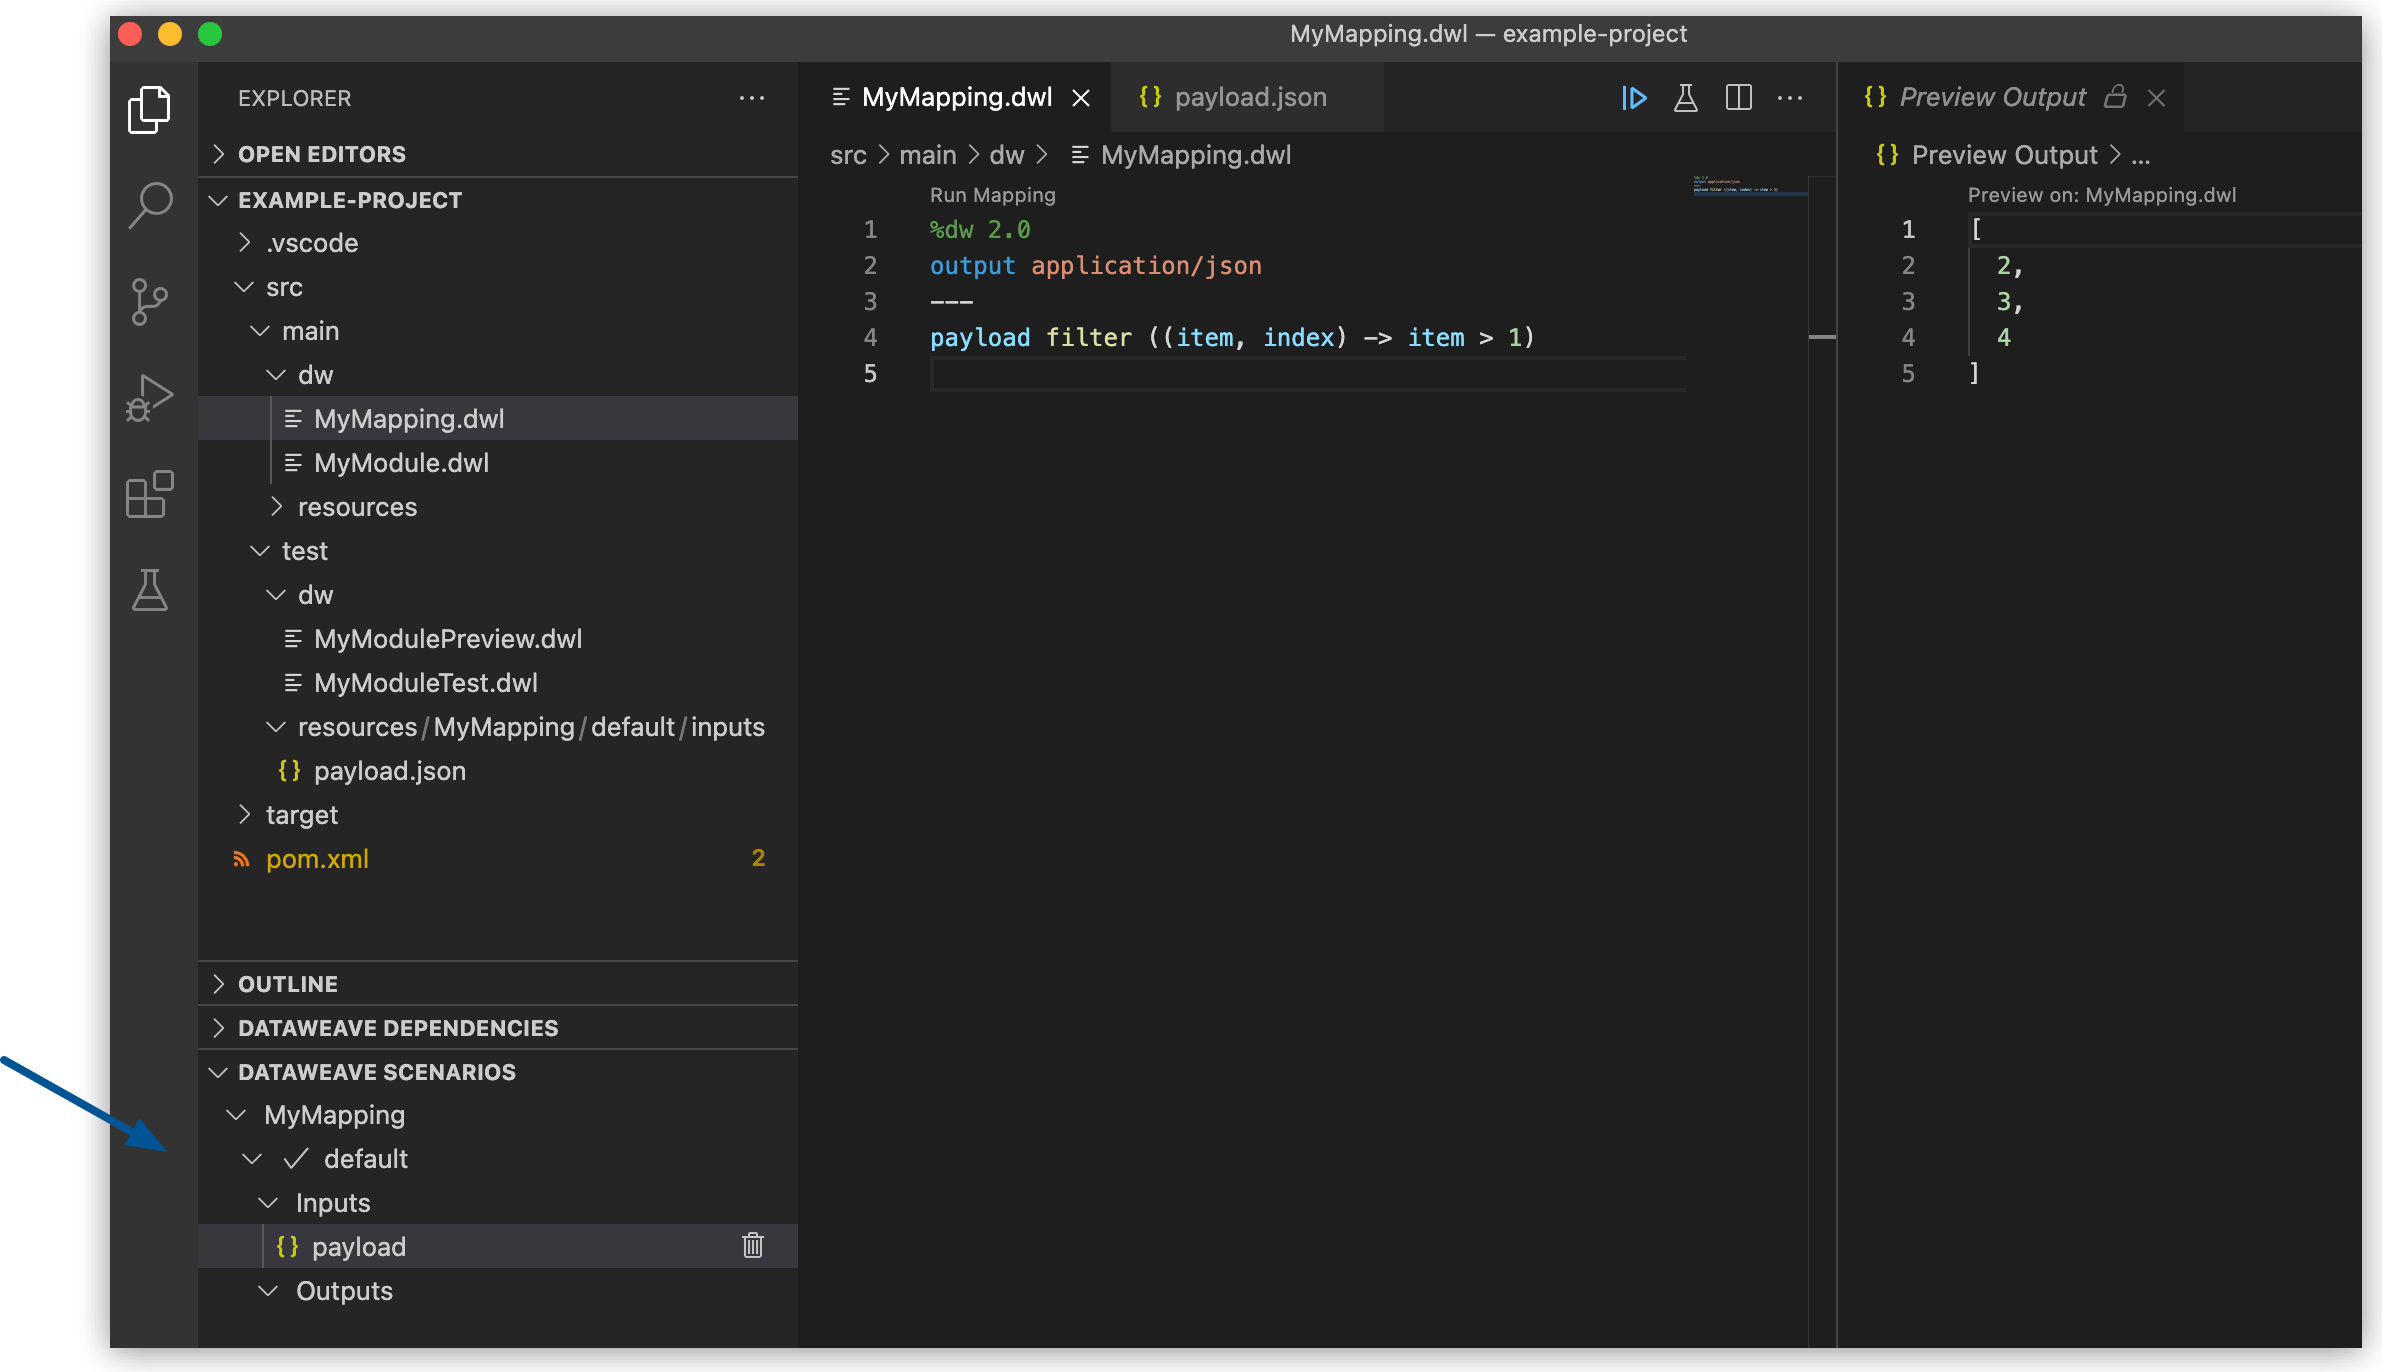
Using sample data generates a DataWeave scenario that contains all the resources required to run the mapping in the context of that scenario.
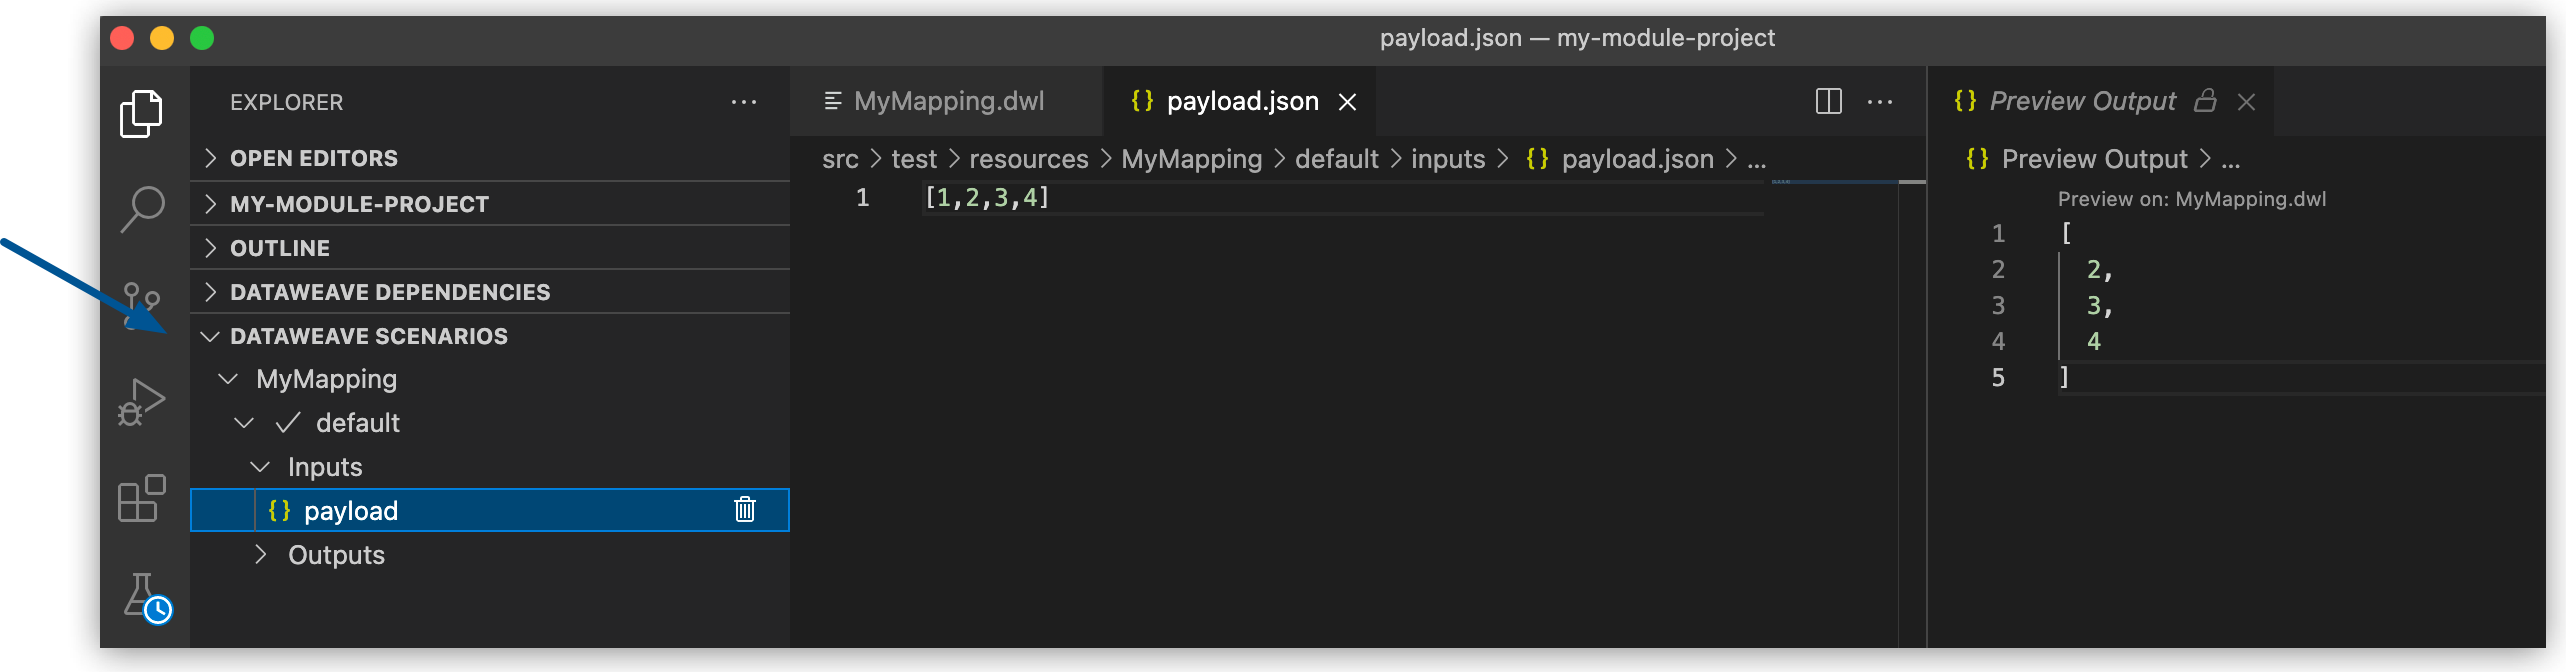
Understanding DataWeave Scenarios
A DataWeave scenario is a group of inputs and outputs that you can inject into your mapping either to try out in the Preview Output view or to test your mapping using the input to evaluate it and compare its output with the desired saved output of your scenario. Scenarios also provide autocompletion based on the input structures.
These scenarios and their resources live in the src/test/resources folder and have the following structure:
├── src/test/resources
│       └── MyMapping //Contains the different scenarios for your mapping called "MyMapping"
│           ├── default //Name of your scenario
│           │   └── inputs //Folder where all of your inputs live
│           │   │   └── payload.json //Input for your mapping (you can use it in your script, naming it to be the same as the name of the file without the file's extension)
│           │   │   └── vars //Folder that represents a name for your input variable in your script: in this case vars
│           │   │       └── test.json //Input for your mapping (you can use it in your script, calling it vars.test)
│           │   └── out.json // Expected output of your mapping running against your inputs (only present when testing)
│           └── SavedTestScenario //Another scenario used for the integration test
Using the DataWeave Scenarios View
The DATAWEAVE SCENARIOS view shows the available scenarios for the .dwl file. In this view, you can add, remove, or set the active scenario that is used for your preview execution, or you can choose that the values be autocompleted.
Using Reader Properties for Inputs
If you want to set different reader properties to the inputs you use, create a properties file with the suffix {fileName}-config.properties in the same directory of your input. For example, if your input is called payload.csv then create a payload-config.properties file that contains all the reader properties required to run your scenario. Creating the properties file also applies while testing your DataWeave mappings.
Preview a DataWeave Mapping
After you define sample data, get feedback on how your mapping is working by previewing the output.
-
In Visual Studio Code, open your DataWeave project.
-
Navigate to the
src/main/dwfolder. -
Select your module
.dwlfile. -
Either preview the mapping function by one of these options:
-
Click the DataWeave: Run Preview button (arrow icon) at the top right corner of your mapping
.dwlfile. -
Right-click the editor and select DataWeave: Enable AutoPreview to run it on every file change.
-
Run and Debug a DataWeave Mapping
Run and debug a DataWeave mapping to be guided through all of the mapping elements, which you can then fix or otherwise update. You can also set breakpoints to stop evaluating expressions and use all the debugging capabilities that Visual Studio Code provides. Debugging works on mapping tests as well.
To run and debug a DataWeave mapping, follow these steps:
-
In Visual Studio Code, open your DataWeave project.
-
Navigate to the
src/main/dwfolder. -
Select your mapping
.dwlfile. -
Click the Run Mapping button located at the top of your
.dwlfile.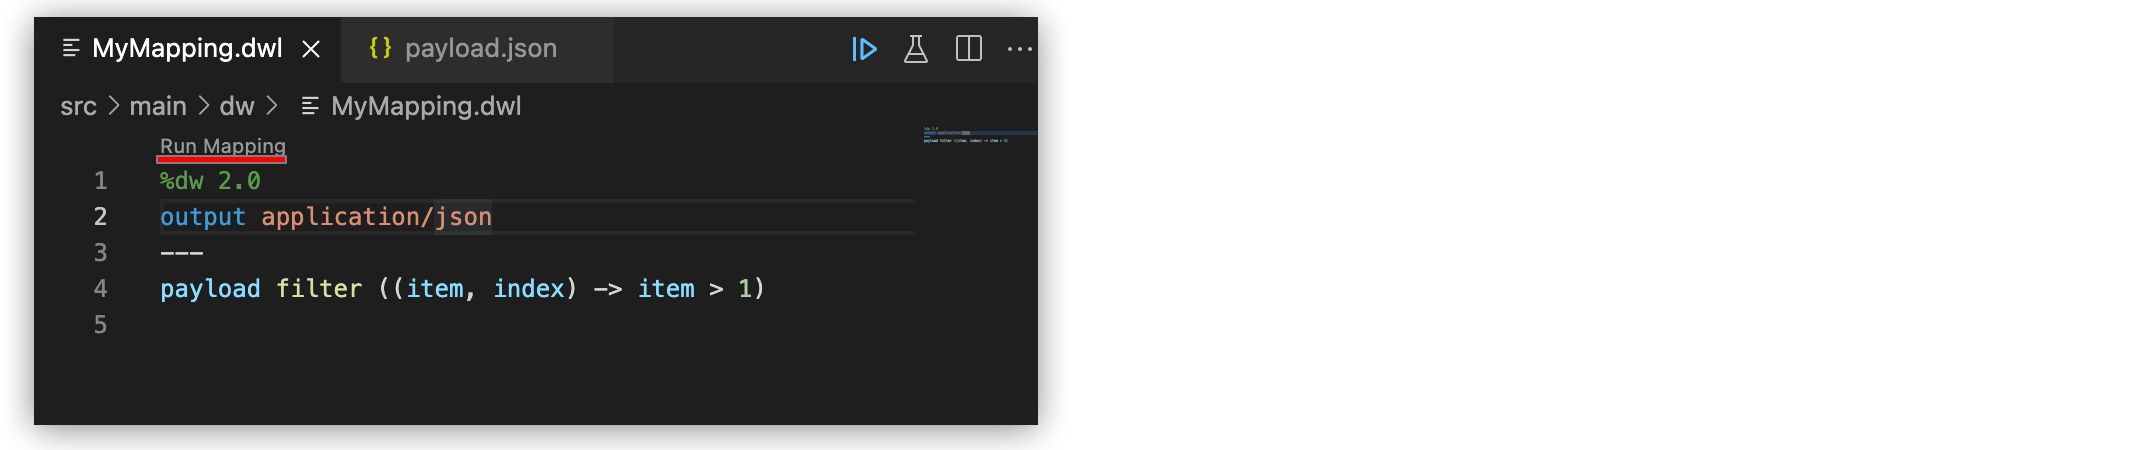
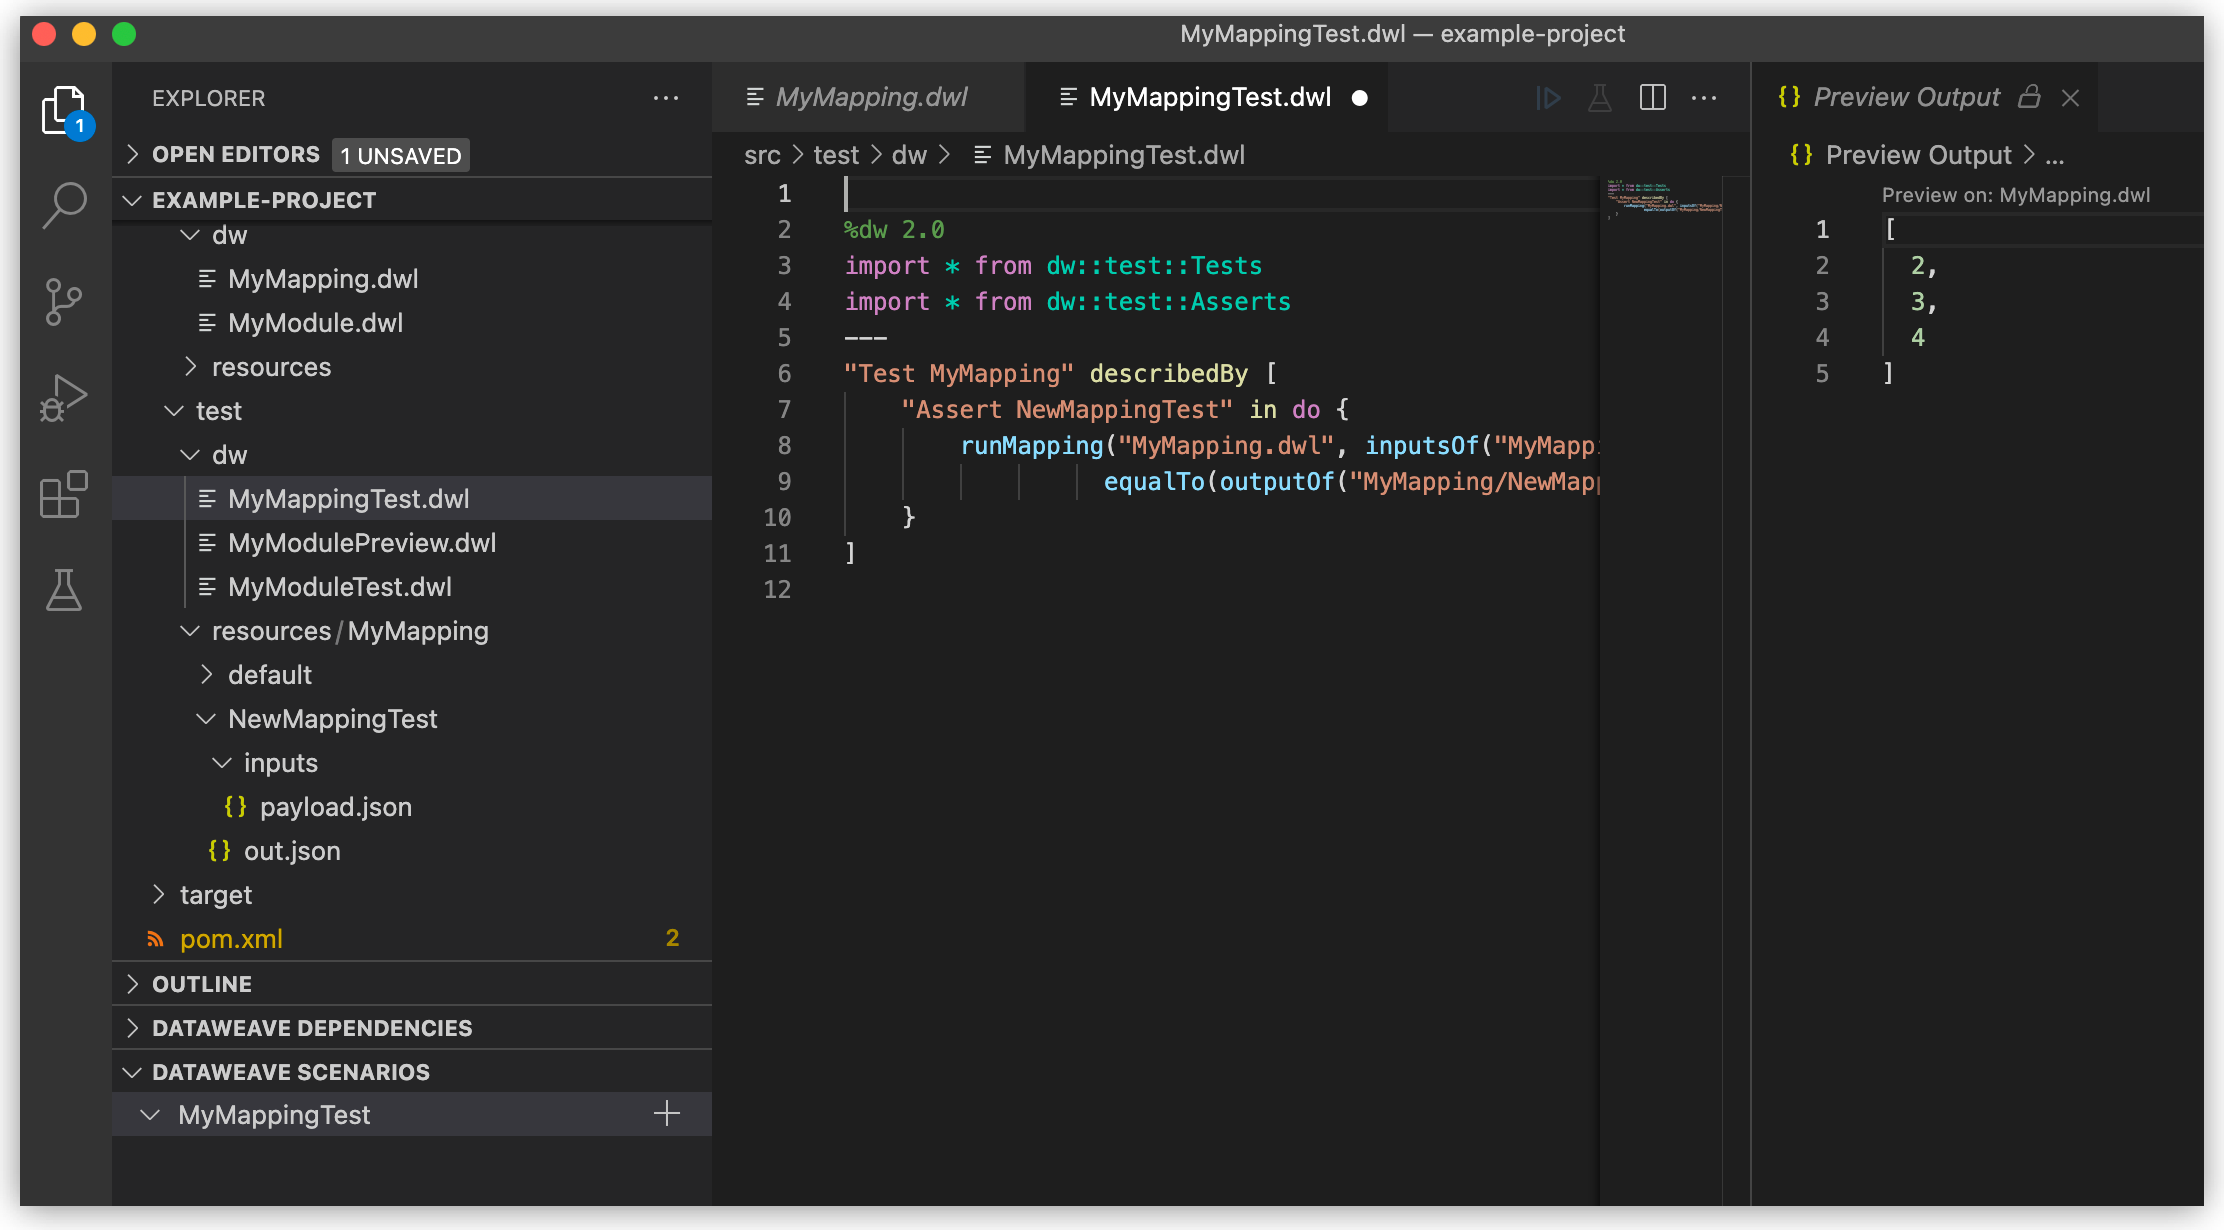
Test a DataWeave Mapping
To test a DataWeave mapping, click the Dataweave: Create Mapping Test button located at the top of your .dwl file to create a new test scenario from a snapshot of your input and your current output.
You can also use this newly created scenario as a normal scenario for your preview or autocompletion.
To test a DataWeave mapping, follow these steps:
-
In Visual Studio Code, open your DataWeave project.
-
Navigate to the
src/main/dwfolder. -
Click the DataWeave: Create Mapping Test button (microscope icon) located at the top of your mapping
.dwlfile.
-
Specify a name for the mapping test and press enter.
This creates a new mapping test .dwl file:
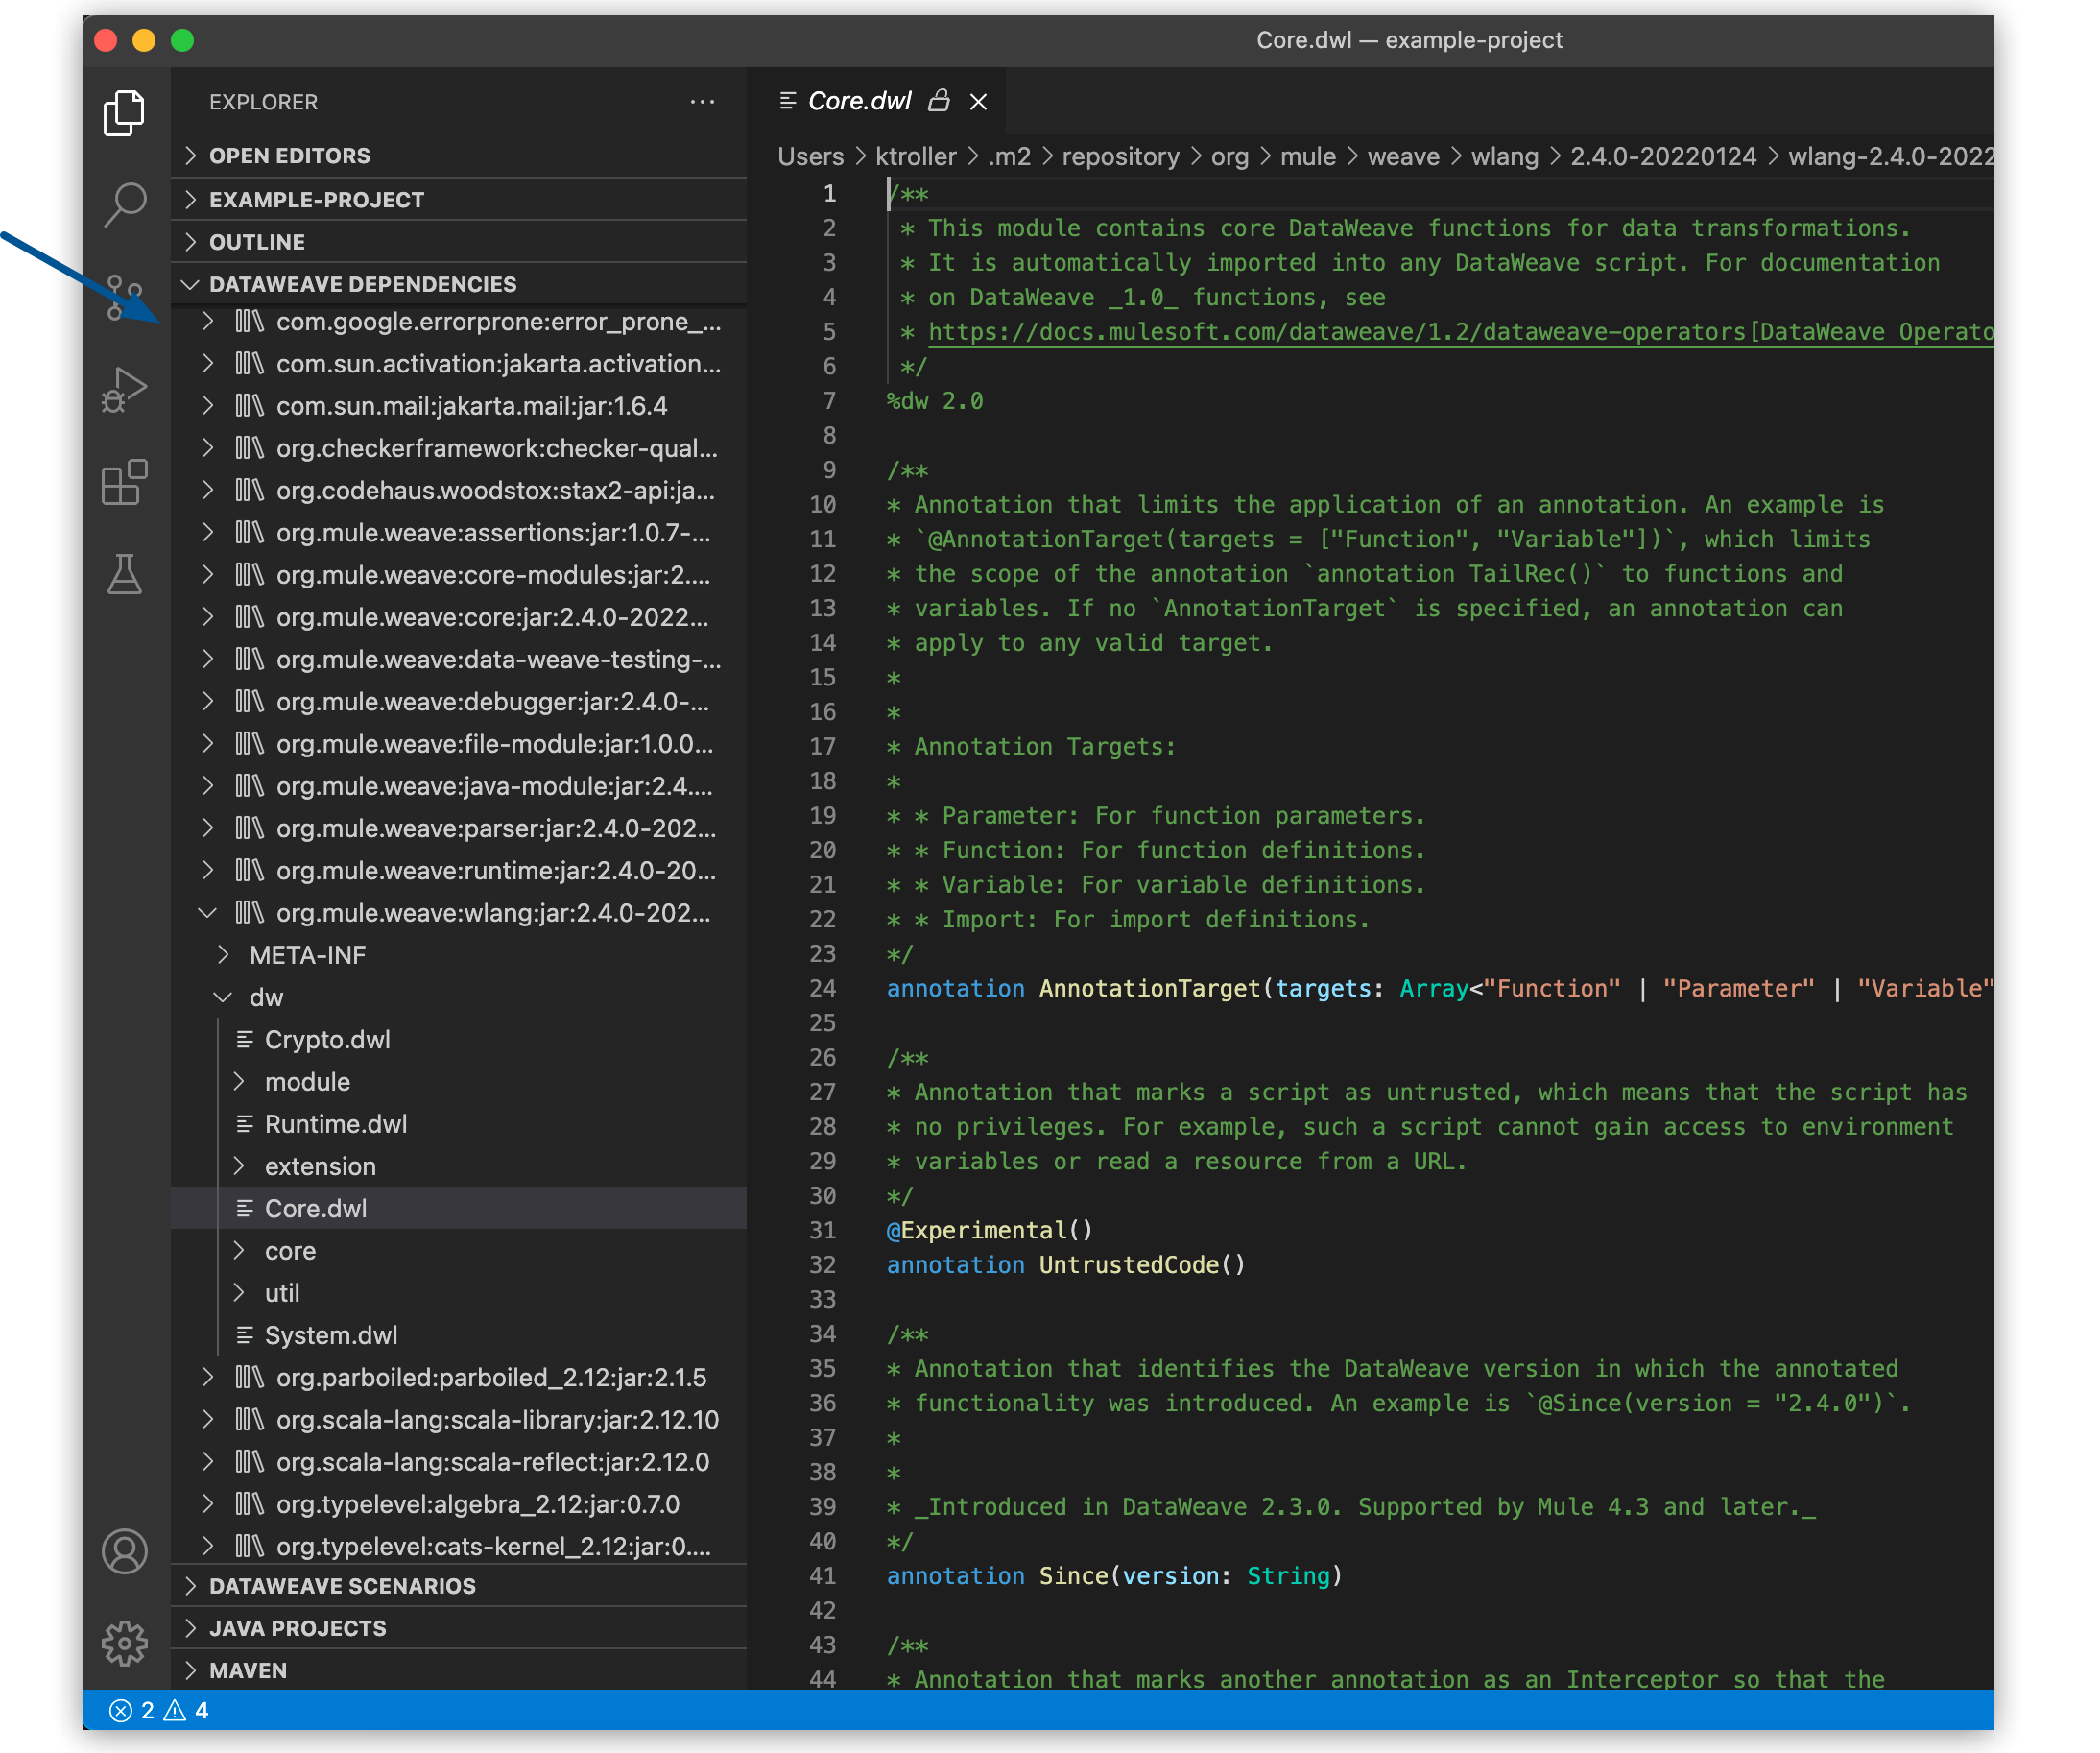
Using the DataWeave Dependencies View
The DATAWEAVE DEPENDENCIES view shows all the dependencies resolved for a DataWeave project. The view enables you to navigate through all of your project’s dependencies and open DataWeave files inside those dependencies.
Deploy DataWeave Libraries
Before deploying your DataWeave library to Anypoint Exchange, generate documentation for your mapping or module functions. When you deploy your DataWeave library to Exchange, the documentation is also published to the Exchange library page.
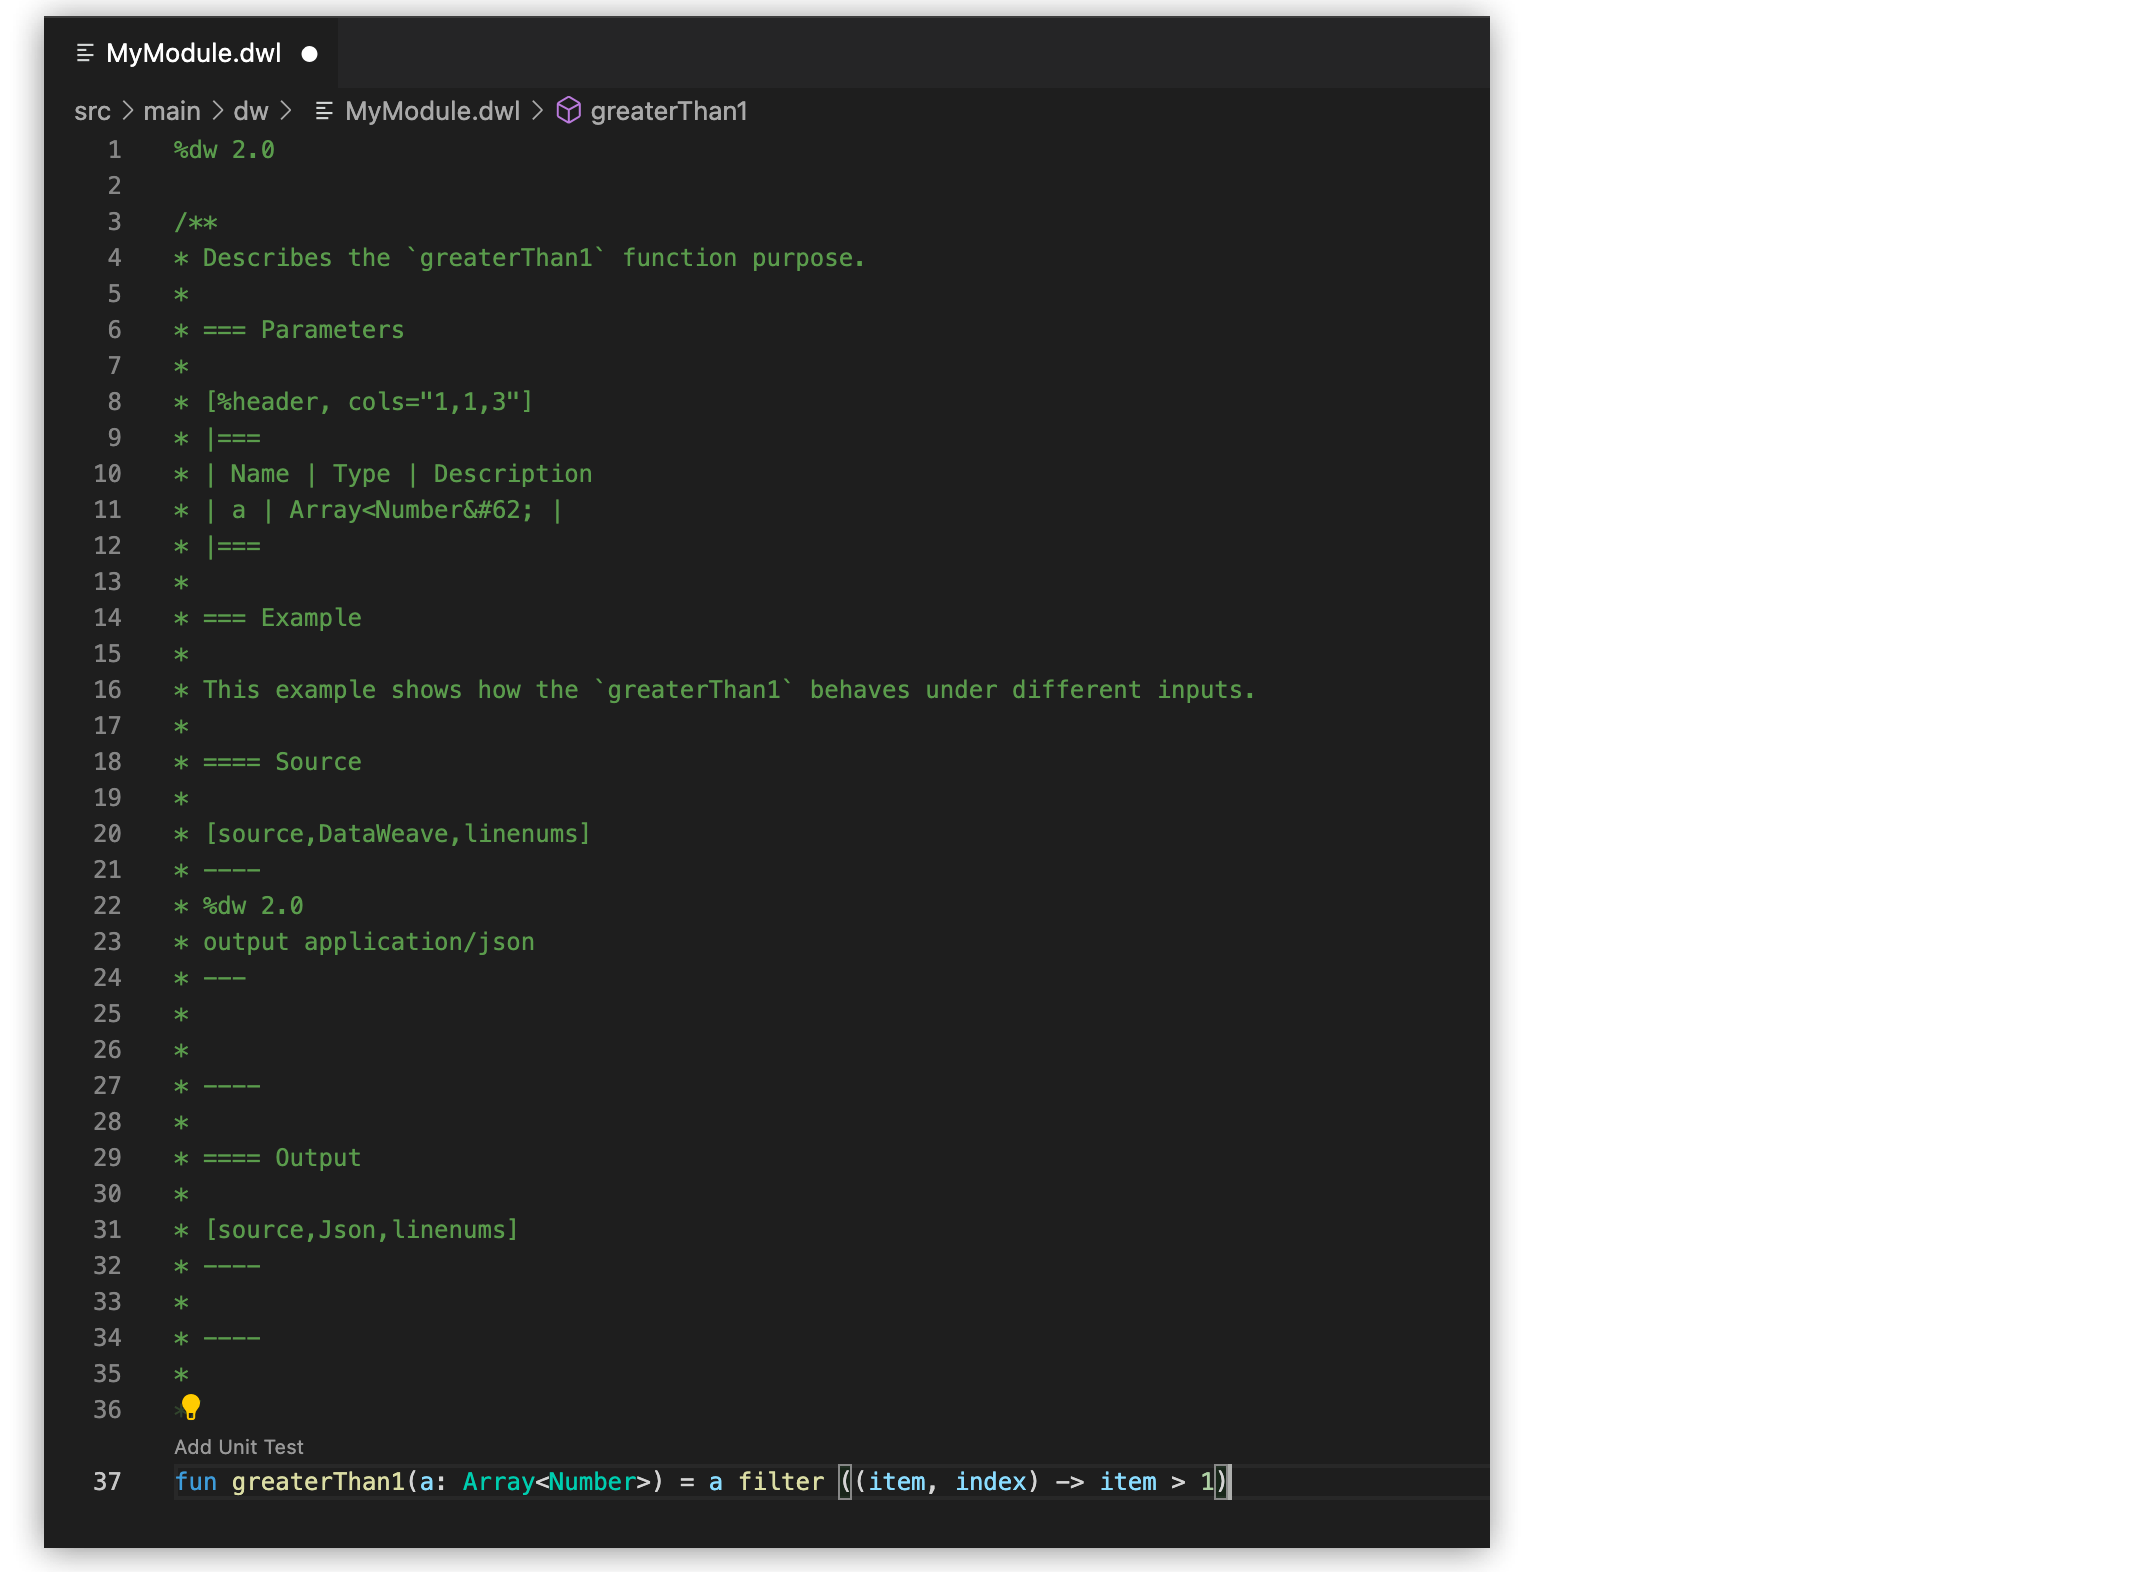
To generate documentation for the functions, follow these steps:
-
In Visual Studio Code, open your DataWeave project.
-
Navigate to the
src/main/dwfolder. -
Click the Generate Weave Documentation button located at the top of the function in the
.dwlfile.
The documentation template appears as a comment above the function:
To deploy a DataWeave library to Exchange:
-
In Visual Studio Code, open your DataWeave project.
-
Open and configure your
pom.xmlfile.-
Ensure that your
groupIdis set to yourorganization ID. -
Add the Maven facade as a repository within the
<distributionManagement>element.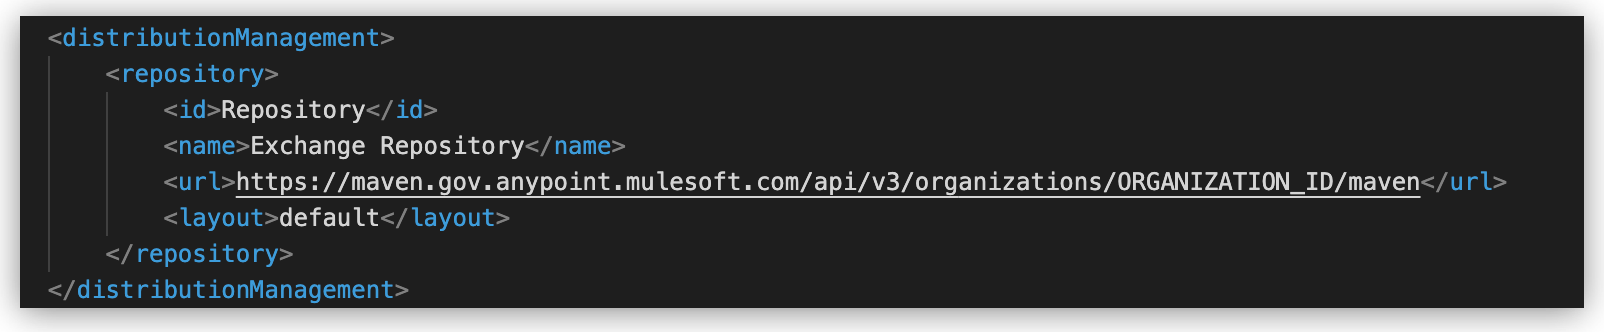
-
-
Update the
settings.xmlfile in your Maven.m2directory with your Anypoint Platform credentials.For guidance, refer to the Publish an Asset to Exchange Using Maven documentation.
-
Execute the Maven
deploycommand to upload the DataWeave library to the deployment target and the auto-generated documentation to Exchange.For guidance, refer to the DataWeave Maven Plugin documentation.
Consume DataWeave Libraries
After deploying your DataWeave library to Exchange, the library appears as an asset for your organization in the Exchange marketplace.
To consume the DataWeave library:
-
Add the library’s group ID, artifact ID, version, and classifier to the
dependencieselement in your project’spom.xmlfile.You can copy the dependency snippet from Exchange.
-
Add the Maven facade as a repository in the
repositoriessection.
For more details, refer to the Publish and Consume Federated Assets documentation.
DataWeave Extension Language Edition Features
The Language Edition features of the DataWeave extension include completion, navigation, code editing, and code inspection.
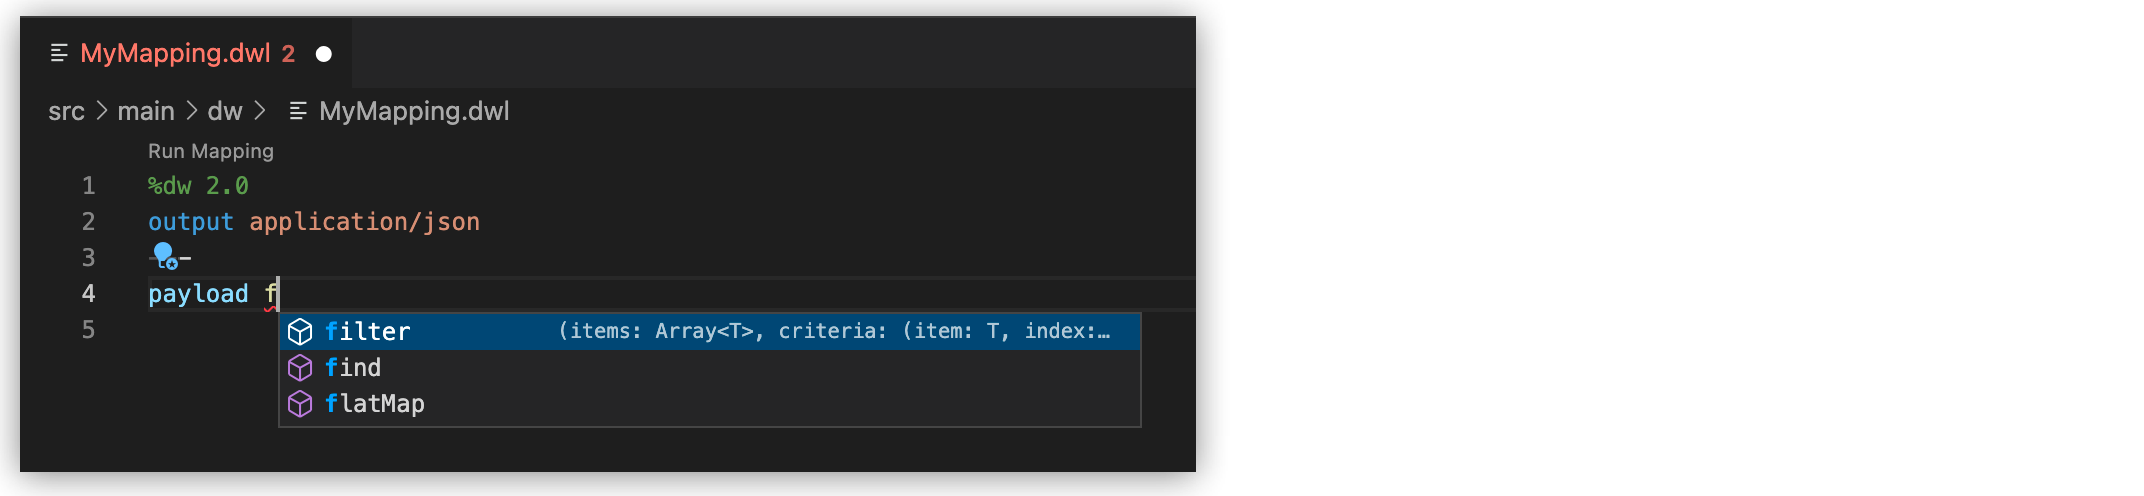
Completion
The completion feature enables you to autocomplete content for any visible functions, variables, or types. The feature also suggests fields based on the type inference.
Code Editing Features
The following features help you to easily code in Visual Studio Code:
-
Find all references
-
Refactors (local and cross files)
-
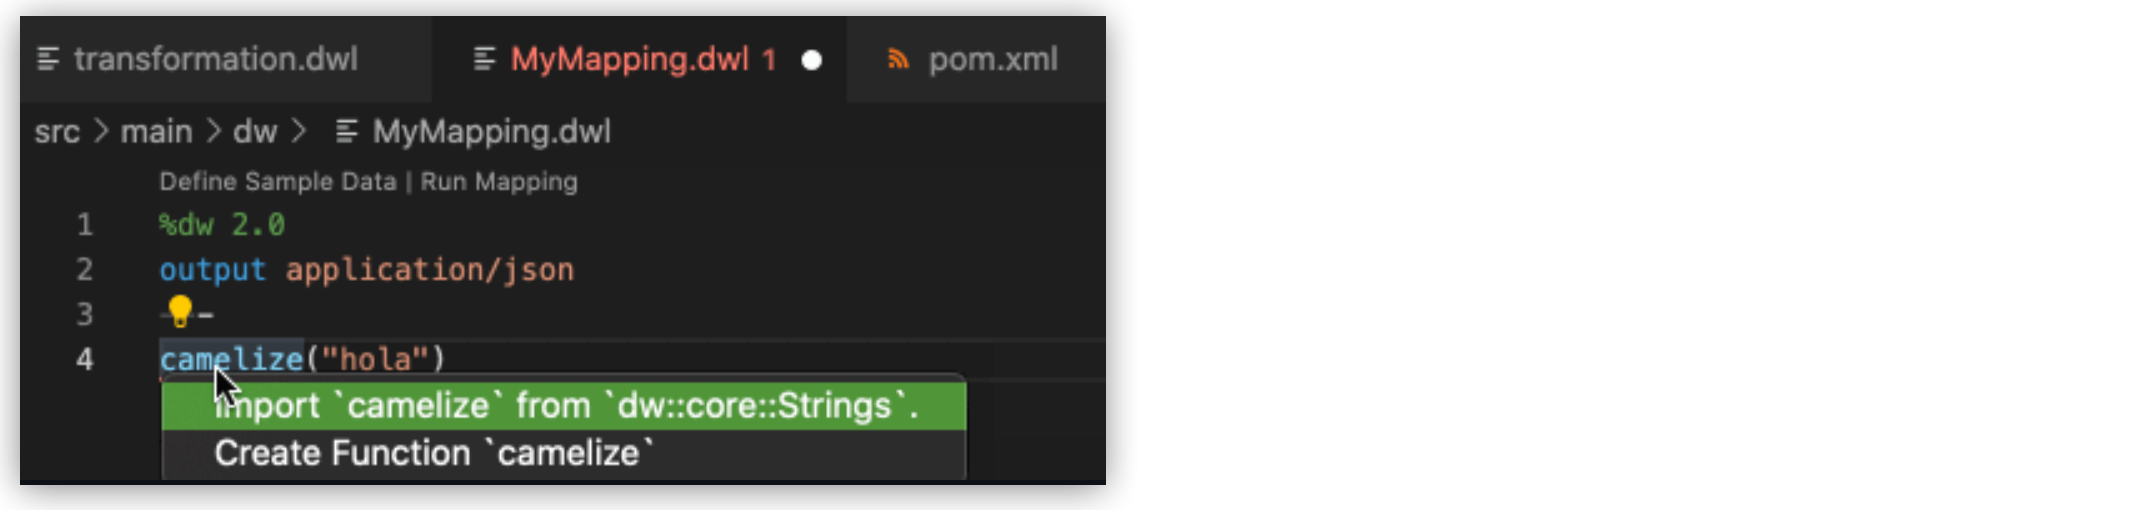
Quick fixes:
-
Auto import when a function is present in a module
-
Create a function, variable, or type when one isn’t found
-
-
Outline
-
Show parameters information
-
Hover information with documentation


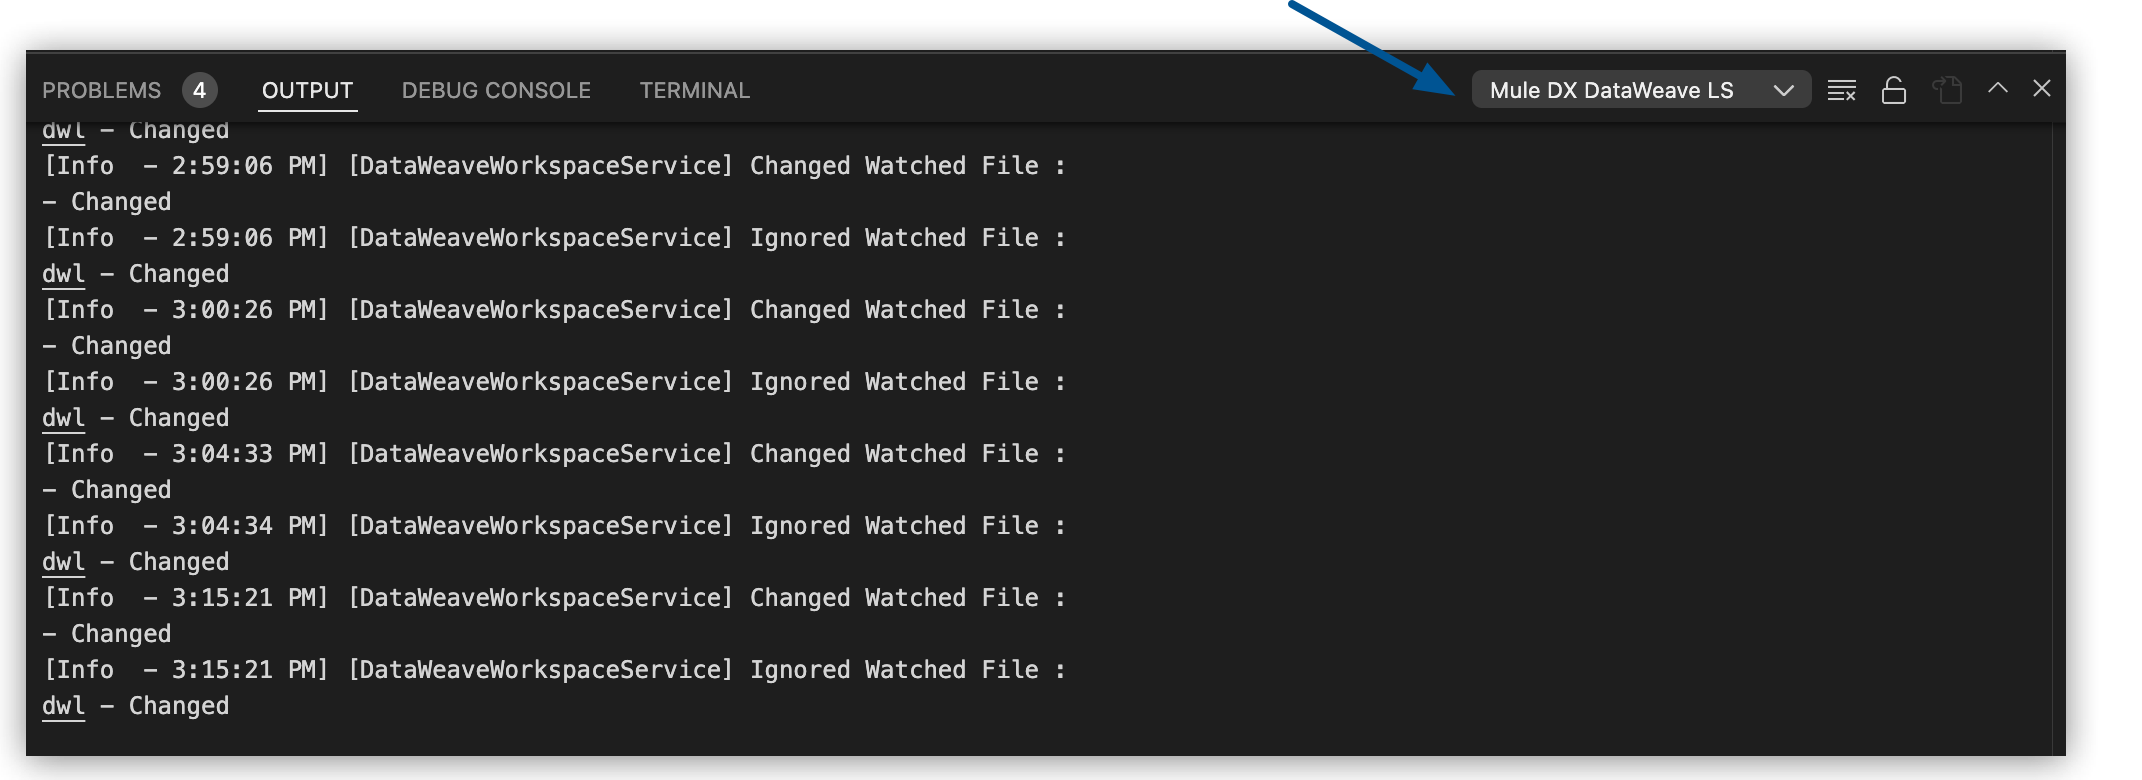
DataWeave Extension Troubleshooting Logs
If an error occurs while you’re working with the DataWeave Extension, check the logs output of the DataWeave Language Server that provide details of what can cause the issue:
To check the logs, follow these steps:
-
In Visual Studio Code, navigate to View > Output to open the OUTPUT view in the Visual Studio Code editor window.
-
In the drop-down menu located on the left of the screen editor, select Mule DX DataWeave LS to show the logs.
Scope Visibility
When you author DataWeave libraries (.dwl files that other DataWeave code imports), the DataWeave extension supports the visibility model introduced in DataWeave 2.12.0:
-
Highlights the keywords
privateandinternalas language keywords. -
Recognizes the
@VisibleToannotation when applied tointernaldirectives. -
Reports visibility violations inline and uses the same wording as the compiler (
… cannot be accessed from … as it is private to the module …,… is internal to the component …). -
Filters out directives that aren’t visible from the current file in auto-completion. For example,
privatehelpers defined in another file don’t appear in the suggestion list. -
Supports
Go to definitionand warns when you navigate to a directive that isn’t accessible from the current file.
These features apply to library projects only. If you write a Mule transformation mapping inline (a %dw 2.0 expression in a Transform Message component, a Set Variable expression, or a DataWeave expression embedded in a connector), the internal keyword and @VisibleTo annotation have no practical effect. An inline mapping is a self-contained script that can’t be imported from another inline mapping, so there is nothing to constrain. The keywords are still parsed, but you don’t need them in mapping code.
The same rule applies to .dwl modules defined inside the Mule application. Every inline mapping and application-level module belongs to an unnamed component, so they can freely reference each other’s internal directives. The private keyword still applies and restricts a directive to its declaring file regardless of component.
For the full visibility model, including definitions for private, internal, and components, and how the Maven plugin for DataWeave generates the component descriptor, see Scope Visibility in DataWeave.